






Events Management Website With Booking & Appointment Feature
Recreate the Events Booking showcase site in Webflow with a single-page layout, anchor navigation, service cards, and a consultation request form, plus when to add a real scheduling tool.

Webflow gives you full control over how an event planning site looks and how its content is structured, and it captures leads natively through forms. What it will not do on its own is sell a time slot. No native availability calendar sits behind a Webflow form, and nothing checks capacity before a visitor claims a Saturday in June.
The Events Management Website With Booking & Appointment Feature showcase site shows how far you can get without that machinery. Despite the name, the on-page experience is a consultation request: one page of anchored sections, a repeatable set of service cards, and a form that lands in your inbox. This guide rebuilds that structure with native Webflow elements, and it is direct about the point where you should hand the calendar to a scheduling tool instead.
It suits event planners and wedding coordinators, and more broadly any service business that agrees scope on a call rather than through a checkout.
How to recreate the Events Booking showcase structure in Webflow
What is the Events Booking showcase site? It is a Made in Webflow showcase built by Flowzai for an event planning service, tagged for event management, booking, and appointments. Its original description credits the booking behaviour to Zaibooking, a third-party app from GetFlowTools, and that is the first thing to know before you copy it: we could not find a live Webflow Marketplace listing for that app, and the vendor's own domain now redirects to an unrelated site. Treat the layout as the thing worth recreating, not the booking widget.
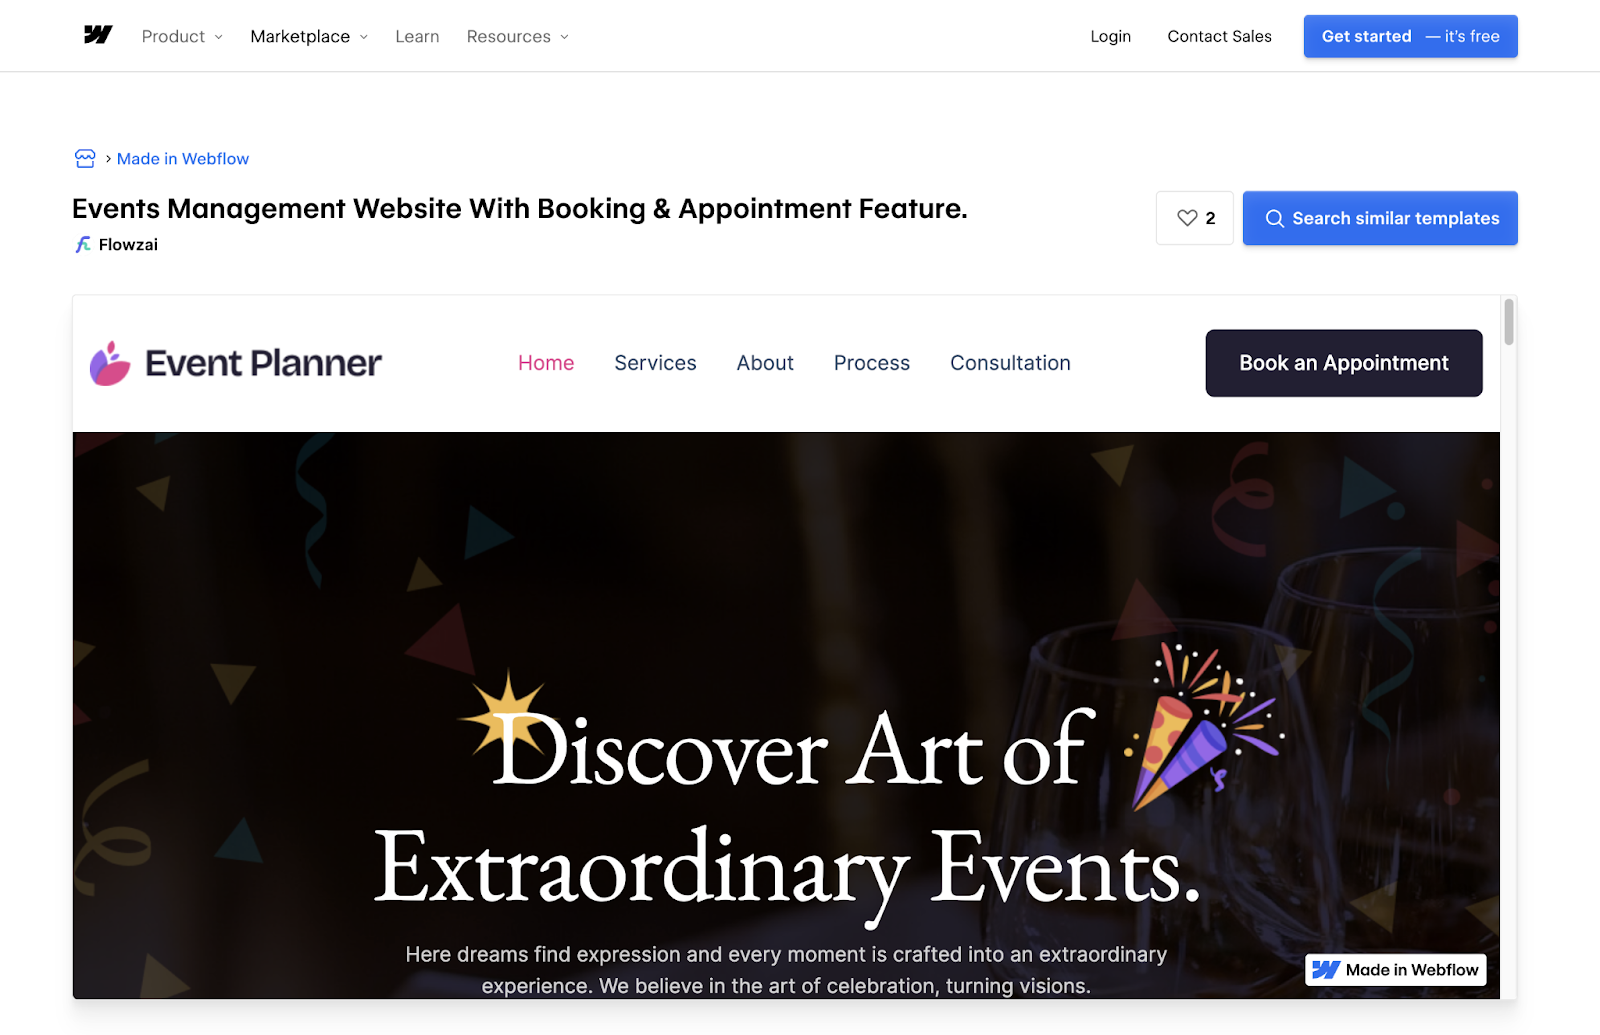
Teams reach for this pattern when the goal is qualified inquiries rather than instant bookings, which covers most event planning work. The date and the headcount get negotiated before anything is confirmed, so a calendar picker would only get in the way.
Five stages make up the build. You lay out stacked sections on a single page, wire anchor navigation so the navbar jumps between them, build repeatable service cards, add a native form for consultation requests, then handle submissions for manual follow-up. Each stage stands on its own once the sections exist, so you can stop after the layout if that is all the page needs.
Build a single-page layout with stacked sections
Create one page, usually Home, and stack the sections in the order a visitor reads them. The showcase opens with a hero carrying the headline and the primary call to action, then a services area split by event type, an about section for the company story, an optional testimonials block, the consultation section holding your form, and a footer with contact details.
Each of those is a Section element wrapping a Container or whichever layout wrapper you prefer, with grids or cards inside. Name the sections as you place them, because you will reference them by ID in the next stage.
Add anchor-based navigation for one-page scrolling
Anchor navigation is what makes a single page behave like a multi-page site. Select the element that opens each section, usually the Section wrapper itself, and give it an ID in the settings panel. Keep those IDs short and lowercase, for example services, about, and consultation.
Then point each nav link at the matching anchor, written as #services or #consultation. For links that stay on the same page you can choose the Section link type instead of typing the fragment by hand, which removes a common source of typos. Our section link settings cover both routes.
One ordering detail is worth respecting: finalise the IDs before you build the navbar. Renaming an ID afterwards quietly breaks every link that pointed at it, and nothing in the interface flags the broken fragment for you.
Create service sections with repeatable cards
Consistency is what makes this layout read as a real business, so build one service card and duplicate it rather than styling each offering from scratch. Turn it into a component if you expect the card structure itself to change later.
Each card carries four parts:
- Service name: The card heading names the offering in the words clients already use, so "Wedding planning" beats "Package A" every time.
- One-line description: A single sentence says what the service covers, which lets a scanning visitor judge fit without opening anything.
- Highlights: A few short lines list what is included, and this is where you set expectations before anyone books a call.
- Call to action: A button links to the consultation anchor, so every card ends at the same form rather than at a dead end.
Keep the type styles and the button treatment identical across cards. If your services change often, move the card content into the Webflow CMS and render the set with a Collection List, which turns a service update into editing one Collection item instead of hunting down duplicated cards.
Set up the consultation request form with native Webflow forms
Use a native Form Block inside the consultation section rather than an embedded third-party form. The styling then follows the rest of the page, and the submissions stay inside your Webflow project where you can export them.
For an event planning inquiry, ask for a name, an email address, the event type, a preferred date range as plain text, and a message field for requirements. A phone number works as an optional extra. Resist adding more than that, because every additional field costs you submissions.
Then configure the form itself:
- Required fields: Mark the name and email as required and leave the rest optional, so a half-formed inquiry still reaches you instead of failing validation.
- Form name: Give the form a descriptive name, because unnamed forms all pile into a single "Email Form" bucket once submissions start arriving.
- Success and error states: Rewrite both messages to say what happens next and when, rather than shipping the default confirmation copy.
- Button copy: Match the submit label to the offer, for example "Request a consultation", so the click and the outcome agree with each other.
That gives you a clean inquiry flow and nothing beyond it. The form carries no availability calendar and no capacity check, so when a client expects to pick a time themselves, add a scheduling app such as the Cal.com scheduling app and let it own the calendar.
Handle submissions for manual follow-up
Because the form captures requests rather than confirmed bookings, everything after the submit button is human. A visitor submits, the notification lands wherever you configured it, and someone on your team replies to agree a time.
Set the notification recipients under Site settings, then Forms. The same place stores every form submission record, and you can export a form as a CSV for a spreadsheet or a CRM import. To route submissions without the copy and paste, connect an automation platform. Zapier handles straightforward field mapping into a CRM, and Make suits longer scenarios where the path branches on the event type.
If you need real time-slot selection, or payment taken at the moment of booking, this pattern is the wrong starting point and a dedicated scheduling product will get you there faster.
What you can build with the Events Booking showcase pattern
This layout travels well past event planning, because its shape of presenting the offer and then capturing the inquiry fits any service that gets sold over a conversation.
Four variants show how far it stretches:
- Event planning agency landing page: Anchor one section per event type and feed a single consultation form into your team inbox for manual follow-up.
- Wedding or private event planner site: Build cards for full planning, day-of coordination, and decor, then pair them with testimonials and a request-a-quote form.
- Corporate event planning page: Give conferences, offsites, and product launches their own anchored sections, each pointing at an intake form that captures headcount and date range.
- Local events coordinator website: Ship a mobile-first single page with a hero, a short set of service cards, and a consultation form high enough to reach without scrolling far.
Pick the variant closest to your business and settle the section order before you touch the styling, since order is what carries a reader down the page. If you would rather hand the calendar to a scheduling tool from the start, follow our Calendly pop-up modal guide and drop the modal into the consultation section. For more cloneable starting points, browse the Made in Webflow events collection. Once the page exists, connect the Webflow MCP server to your AI client so you can scaffold the remaining sections in place and then check which of them visitors actually reach.
Frequently asked questions
Give each major section an ID in the settings panel, for example
servicesorconsultation, then point every nav link at the matching anchor such as#services. Clicking a link scrolls the page to that section. Set the IDs first, because renaming one later breaks the links that referenced it.Drop a native Form Block into the consultation section and add fields for name, email, event type, and a message. Mark name and email as required, rewrite the success message, then point your page buttons at the form anchor
#consultationso visitors reach it from anywhere on the page.Build one card layout with a heading, a short description, a highlights list, and a button, then duplicate it for each service. Keep the type styles and spacing identical on every card. If your services change often, store them as Collection items and render the cards dynamically.
This pattern is built for marketing and lead capture. It does not select time slots, enforce capacity, take payment, or send automated scheduling messages, so a business that needs any of that will want a third-party scheduling tool. Browse our calendars and scheduling integrations for options.
Not with a native feature. User Accounts, previously called Memberships, was sunset on January 29, 2026, and both the feature and its APIs are gone, so any tutorial that walks you through adding Memberships to a site is out of date. Read the User Accounts sunset notice for the detail. For gated event content or member pricing, use Memberstack or Outseta, our named migration partners.
Description
Rebuild the Events Booking showcase pattern in Webflow using native sections, anchor navigation, service cards, and a consultation request form for event planning businesses
This integration page is provided for informational and convenience purposes only.

Luma
Connect Luma, an event hosting and ticketing platform, with Webflow to embed registration buttons, display calendar widgets, and sync event data to CMS collections automatically.

Zoom
Connect Zoom with Webflow to register webinar attendees from site forms, embed Zoom Scheduler booking pages, and publish sessions and recordings to the CMS.

Ticket Tailor
Connect Ticket Tailor with Webflow to sell tickets directly on your site, with no redirect to an external checkout.
LiveStorm
Connect LiveStorm with Webflow to automate registrations, embed webinar rooms, and sync attendee data.
Humanitix
Connect Humanitix, a B-Corp certified event ticketing platform that donates booking fee profits to charity, with Webflow to sell tickets through embedded widgets on your site.
Luma
Connect Luma, an event hosting and ticketing platform, with Webflow to embed registration buttons, display calendar widgets, and sync event data to CMS collections automatically.

Happyning Events
Connect Happyning Events with Webflow to publish Riviera event listings and capture guest inquiries on your own site.

Eventbrite
Connect Eventbrite, an event management and ticketing platform, with Webflow to embed on-site checkout, display event calendars, and sync event data to CMS collections automatically.

Enrollsy
Connect Enrollsy with Webflow to take program enrollments and payments on your own pages through embedded forms and program listings.
Related integrations
Get started for free
Try Webflow for as long as you like with our free Starter plan. Purchase a paid Site plan to publish, host, and unlock additional features.
