










An event page earns its place when registrations reach your audience the moment someone submits. Webflow Cloud lets you own that hand-off in a single Route Handler.
Event pages are one of the few places on a marketing site where the web is measurably a revenue engine. Someone lands on the page, gives you an email address, and expects a confirmation within seconds. When that hand-off is manual, or routed through a spreadsheet, the follow-up arrives late and the registration leaks.
Webflow gives you the page and the form. Mailchimp gives you the audience, the confirmation email, and the reminder sequence. What sits between them is a decision, and the right answer depends on how much control you need over what happens after someone hits submit.
This guide covers all three connection routes, then builds the one that gives you full control: a Route Handler running on Webflow Cloud that writes the registrant straight into a Mailchimp audience.
What do you need to connect Webflow and Mailchimp?
Four things, and only one of them costs anything: a Webflow site with a form, a Mailchimp account with an audience, an API key, and a Webflow Cloud project if you want the coded route. No paid Webflow plan is required to start.
Here is the full list before you touch any code:
- A Webflow site with a published event page and a form
- A Mailchimp account with at least one audience. Feature availability differs by plan, so check Mailchimp pricing for what your tier includes
- A Mailchimp API key, which you generate from your account settings
- For the coded route, a Webflow Cloud project running a Next.js app, plus Node.js 22.13.0 or higher locally, the floor set by Webflow CLI 2.x
Webflow Cloud is available from the free Starter site plan up, and mounting your app to a custom domain requires a Premium site plan or higher. Once these are in place, the whole flow comes down to a single Route Handler and the way Mailchimp identifies a contact. Here's how.
3 ways to connect a Webflow form to Mailchimp
All three routes end with a contact in your audience. They differ in one dimension: how much of the submission you control before it gets there.
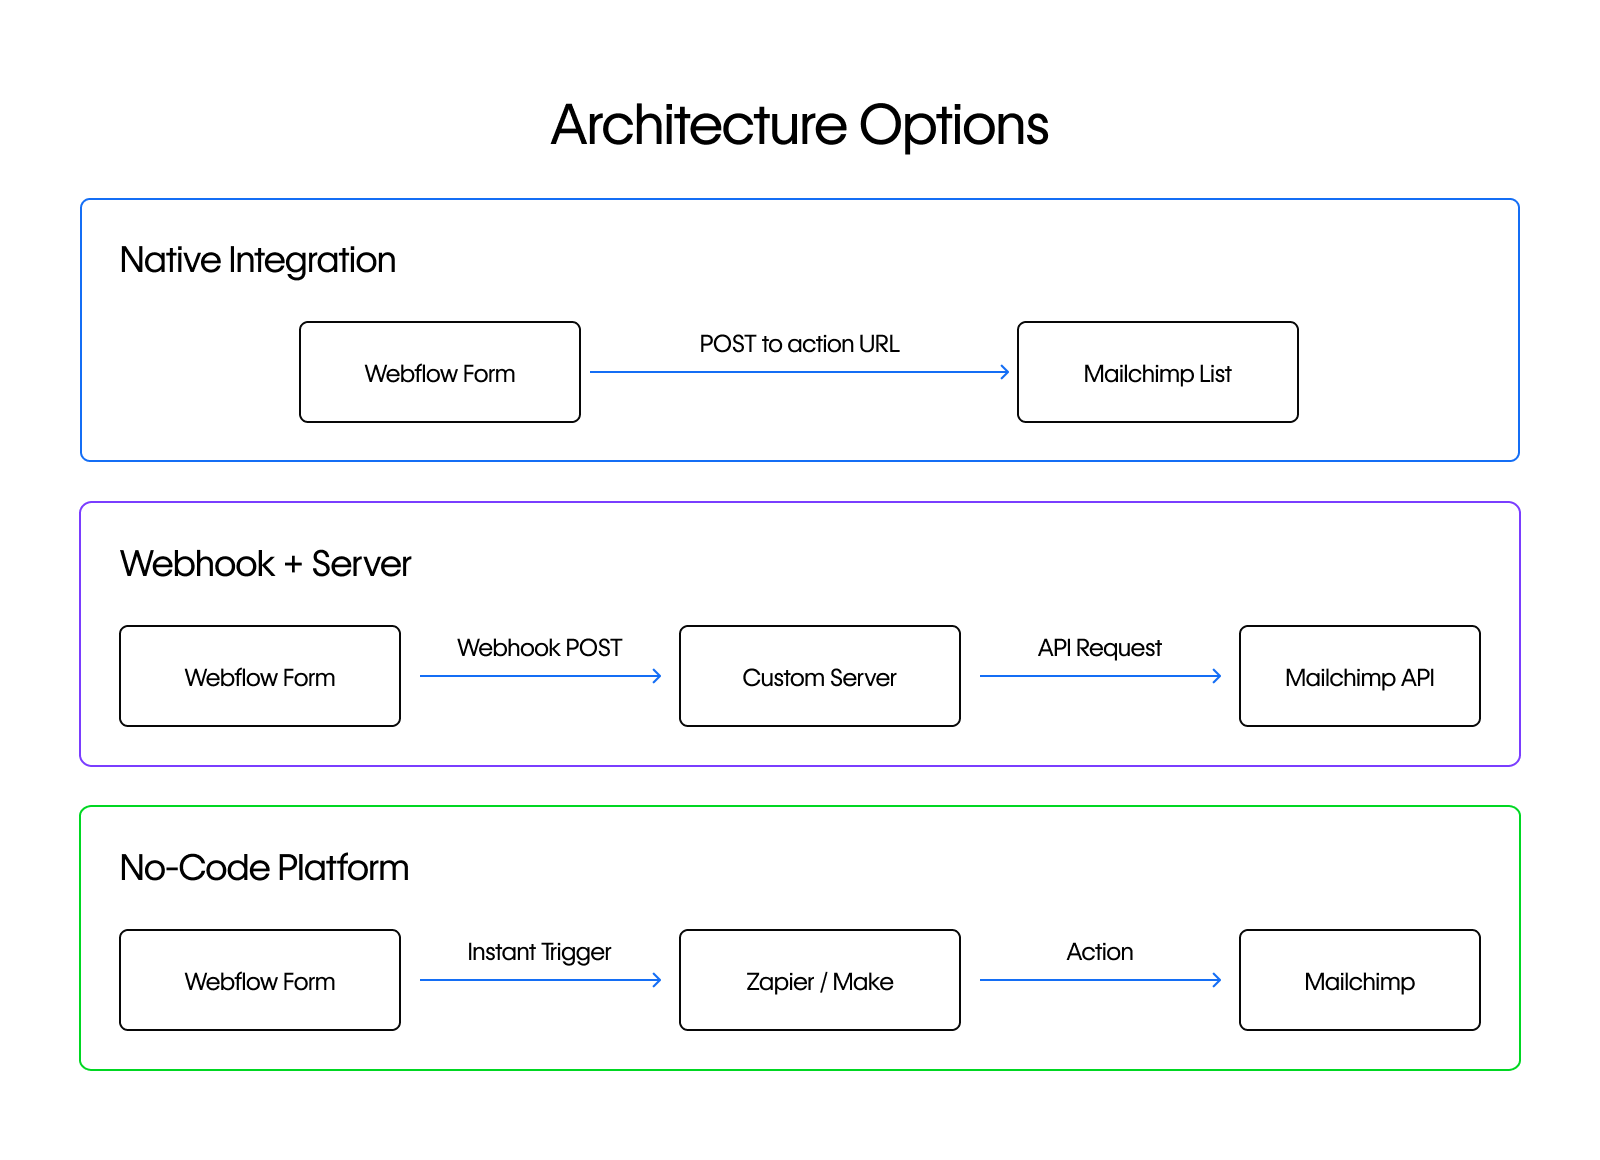
The diagram maps the three cleanly. A native form action posts straight to Mailchimp, an automation platform sits in the middle as a hosted step, and your own server receives the submission and calls the API itself. This table is the shorter version of the same decision:
The rest of this guide builds the third route. It is the only one where a registration can do more than one thing, which is what an event needs the moment you add capacity limits, waitlists, or a record in your own database.
6 steps to build an event registration system in Webflow
The build is one Mailchimp audience, one Route Handler, and one form component. The Route Handler does the interesting work, because Mailchimp identifies contacts by a hashed email rather than a plain one.
1. Create the Mailchimp audience and merge fields
Start in Mailchimp rather than in code, because every field you plan to send has to exist before the API will accept it. Open Audience, then Settings, then Audience fields and *|MERGE|* tags.
The merge tag is the name you use in the API call, not the label shown in the interface. Keep this list short: every field you add is a field somebody has to fill in, and registration forms lose people with each extra input. First name, last name, and email cover most events.
Note the audience ID while you are here. It appears under Audience, then the More options drop-down, then Audience settings, in a row labelled Audience ID. The API refers to it as the list ID. You should finish this step with two values written down: the audience ID and the merge tags you intend to populate.
2. Generate an API key and find your data center
Generate an API key from your Mailchimp account: open your profile, then the Extras drop-down, then API keys. The key carries the permissions of the user who created it, so create it from an account with the access you intend the integration to have, not from a personal admin login you may later remove.
Every Mailchimp API request goes to a data center specific to your account. The root URL is https://<dc>.api.mailchimp.com/3.0/, where <dc> is a value such as us6. The prefix is the segment after the final dash in your API key, which is why the code below derives it rather than asking you to hardcode it. Both the URL structure and the two accepted authentication styles are set out in Mailchimp's API fundamentals. At the end of this step you have a key whose suffix tells you which host to call.
3. Store the credentials as environment variables
Both values belong in your Webflow Cloud environment rather than in the repository.
Open Environment Variables and add them, marking the API key as a Secret:
MAILCHIMP_API_KEY=your-key-here-us6
MAILCHIMP_LIST_ID=57afe96172
Webflow Cloud makes environment variables available to the build and to the deployed app at runtime, and it redacts secret values from build logs. Read them inside the handler rather than at module top level, so the value resolves in the request context. A deployment after adding them is what makes them live.
4. Build the registration Route Handler
This is where the interesting constraint appears. Mailchimp's canonical identifier for a contact is the MD5 hash of the lowercase email, though the endpoint also accepts a plain email address or contact ID. The hash is documented in Mailchimp's methods and parameters reference, and hashing means you can address a contact without putting the email itself in the request path.
MD5 is not part of the WebCrypto standard, so this is the point where a lot of edge deployments fall over. Cloudflare Workers, the runtime behind Webflow Cloud, supports MD5 in crypto.subtle.digest specifically for talking to systems that require it. Cloudflare's Web Crypto documentation lists it and adds a warning worth repeating: MD5 is a weak algorithm and should never be relied on for security.
Here it is an identifier, not a protection.
// app/api/register/route.ts
import { NextRequest, NextResponse } from 'next/server'

type RegistrationBody = {
  email: string
  firstName?: string
  lastName?: string
}

// Mailchimp identifies a contact by the MD5 hash of its lowercase email.
async function subscriberHash(email: string): Promise<string> {
  const bytes = new TextEncoder().encode(email.trim().toLowerCase())
  const digest = await crypto.subtle.digest('MD5', bytes)
  return [...new Uint8Array(digest)]
    .map((b) => b.toString(16).padStart(2, '0'))
    .join('')
}

export async function POST(request: NextRequest) {
  const { email, firstName, lastName } =
    (await request.json()) as RegistrationBody

  if (!email) {
    return NextResponse.json({ error: 'Email is required' }, { status: 400 })
  }

  // Read secrets inside the handler, not at module top level.
  const apiKey = process.env.MAILCHIMP_API_KEY
  const listId = process.env.MAILCHIMP_LIST_ID

  if (!apiKey || !listId) {
    return NextResponse.json(
      { error: 'Mailchimp is not configured' },
      { status: 500 }
    )
  }

  // Normalise once so the hash and the body always agree.
  const normalizedEmail = email.trim().toLowerCase()

  // The data center is the segment after the final dash in the key.
  const dc = apiKey.split('-').pop()
  const hash = await subscriberHash(normalizedEmail)

  const response = await fetch(
    `https://${dc}.api.mailchimp.com/3.0/lists/${listId}/members/${hash}`,
    {
      method: 'PUT',
      headers: {
        Authorization: `Bearer ${apiKey}`,
        'Content-Type': 'application/json',
      },
      body: JSON.stringify({
        email_address: normalizedEmail,
        status_if_new: 'pending',
        merge_fields: { FNAME: firstName ?? '', LNAME: lastName ?? '' },
      }),
    }
  )

  if (!response.ok) {
    // A gateway error may not be JSON, so never assume it parses.
    const detail = await response.json().catch(() => null)
    return NextResponse.json(
      { error: (detail as { title?: string })?.title ?? 'Registration failed' },
      { status: 502 }
    )
  }

  return NextResponse.json({ ok: true })
}
Three things in this handler are deliberate. The request uses PUT rather than POST, because the add or update endpoint creates the contact if it does not exist and updates it if it does. A POST to the members collection is documented for adding a new member, which is why Mailchimp tells you to use add or update whenever you do not know whether the contact already exists. Every repeat registrant is that case.
The status is status_if_new: 'pending', which leaves a new contact awaiting opt-in confirmation rather than subscribing them outright. This is the setting worth defending hardest: registering for an event is consent to hear about that event, not consent to a marketing list, and treating the two as the same thing is how a sender reputation degrades. If you hold separate, explicit consent, change it to subscribed deliberately rather than by default.
The Mailchimp error body is read before responding, and the form displays it, so a failure shows Mailchimp's own message rather than a generic 500. Deploy this and a POST to the route should return { ok: true } with the contact visible in your audience.
5. Post the form to your Route Handler
The client component collects the fields and posts JSON to the handler you just built. Webflow Cloud injects the base path at build time, so you no longer declare it in next.config. A client-side fetch is not rewritten for you.
Pass the mount path in through a NEXT_PUBLIC_BASE_PATH variable and prefix the call with it:
// app/components/RegistrationForm.tsx
'use client'

import { useState } from 'react'

// Webflow Cloud injects the base path at build time, so read the mount
// path from an environment variable rather than from next.config.
const baseUrl = process.env.NEXT_PUBLIC_BASE_PATH || ''

export default function RegistrationForm() {
  const [status, setStatus] = useState<'idle' | 'sending' | 'done' | 'error'>('idle')
  const [error, setError] = useState('')

  async function handleSubmit(event: React.FormEvent<HTMLFormElement>) {
    event.preventDefault()
    const form = new FormData(event.currentTarget)
    setStatus('sending')

    try {
      const res = await fetch(`${baseUrl}/api/register`, {
        method: 'POST',
        headers: { 'Content-Type': 'application/json' },
        body: JSON.stringify({
          email: form.get('email'),
          firstName: form.get('firstName'),
          lastName: form.get('lastName'),
        }),
      })

      if (!res.ok) {
        const detail = await res.json().catch(() => null)
        setError(detail?.error ?? 'Registration failed')
        setStatus('error')
        return
      }
      setStatus('done')
    } catch {
      setStatus('error')
    }
  }

  return (
    <form onSubmit={handleSubmit}>
      <input name="firstName" placeholder="First name" />
      <input name="lastName" placeholder="Last name" />
      <input name="email" type="email" required placeholder="Email" />
      <button type="submit" disabled={status === 'sending'}>
        {status === 'sending' ? 'Registering...' : 'Register'}
      </button>
      {status === 'done' && <p>Check your inbox to confirm your place.</p>}
      {status === 'error' && <p>{error || 'Something went wrong. Please try again.'}</p>}
    </form>
  )
}
The confirmation copy matters more than it looks. Because the contact is created as pending, the registration is not complete until they click the link in their inbox, and a message saying "you are registered" would be wrong. Submitting the form should leave you on the page with a message telling the visitor to check their inbox.
6. Confirm the contact landed, then segment it
Submit a test registration and open the audience in Mailchimp. A pending contact appears immediately, with the merge fields populated and a status that changes once the confirmation link is clicked.
For multiple events in one audience, tags are the mechanism that keeps them apart, and Mailchimp's guide to tags covers applying them through the API. Tagging by event means one audience can drive a reminder sequence per event without a separate list for each. Once you see the pending contact with the right tag, the pipeline is working end to end.
What causes Webflow to Mailchimp registration to fail? Tips to troubleshoot
Four failures account for nearly everything here: the edge runtime directive, a missing or mismatched key, the pending status being mistaken for a bug, and using the wrong HTTP method for a repeat registrant.
The build fails after you add the Route Handler
Cause: an export const runtime = 'edge' directive in the route file. Webflow Cloud deploys Next.js through the OpenNext Cloudflare adapter, which does not support the Next.js edge runtime.
Fix: delete the line. Route Handlers already run on the Workers runtime without it, and the build succeeds on the next deploy.
Mailchimp returns 401 Unauthorized after deployment but works locally
Cause: the key exists in your local environment file and not in the deployed environment, or it was added after the last deploy. A key from one account used against another account's data center prefix also returns 401 rather than a clearer error.
Fix: add the variable in the Webflow Cloud environment, redeploy, and confirm the prefix in the request URL matches the suffix on the key you pasted.
Registrations succeed but nobody appears subscribed
Cause: this is the expected behaviour of pending, not a bug. The contact exists and is waiting on the confirmation click.
Fix: nothing, unless your event genuinely requires immediate subscription and you hold the consent to do it. In that case change the status deliberately and say so on the form.
The first registration works and the second fails
Cause: you are using POST to the members collection rather than PUT to the member resource. The collection endpoint is documented for adding a new member only.
Fix: switch to the hashed member URL with PUT, which upserts rather than inserts and fixes the problem permanently. This is worth catching in testing rather than in production, because it only appears on the second registration from the same address, and a single-pass test will never surface it. Register yourself twice before you consider the flow finished.
What you can build next with Mailchimp and Webflow Cloud
The Route Handler is a single place where a registration passes through your own code, which is what makes the rest possible: writing the registrant to a database for capacity limits, checking a waitlist before confirming, or sending an internal notification at the same time.
The same pattern applies to any transactional provider, and our SendGrid contact form guide covers that variant including honeypot spam protection, which an event form on a public page will eventually need. If you would rather not maintain the code at all, the Webflow and Mailchimp integration covers the native connection route from the diagram above.
For deeper customization beyond what the native integration handles, Webflow's developer docs cover Route Handlers, storage bindings, and the rest of the Webflow Cloud runtime.
Frequently asked questions
Do I need Webflow Cloud to connect a Webflow form to Mailchimp?
No. A Webflow form can post directly to a Mailchimp form action URL, and automation platforms can pick up a form submission and create the contact for you. Webflow Cloud becomes worthwhile when you need something to happen between the submit and the contact being created, such as validation, deduplication against your own records, or a capacity check.
Why does the API need an MD5 hash instead of the email address?
Mailchimp uses the MD5 hash of the lowercase email as the contact identifier in the URL path, so a contact can be addressed without the email appearing in the request path or in server logs. MD5 is doing identification here, not protection, and it should not be used as a security measure anywhere else in your app.
Will this work on other edge platforms?
The hashing step is the part to check. MD5 is not in the WebCrypto standard, so a runtime that implements only the standard algorithms will reject crypto.subtle.digest('MD5', ...). Cloudflare Workers supports it as an addition, which is why the code above runs unchanged on Webflow Cloud.
Should event registrants be subscribed immediately?
Only if you have consent for that, and registering for an event is not by itself consent to a marketing list. The code above creates contacts as pending, which sends Mailchimp's confirmation email first. It costs a click and protects the deliverability of every campaign you send afterwards.
How do I keep several events in one audience?
Tag each contact with the event they registered for, then build your reminder automations against the tag. One audience with tags is easier to report on than a separate audience per event, and it avoids paying for the same contact more than once on plans priced by contact count.



















