




Calling OpenAI for image generation from the browser exposes your API key to anyone with DevTools. Webflow Cloud solves this with a server-side architecture that keeps the key private, the stack unified, and the deployment tied to your Webflow site.
One of the most common requests I get when adding AI to a Webflow project is to let users generate images from their own prompts.
However, you cannot call OpenAI from the browser without exposing your API key in the page source. Anyone who opens DevTools can copy it, and from that point, your quota is theirs. The workaround most teams reach for (a serverless function hosted separately) works, but it fragments the stack and adds a deployment you have to manage independently of the Webflow site.
With Webflow Cloud Apps, you can have a Next.js Route Handler run server-side on Cloudflare Workers, proxy the OpenAI request with your key stored as an environment variable, and return the generated image to the browser. The API key never touches the client. The whole thing deploys alongside your Webflow site from a single CLI command.
This guide covers how to build a complete AI image generator tool on Webflow Cloud, from scaffold to deployment, using OpenAI's gpt-image-1 model.
What do you need to build an AI image generator in Webflow?
You need an OpenAI API key, a Webflow Cloud App, and no client-side API exposure. The architecture is a server-side proxy. The browser communicates with your Route Handler, which in turn communicates with OpenAI.
Here are the key requirements:
No additional npm packages are required for the API calls. The Route Handler uses the standard fetch() API, which is available natively on Cloudflare Workers.
Once you've confirmed access to all five requirements, you're ready to scaffold the app and write the Route Handler that keeps your API key off the client.
5 steps to build an AI image generator on Webflow Cloud
The build has two parts. Steps 1 and 2 set up the Webflow Cloud App scaffold and configure the OpenAI API key. Steps 3 and 4 build the server-side Route Handler and the client-side form. Step 5 deploys everything.
The key design decision in this architecture is where the OpenAI call lives. I always put it in the Route Handler, not the client. Even a read-only API key can generate thousands of images on your quota if it leaks. The Route Handler provides a single point to add rate limiting, prompt validation, or content filtering before the request ever reaches OpenAI.
Steps 1 through 5 build on each other sequentially. Don't skip the environment variable step, since a missing key is the most common cause of 500 errors after deployment.
1. Scaffold the Webflow Cloud App
Start by installing the Webflow CLI globally and running the init command. This scaffolds a Next.js project, authenticates your Webflow account, and links the app to a specific site, all in one flow.
Install the Webflow CLI globally, then run webflow cloud init to scaffold the project:
npm install -g @webflow/webflow-cli
webflow cloud init
The CLI prompts you to choose a framework (select Next.js), set an app mount path (for example, /generator), and authenticate with your Webflow account. Authentication happens in-line during init. No separate auth command is required at this stage.
After authentication, select the Webflow site you want to attach the app to.
The CLI generates a scaffold with five pre-configured files:
your-app/
├── next.config.js          # basePath + assetPrefix set to your mount path
├── open-next.config.ts     # OpenNext adapter for Cloudflare Workers
├── cloudflare.env.ts       # TypeScript types for env vars and bindings
├── wrangler.json           # Cloudflare Workers config — do not edit
└── webflow.json            # Webflow project metadata
I leave wrangler.json alone on every project. Webflow Cloud regenerates it on each deployment based on webflow.json. Editing it manually causes silent conflicts.
Expected outcome: A scaffolded Next.js project linked to your Webflow site, with next.config.js containing your mount path as both basePath and assetPrefix.
2. Set your OpenAI API key as an environment variable
Before writing any Route Handler code, store the OpenAI API key somewhere the client can't read it.
Create a .env.local file at the project root and add your OpenAI API key:
OPENAI_API_KEY=sk-...your-key-hereDo not prefix this with NEXT_PUBLIC_. That prefix exposes the value in the client-side JavaScript bundle. That's exactly what we're trying to avoid. A variable without NEXT_PUBLIC_ is only accessible in Route Handlers and Server Components, which run on the server.
Add .env.local to your .gitignore if it isn't already there. I've reviewed projects where the .env.local file was committed to a public GitHub repository. The key was rotated within hours of someone finding it via a GitHub search. Don't rely on obscurity.
# .gitignore
.env.local
.env*.local
You'll also add this key to your Webflow Cloud environment before deployment. That's covered in Step 5.
Expected outcome: OPENAI_API_KEY available at runtime in your Route Handler via process.env.OPENAI_API_KEY, invisible to the browser.
3. Build the server-side Route Handler
The Route Handler is the core of this architecture. It sits between the browser and OpenAI, receives the user's prompt, makes the API call with your server-stored key, and returns the image data to the client.
Create a Route Handler at app/api/generate/route.ts. This file receives the prompt from the browser, calls the OpenAI Images API, and returns the base64-encoded image.
Here's the complete Route Handler. Copy it into app/api/generate/route.ts. The inline comments explain the decisions worth understanding before you deploy:
// app/api/generate/route.ts
export async function POST(request: Request) {
  const OPENAI_API_KEY = process.env.OPENAI_API_KEY;

  if (!OPENAI_API_KEY) {
    return Response.json(
      { error: "OpenAI API key not configured" },
      { status: 500 }
    );
  }

  const { prompt } = await request.json();

  if (!prompt || typeof prompt !== "string" || prompt.trim().length === 0) {
    return Response.json(
      { error: "A prompt is required" },
      { status: 400 }
    );
  }

  const openaiResponse = await fetch(
    "https://api.openai.com/v1/images/generations",
    {
      method: "POST",
      headers: {
        Authorization: `Bearer ${OPENAI_API_KEY}`,
        "Content-Type": "application/json",
      },
      body: JSON.stringify({
        model: "gpt-image-1",
        prompt: prompt.trim(),
        size: "1024x1024",
        quality: "medium",
        n: 1,
      }),
    }
  );

  if (!openaiResponse.ok) {
    const error = await openaiResponse.json();
    return Response.json(
      { error: error.error?.message ?? "Image generation failed" },
      { status: openaiResponse.status }
    );
  }

  const data = await openaiResponse.json();
  const imageBase64 = data.data?.[0]?.b64_json;

  if (!imageBase64) {
    return Response.json(
      { error: "No image returned from OpenAI" },
      { status: 500 }
    );
  }

  return Response.json({ image: imageBase64 });
}
One thing this handler does not do: it does not authenticate or rate-limit the caller. As written, anyone who finds the endpoint can spend your OpenAI balance. Before you put this on a public site, add an IP-keyed rate limit backed by the Key Value Store, cap the prompt length, and set a monthly budget limit in your OpenAI dashboard.
Three other things to note in this implementation.
(1) First, do not add export const runtime = "edge". The OpenNext Cloudflare adapter that Webflow Cloud uses does not support the Next.js edge runtime, and leaving the directive in place breaks the build. Route Handlers already run on the Workers runtime.
(2) Second, I validate the prompt before the API call. OpenAI will return a 400 if the prompt is empty, but handling it on our side means a faster response and a more useful error message for the client.
(3) Third, the response is b64_json (a base64-encoded PNG string), not a URL. OpenAI's GPT Image models return image data directly, not a hosted link.
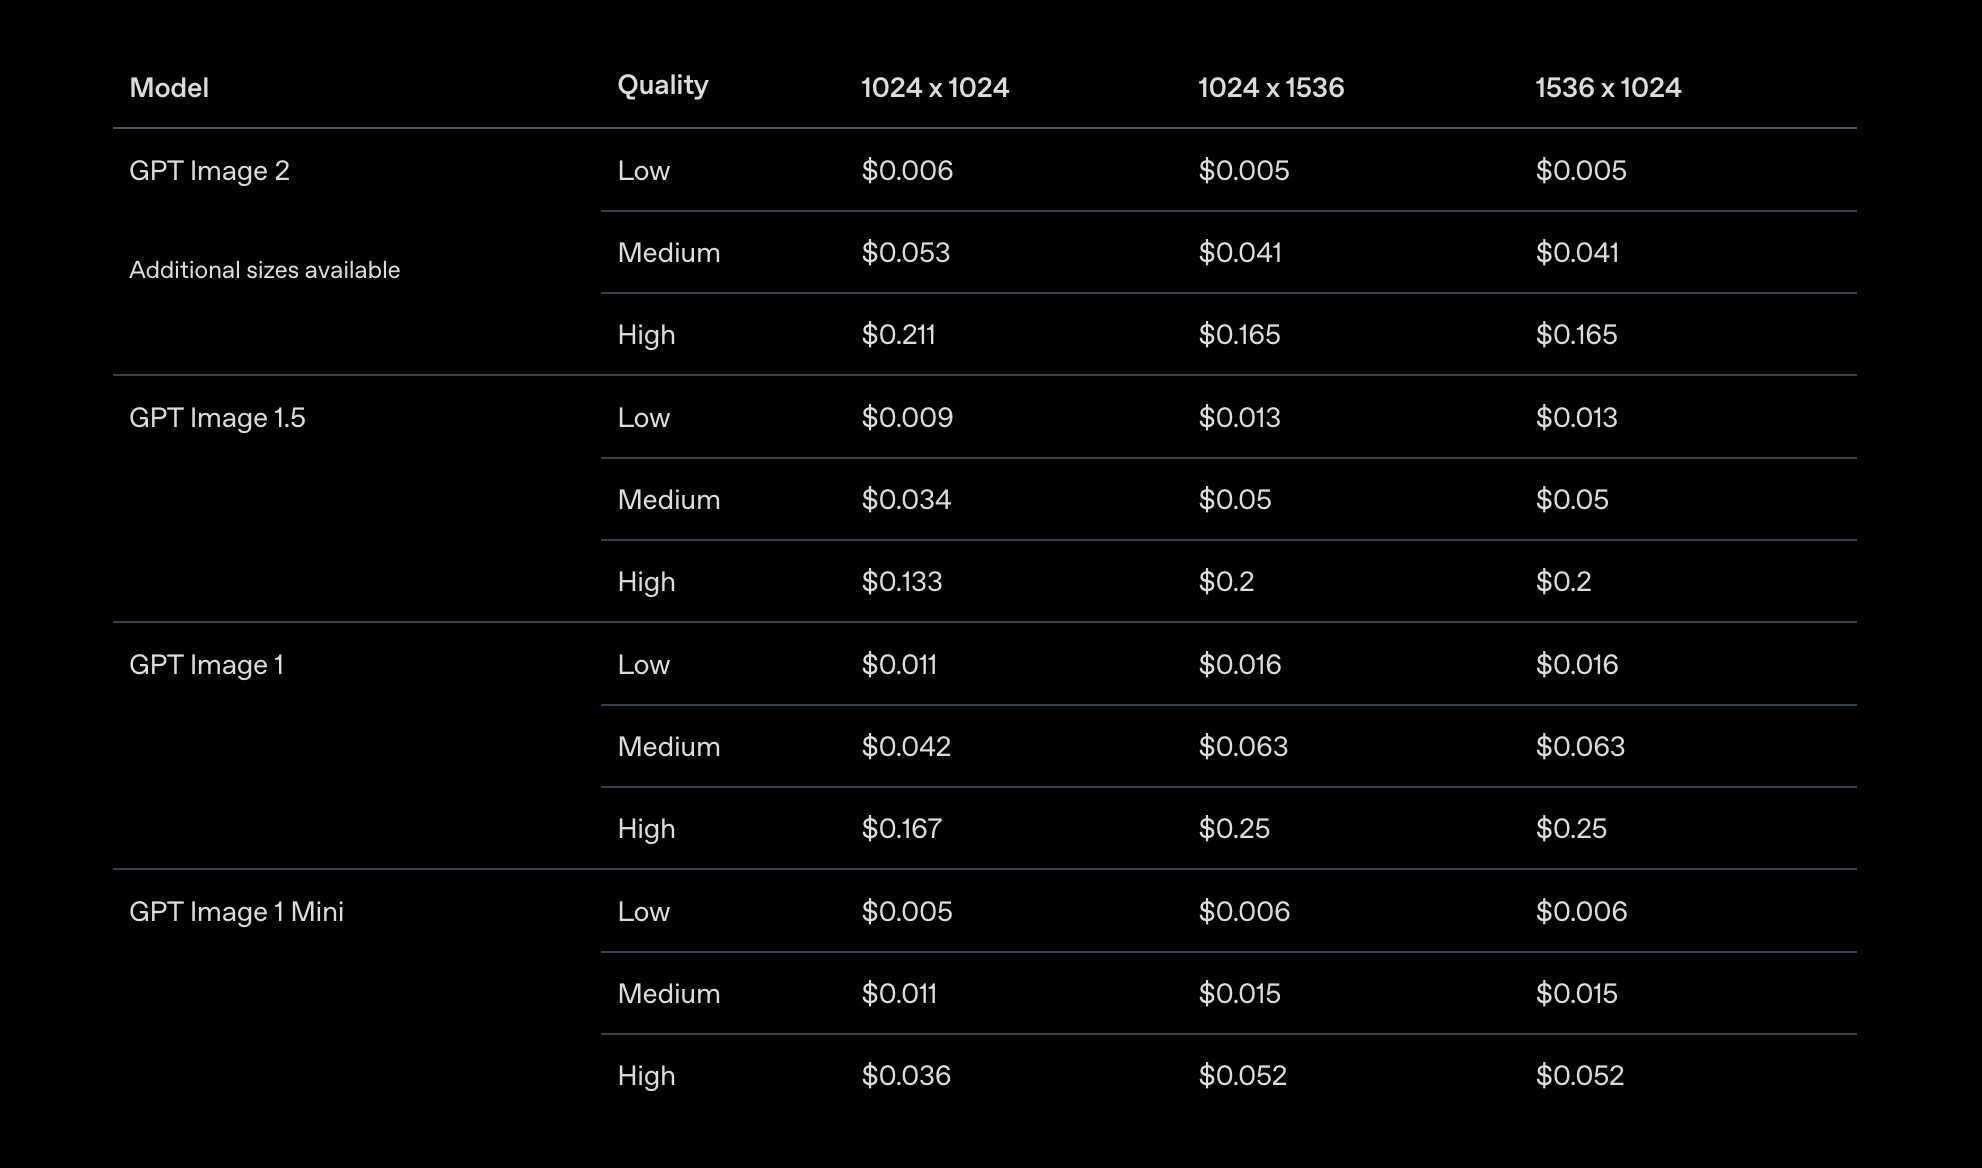
For new builds, use "gpt-image-2", OpenAI's current image model. Do not start a project on "gpt-image-1.5" or "gpt-image-1-mini": OpenAI deprecated both on June 2, 2026, with shutdown on December 1, 2026 and "gpt-image-2" as the named replacement. All of these share the same API surface, so the model value is the only change required.
Expected outcome: A Route Handler at /generator/api/generate (relative to your mount path) that accepts POST requests with a { prompt: string } body and returns { image: string } containing the base64 PNG.
4. Build the client-side image generator form
With the Route Handler in place, the client-side page needs to do three things: capture a text prompt, POST it to the handler, and render the base64 image that comes back.
Create a Client Component with a text input for the prompt, a submit button, and an image display area. The component posts to the Route Handler and renders the returned base64 string as an <img> tag.
Here's the full component. It handles loading state, error display, and image rendering, and it posts to the Route Handler using the full mount path:
// app/page.tsx
"use client";

import { useState } from "react";

export default function ImageGeneratorPage() {
  const [prompt, setPrompt] = useState("");
  const [imageBase64, setImageBase64] = useState<string | null>(null);
  const [loading, setLoading] = useState(false);
  const [error, setError] = useState<string | null>(null);

  async function handleGenerate() {
    if (!prompt.trim()) return;

    setLoading(true);
    setError(null);
    setImageBase64(null);

    try {
      const response = await fetch("/generator/api/generate", {
        method: "POST",
        headers: { "Content-Type": "application/json" },
        body: JSON.stringify({ prompt }),
      });

      const data = await response.json();

      if (!response.ok) {
        setError(data.error ?? "Something went wrong. Try again.");
        return;
      }

      setImageBase64(data.image);
    } catch {
      setError("Network error. Check your connection and try again.");
    } finally {
      setLoading(false);
    }
  }

  return (
    <main style={{ maxWidth: 640, margin: "0 auto", padding: "2rem" }}>
      <h1>AI Image Generator</h1>
      <p>Describe an image and generate it instantly with OpenAI.</p>

      <textarea
        value={prompt}
        onChange={(e) => setPrompt(e.target.value)}
        placeholder="A minimalist product photo of a white ceramic mug on a marble surface..."
        rows={3}
        style={{ width: "100%", fontSize: "1rem", padding: "0.75rem" }}
      />

      <button
        onClick={handleGenerate}
        disabled={loading || !prompt.trim()}
        style={{ marginTop: "1rem", padding: "0.75rem 1.5rem" }}
      >
        {loading ? "Generating..." : "Generate Image"}
      </button>

      {error && (
        <p style={{ color: "red", marginTop: "1rem" }}>{error}</p>
      )}

      {imageBase64 && (
        <div style={{ marginTop: "2rem" }}>
          <img
            src={`data:image/png;base64,${imageBase64}`}
            alt={prompt}
            style={{ width: "100%", borderRadius: 8 }}
          />
          <a
            href={`data:image/png;base64,${imageBase64}`}
            download="generated-image.png"
            style={{ display: "block", marginTop: "0.5rem" }}
          >
            Download image
          </a>
        </div>
      )}
    </main>
  );
}
One thing I've run into on almost every image generator project: the base64 payload is large.
A 1024x1024 PNG comes back as a base64 string several times larger than the binary image. That's within normal range for a single image, but if you plan to let users generate multiple images and display them in a grid, store each result in state and avoid refetching.
The imageBase64 state variable here holds only the latest image. Extend it to an array if you need a gallery.
The fetch URL uses the full mount path: /generator/api/generate. Update this to match whatever mount path you set during webflow cloud init. I always hardcode the full path rather than deriving it dynamically, which avoids routing edge cases on Cloudflare Workers.
Expected outcome: The page at your-site.com/generator renders a prompt form. Submitting a prompt calls the Route Handler, and the generated image appears on the page within 10-20 seconds, depending on the model and quality settings.
5. Add the environment variable and deploy
In your Webflow site settings, navigate to Webflow Cloud, open your project environment, and add OPENAI_API_KEY under Environment Variables.
Then authenticate and deploy from the CLI:
webflow auth login
webflow cloud deploy
webflow auth login opens a browser window to authenticate your Webflow account. After granting access, webflow cloud deploy pushes the project. Alternatively, push to your connected GitHub branch, and Webflow Cloud deploys automatically.
Monitor build progress and logs in the Webflow Cloud dashboard under Deployment History. Build duration varies with project size; watch Deployment History for the result.
Expected outcome: The image generator is live at your-site.webflow.io/generator. Entering a prompt and clicking Generate returns a 1024x1024 AI-generated image within 10-20 seconds. The API key is not visible in the page source or network tab.
What causes image generation to fail on Webflow Cloud with OpenAI?
Most failures fall into four buckets: missing or misconfigured API key, content policy rejections, rate-limit hits, or a leftover runtime = "edge" directive that breaks the build.
Each failure mode below includes the specific error you'll see, the most likely cause, and the fix, in order of how often they appear in practice.
The API returns 401 or "Invalid API key"
Cause: The OPENAI_API_KEY environment variable is not set in the Webflow Cloud environment, or the key was added to .env.local only and not to the Cloud environment panel.
Fix: Open Webflow Cloud → Environment Variables and confirm OPENAI_API_KEY exists with the correct value. Changes to environment variables require a new deployment to take effect. Run webflow cloud deploy or push to GitHub to trigger one.
The API returns 400 with a content policy error
Cause: OpenAI rejected the prompt for violating its usage policy. This happens with prompts that include specific names, violent descriptions, or content that triggers the safety system. The error message from OpenAI usually describes the violation category.
Fix: Surface the OpenAI error message to the user so they can modify the prompt. The Route Handler in Step 3 already passes error.error?.message back to the client. Make sure the frontend renders it visibly rather than silently swallowing it.
I've had clients report a "broken" generator that was actually rejecting all their prompts because of brand-name inclusion. Catching and displaying the error message would have made that obvious immediately.
Images are generated locally, but not after deployment
Cause: An export const runtime = "edge" directive is present in route.ts. The OpenNext Cloudflare adapter does not support the edge runtime, so the build fails or the route never runs.
Fix: Add export const runtime = "edge" as the first export in app/generate/route.ts. Redeploy after the change.
The response is slow or times out
Cause: Image generation with gpt-image-1 at medium quality takes 10-20 seconds. At high quality, it can reach 30-40 seconds. Webflow Cloud meters Worker CPU time, but that budget counts active computation, not time spent awaiting the OpenAI response. The more common failure is the browser or an intermediate proxy giving up on a request left open that long.
Fix: Drop quality to "low" during testing. I prototype at quality: "low" to keep the iteration loop fast and cheap, then raise quality before the client demo. Avoid reaching for gpt-image-1-mini, which OpenAI shuts down on December 1, 2026.
If timeouts persist at high quality, consider queuing the request asynchronously and polling for the result rather than waiting on a single long-lived fetch.
Build more AI tools on Webflow Cloud
This guide covers a single-prompt image generator as a starting point. The same Route Handler pattern works for image editing (call the /v1/images/edits endpoint with "gpt-image-2" and pass an image input alongside the prompt), batch generation, or piping the generated image into a CMS item via the Webflow Data API.
Explore Webflow + OpenAI to connect OpenAI's text and chat capabilities alongside image generation, and also the full range of integration patterns.
Frequently asked questions
Which OpenAI model should I use for image generation in 2026?
Use "gpt-image-2", OpenAI's current image model. "gpt-image-1" still works and is the cheaper fallback. Do not build on "gpt-image-1.5" or "gpt-image-1-mini", which OpenAI deprecated on June 2, 2026 and shuts down on December 1, 2026. The DALL-E models are already gone, removed from the API on May 12, 2026.
How do I save generated images to Webflow CMS?
Decode the base64 string to binary, then use the Webflow Assets API to register the asset with its file name and MD5 hash and upload the bytes to the URL it returns. Take the hosted URL from the response and write it into an image field. The Assets API does not accept a base64 body directly. I've built this pattern for client galleries, where every generated image is automatically saved to an Airtable-synced collection. It adds two API calls per generation but keeps everything in one place.
Why does my image generator work locally but return a 500 after deployment?
The most common cause is a missing OPENAI_API_KEY in the Webflow Cloud environment panel. A close second is a leftover export const runtime = "edge" directive in the Route Handler, which the adapter does not support. Check both before debugging further. Changes to environment variables require a new deployment to take effect.
Can I display the generated image without using base64?
OpenAI's GPT Image models return b64_json by default. There is no hosted URL option; the DALL-E models that returned one were removed from the API on May 12, 2026. I convert base64 to a Blob URL in memory for display and add a download link. For persistent storage, upload the decoded base64 to Cloudinary, Cloudflare R2, or another asset host and store the resulting URL.
How do I prevent users from generating inappropriate content?
Add prompt validation in the Route Handler before the OpenAI call. I run a keyword blocklist for obvious cases and rely on OpenAI's built-in content policy for everything else. OpenAI rejects policy-violating prompts with a clear error message that you can surface to the user. For stricter control over public-facing tools, add an OpenAI moderation endpoint check before every image generation call.