

The bigger your content library gets, the harder it is for visitors to actually find what they're looking for.
Most search solutions make you choose: powerful but painful to set up, or easy but limited. Algolia is neither. It's a fully-featured search service with a generous free tier, a developer-friendly API, and, as I'll show you here, it can stay in perfect sync with your Webflow CMS automatically via webhooks. Set it up once and your content is indexed and searchable in minutes. And beyond search itself, Algolia's dashboard gives you a window into how people are actually using it: what they're searching for, and where your content might have gaps.
I've been using Algolia on my personal blog for years now, and it handles my nearly 7,000 blog posts without breaking a sweat. Their pricing is ridiculously good: the free tier covers a lot of ground and can handle quite a few sites, which means at minimum, it gets you started before you need to consider graduating to a higher paid plan. In this post, I'll walk you through integrating it with a Webflow site, keeping things as simple as possible.
What do you need?
On the Webflow side, you'll need a CMS plan as that's how I'm going to do the integration. Algolia also has a web crawler option but we’ll be focusing on the CMS option for this post.
For Algolia, you will want an account there. I'll be using the free tier so there's no cost involved. That free tier covers 10,000 requests and one million records. There's more setup required, but I'll cover that later.
Alright, let's get started!
The content
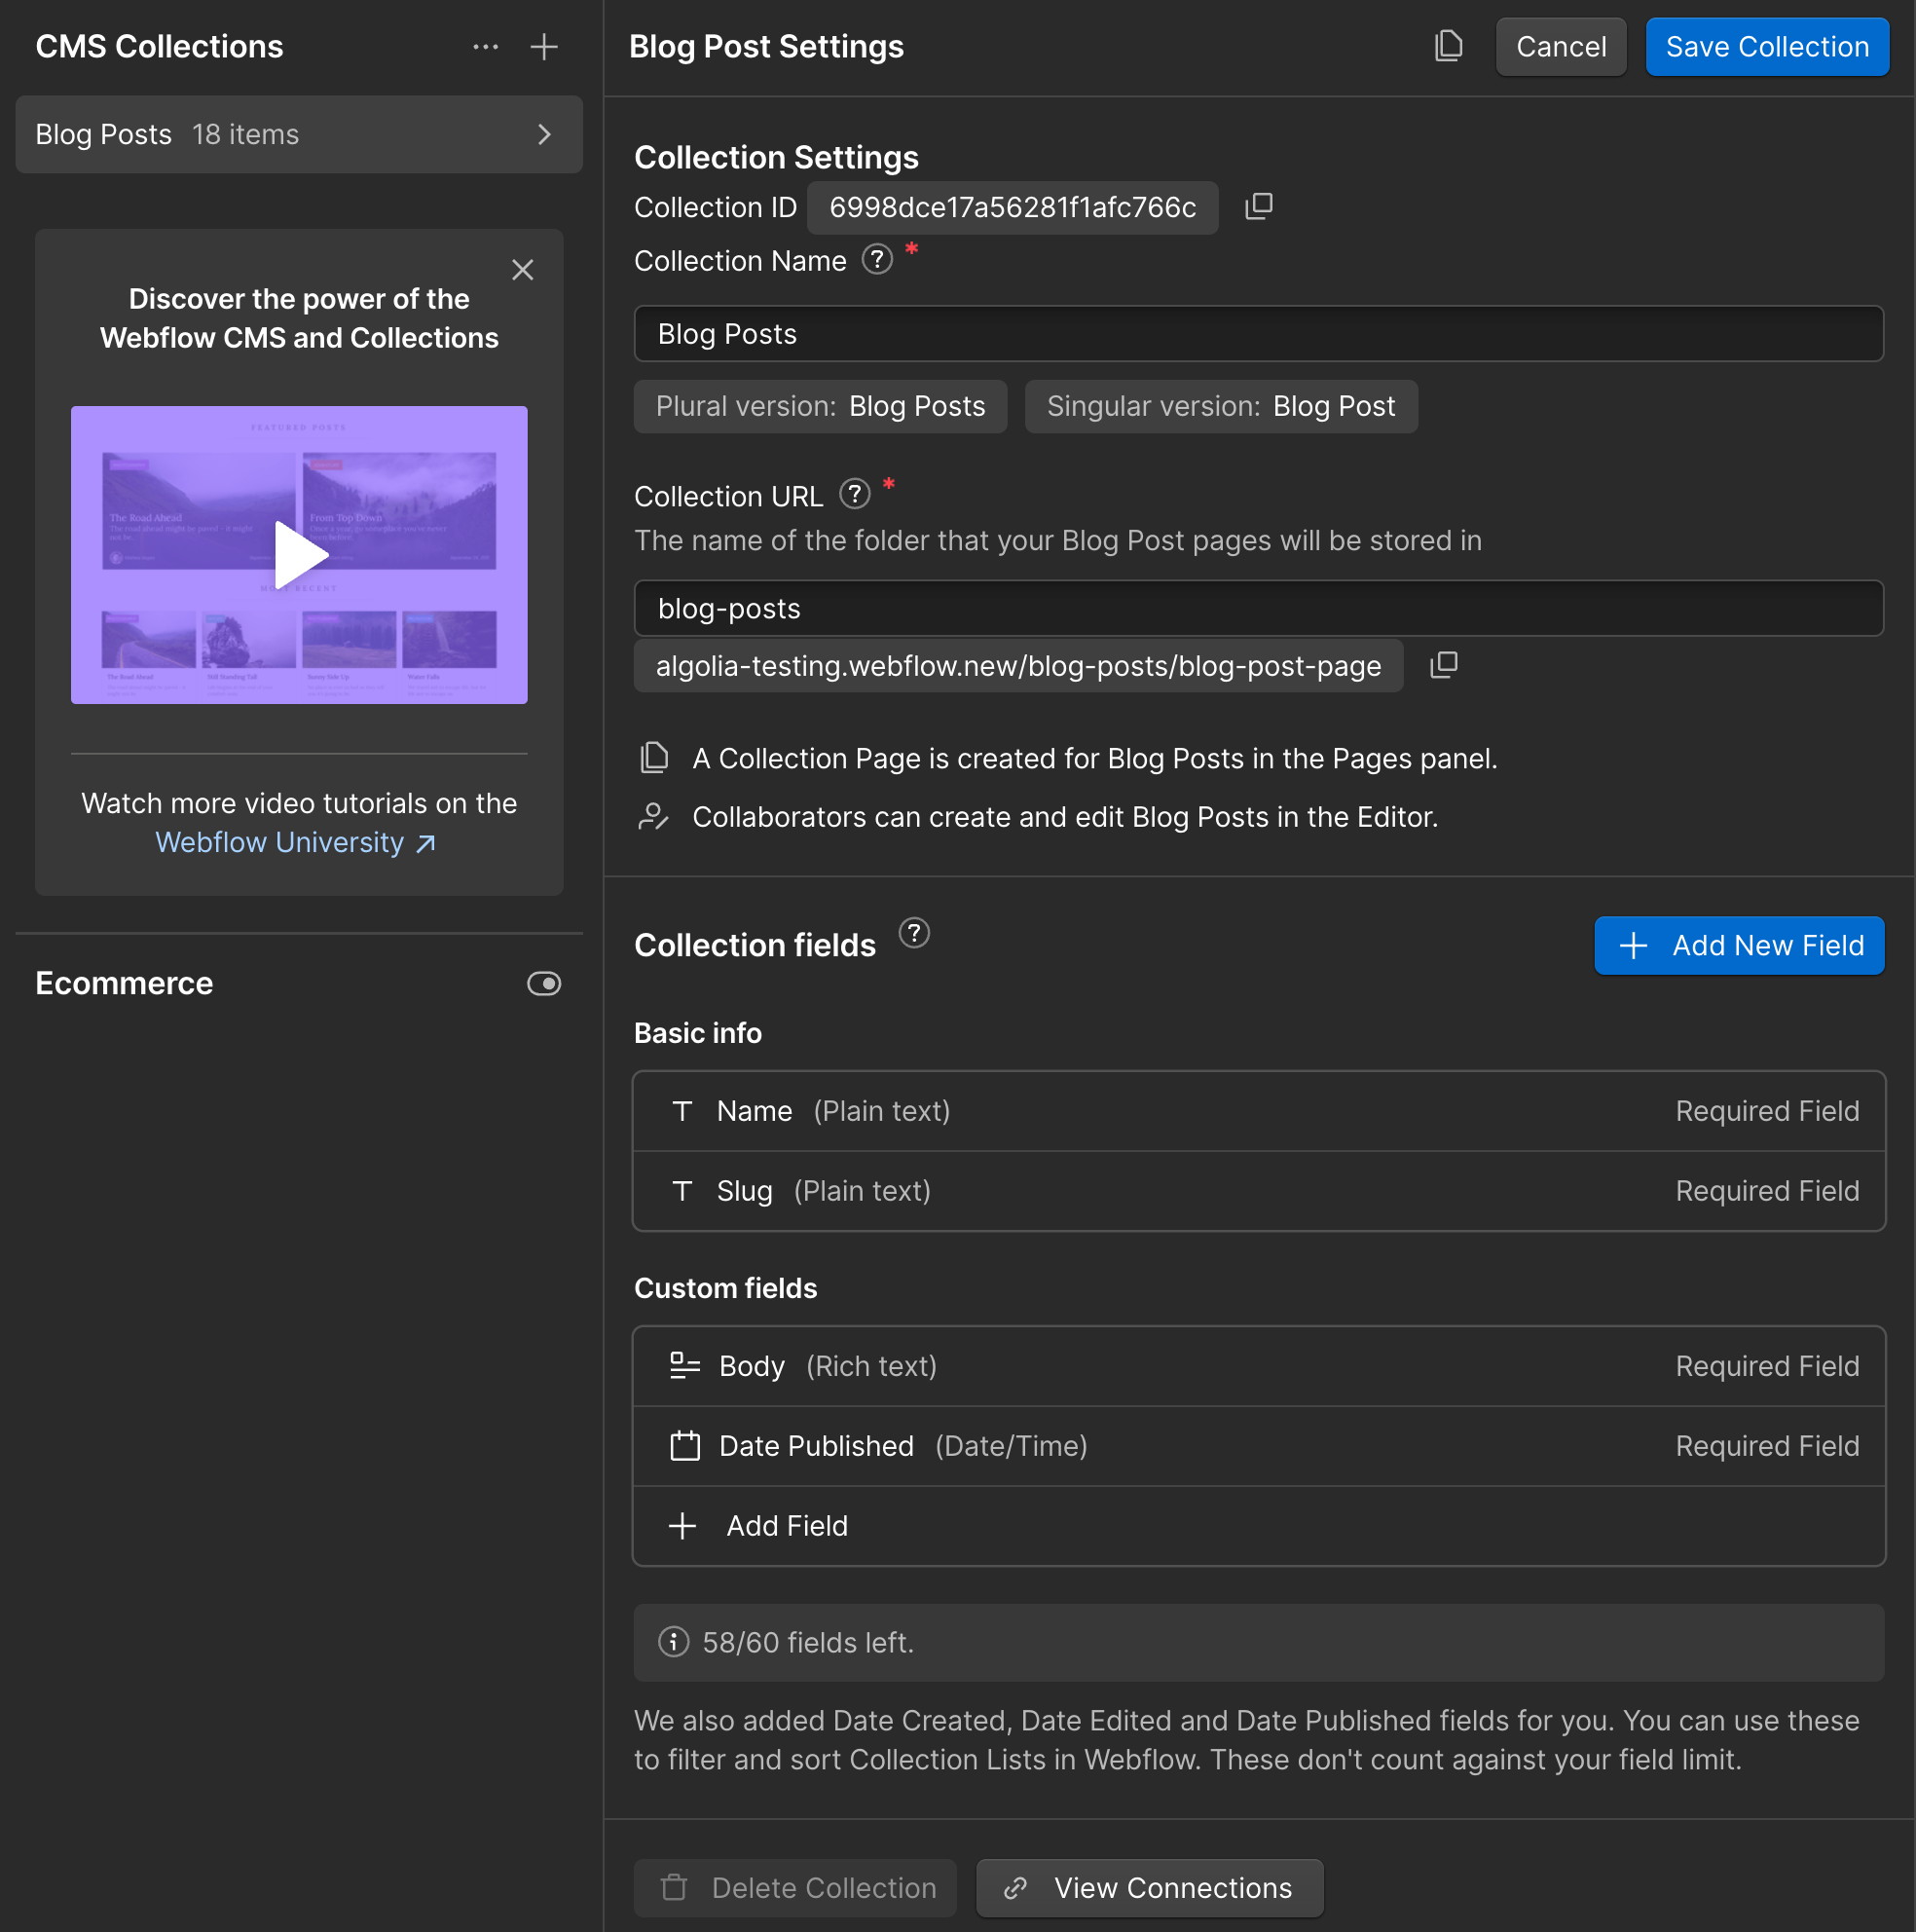
Before I get started, note that Algolia can work with any type of data - blog posts, products, reviews, cats, and more. Algolia doesn't care about the shape of your data as long as it can be turned into JSON. You can also work with multiple different types of content. In order to keep things simple for this demo, I'll use a Blog Posts collection. This is based on the default Webflow CMS sample for blog posts and consists of:
- Name
- Slug
- Body
- Date Published
Create this collection, and make note of the ID value. This will be needed later.
When Webflow offers to make AI generated content for you, I’d take it up on the offer as it will create some good seed content for testing. Obviously, if you have a CMS collection already with content and you're following along with this guide, you don't have to worry about that!
The Algolia index
Algolia works by having an index of your content. You can think of it as a copy of your content, but not necessarily a one to one copy. For example, your content may include properties that don't make sense for search. Your content may also include properties you want to modify before they're indexed. What goes in the index is up to you and your particular site and search needs.
But the crucial point is this: Algolia can't search for something that's not in your index. That means you're going to need to ensure your Webflow site's content stays in sync with your index.
Earlier, I asked you to create an Algolia account, and if you've done that and logged into your dashboard, you can click "Search" in the left-hand nav under ‘Products.’ (Note: you may be asked to create an Application initially.) This application is much like a workspace in Webflow. You can use an application as a container for your indexes and create multiple applications if you would like.
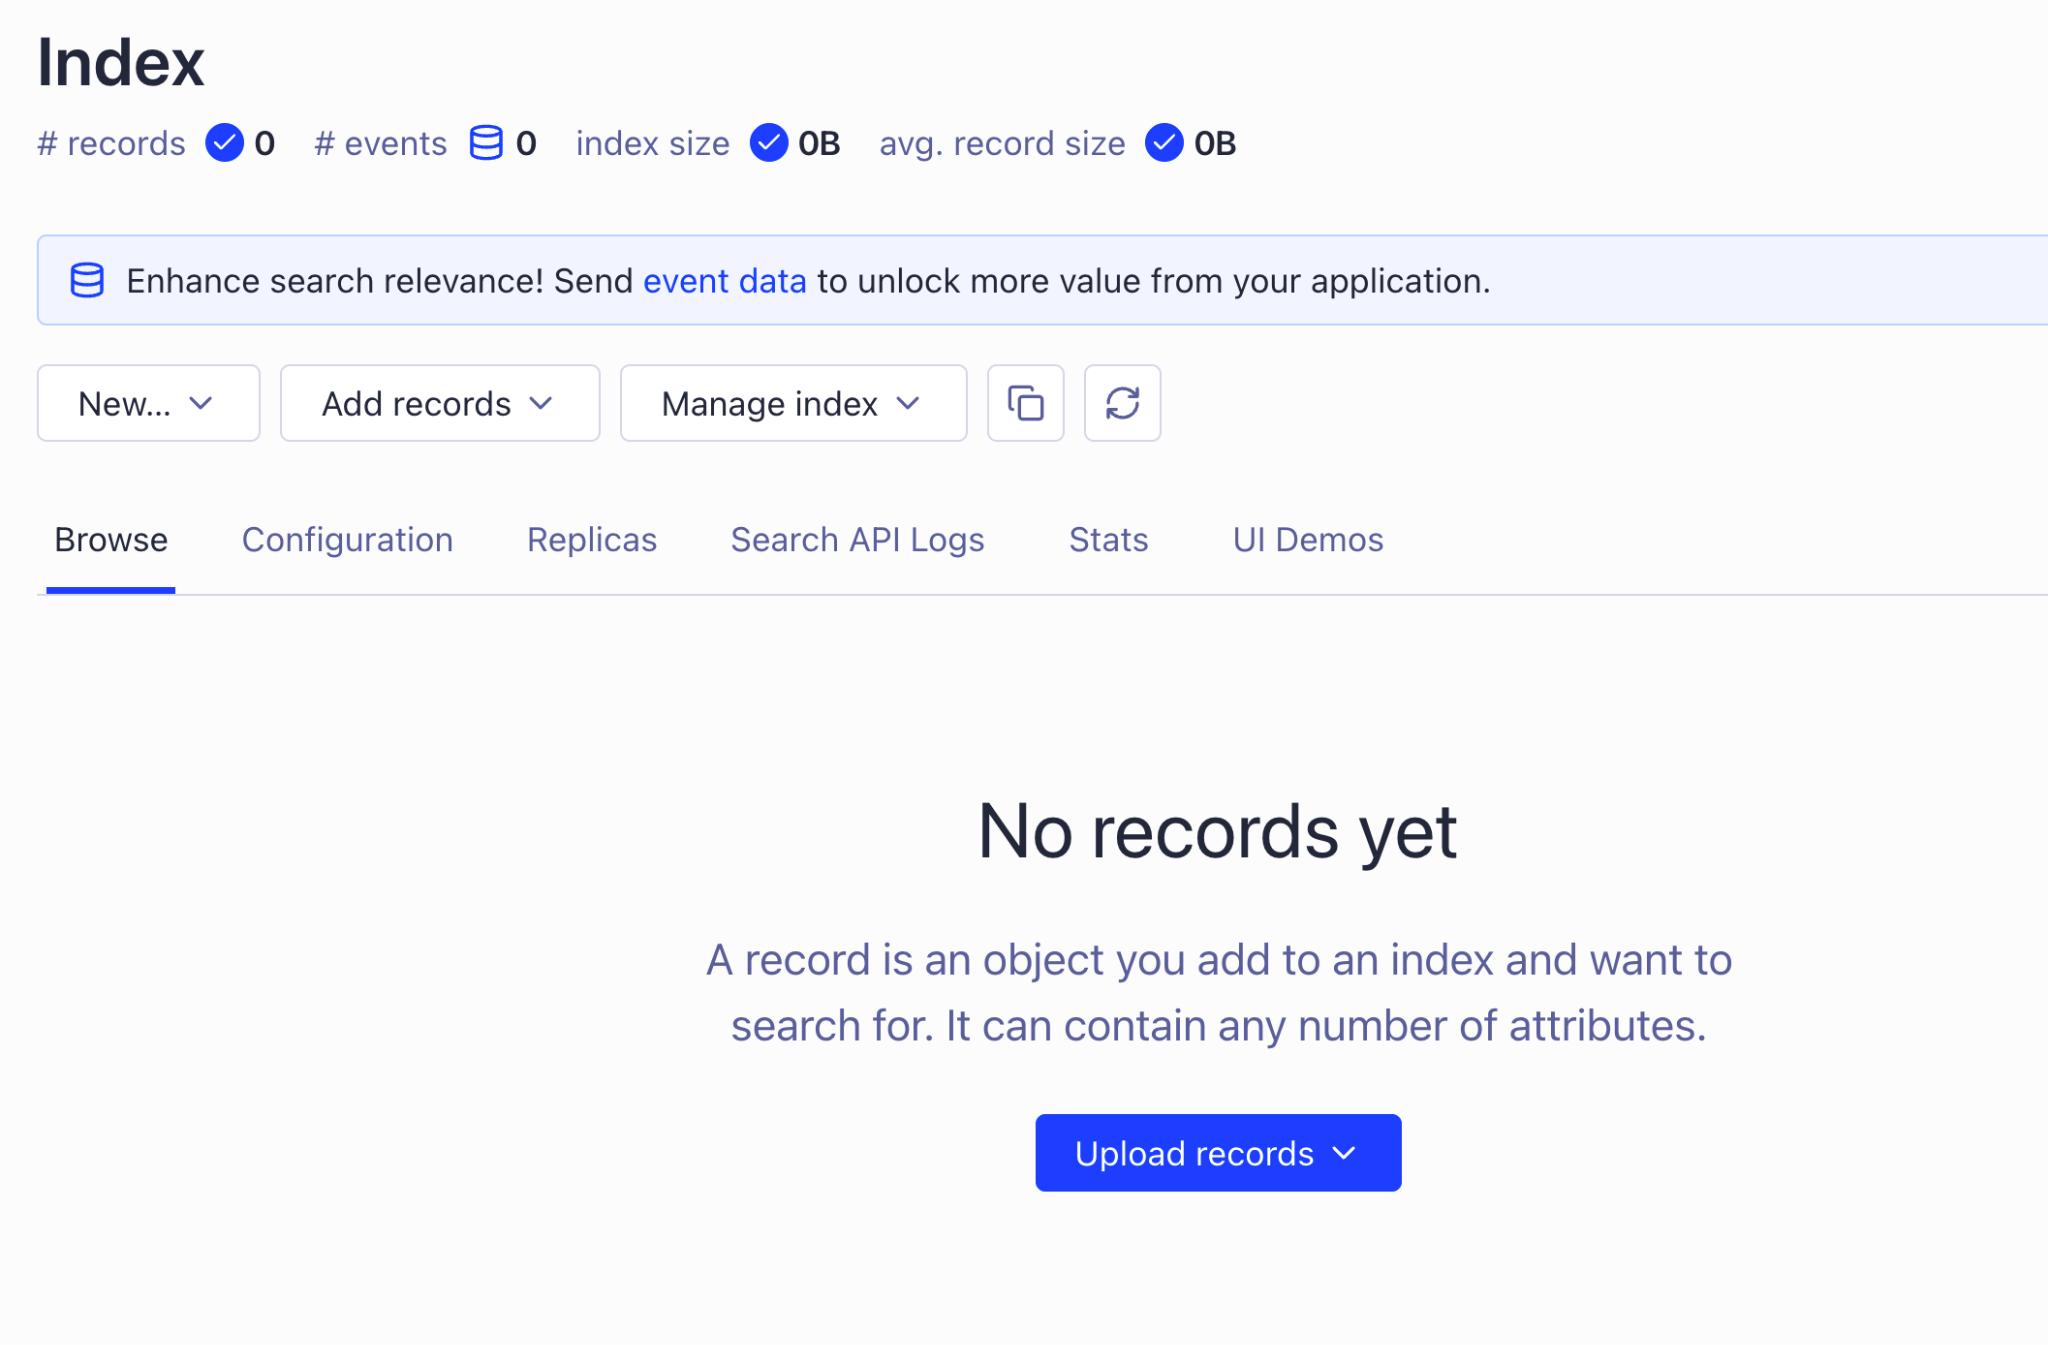
You need to create an index for your site, typically named something relevant to your site to make it easy to find later.

After creating your index, you'll land on a new Index page. You'll be able to browse content here and test search - once you've actually indexed something.
As I mentioned, there is quite a lot of configuration you can do to customize how your content is discovered. The Algolia documentation is quite intensive and I absolutely urge you to check it out.
At this point, you should have:
- A Webflow site with a CMS collection and some content. It doesn't really matter how much, but at least a couple entries.
- An empty Algolia index, waiting for your data.
Get your Algolia credentials
The next few steps will require certain credentials from the Algolia side, namely:
- The Algolia App ID
- The Algolia API key
- The Algolia Search API key
- The Algolia index name
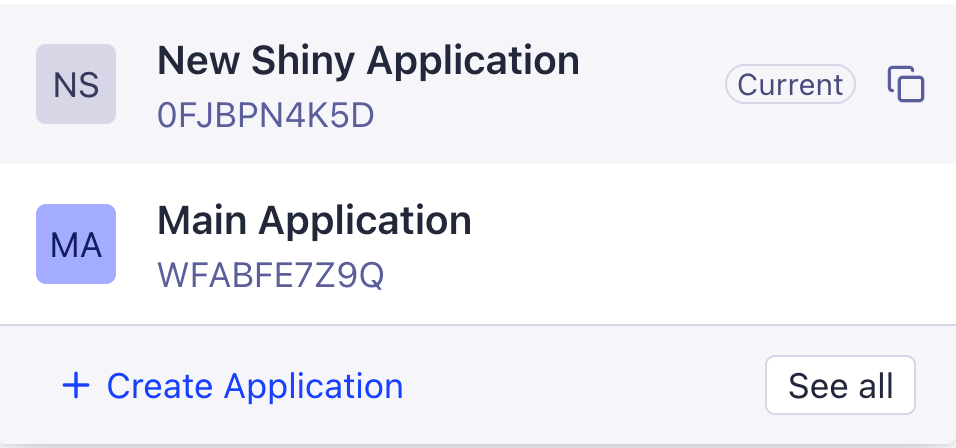
You already have the index name, just be sure to remember it. To get your App ID, in the dashboard, note the "Application" dropdown on top of the screen. Clicking that will show a list of applications, along with their ID:
You can click the little "copy" icon there to copy the value to your clipboard, or just have better memory than I do.
For your API key, go into your settings (gear icon on the bottom left), click "API Keys", and on this page, you'll see a few different keys. The one marked "Search API Key" and documented as "safe in your front end code" will be used later when we build the search interface on our Webflow site. Copy it so you have it handy.
The next one, "Write API Key," is what our code will use to work with the Algolia index. This is not safe for the public, but safe in our backend code. Copy that down as well.
Seeding the index
At this point, we're ready to begin our integration, but there's something that needs to happen first. I have existing content I want to seed into the index. If you’re building a new site and don’t have content yet, feel free to skip to the next section. In the future, if you need to build a new index and re-populate it, this script will do exactly that! Our script is a Node.js file that can run on your machine, there is no need to host it.
In order for our script to work, we'll need the Algolia API key mentioned above, the CMS ID, and a Webflow API key that allows for CMS Read operations. I created a .env file with these settings:
WF_API_KEY=my secret key
WF_COLLECTION_ID=6998dce17a56281f1afc766c

ALGOLIA_APP_ID=0FJBPN4K5D
ALGOLIA_API_KEY=my secret key
ALGOLIA_INDEX_NAME=webflow1
Our script needs to do two basic things:
- First, connect to Webflow and get our CMS items.
- Send this data to Algolia
Let's break the script down, bit by bit.
First, I read from the environment all the information I need and create an instance of the Algolia SDK:
/*
I'm responsible for reading from the Webflow CMS and populating into an Algolia index.

In theory, I should only be run once, but if you clear out the index you can run this again.
*/
import { algoliasearch as algoliaSearch } from 'algoliasearch';

const WF_API_KEY = process.env.WF_API_KEY;
const WF_COLLECTION_ID = process.env.WF_COLLECTION_ID
const ALGOLIA_APP_ID = process.env.ALGOLIA_APP_ID;
const ALGOLIA_API_KEY = process.env.ALGOLIA_API_KEY;
const ALGOLIA_INDEX_NAME = process.env.ALGOLIA_INDEX_NAME;

if(!WF_API_KEY || !WF_COLLECTION_ID|| !ALGOLIA_APP_ID || !ALGOLIA_API_KEY || !ALGOLIA_INDEX_NAME) {
  console.error('Missing environment variables. Please set WF_API_KEY, WF_COLLECTION_ID, ALGOLIA_APP_ID, ALGOLIA_API_KEY, and ALGOLIA_INDEX_NAME.');
  process.exit(1);
}

const algolia = algoliaSearch(ALGOLIA_APP_ID, ALGOLIA_API_KEY);
Next, I need to get all the data from the CMS collection. The List Live Items endpoint will do this. It returns a paginated set of data, so I wrote my function to handle that and keep getting data until everything is retrieved.
async function getCMSItems(cmsid, apikey) {
    let results = [];
    let hasMore = true;
    let offset = 0;
    while (hasMore) {
        const response = await fetch(`https://api.webflow.com/v2/collections/${cmsid}/items/live?limit=100&offset=${offset}`, {
            headers: {
                'Authorization': `Bearer ${apikey}`
            }
        });
        const data = await response.json();
        results = results.concat(data.items);
        hasMore = data.pagination.total > offset + 100;
        offset += 100;
    }
    return results;
}

let items = await getCMSItems(WF_COLLECTION_ID, WF_API_KEY);
console.log(`Fetched ${items.length} items from Webflow CMS.`);
At this point, you should have an array of items from your Webflow CMS. The Algolia SDK and APIs support both atomic operations as well as batch operations. Even nicer, they support an "update" operation that works for both old and new data, making it simpler to build your code.
As you can imagine, Algolia has an extensive set of API operations, and multiple different SDKs. My code is using the Node SDK, and you can check out the documentation here.
My script makes use of the batch operation which essentially lets you take any list of operations and perform them with one call. The rest of the script shows this in action:
let requests = [];
items.forEach(item => {
    requests.push({
        action: 'updateObject',
        body: {
            objectID: item.id,
            name: item.fieldData.name,
            slug: item.fieldData.slug,
            body: item.fieldData.body,
            published: new Date(item.lastPublished).getTime(),
            // could also include lastUpdated
        }
    });
});

let algoliaResponse = await algolia.batch({
    indexName: ALGOLIA_INDEX_NAME,
    batchWriteParams: {
        requests
    }
});

console.log('Done with inserts, check response to be sure.');
While this is a pretty short amount of code, there are some fairly important things to consider:
- What you put in the index directly shapes how people search your site and what results they get. In the code above I went with name, slug, body, and published, but this is worth thinking through carefully for your own site and content. The only real required value is
objectID, which is how Algolia will treat the identifier for your content. This is what makesupdateObjectwork well. I tell it what the unique ID of my content is and it handles recognizing, "Is this a new entry in the index or an update?". - Remember: You are allowed to change and modify data before you send it. I don't do it here, but I could send a portion of the content body instead of the whole thing. I could add new values not present in my CMS at all. I could even take two CMS collections in Webflow and combine them into one index.
- As the code says, I should be checking the result to see if everything is ok, but the Algolia dashboard makes that rather simple. As soon as this runs, I can start seeing my content.

Note that the dashboard also lets you search as well. This is a quick way to do a sanity check that Algolia actually received your content.
Before going on, let's just ensure we understand exactly what we've done so far:
- We have an Algolia index to store our content
- We created a script that reads all of our Webflow CMS collection and adds it.
You can find that complete script here.
Connecting Webflow and Algolia
We've got an Algolia index — now comes the fun part: keeping the index in sync with our Webflow data. Luckily, this can be done via webhooks. Webhooks let you tell Webflow to call an external service when a change is made on your site. There are many different types of events you can tie into, but for our needs, we care about two:
- collection_item_published
- collection_item_unpublished
To act on those events, you'll need a webhook handler, a small piece of backend code that receives the webhook request from Webflow and decides what to do with it. In our case, that means telling Algolia to add, update, or remove content from the index. In order to support this, you'll need to register two webhooks in your site, but you'll need to know the URL where your custom logic will live. This is an excellent time to turn to Webflow Cloud. We can host the webhook handler directly under our site and keep everything together on one platform.
To get started with Webflow Cloud, create a new project, select the app starter template, and make it an app under your site. Once deployed, you'll have the URL you need when registering your webhooks.
I scaffolded a new Astro app and in my pages directory, I created api/contentChange.json.js. I'll use one file and one endpoint for both webhooks with logic inside the code to handle recognizing if content was added or removed.
Here's how I handled it:
export const prerender = false;
import crypto from 'crypto';

import { algoliasearch as algoliaSearch } from 'algoliasearch';


export async function POST({ params, request, locals }) {

    const ALGOLIA_APP_ID = locals.runtime.env.ALGOLIA_APP_ID || process.env.ALGOLIA_APP_ID;
    const ALGOLIA_API_KEY = locals.runtime.env.ALGOLIA_API_KEY || process.env.ALGOLIA_API_KEY;
    const ALGOLIA_INDEX_NAME = locals.runtime.env.ALGOLIA_INDEX_NAME || process.env.ALGOLIA_INDEX_NAME;

    const WEBHOOK_PUBLISH_SECRET = locals.runtime.env.WEBHOOK_PUBLISH_SECRET || process.env.WEBHOOK_PUBLISH_SECRET;
    const WEBHOOK_UNPUBLISH_SECRET = locals.runtime.env.WEBHOOK_UNPUBLISH_SECRET || process.env.WEBHOOK_UNPUBLISH_SECRET;


    const body = await request.json();

    let wh_secret;
    let algoliaAction;

    // validate it's a trigger we handle
    if(body.triggerType !== 'collection_item_published' && body.triggerType !== 'collection_item_unpublished') {
        return new Response(JSON.stringify({ success: false, error: 'Invalid trigger type' }), { status: 400 });
    } else {
        if(body.triggerType === 'collection_item_published') {
            wh_secret = WEBHOOK_PUBLISH_SECRET;
            algoliaAction = 'updateObject';
        } else {
            wh_secret = WEBHOOK_UNPUBLISH_SECRET;
            algoliaAction = 'deleteObject';
        }
    }

    let ts = request.headers.get('x-webflow-timestamp');
    let sig = request.headers.get('x-webflow-signature');
    let isValid = verifyWebflowSignature(wh_secret, ts, JSON.stringify(body), sig);

    if(!isValid) {
        return new Response(JSON.stringify({ success: false, error: 'Invalid signature' }), { status: 400 });
    }

    console.log(`Valid webhook, send to Algolia with action ${algoliaAction}`);
    const algolia = algoliaSearch(ALGOLIA_APP_ID, ALGOLIA_API_KEY);

    let requests = [];
    if(algoliaAction === 'updateObject') {
        // when a CMS publish event is fired, it's an array
        body.payload.items.forEach(item => {
            requests.push({
                action: algoliaAction,
                body: {
                    objectID: item.id,
                    name: item.fieldData.name,
                    slug: item.fieldData.slug,
                    body: item.fieldData.body,
                    published: new Date(item.lastPublished).getTime(),
                    // could also include lastUpdated
                }
            });
        });
    } else {
        // but a CMS unpublish event is just a single item
        requests.push({
            action: algoliaAction,
            body: {
                objectID: body.payload.id
            }
        });
    }

    let algoliaResponse = await algolia.batch({
        indexName: ALGOLIA_INDEX_NAME,
        batchWriteParams: {
            requests
        }
    });
    console.log('Algolia response', algoliaResponse);

    return new Response(JSON.stringify({ success: true }));
}

function verifyWebflowSignature(clientSecret, timestamp, requestBody, providedSignature) {
  try {
    const requestTimestamp = parseInt(timestamp, 10);
    const data = `${requestTimestamp}:${requestBody}`;
    const hash = crypto.createHmac('sha256', clientSecret)
                      .update(data)
                      .digest('hex');
    if (!crypto.timingSafeEqual(Buffer.from(hash, 'hex'), Buffer.from(providedSignature, 'hex'))) {
      throw new Error('Invalid signature');
    }
    const currentTime = Date.now();
    if (currentTime - requestTimestamp > 300000) { // 5 minutes in milliseconds
      throw new Error('Request is older than 5 minutes');
    }
    return true; // The request is valid
  } catch (err) {
    console.error(`Error verifying signature: ${err.message}`);
    return false;
  }
}
Let's break this down. The core functionality falls into the POST method; this is an Astro way of saying, “Run this code when a POST HTTP request is made to this endpoint." I grab all my environment variables. and you'll notice that while the first three were already discussed, we also have secret values related to webhooks. When we are creating the webhooks in the Webflow dashboard, the output is a special key. This key is used to verify that the webhook came from Webflow directly. (This is all handled in verifyWebflowSignature.)
The next step is to look at the body of the webhook request. If it's publishing, we set the Algolia action to updateObject, otherwise it is deleteObject.
After the webhook request is verified, we go back to the Algolia SDK and perform the update. Note that I'm using the batch process again because it is possible for multiple items to be published, or unpublished, at once.
After the Astro app is deployed to your site, you'll then have a proper URL you can use when registering the webhook with the Webflow site. This will be based on your site’s domain and how you deployed your Webflow Cloud app.
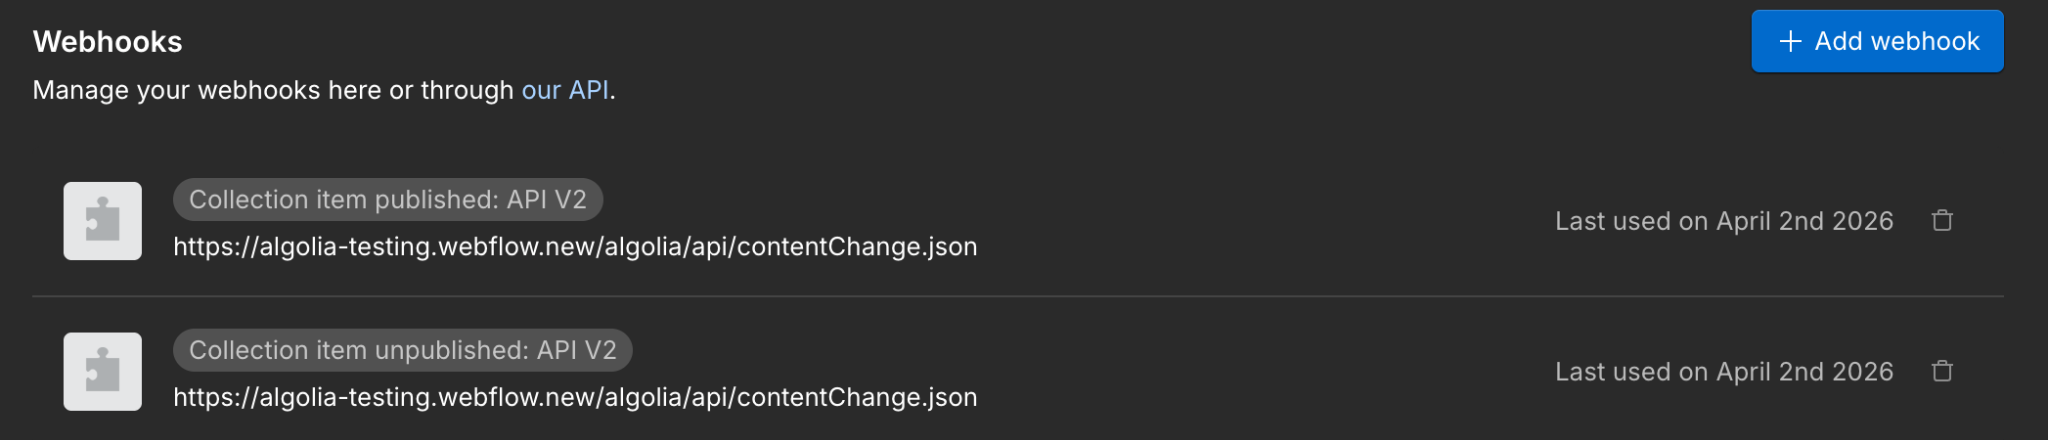
For my testing, the mount path was /algolia. My site publishes to https://algolia-testing.webflow.new. Putting this together, my webhooks need to use this URL: https://algolia-testing.webflow.new/algolia/api/contentChange.json. I created one for both webhooks (these are created in the “Apps & Integrations” section of your site settings), copied down the keys, and ensured they were set as environment variables.
Note: As of the time this post was created, you are unable to register a webhook that points to the default webflow.io domain. Instead, you must use a custom domain. This issue has been recorded and will be corrected in the future.
Adding the Search UI
Alright readers, I know it's been a bit of a long journey here, but we're almost done. The last part we need to add is the actual search engine interface itself. I know I’ve said this already, but, Algolia truly is incredibly flexible, and this extends to the ways you can search your index.
You can perform REST API calls in your client-side JavaScript, use a lightweight JavaScript SDK (as I do on my sites), or use Algolia’s own InstantSearch.js, which you can think of as an "everything included and more" package for quickly adding search and results to a web page.
As it can do quite a lot, I highly recommend checking out the Getting Started guide for a detailed introduction.
For the most part, it's plug and play, but one behavior you'll notice right away is that the default installation of InstantSearch.js will act as a "filter" search — by that I mean it will render all of your content with the search interface used to filter down the results that match against the query. Luckily, the InstantSearch.js client is pretty easy to modify. Here's how I added it to my Webflow page.
First, in my page settings, in the Inside <head> tag section, I loaded the library:
<script
  src="https://cdn.jsdelivr.net/npm/algoliasearch@5.49.0/dist/lite/builds/browser.umd.js"
  integrity="sha256-53H4IWcSVrGHJcAcMarpv0gufrwaSu5c6d98uAAU8sM="
  crossorigin="anonymous"
></script>

<script src="https://cdn.jsdelivr.net/npm/instantsearch.js@4.88.0/dist/instantsearch.production.min.js" integrity="sha256-ol74T+oVfFEfu1s0w1M04ASFpSeu+TdPVabtUdfDOkc=" crossorigin="anonymous"></script>
I'm doing this in the page settings, not the site settings, because my particular demo only has one main page. Depending on how you implement search, you may want to change it up.
Next, I moved down to the Before </body> tag and added my JavaScript. This is a slight modification on what you'll see in the introduction on Algolia's site:
<script>
/*
  Initialize the search client

  If you're logged into the Algolia dashboard, the following values for
  ALGOLIA_APPLICATION_ID and ALGOLIA_SEARCH_API_KEY are auto-selected from
  the currently selected Algolia application.
*/
const { liteClient: algoliasearch } = window["algoliasearch/lite"];
const searchClient = algoliasearch(
  "0FJBPN4K5D",
  "8f741f50b983176875b65e252402b140",
);

// Render the InstantSearch.js wrapper
// Replace INDEX_NAME with the name of your index.
const search = instantsearch({
  indexName: "webflow1",
  searchClient,
});

search.addWidgets([
  instantsearch.widgets.searchBox({
    container: "#searchbox",
  }),

  instantsearch.widgets.hits({
    container: "#hits",
    transformItems(items, { results }) {
      if (results.query === '') return [];
      return items;
    },
    templates: {
      empty(results, { html }) {
        if (results.query === '') return null;
        return html`No results found for "${results.query}"`;
      },
      item(hit, { html, components }) {
				return html`
            <a href="/blog-posts/${hit.slug}">${hit.name}</a>
        `;
			},
    }
  }),
]);

search.start();
</script>
On top, I start off with my app ID and the search key we mentioned way back at the top of this write up. To jog your memory, this is a read-only key meant to be used in client-side applications.
I then create an instance of the search UI library and point it to my index.
The next part does two things: it initializes two widgets and points to them in the DOM. The search widget will look for a div with the id of searchbox. I added this div to my Webflow page and positioned it where I thought it made the most sense.
The hits widget handles rendering results. The first customization in transformItems is how you handle changing the default "show everything and filter" behavior to "only show when actually searching." The item method is how I handle rendering the results so it links to the CMS collection item page Webflow set up for my content.
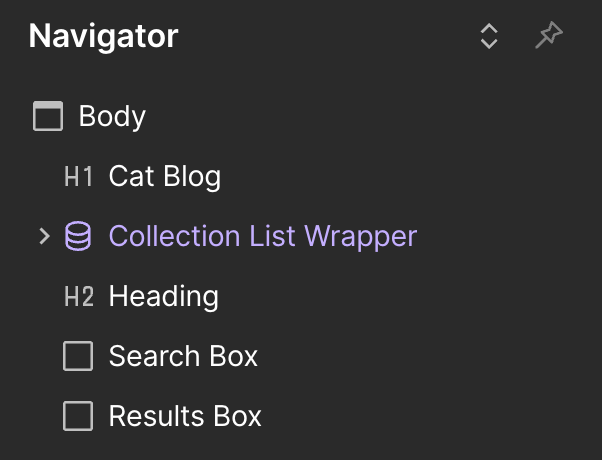
Here's the Navigator outline. I've renamed my two divs so they’re more easily discovered:
And in the end, I hit “publish” and did some quick testing:
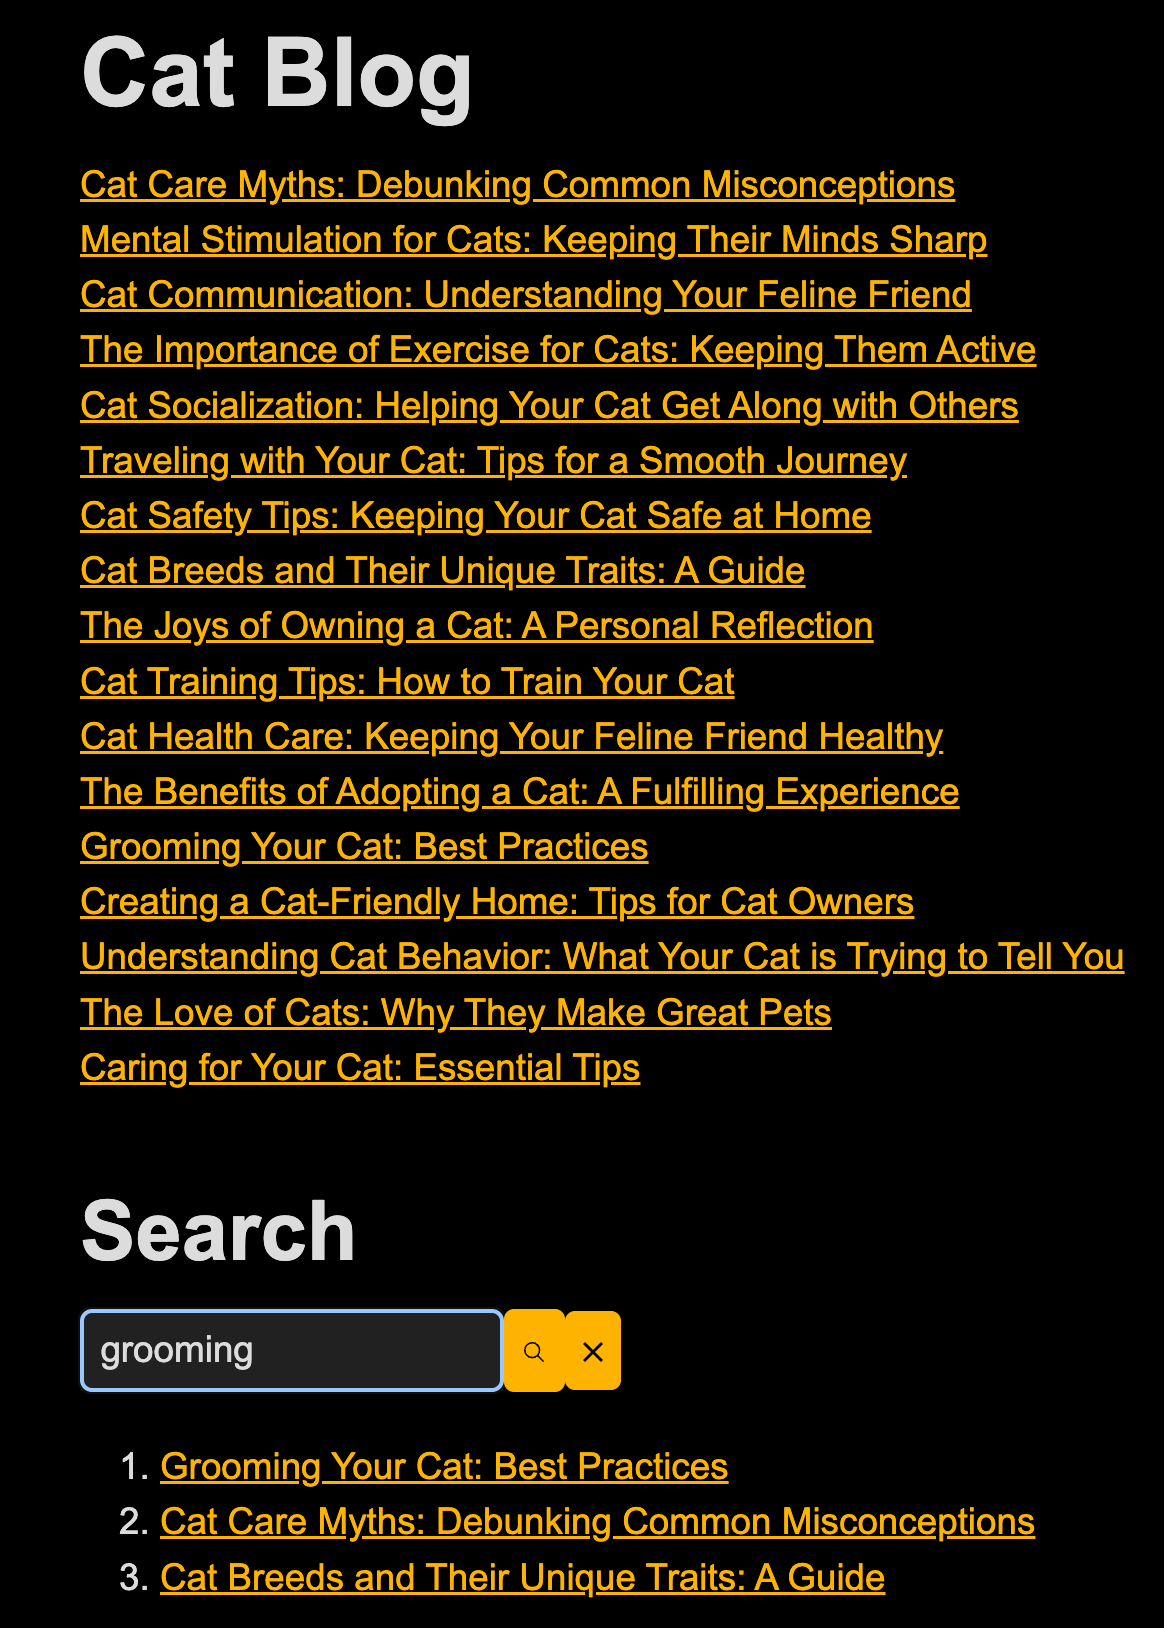
Let me strongly remind folks: I didn't spend a lot of time on the design here. You can, and should, obviously work on properly rendering your results, integrating the search UI into your site, and so forth. If you want to give it a try yourself, you can check out the running demo.
Testing the webhook
Ok, while search works, how do we really know the index is properly updating? The Webflow Cloud dashboard lets me view logs, and that's one way. But to really test it out, I created a new blog post with my name in it:
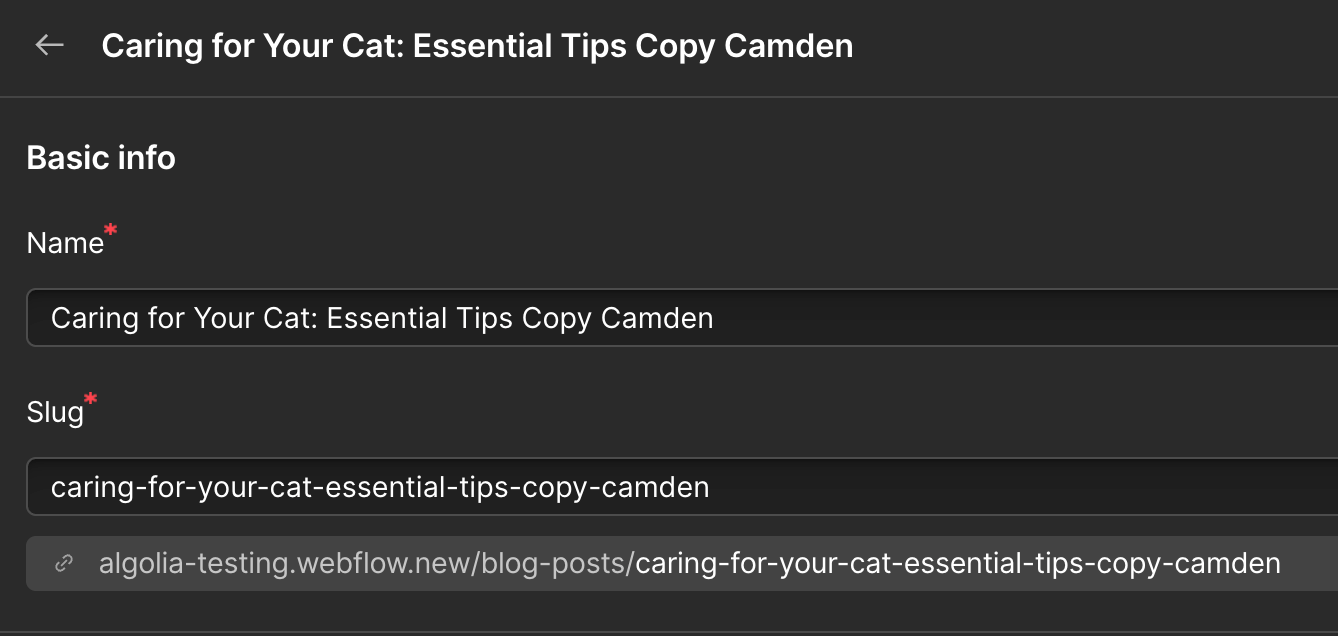
I published it, searched for Camden, and confirmed my content showed up. I then unpublished it, searched again, and confirmed the content was gone. All of this happened incredibly quickly. The webhook is fired as soon as the change is made, and Algolia reflects changes (as far as I can tell) near instantly!
Searching for more?
If you want to look over the entire codebase discussed here, including the "seed" script and Astro app, you can find it on our GitHub repository. Let us know if you build an integration! And be sure to dig deeper into Algolia for more examples of what’s possible.