










Webflow Cloud runs your app on Cloudflare Workers. That changes which auth libraries actually work and which silently fail. Here's the pattern that holds up.
Webflow Cloud runs on Cloudflare Workers, a V8 isolate environment that doesn't expose the full Node.js API surface. That means some auth libraries built around Node.js-specific crypto modules won't work out of the box.
The jose library is explicitly designed for edge runtimes: Cloudflare Workers, Deno, Bun. Auth0's official Next.js SDK uses it internally. The approach here builds directly on that.
In this guide, we build a Webflow Cloud App with three protected zones: a public landing page, a member dashboard, and an admin panel. Visitors who aren't logged in see the landing page. Logged-in users with the member role reach the dashboard. Only users with the admin role reach the admin panel.
What do you need to add Auth0 RBAC to a Webflow Cloud App?
You need an Auth0 tenant, a Webflow Cloud App, and one npm package. Auth0 handles the authentication UI and token issuance. Your Cloud App handles JWT verification and role enforcement.
One package, jose, covers JWT verification, and the platform's built-in fetch covers the Auth0 token exchange. Nothing else is needed beyond your framework dependencies. No session library or adapter abstraction.
Here are the specific prerequisites:
- An Auth0 account: The free tier supports up to 25,000 monthly active users with unlimited social connections, which covers development and most small production apps
- AWebflow Cloud App: Run
webflow cloud init -f nextjsto scaffold the project. Authenticate when prompted, or runwebflow auth loginbeforehand. - The
josepackage for JWT verification:npm install jose - Node.js 22.13.0 or higher locally, the minimum for Webflow CLI 2.0
The complete flow: your Webflow site sends users to the Cloud App's /api/auth/login handler, which redirects to Auth0's Universal Login. After authentication, Auth0 redirects back to /api/auth/callback, where you exchange the authorization code for tokens and store the ID token in a cookie.
Every subsequent request runs through middleware that verifies the token and extracts the user's roles.
Once prerequisites are in place, you can proceed with the setup.
5 steps to set up Auth0 RBAC on your Webflow Cloud App
Auth0 owns the authentication UI and token issuance, and it stores the role assignments. Your Webflow Cloud App handles verification and enforcement. The five steps build each piece in order: Auth0 configuration first, then the app code that consumes it.
1. Configure Auth0 (application, RBAC, roles, and Post-Login Action)
Four things to set up in the Auth0 Dashboard before touching any code.
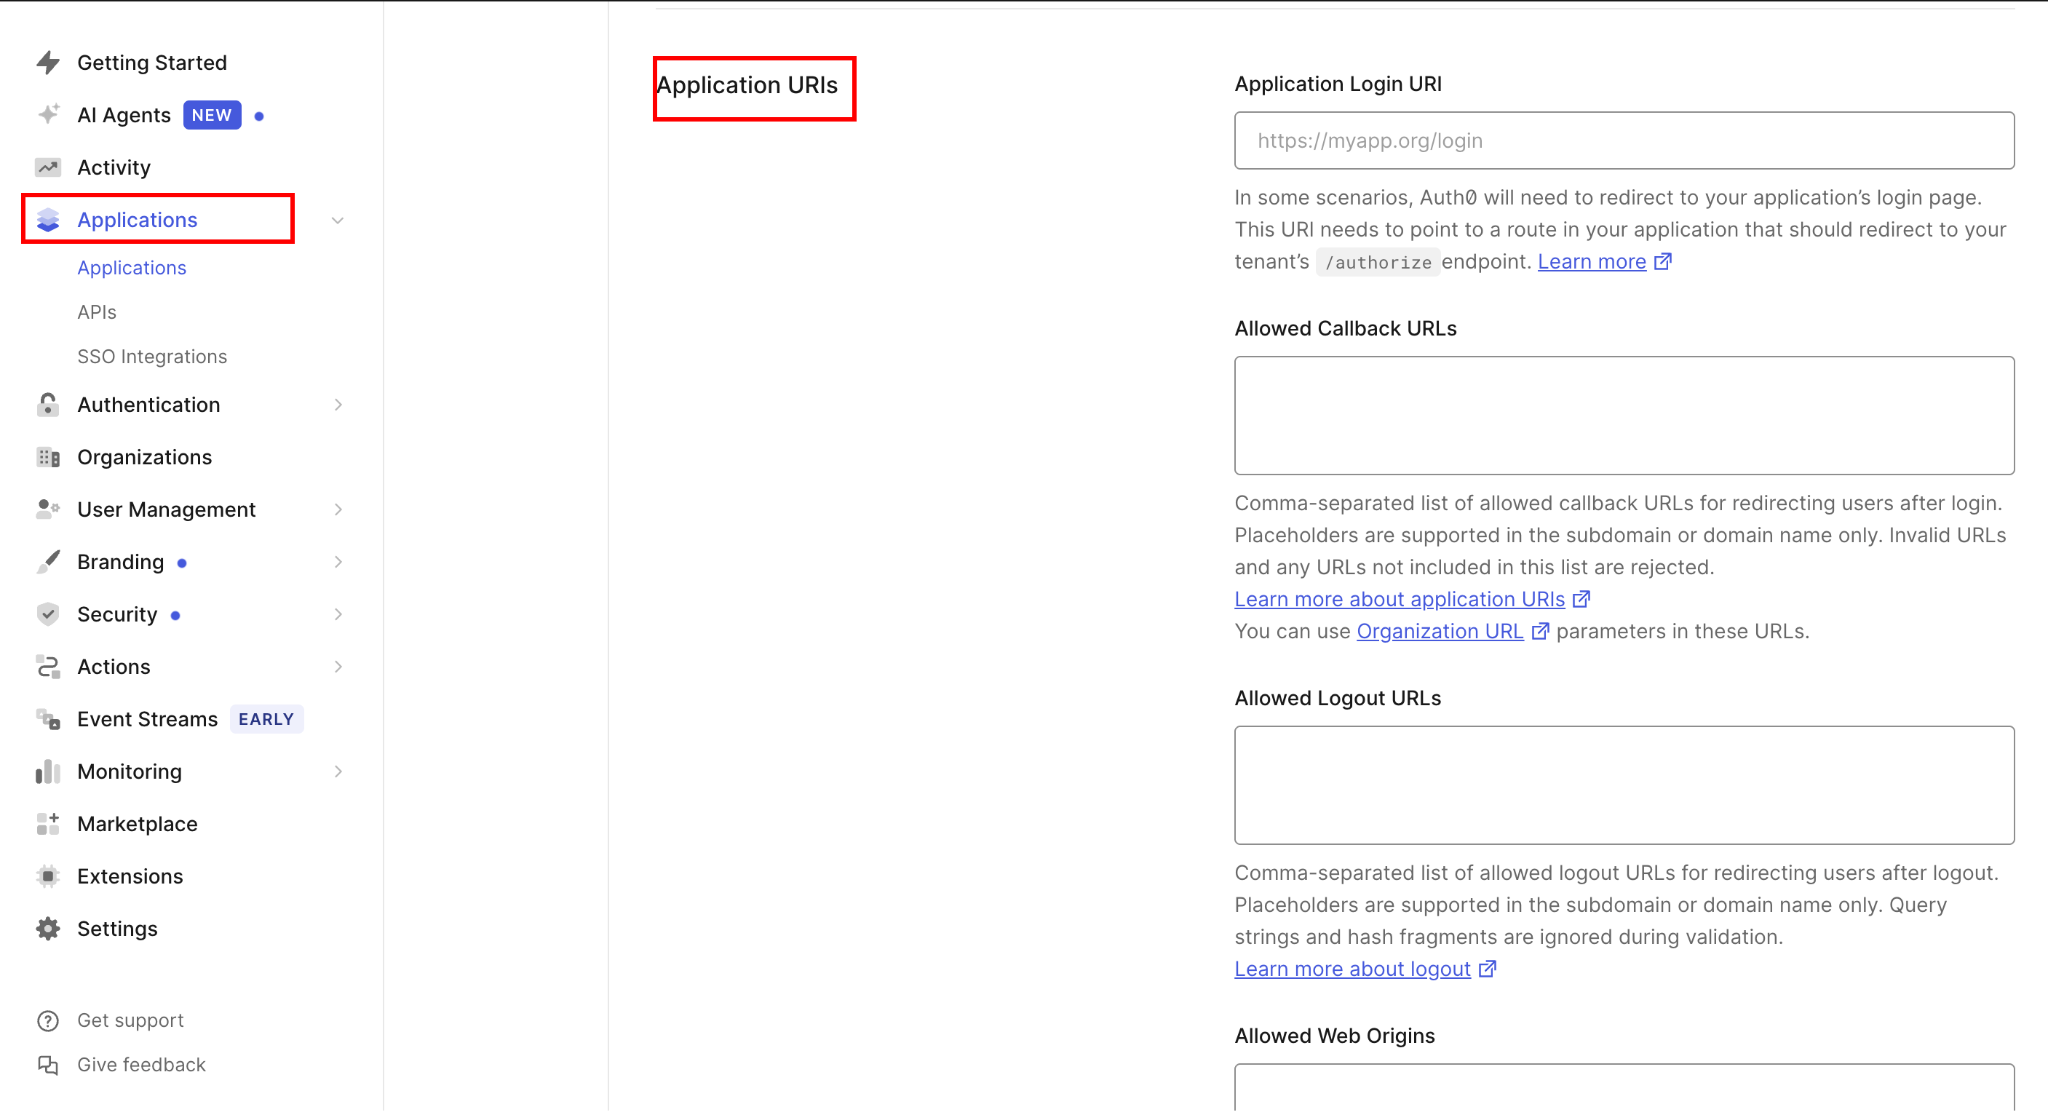
Create the application. In the Auth0 Dashboard, navigate to Applications → Applications → Create Application. Choose Regular Web Applications, not SPA. This is a server-side app. Copy the Domain, Client ID, and Client Secret from the Settings tab. You'll need all three.
Under Application URIs, set:
- Allowed Callback URLs:
http://localhost:3000/app/api/auth/callback, https://your-production-domain.com/app/api/auth/callback - Allowed Logout URLs:
http://localhost:3000, https://your-production-domain.com
Note on the RBAC toggle. Auth0 has a native RBAC toggle (in Dashboard > Applications > APIs > your API > Settings > RBAC Settings) that controls whether permissions from Auth0's roles system appear in the standard scope claim of access tokens. This guide injects roles into a custom claim in the ID token via a Post-Login Action instead; a pattern that works without configuring a separate Auth0 API and does not depend on the RBAC toggle.
Create roles. Navigate to User Management → Roles → Create Role. Create two roles: member and admin. Assign users to roles from the Users tab on each role page, or from the individual user's Roles tab under User Management → Users.
Adding the Post-Login Action
Add the Post-Login Action to inject roles into the JWT. Auth0 doesn't include role data in tokens by default. You must add it via an Action. Navigate to Actions → Library and select Create Action → Build from scratch. Name it Add Roles to Token and choose the Login / Post Login trigger.
Paste this code:
exports.onExecutePostLogin = async (event, api) => {
  const namespace = 'https://webflow-app.io/claims';
  const roles = event.authorization?.roles ?? [];

  // Add roles to the ID token (used by the app to check role)
  api.idToken.setCustomClaim(`${namespace}/roles`, roles);

  // Add roles to the access token (if you're also protecting APIs)
  api.accessToken.setCustomClaim(`${namespace}/roles`, roles);
};
Deploy the Action, then open Actions → Flows → Login, drag it into the flow between Start and Complete, and click Apply.
Why a namespace? Auth0 requires custom claims to use a URI-format namespace to avoid collisions with standard JWT claim names. Use any valid URL you control, or that matches your app domain.
Checkpoint: Log in as a test user assigned the admin role, decode the ID token at jwt.io, and confirm you see https://webflow-app.io/claims/roles: ["admin"] in the payload.
2. Add Auth0 environment variables to Webflow Cloud
Your Cloud App needs five values from Auth0. Add all of them to your .env.local for local development and to the Webflow Cloud environment panel for production.
Here’s how things look:
# .env.local
AUTH0_DOMAIN=your-tenant.auth0.com
AUTH0_CLIENT_ID=your_client_id
AUTH0_CLIENT_SECRET=your_client_secret
AUTH0_CALLBACK_URL=http://localhost:3000/app/api/auth/callback
APP_BASE_URL=http://localhost:3000
In your Webflow site settings, open Webflow Cloud, select your environment, and add each variable under Environment Variables. Note that APP_BASE_URL is the origin only, with no mount path. Webflow Cloud serves your app from a mount path such as /app, that path has to be mirrored in the basePath and assetPrefix fields of next.config.ts, and Next.js does not prepend it to redirect targets you construct yourself. That is why the code below keeps the mount path in its own constant and prepends it to every in-app redirect. Matcher patterns are the exception, since those are matched after the mount path is stripped.
For production, update AUTH0_CALLBACK_URL and APP_BASE_URL to your deployed domain.
AUTH0_CLIENT_SECRET is sensitive. It authenticates your server to Auth0's token endpoint. Never expose it in client-side code or include it in your git history.
Checkpoint: Run next dev locally and confirm process.env.AUTH0_DOMAIN resolves to your tenant domain. If it's undefined, your .env.local file isn't being picked up. Check the filename and working directory.
3. Build the login, callback, and logout Route Handlers
Three Route Handlers handle the entire Auth0 OAuth 2.0 flow.
Create them at:
app/api/auth/login/route.ts: redirects to Auth0 Universal Loginapp/api/auth/callback/route.ts: exchanges the authorization code for tokens and stores the sessionapp/api/auth/logout/route.ts: clears the session cookie
Each handler is minimal by design. The login route redirects. The callback exchanges a code for tokens, and the logout route clears state and ends the session at Auth0.
Login handler
Login handler generates a state token for CSRF protection and redirects to Auth0:
// app/api/auth/login/route.ts
import { NextResponse } from 'next/server'

export async function GET(request: Request) {
  const state = crypto.randomUUID()
  const params = new URLSearchParams({
    response_type: 'code',
    client_id: process.env.AUTH0_CLIENT_ID!,
    redirect_uri: process.env.AUTH0_CALLBACK_URL!,
    scope: 'openid profile email',
    state,
  })

  const authUrl = `https://${process.env.AUTH0_DOMAIN}/authorize?${params}`

  const response = NextResponse.redirect(authUrl)

  // Store state in a short-lived cookie for CSRF validation on callback
  response.cookies.set('auth_state', state, {
    httpOnly: true,
    secure: process.env.NODE_ENV === 'production',
    sameSite: 'lax',
    maxAge: 60 * 10, // 10 minutes
    path: '/',
  })

  return response
}
The state cookie has a 10-minute expiry. If the user takes longer than that to complete the Auth0 login flow, the callback will reject the state mismatch and return a 400. This is intentional. Short-lived state tokens limit CSRF exposure.
Callback handler
Callback handler verifies state, exchanges code for tokens, stores the ID token in a session cookie:
// app/api/auth/callback/route.ts
import { NextResponse } from 'next/server'

export async function GET(request: Request) {
  const url = new URL(request.url)
  const code = url.searchParams.get('code')
  const state = url.searchParams.get('state')

  // Parse the incoming cookies
  const cookieHeader = request.headers.get('cookie') ?? ''
  const cookies = Object.fromEntries(
    cookieHeader.split(';').map((c) => {
      const [k, ...v] = c.trim().split('=')
      return [k, v.join('=')]
    })
  )

  // CSRF check
  if (!code || !state || state !== cookies['auth_state']) {
    return new Response('Invalid state parameter', { status: 400 })
  }

  // Exchange authorization code for tokens
  const tokenRes = await fetch(
    `https://${process.env.AUTH0_DOMAIN}/oauth/token`,
    {
      method: 'POST',
      headers: { 'Content-Type': 'application/json' },
      body: JSON.stringify({
        grant_type: 'authorization_code',
        client_id: process.env.AUTH0_CLIENT_ID,
        client_secret: process.env.AUTH0_CLIENT_SECRET,
        code,
        redirect_uri: process.env.AUTH0_CALLBACK_URL,
      }),
    }
  )

  if (!tokenRes.ok) {
    return new Response('Token exchange failed', { status: 500 })
  }

  const { id_token } = await tokenRes.json()

  // Store the ID token in an httpOnly cookie
  // APP_BASE_URL is the origin only, so the mount path is added here. Without it
  // the redirect lands at the site root instead of inside the app.
  const response = NextResponse.redirect(
    new URL('/app/dashboard', process.env.APP_BASE_URL!)
  )

  response.cookies.set('auth_token', id_token, {
    httpOnly: true,
    secure: process.env.NODE_ENV === 'production',
    sameSite: 'lax',
    maxAge: 60 * 60 * 24, // 24 hours
    path: '/',
  })

  // Clear the state cookie
  response.cookies.set('auth_state', '', { maxAge: 0, path: '/' })

  return response
}
The callback stores the ID token, not the access token, because the ID token is what carries the role claims you set in the Post-Login Action. The access token is for calling external APIs; the ID token is for your app's own session management.
Logout handler
Logout handler clears the session and redirects to Auth0's logout endpoint:
// app/api/auth/logout/route.ts
import { NextResponse } from 'next/server'

export async function GET() {
  const returnTo = encodeURIComponent(process.env.APP_BASE_URL!)
  const logoutUrl = `https://${process.env.AUTH0_DOMAIN}/v2/logout?client_id=${process.env.AUTH0_CLIENT_ID}&returnTo=${returnTo}`

  const response = NextResponse.redirect(logoutUrl)
  response.cookies.set('auth_token', '', { maxAge: 0, path: '/' })

  return response
}
Checkpoint: Start the dev server, visit /api/auth/login, complete the Auth0 login flow, and confirm you land on /dashboard with an auth_token cookie set. Decode the token at jwt.io and confirm the roles claim is present.
4. Enforce roles in middleware
Middleware runs on every request before it reaches a route. This is where you verify the JWT and extract roles, then redirect anyone who fails the check.
Create or update middleware.ts in the project root:
// middleware.ts
import { NextResponse, type NextRequest } from 'next/server'
import { createRemoteJWKSet, jwtVerify } from 'jose'

const JWKS = createRemoteJWKSet(
  new URL(`https://${process.env.AUTH0_DOMAIN}/.well-known/jwks.json`)
)

const ROLES_CLAIM = 'https://webflow-app.io/claims/roles'

// Routes that require authentication (any logged-in user)
const memberRoutes = ['/dashboard']

// Routes that require the admin role
const adminRoutes = ['/admin']

// Webflow Cloud serves the app from a mount path. Next.js does not prepend it to
// redirect targets you build yourself, so every in-app redirect needs it.
const BASE_PATH = '/app'

export async function middleware(request: NextRequest) {
  const { pathname } = request.nextUrl
  const token = request.cookies.get('auth_token')?.value

  const requiresMember = memberRoutes.some((p) => pathname.startsWith(p))
  const requiresAdmin = adminRoutes.some((p) => pathname.startsWith(p))

  if (!requiresMember && !requiresAdmin) {
    return NextResponse.next()
  }

  if (!token) {
    return NextResponse.redirect(
      new URL(`${BASE_PATH}/api/auth/login`, request.url)
    )
  }

  try {
    const { payload } = await jwtVerify(token, JWKS, {
      issuer: `https://${process.env.AUTH0_DOMAIN}/`,
      audience: process.env.AUTH0_CLIENT_ID,
    })

    const roles = (payload[ROLES_CLAIM] as string[]) ?? []

    if (requiresAdmin && !roles.includes('admin')) {
      return NextResponse.redirect(new URL(`${BASE_PATH}/dashboard`, request.url))
    }

    // Do not pass roles to handlers via headers: inbound headers are client-controlled
    const response = NextResponse.next()
    response.headers.set('x-auth-roles', roles.join(','))
    response.headers.set('x-auth-sub', payload.sub ?? '')
    return response
  } catch {
    // Token expired or invalid: clear cookie and redirect to login
    const response = NextResponse.redirect(
      new URL(`${BASE_PATH}/api/auth/login`, request.url)
    )
    response.cookies.set('auth_token', '', { maxAge: 0, path: '/' })
    return response
  }
}

export const config = {
  matcher: ['/dashboard/:path*', '/admin/:path*'],
}
createRemoteJWKSet fetches Auth0's public keys and caches them per isolate. On the first request, it makes a network call to /.well-known/jwks.json. Subsequent requests within the same Worker instance use the cached keys. On key rotation, jose automatically refetches the JWKS when it encounters a key ID it doesn't recognize.
5. Verify roles at the data access layer
Middleware protects pages, but it can be bypassed if someone calls your API Route Handlers directly. Always re-verify roles inside any Route Handler that handles sensitive data or privileged operations. Middleware headers are not a trust boundary.
The requireRole helper below reads the auth cookie directly from the request, verifies the JWT against Auth0's JWKS, and returns the decoded payload or null.
Call it as the first line of any Route Handler that touches sensitive data:
// app/api/admin/users/route.ts
import { createRemoteJWKSet, jwtVerify } from 'jose'

const JWKS = createRemoteJWKSet(
  new URL(`https://${process.env.AUTH0_DOMAIN}/.well-known/jwks.json`)
)

const ROLES_CLAIM = 'https://webflow-app.io/claims/roles'

async function requireRole(request: Request, role: string) {
  const cookieHeader = request.headers.get('cookie') ?? ''
  const match = cookieHeader.match(/auth_token=([^;]+)/)
  const token = match?.[1]

  if (!token) return null

  try {
    const { payload } = await jwtVerify(token, JWKS, {
      issuer: `https://${process.env.AUTH0_DOMAIN}/`,
      audience: process.env.AUTH0_CLIENT_ID,
    })
    const roles = (payload[ROLES_CLAIM] as string[]) ?? []
    return roles.includes(role) ? payload : null
  } catch {
    return null
  }
}

export async function GET(request: Request) {
  const user = await requireRole(request, 'admin')

  if (!user) {
    return Response.json({ error: 'Forbidden' }, { status: 403 })
  }

  // Fetch and return admin data
  const users = await fetchAllUsers()
  return Response.json(users)
}
The requireRole helper verifies the JWT independently of middleware and returns the decoded payload or null. Calling it as the first line of any sensitive handler means even a direct API call is fully verified.
Why verify twice? Middleware runs before routing, but a misconfigured matcher, an edge cache, or a direct request to your origin can bypass it. Verifying at the data layer means that a bypassed middleware produces a 403, not leaked data. This is the same principle behind CVE-2025-29927.
Checkpoint: Call GET /api/admin/users with no auth cookie and confirm a 403 response. Log in as a user without the admin role and confirm the same 403. Log in as an admin user and confirm a 200 with the user list.
What causes Auth0 RBAC to fail on Webflow Cloud?
Most failures fall into one of four categories: missing role claims in the token, CSRF state mismatches on callback, JWKS fetch failures, and session cookie issues.
Let’s look into each.
Roles claim missing from the decoded JWT
Navigate to Actions → Flows → Login in the Auth0 Dashboard and confirm the Post-Login Action is deployed and connected between Start and Complete. A disconnected Action runs no code.
Also, confirm the user has roles actually assigned in Auth0. Navigate to User Management → Users, select the user, open the Roles tab, and verify the expected role appears there. event.authorization?.roles in the Action reflects User Management role assignments, and it is not affected by the RBAC API toggle.
If both settings are correct, check the namespace in the Action. The claim in the token must exactly match the ROLES_CLAIM constant in your middleware and Route Handlers. A single character difference means the claim is present, but the role check always returns false.
Callback fails with "Invalid state parameter"
The state CSRF check compares the state query parameter from Auth0 with the auth_state cookie set at login. This fails when the callback takes longer than 10 minutes (the cookie's maxAge) or when the login and callback requests land on different Workers instances with different cookie jars in test environments.
In local development, make sure you're hitting the same origin for login and callback. In production on Webflow Cloud, this is automatic. All requests for a given session route through the same cookie domain.
JWKS fetch fails or returns stale keys
createRemoteJWKSet calls https://{auth0-domain}/.well-known/jwks.json on the first request within each Worker isolate. If this fetch times out, all JWT verifications in that isolate fail until the next attempt.
Check that AUTH0_DOMAIN is set correctly in the Webflow Cloud environment panel (no https:// prefix, just the bare domain like your-tenant.auth0.com). An incorrect domain causes the JWKS fetch to fail with a DNS error, which surfaces as a 500 in your logs rather than a clear auth error.
auth_token cookie not being set after login
The callback handler stores the ID token in a cookie marked httpOnly and secure. In local development with http://localhost, secure: true prevents the cookie from being set. The callback handler sets secure: process.env.NODE_ENV === 'production' to handle this. Confirm your local environment has NODE_ENV set to development (Next.js does this by default).
If the cookie is present but verification fails, the token has most likely expired. Auth0's default ID token lifetime is 36000 seconds, 10 hours, while the cookie above lives for 24 hours, so the cookie can outlast the token it carries. Log the JWT error in the catch block during debugging: console.log('JWT verify error:', err.message).
What to build after Auth0 RBAC is running on your Webflow Cloud App
With role enforcement in place, the natural next step is Auth0 Organizations for multi-tenant apps. Auth0 Organizations let you group users by customer account, with each organization carrying its own roles and connections, plus its own branding. The RBAC pattern from this guide extends to organizations: event.organization?.name is available in Post-Login Actions alongside the roles array.
Explore Webflow + Auth0 for the full integration overview, including how Auth0 connects to Webflow sites and what use cases the combination covers.
Frequently asked questions
Why not use @auth0/nextjs-auth0?
The SDK has a history of Workers deployment failures, including issue #1081, now closed. The v4 SDK now ships jose as a direct dependency and has improved edge runtime support, but compatibility with Webflow Cloud's specific Workers environment is not guaranteed. The manual jose approach in this guide removes that dependency entirely.
Can I use Auth0 permissions instead of roles for finer-grained control?
Yes. Auth0 RBAC supports both roles (broad groupings) and permissions (specific actions, such as read:invoices). With Add Permissions in the Access Token enabled in your API's RBAC Settings (Dashboard > Applications > APIs > your API > Settings), permissions are automatically added to the access token. Permissions are not exposed on the Action event object, so there is nothing to change in the Post-Login Action. Read them from the permissions claim that Auth0 adds to the verified access token, and point ROLES_CLAIM at a permission check instead of a role check. The verification and enforcement pattern in the middleware and Route Handlers stays the same.
How do I handle token expiry gracefully?
The jwtVerify call throws when the token has expired. The catch block in the middleware clears the cookie and redirects to the login page, which is the correct behavior for expired sessions. For a smoother UX, set the ID token's maxAge cookie to match Auth0's token expiry (configurable in Applications → Settings → ID Token Expiration), so the cookie and the token expire at the same time rather than the cookie outliving the token.
Does this pattern work for API-only apps (no page routes)?
Yes. Skip the middleware entirely and use only the requireRole helper from Step 5. Every Route Handler calls requireRole(request, 'desired-role') directly. For API-only apps where clients send the Auth0 access token rather than a cookie, read from the Authorization: Bearer {token} header instead of the cookie.



















