


Webflow Cloud lets you run a server-rendered Next.js app directly alongside your Webflow site. Pair it with Supabase Realtime, and you get a live data dashboard that updates without a page reload.
With Webflow Cloud Apps, you can deploy a Next.js app alongside your Webflow site, and you get a server-rendered page that opens a WebSocket connection to Supabase Realtime. New rows in your database appear on the dashboard the moment they're inserted. No page refresh, polling, or rebuild cycle.
This guide covers how to build a live metrics dashboard on Webflow Cloud that subscribes to changes in Supabase Postgres. The pattern splits into two layers: a Server Component fetches the initial data snapshot, and a Client Component keeps the view up to date in real-time.
What do you need to build a real-time dashboard in Webflow?
You need three things:
- A Webflow Cloud App
- A Supabase project with Realtime enabled
- Two npm packages
All six are required before you write any component code. The Supabase free tier supports Realtime out of the box, but you need to explicitly opt your table into the supabase_realtime publication (covered in Step 3).
Once these are in place, you can proceed with the full build.
6 steps to build a real-time Supabase dashboard on Webflow Cloud
The build splits into two distinct phases. Steps 1 through 3 configure the infrastructure: the Webflow Cloud App scaffold, the Supabase connection, and the Realtime publication. Steps 4 and 5 build the two React components that make the dashboard work. Step 6 deploys.
The reason for the two separate components (Server and Client) matters here.
Supabase Realtime subscriptions are WebSocket connections maintained by the browser. A Server Component running on Cloudflare Workers cannot hold an open WebSocket connection. The Server Component handles the initial data fetch via REST, passes that snapshot as props, and the Client Component takes over to stream updates.
With the table in the publication and RLS in place, the database is ready. The next two steps build the components that read from it.
1. Scaffold the Webflow Cloud App
This command handles everything in one pass: it installs a Next.js starter, sets the mount path, and links the project to your Webflow account. You'll only need to run it once.
Install the Webflow CLI globally, then run webflow cloud init to scaffold the project:
npm install -g @webflow/webflow-cli
webflow cloud init
The CLI prompts you to choose a framework (select Next.js), set an app mount path (for example, /dashboard), and authenticate with your Webflow account. Authentication happens in-line during init. No separate auth command is required at this stage.
After authentication, select the Webflow site you want to attach the app to.
The CLI generates a project scaffold with the following files already configured:
your-app/
├── next.config.js          # basePath + assetPrefix set to your mount path
├── open-next.config.ts     # OpenNext adapter for Cloudflare Workers
├── cloudflare-env.d.ts     # TypeScript declarations for Cloudflare environment variables
├── wrangler.json           # Cloudflare Workers config (auto-generated, do not edit)
└── webflow.json            # Webflow project metadata
Do not edit wrangler.json directly. Webflow Cloud regenerates it on every deployment based on your webflow.json settings.
Expected outcome: A fully scaffolded Next.js project folder linked to your Webflow site, with next.config.js containing your mount path as both basePath and assetPrefix.
2. Install Supabase and configure your environment variables
With the project scaffolded, the next step is connecting it to Supabase. You'll need your project URL and anon key from the Supabase dashboard. Both are available under Project Settings → API.
Inside the project directory, install the Supabase JavaScript client:
npm install @supabase/supabase-jsThen open your Supabase project dashboard. Copy your project URL and anon key.
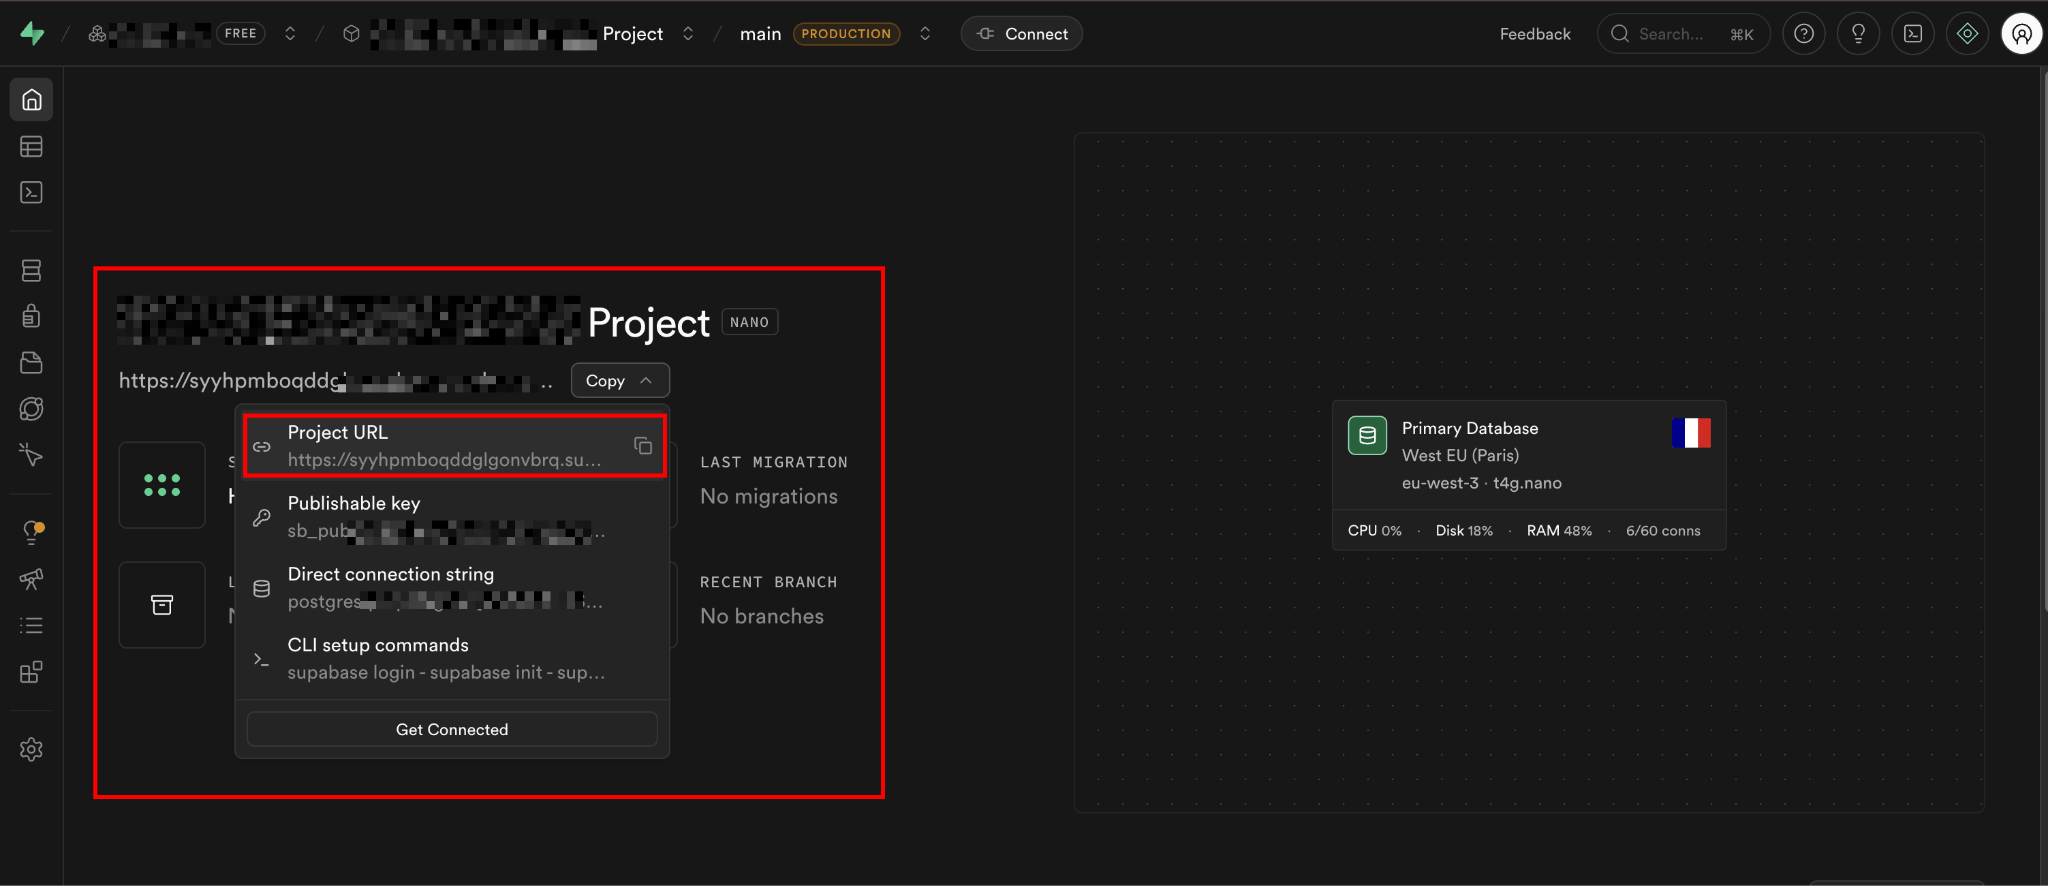
Add both to a .env.local file at the root of your project:
NEXT_PUBLIC_SUPABASE_URL=https://your-project-ref.supabase.co
NEXT_PUBLIC_SUPABASE_ANON_KEY=your-anon-key-here
The NEXT_PUBLIC_ prefix makes these values available in both Server Components and Client Components. The Supabase anon key is safe to expose in the browser. Supabase's security model relies on Row Level Security (RLS), not key secrecy for the anon key. Never use the service role key in client-side code.
Create a shared Supabase client file that both components will import:
// lib/supabase.ts
import { createClient } from "@supabase/supabase-js";

export const supabase = createClient(
  process.env.NEXT_PUBLIC_SUPABASE_URL!,
  process.env.NEXT_PUBLIC_SUPABASE_ANON_KEY!
);
This single client instance works for both the initial server-side fetch and the browser-side Realtime subscription. You'll also need to add these environment variables to your Webflow Cloud environment before deploying (as covered in Step 6).
Expected outcome: @supabase/supabase-js installed, .env.local populated with your Supabase credentials, and a shared client file at lib/supabase.ts.
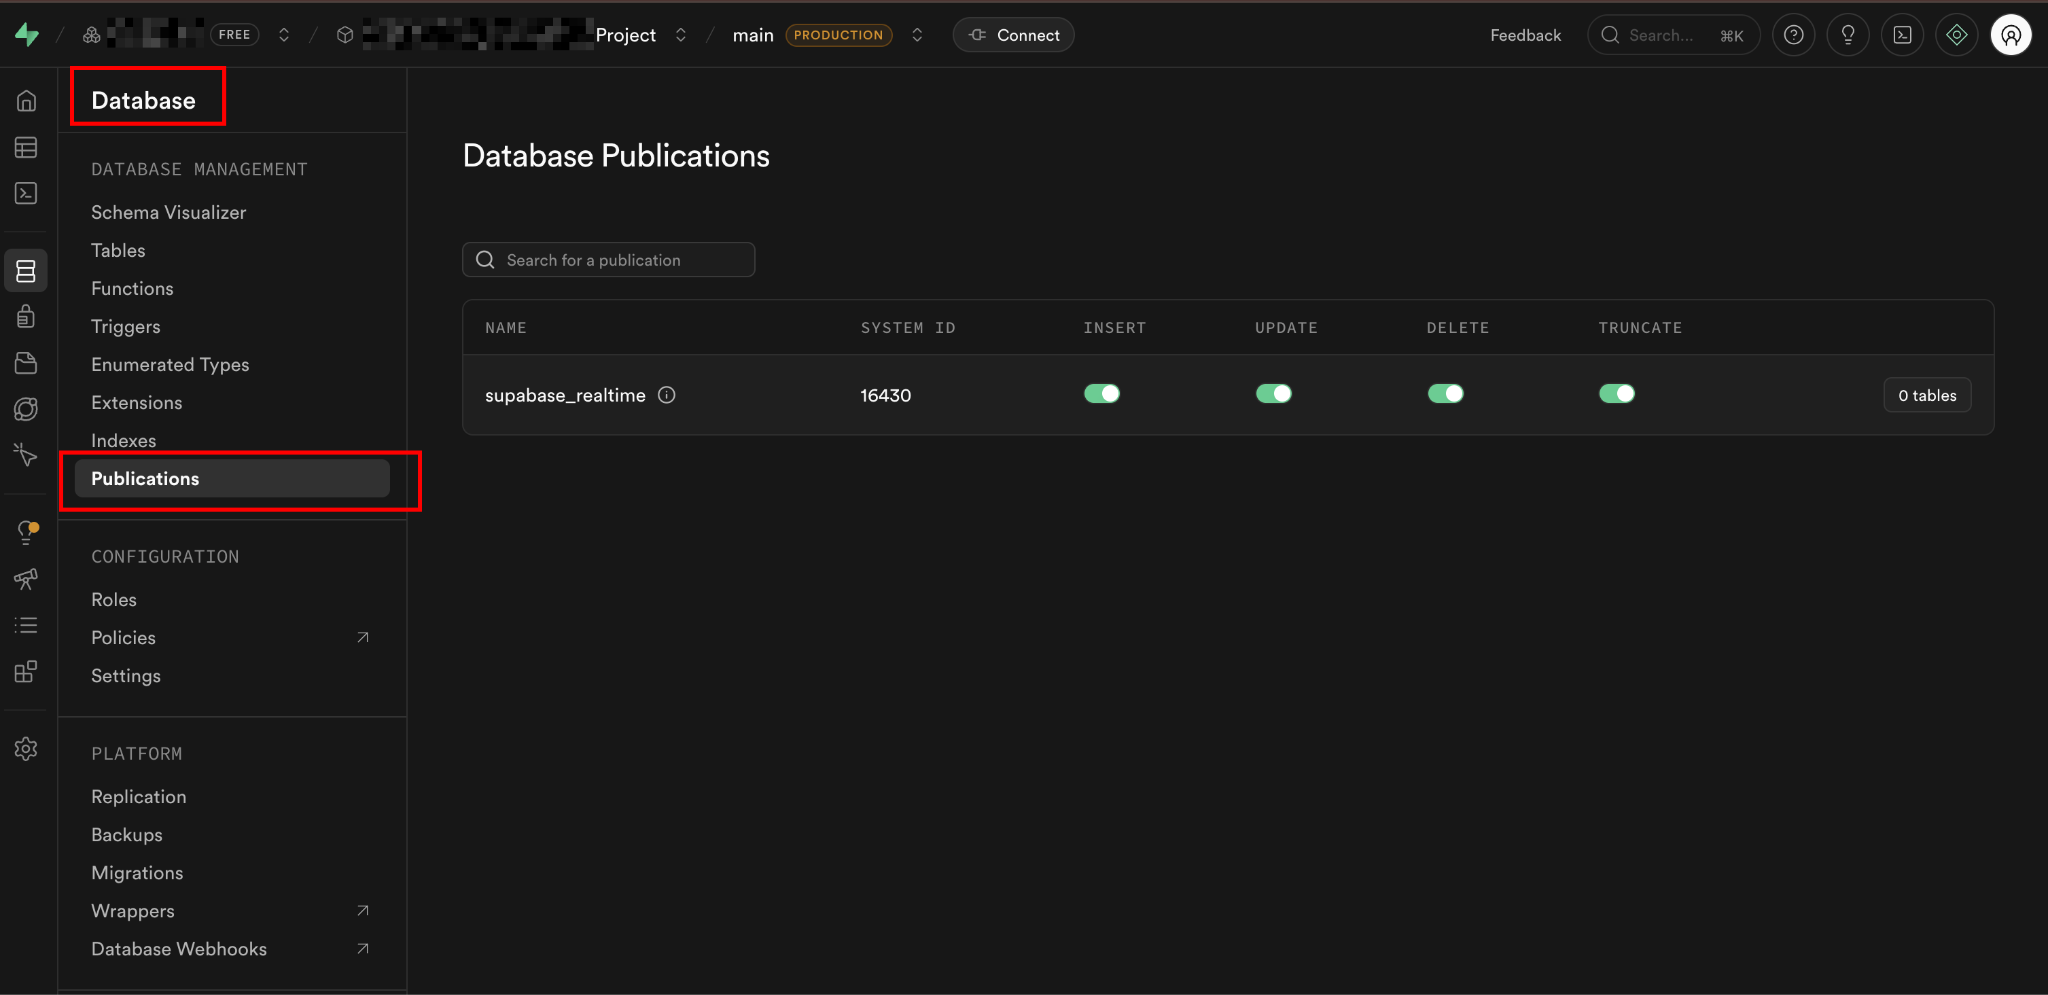
3. Enable Postgres Realtime on your Supabase table
Supabase Realtime does not monitor all tables by default. You need to add your table to the supabase_realtime publication explicitly.
To do that, in your Supabase dashboard, navigate to Database → Publications. Under supabase_realtime, toggle on the table you want to subscribe to.
Alternatively, you can run this SQL in the Supabase SQL Editor:
-- Enable replication for the orders table
alter publication supabase_realtime add table orders;

-- Enable Row Level Security
alter table orders enable row level security;

-- Allow anonymous read access (adjust for your auth requirements)
create policy "Allow anonymous read"
  on orders
  for select
  to anon
  using (true);
For this guide, the example table is orders with the following structure:
create table orders (
  id        serial primary key,
  customer  text not null,
  amount    numeric(10, 2) not null,
  status    text not null default 'pending',
  created_at timestamptz not null default now()
);
Once the SQL runs, the orders table is part of the supabase_realtime publication and protected by an RLS policy. Any client with a valid anon key can now subscribe to INSERT events on this table.
Capturing old row values with replica identity
One important setting: by default, UPDATE and DELETE events only return the new (or empty) record in the Realtime payload.
If your dashboard needs to know what changed, set replica identity to full:
alter table orders replica identity full;Without this, UPDATE payloads include the new row but not the previous values. For an append-only dashboard showing new records, this setting is optional.
Expected outcome: Your orders table is added to the supabase_realtime publication and has an RLS policy allowing read access.
4. Build the Server Component to fetch the initial data
The Server Component runs on Cloudflare Workers at request time and fetches the latest records from Supabase via REST. It passes that data as props to the Client Component, which renders the dashboard.
Create app/dashboard/page.tsx as an async Server Component. It fetches the 50 most recent orders at request time and passes them to the Client Component as initial state:
// app/dashboard/page.tsx
import { supabase } from "@/lib/supabase";
import { DashboardClient } from "./dashboard-client";

export type Order = {
  id: number;
  customer: string;
  amount: number;
  status: string;
  created_at: string;
};

export default async function DashboardPage() {
  const { data: initialOrders, error } = await supabase
    .from("orders")
    .select("id, customer, amount, status, created_at")
    .order("created_at", { ascending: false })
    .limit(50);

  if (error) {
    console.error("Failed to fetch initial orders:", error.message);
  }

  return <DashboardClient initialOrders={initialOrders ?? []} />;
}
The initialOrders array seeds the Client Component's state. When the page loads, the user immediately sees the last 50 orders, with the Realtime subscription opening in the background as the browser hydrates.
This pattern avoids the flash of the empty state you get with client-only data fetching. The HTML that arrives from the server already contains the initial records.
Expected outcome: DashboardPage renders server-side with the 50 most recent orders pre-populated as props to DashboardClient.
5. Build the Client Component for live updates
The Client Component holds the orders in React state, opens a Supabase Realtime channel on mount, and appends new rows to the top of the list as they arrive.
Create app/dashboard/dashboard-client.tsx with "use client" at the top. This component holds the orders list in React state, opens the Supabase channel on mount, and prepends incoming inserts:
// app/dashboard/dashboard-client.tsx
"use client";

import { useEffect, useState } from "react";
import { supabase } from "@/lib/supabase";
import { Order } from "./page";

export function DashboardClient({
  initialOrders,
}: {
  initialOrders: Order[];
}) {
  const [orders, setOrders] = useState<Order[]>(initialOrders);

  useEffect(() => {
    const channel = supabase
      .channel("orders-live") // any string except 'realtime'
      .on(
        "postgres_changes",
        {
          event: "INSERT",
          schema: "public",
          table: "orders",
        },
        (payload) => {
          setOrders((prev) => [payload.new as Order, ...prev]);
        }
      )
      .subscribe();

    // Clean up the channel when the component unmounts
    return () => {
      supabase.removeChannel(channel);
    };
  }, []);

  return (
    <div className="dashboard">
      <h1>Live Orders</h1>
      <p>{orders.length} orders loaded — new orders appear automatically.</p>
      <table>
        <thead>
          <tr>
            <th>Customer</th>
            <th>Amount</th>
            <th>Status</th>
            <th>Time</th>
          </tr>
        </thead>
        <tbody>
          {orders.map((order) => (
            <tr key={order.id}>
              <td>{order.customer}</td>
              <td>${order.amount.toFixed(2)}</td>
              <td>{order.status}</td>
              <td>{new Date(order.created_at).toLocaleTimeString()}</td>
            </tr>
          ))}
        </tbody>
      </table>
    </div>
  );
}
A few things worth noting in this implementation. The "use client" directive at the top tells Next.js this component runs in the browser — required for useState, useEffect, and WebSocket connections.
The channel name "orders-live" can be any string, but "realtime" is reserved by Supabase and will cause the subscription to fail. The cleanup function in the useEffect return calls supabase.removeChannel(channel). Skipping this causes channel leaks if the component remounts.
The subscription only listens to INSERT events here. To also handle updates to existing orders, add a second .on() listener with event: "UPDATE" and merge the payload into state by matching id.
Expected outcome: The browser opens a WebSocket connection to Supabase on page load. When a new row is inserted into the orders table, it appears at the top of the dashboard table without a page refresh.
6. Add environment variables and deploy to Webflow Cloud
Before deploying, add your Supabase credentials to the Webflow Cloud environment.
In your Webflow site settings, navigate to Webflow Cloud, open your project environment, and add the following variables under Environment Variables:
NEXT_PUBLIC_SUPABASE_URL      = https://your-project-ref.supabase.co
NEXT_PUBLIC_SUPABASE_ANON_KEY = your-anon-key-here
Then authenticate and deploy from the CLI:
webflow auth login
webflow cloud deploy
webflow auth login opens a browser window to authenticate your Webflow account. After granting access, run webflow cloud deploy to push your project. Alternatively, push to your connected GitHub branch, and Webflow Cloud will automatically trigger a deployment.
Deployments typically complete within two minutes. Monitor build status and logs in the Webflow Cloud dashboard under your environment's Deployment History.
Expected outcome: Your dashboard is live at your-site.webflow.io/dashboard. New orders inserted into Supabase appear in the browser in real-time without a page refresh.
What causes real-time Supabase updates to stop working in Webflow Cloud?
Most real-time failures trace to one of four root causes: the table was never added to the Realtime publication, the channel name conflicts with a reserved string, the subscription was created in a Server Component, or the cleanup function is missing, and channels are leaking.
Each cause has a distinct symptom, which makes them straightforward to isolate. The sections below address them in order of how frequently they appear in practice.
Updates never arrive in the browser
Cause: The table is not in the supabase_realtime publication. This is the most common first-deploy mistake.
Fix: Run select * from pg_publication_tables where pubname = 'supabase_realtime'; in the Supabase SQL editor and confirm your table appears. If it does not, run alter publication supabase_realtime add table your_table;.
Subscription opens, but no events fire
Cause: The channel name is set to "realtime". Supabase reserves this string. Channels using it will not receive events.
Fix: Rename the channel to anything else: "orders-live", "dashboard-feed", or any descriptive string.
Console error: "supabase is not defined" in a Server Component
Cause: A real-time subscription was written in a Server Component or a file without "use client" at the top. WebSocket connections cannot be held open on the server.
Fix: Move the .channel() call and the useEffect hook into a file with "use client" as the first line. The Server Component should fetch data only; the Client Component should subscribe.
Subscription fires on the first load, then stops after navigation
Cause: The useEffect cleanup function is missing. When the component unmounts (on navigation), the old channel is not removed. When the component remounts, a duplicate channel is created, and one or both stop receiving events.
Fix: Always return () => { supabase.removeChannel(channel); } from the useEffect. Verify in the Supabase Realtime dashboard (Realtime → Inspector) that only one channel subscription appears for your table.
DELETE events fire but include no data
Cause: replica identity is set to the default (default), which does not capture the old row values for deletes. Additionally, Supabase Realtime does not support column-level filters on DELETE events. You cannot filter event: "DELETE" by a specific column value.
Fix: Run alter table your_table replica identity full;to receive the old record on DELETE events. Note that with RLS enabled (as configured in this guide), the old record will include only the primary key(s), not the full row. If your dashboard only needs to know a deletion occurred rather than what was deleted, the default identity is fine.
Build live experiences with Supabase and Webflow Cloud
This guide covered a read-only dashboard that displays new orders in real time. The same pattern extends to any data that changes frequently: support ticket queues, form submission feeds, user activity logs and inventory trackers.
Explore Webflow + Supabase for auth setup, CMS sync and no-code connection options and for adding user authentication to control who can see the dashboard.
Frequently asked questions
Does Supabase Realtime work on the Webflow Cloud free tier?
Supabase's free tier includes Realtime. Webflow Cloud requires a CMS site plan or higher. The WebSocket connection runs in the user's browser, not on the Cloudflare Worker, so it does not count against your Cloud compute usage.
Can I subscribe to multiple tables at once?
Yes. Chain multiple .on() calls on the same channel, or create separate channels for each table. A single channel can listen to different tables, schemas, and event types simultaneously. Separate channels make it easier to clean up subscriptions independently.
Why can't I run the Supabase Realtime subscription in a Server Component?
Server Components execute on Cloudflare Workers and return HTML. They cannot maintain persistent connections. WebSockets require a long-lived browser connection. Any .channel() call must be inside a Client Component with "use client" at the top.
What happens to real-time updates when the user navigates away and returns?
The useEffect cleanup unmounts the channel on navigation. When the user returns, the Server Component re-fetches the latest snapshot and passes it to the Client Component, which re-opens the Realtime subscription. Any rows inserted during the away period are included in the fresh server fetch.
Is the Supabase anon key safe to expose in the browser?
The anon key is designed to be public. Supabase's security model uses Row Level Security (RLS) policies to control data access. The anon key alone does not grant unrestricted access. Never expose the service_role key in client-side code or prefix it with NEXT_PUBLIC_.


