

Ghost
Connect Ghost, an open-source publishing platform, with Webflow to embed membership signup forms, display blog content on pages, and sync published posts into CMS collections automatically.
Ghost pairs a professional editor, free and paid membership tiers, and a built-in newsletter system with a Content API that delivers posts as structured JSON. Connect it with Webflow to embed signup forms on your pages, display Ghost blog content in a Collection List, and sync published posts into CMS collections automatically.
This setup fits newsletter creators, independent publishers, SaaS content marketing teams, and agencies running editorial operations in Ghost alongside Webflow client sites. If you're building headless content architectures, you'll find API-level sync patterns here too.
How to integrate Ghost with Webflow
What is Ghost? Ghost is an open-source publishing platform operated by a non-profit foundation. It combines a professional editor, built-in email newsletter delivery with unlimited sends, and built-in membership management with free and paid tiers through Stripe. Ghost offers a fully managed hosting option (Ghost Pro) and a self-hosted deployment for teams that want full infrastructure control.
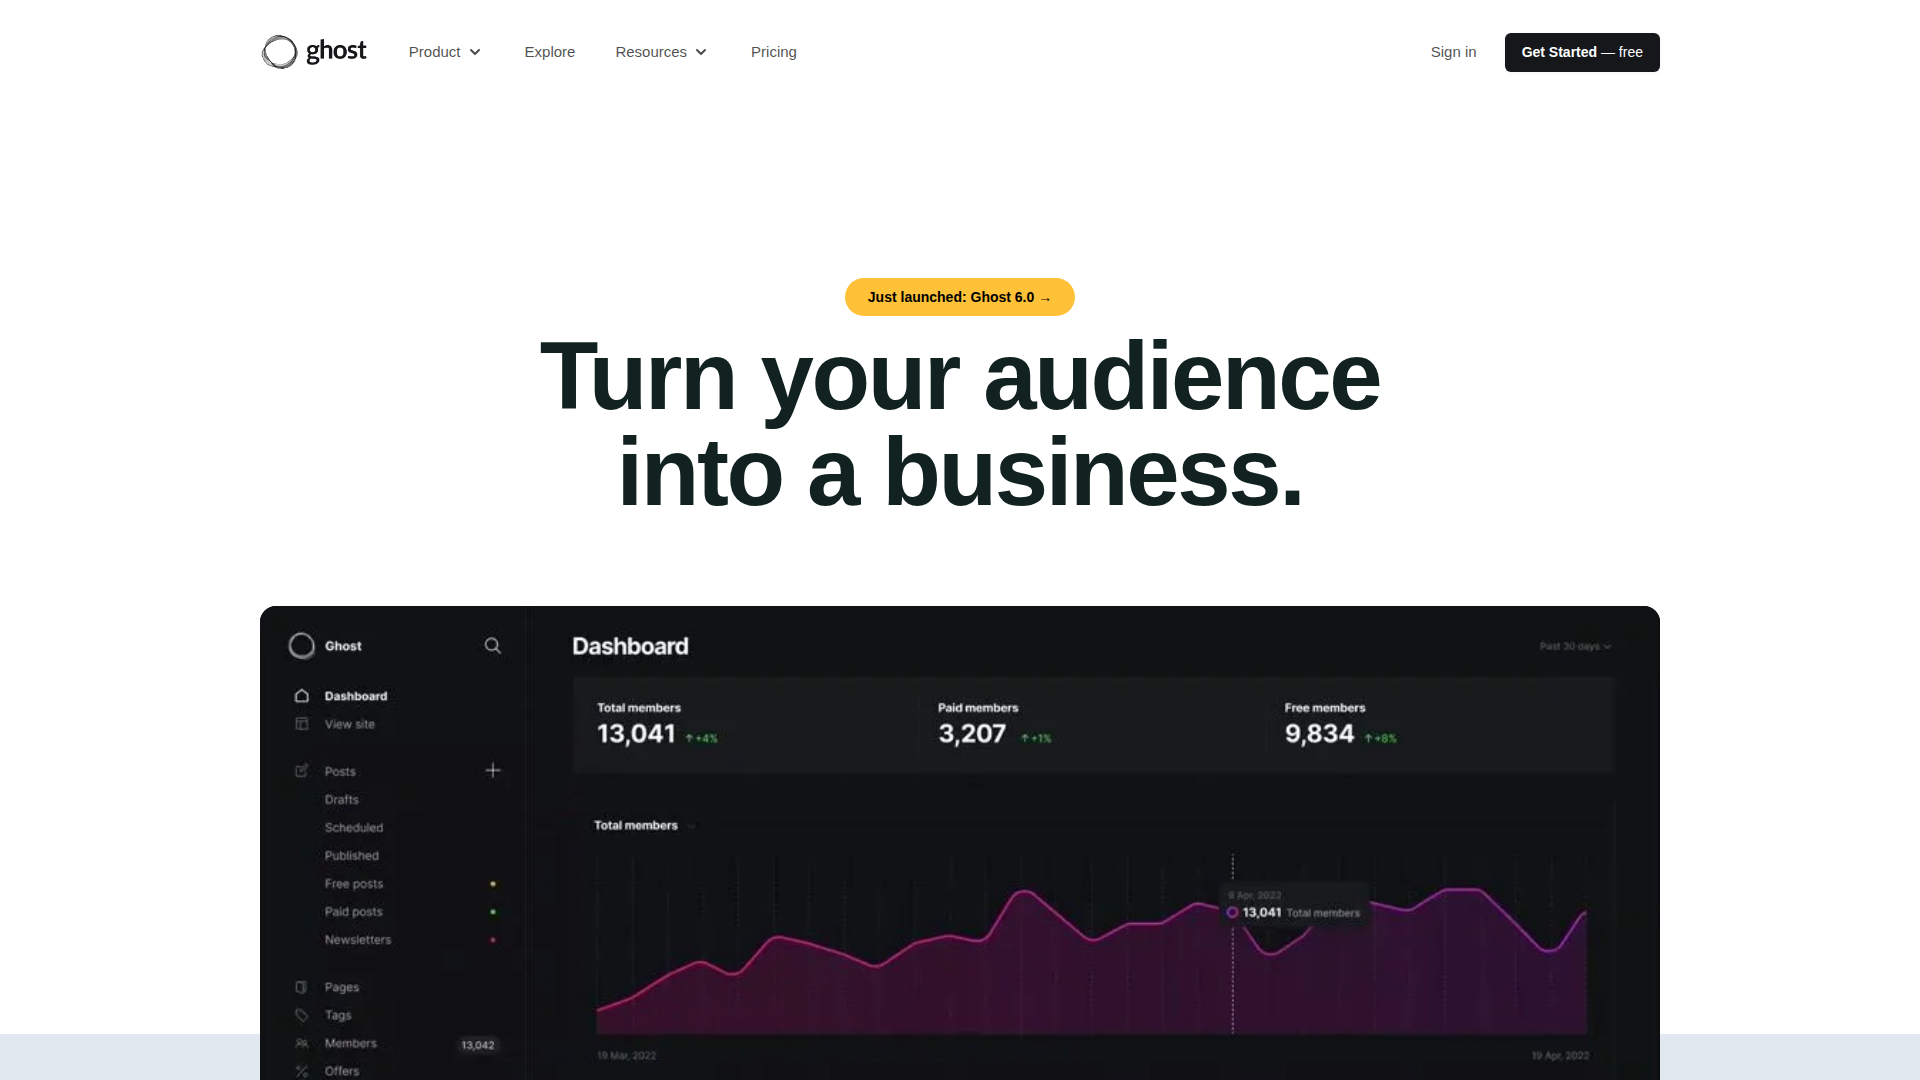
Teams use Ghost and Webflow together when the marketing site lives in Webflow but the editorial operation, including blog publishing, subscriber management, and newsletter delivery, runs in Ghost. The most common setup places Webflow at the primary domain and Ghost on a subdomain (for example, blog.yourdomain.com), keeping both platforms in their areas of strength.
You can connect Ghost and Webflow in three ways:
- Ghost embed codes and scripts let you add membership signup forms, login portals, and blog post listings to Webflow pages without server-side code.
- Zapier and n8n workflows such as Ghost post published → Create a Webflow CMS item and Webflow form submission → Create a Ghost member sync publishing events and member data without custom code.
- The Webflow and Ghost APIs let you sync content, create members, and run webhook-driven publishing workflows, but require server-side development.
Most implementations combine two or more of these methods depending on the complexity of the setup. That lets teams combine simple embeds with deeper automation or API-based sync where needed.
Add Ghost components with Code Embed elements
Ghost provides several embeddable scripts and HTML snippets that work on any external website, including Webflow pages. These are membership signup overlays, inline newsletter forms, pre-built signup widgets, and client-side blog post displays. You add them to your Webflow site using Code Embed elements or custom code in head and body tags, depending on whether the feature should load site-wide or on a specific page.
Before using any of these methods, you need a Ghost Content API key. Go to Ghost Admin, then Settings > Integrations > Add custom integration. Copy the Content API Key and note your Ghost publication URL. The Content API key is safe for client-side use.
A paid site plan is required to add custom code in Webflow. Custom code effects appear in preview mode but do not go live until the site is published.
Embed the Ghost Portal script for site-wide membership
The Ghost Portal script adds a floating "Subscribe" button and a full membership overlay to every page on your Webflow site. Visitors can sign up, log in, manage their account, and upgrade to paid tiers without leaving your site. Ghost handles the authentication flow using its passwordless email-link system.
To add the Portal script site-wide:
- Open your site in Webflow and go to Site Settings > Custom Code.
- Scroll to the Footer Code section (labeled "Before
</body>tag"). - Paste the following script, replacing the placeholder values with your Ghost URL and Content API key:
<script defer src="https://unpkg.com/@tryghost/portal@latest/umd/portal.min.js"
  data-ghost="https://YOUR-GHOST-SITE.com/"
  data-api="https://YOUR-GHOST-SITE.com/ghost/api/content/"
  data-key="YOUR_CONTENT_API_KEY">
</script>
- Click Save Changes, then Publish your site.
Once loaded, the Portal script also enables deep links you can attach to any Webflow button or link element. Set the href to /#/portal/signup to open the signup flow directly, or /#/portal/account/plans to show pricing and plan selection. These links work on any page where the Portal script is active.
Add an inline newsletter signup form to a specific page
If you want a signup form embedded within your page layout rather than as a floating overlay, Ghost supports inline forms using the data-members-form attribute. This method requires the Portal script (above) to be loaded on the same page.
To add an inline signup form:
- Open the target page in Webflow.
- Add a Code Embed element to the canvas where you want the form to appear.
- Double-click the Code Embed element to open the code editor.
- Paste the following HTML:
<form data-members-form>
  <input type="email" required data-members-email placeholder="Your email address" />
  <input type="hidden" data-members-label value="webflow-homepage" />
  <button type="submit">Subscribe</button>
  <strong class="feedback">Check your inbox for an activation link.</strong>
</form>

<style>
  form .feedback { display: none; }
  form.success input, form.success button { display: none !important; }
  form.success .feedback { display: unset; }
</style>
- Click Save & Close, then publish your site.
The data-members-label attribute tags each subscriber with a label (in this example, "webflow-homepage"), so you can track which Webflow page generated the signup inside Ghost Admin. You can change the value to match the page or campaign.
Use Ghost's pre-built embeddable signup form
Ghost also generates ready-made embed code from its admin panel, so you do not need to write any HTML manually. Go to Ghost Admin, then Settings > Growth > Signup forms, and click Embed next to the Embeddable signup form option. Choose a branded or minimal layout, configure colors and member labels, and click Copy. Paste the resulting snippet into a Code Embed element on your Webflow page using the same process described above. Full configuration options are documented in the Ghost embeddable signup forms guide.
Display Ghost blog posts on a Webflow page
Ghost's Content API returns published posts as JSON, which you can fetch and render on any Webflow page using client-side JavaScript. This approach works well for showing recent articles on a homepage or resources section without manually duplicating content.
To set up a client-side blog post listing:
- Add a Div Block to your Webflow page. In the settings panel, set its ID to
ghost-posts. - Open the page settings (click the gear icon next to the page name in the Pages panel).
- In the Custom Code section, paste the following script in the Before
</body>tag field:
<script src="https://unpkg.com/@tryghost/content-api@1.11.20/umd/content-api.min.js"></script>
<script>
  const api = new GhostContentAPI({
    url: 'https://YOUR-GHOST-SITE.com',
    key: 'YOUR_CONTENT_API_KEY',
    version: 'v6.0'
  });

  api.posts.browse({ limit: 6, include: 'tags,authors' })
    .then(posts => {
      const container = document.getElementById('ghost-posts');
      posts.forEach(post => {
        container.innerHTML += `
          <div>
            <a href="${post.url}"><h3>${post.title}</h3></a>
            <p>${post.excerpt || ''}</p>
          </div>
        `;
      });
    })
    .catch(err => console.error(err));
</script>
- Save and publish your site.
The output renders as unstyled HTML. Style the ghost-posts container and its child elements using Webflow's native styling tools, or add CSS directly in the script. Post links point to the original Ghost URLs by default. If you want posts to link to Webflow-hosted pages instead, you will need to sync content into Webflow CMS collections using one of the methods below.
Connect with Zapier or n8n
Zapier and n8n both support Ghost and Webflow workflows for content sync and member creation. Ghost's Zapier integration requires the Publisher plan or above. Zapier offers five pre-built Ghost-Webflow templates, while n8n provides Ghost and Webflow nodes you combine into custom workflows.
[image placeholder]
To connect Ghost and Webflow through Zapier:
- In Ghost Admin, go to Settings > Integrations > Zapier > Connect with Zapier.
- Log into Zapier and click Create Zap.
- Choose a Ghost trigger such as Post Published.
- Choose a Webflow action such as Create Live Item.
- Map Ghost post fields to your Webflow CMS collection fields, then activate the Zap.
Zapier's pre-built Ghost-Webflow templates cover these workflows:
- Ghost post published → Create a Webflow CMS item
- Ghost post published → Create a live Webflow CMS item
- Ghost page published → Create a Webflow CMS item
- Webflow form submission → Create a Ghost member
- Webflow form submission → Create a Ghost member (variant)
These templates cover the most common publishing and member-capture automations between the two platforms.
For n8n, you build custom workflows such as Ghost post published → Create a Webflow CMS item, Ghost post published → Update a Webflow CMS item, and Webflow form submission → Create a Ghost member by combining Ghost nodes with Webflow nodes. n8n also offers a Webflow Trigger node for event-driven workflows. No pre-built templates exist for the Ghost-Webflow combination in n8n, so you assemble the workflow manually.
Zapier triggers can run on timed intervals rather than instantly, so expect up to a 15-minute delay between a Ghost event and the corresponding Webflow action. Zapier syncs data between the two platforms but does not display Ghost content or membership UI on your Webflow pages. You still need the embed methods above for any on-page Ghost functionality.
Build with the Webflow and Ghost APIs
If you need direct control over content sync, member management, and real-time publishing workflows, connect the Ghost and Webflow APIs through server-side code. This approach supports bulk content migration, webhook-driven sync on publish, and custom member creation flows triggered by Webflow form submissions. It requires a server or serverless function environment (such as AWS Lambda, Vercel, or Cloudflare Workers) because the Ghost Admin API key must never be exposed in browser JavaScript.
The APIs you will use are:
- The Ghost Content API is the read-only endpoint for published posts, pages, tags, authors, and membership tiers. It authenticates with a query parameter key and is safe for client-side use.
- The Ghost Admin API is the read/write endpoint for posts, pages, tags, members, and webhooks. It requires JWT authentication and the Ghost Publisher plan or above.
- The Webflow Data API is the endpoint for CMS collection items, form submissions, site publishing, and webhook registration. It authenticates with a Bearer token.
- Webflow webhooks and Ghost webhooks trigger real-time events between both systems.
These APIs support read-only content display, webhook-driven publishing, and member creation. Teams usually combine read-only access, write access, and webhooks based on how much automation they need.
Ghost does not publish specific API rate limits. The Content API documentation describes it as "fully cacheable, meaning you can fetch data as often as you like without limitation." Implement exponential backoff on all API calls regardless.
Sync Ghost posts to Webflow CMS collections
The most common API integration pulls published Ghost posts into a Webflow CMS collection so each post renders as a native CMS item on your site. This gives you full design control over blog post templates in Webflow while Ghost handles the editorial workflow.
To implement a basic sync:
- Fetch posts from the Ghost Content API at
GET /ghost/api/content/posts/?key={content_api_key}&include=tags,authors&limit=100&page=1. The Content API uses numeric pagination, so if you need all posts, continue requesting additional pages withpage=2,page=3, and so on. Each post object includestitle,slug,html(pre-rendered HTML),feature_image,published_at, and SEO metadata fields. - Create a CMS collection in Webflow with fields that map to Ghost's post structure: a Name field (for
title), a Slug field, a Rich Text field (forhtml), an Image field (forfeature_image), and a Date field (forpublished_at). Note the collection ID from the URL or viaGET /v2/sites/{site_id}/collections. - For each Ghost post, send a
POSTrequest tohttps://api.webflow.com/v2/collections/{collection_id}/itemswith the mapped field data. Items created through this endpoint are staged (draft) by default. - Publish the items by sending
POST /v2/collections/{collection_id}/items/publishwith an array of item IDs.
Ghost stores images on its own CDN. Images referenced in post HTML and feature_image fields remain as external URLs in Webflow unless you re-upload them through the Webflow Assets API.
Set up real-time sync with Ghost webhooks
Instead of running periodic syncs, you can register Ghost webhooks that fire HTTP POST requests to your server whenever content changes. Register post.published and post.published.edited as separate webhook events in Ghost Admin (go to Settings > Advanced > Integrations > your custom integration > Add webhook). Point both webhooks at your serverless function URL.
When your function receives a post.published event, extract the post data from the post.current object in the payload and create a new Webflow CMS item. For post.published.edited events, compare the current and previous objects in the payload to identify changed fields, then send a PATCH request to update the existing Webflow item. After any create or update, call the publish endpoint to make changes visible on the live site.
Register post.deleted as a third webhook to remove the corresponding Webflow CMS item when a Ghost post is deleted. The full list of available webhook events includes post, page, tag, and member lifecycle events, documented in the Ghost webhooks reference.
Webhooks can miss events during network failures. Build reconciliation logic that runs a periodic full sync, and make your webhook handlers idempotent so duplicate events do not create duplicate CMS items.
Create Ghost members from Webflow form submissions
You can route Webflow form submissions to Ghost's Admin API to create new members automatically. Register a form_submission webhook on your Webflow site at POST /v2/sites/{site_id}/webhooks, pointing to a serverless function. When the function receives a form submission, extract the email and name fields, generate a JWT from your Ghost Admin API key, and send a POST request to /ghost/api/admin/members/:
const jwt = require('jsonwebtoken');
const [id, secret] = GHOST_ADMIN_API_KEY.split(':');
const token = jwt.sign({}, Buffer.from(secret, 'hex'), {
  keyid: id,
  algorithm: 'HS256',
  expiresIn: '5m',
  audience: '/admin/'
});
const result = await fetch( ${GHOST_URL}/ghost/api/admin/members/?send_email=true&email_type=signup, { method: 'POST', headers: { 'Content-Type': 'application/json', 'Authorization': 'Ghost ' + token }, body: JSON.stringify({ members: [{ name: formData.name, email: formData.email, newsletters: [] }] }) } );
Set `email_type=signup` (not `signin`) for new member creation. The `send_email=true` parameter triggers a confirmation email from Ghost. The Admin API key must stay server-side and never appear in browser JavaScript.

## **What can you build with the Ghost Webflow integration?**

Integrating Ghost with Webflow lets you run a full publishing and membership operation alongside your Webflow site without duplicating content or managing a separate email marketing subscription.

- **Newsletter-driven landing pages:** Build a conversion-focused landing page in Webflow with an embedded Ghost signup form that feeds subscribers directly into Ghost's member database. Visitors subscribe, receive a confirmation email, and start getting your Ghost newsletter, all from a single Webflow page.
- **Hybrid publication sites:** Run your marketing site, product pages, and landing pages in Webflow at your primary domain while operating a full Ghost publication on a subdomain (`blog.yourdomain.com`). Ghost handles newsletters, paid memberships, and editorial workflow. Webflow handles brand and conversion pages.
- **Auto-synced blog sections:** Display your latest Ghost posts on a Webflow homepage or resources section that updates automatically. Use Zapier to push new Ghost posts into a Webflow CMS collection, or use the Content API to render posts client-side. Either way, the content team publishes in Ghost and the Webflow site reflects changes without manual updates.
- **Multi-newsletter subscription pages:** Create separate Webflow landing pages for each Ghost newsletter product, each with its own embedded signup form tagged with a unique `data-members-label`. A SaaS company might have a product updates newsletter and a separate industry insights newsletter, both managed from a single Ghost instance but promoted through distinct Webflow pages.

If you need more control over content migration, member lifecycle events, or custom access gating, the API integration path handles those cases through direct API calls, webhooks, and server-side logic.
Frequently asked questions
No. Ghost does not have an official app listing on the Webflow Apps Marketplace. All integration between the two platforms uses embed codes, automation tools (Zapier, n8n), or direct API connections.
It depends on the method. Ghost's Content API, which supports read-only access to published posts, is available on all Ghost plans, including Starter. The Admin API, webhooks, and Zapier integration all require the Publisher plan or above. If you only need to display Ghost posts on a Webflow page using client-side JavaScript, any Ghost plan works. For bidirectional sync or automated member creation, Publisher is the minimum.
Partially. You can embed Ghost's Portal script and signup forms on Webflow pages to capture members and display login/account overlays. Ghost's membership features like Stripe-powered paid subscriptions, content gating, comments, and analytics require Ghost to serve its own frontend. In a fully headless setup where Webflow is the only frontend, these features do not function. The Ghost JAMstack documentation explains this constraint in detail. Most teams address this by running Ghost on a subdomain.
Ghost's Content API returns pre-rendered HTML in the
htmlfield, which maps to Webflow Rich Text fields. Standard content like paragraphs, headings, images, and links renders correctly. Ghost-specific card types (audio players, product cards, accordion toggles) use CSS classes likekg-cardandkg-image-cardthat have no corresponding styles in Webflow. You need to add custom CSS through site-level custom code to style these elements. Complex Ghost cards may need to be handled as separate embed blocks rather than Rich Text content. The Ghost content cards reference lists all available card types and their HTML output.If Ghost remains live at its original URL while the same content publishes to Webflow, search engines may index both versions. Set canonical tags on your Webflow CMS items pointing to the preferred URL, or take the Ghost frontend offline with redirects before the Webflow content goes live. Ghost defaults to
/post-slug/URL paths, while Webflow CMS uses/collection-name/post-slug/. Plan a full 301 redirect map before launch to preserve existing backlinks. Ghost's SEO metadata fields (meta_title,meta_description,og_image,canonical_url) are not transferred automatically and must be mapped as dedicated fields in your Webflow CMS collection schema.
Description
Ghost adds newsletter publishing, membership management, and editorial workflows to Webflow through embeddable signup forms and Portal scripts.
This integration page is provided for informational and convenience purposes only.
Jasper
Connect Jasper's AI-powered content generation with Webflow to create, optimize, and localize website content at scale. Generate on-brand copy, rewrite existing content, and translate pages — all without leaving Webflow.
Google Ads by Clever
Advertise on Google and grow your business with Clever Ads. Have your Google Ads Search & Display campaigns created for free.
EmbedStories (by EmbedSocial)
Connect EmbedStories with Webflow to automatically display Instagram Stories and custom photo stories on your website, keeping your content fresh and interactive without any coding.
Elfsight YouTube Gallery
Connect Elfsight YouTube Gallery to Webflow and display dynamic video content from YouTube channels, playlists, or individual videos. This integration enables businesses to showcase product demos, tutorials, testimonials, and more without coding knowledge.
PowerImporter Airtable Sync
Connect PowerImporter Airtable Sync, a one-way data sync tool, with Webflow to automatically push Airtable content into CMS collections without writing code.
AirOps
Connect AirOps, an AI content operations platform, with Webflow to research, draft, and publish content directly to CMS collections without switching tools.
Related integrations
Get started for free
Try Webflow for as long as you like with our free Starter plan. Purchase a paid Site plan to publish, host, and unlock additional features.
