


Webflow's CMS API gives you full programmatic control over collections and content, but knowing where to start saves hours of trial and error.
Most Webflow CMS workflows start manually and stay that way: someone logs into the Editor, fills in fields, and hits publish. That works until you're managing hundreds of items, syncing from an external data source, or shipping content on a schedule. The CMS API is how you take that work entirely out of the UI.
This guide runs that sequence end-to-end. You'll generate an API token, connect via the JavaScript SDK, read your collections, create items, and publish them to your live site.
What do you need to start with the Webflow CMS API?
You need a Webflow site on any paid plan, site administrator access to generate a token, and Node.js installed if you're following the JavaScript examples below. The API is REST-based, so cURL works as well, but the SDK significantly reduces boilerplate.
Before starting, verify all of these.
A Webflow site on a paid plan
The Webflow CMS API is available on any Webflow site plan that includes CMS: Starter (free), CMS, and Business. The Basic plan ($14/mo) is the exception. It explicitly lacks CMS features, so CMS collections don't exist on Basic sites, and the CMS endpoints will return no useful data.
Rate limits also vary by plan. CMS, eCommerce, and Business plans get 120 requests per minute. Starter and Basic plans are capped at 60. Both track limits per API key, not per site, so each token you generate has its own counter. Check your plan in your site’s Site Settings.
Site administrator access to generate an API token
Only site administrators can generate site tokens. If your account has editor or content-only access, you won't see the API access section in Site Settings. You'll need an administrator to generate a token and share it with you, or request a role change before proceeding.
Tokens expire after 365 consecutive days of inactivity. Any successful API call resets the clock. Each site supports up to 5 tokens simultaneously, so if your site already has 5, one needs to be revoked before you can create a new one.
Node.js 18 or later (for the JavaScript SDK)
The official Webflow JavaScript SDK (webflow-api) runs in any Node.js 18+ environment. It handles authentication, request formatting, pagination, and exponential backoff on rate-limit errors automatically. Things you'd otherwise implement yourself against the raw REST API.
If you're building server-side scripts, Webflow Cloud apps, or Node-based automation, the SDK is the right starting point.
If you're using Python, the webflowpackage on PyPI provides equivalent coverage. All code examples in this guide use TypeScript and the JavaScript SDK.
A collection already created in the Webflow Designer
The CMS API can read, create, update, and delete collection items. The collection schema (its fields and structure) is defined in the Webflow Designer. You don't need a populated collection to start, but you need the collection to exist.
If you haven't created one yet, open the CMS panel in the Designer, click "New Collection," define your fields, and save it before running any API calls.
Once these are in place, you can make your first CMS API call in about 15 minutes. Here's how.
6 steps to make your first Webflow CMS API call
Getting from zero to reading and writing CMS content programmatically involves generating a token, installing the SDK, finding your site ID, listing collections, creating and reading items, and publishing to your live site.
Each step builds on the previous one. Don't skip ahead.
1. Generate a site API token
Open the Webflow Designer for your site and click the gear icon in the top-left corner to open Site Settings.
In the left sidebar, select Apps & integrations. Scroll to the bottom of the page to find the API access section.
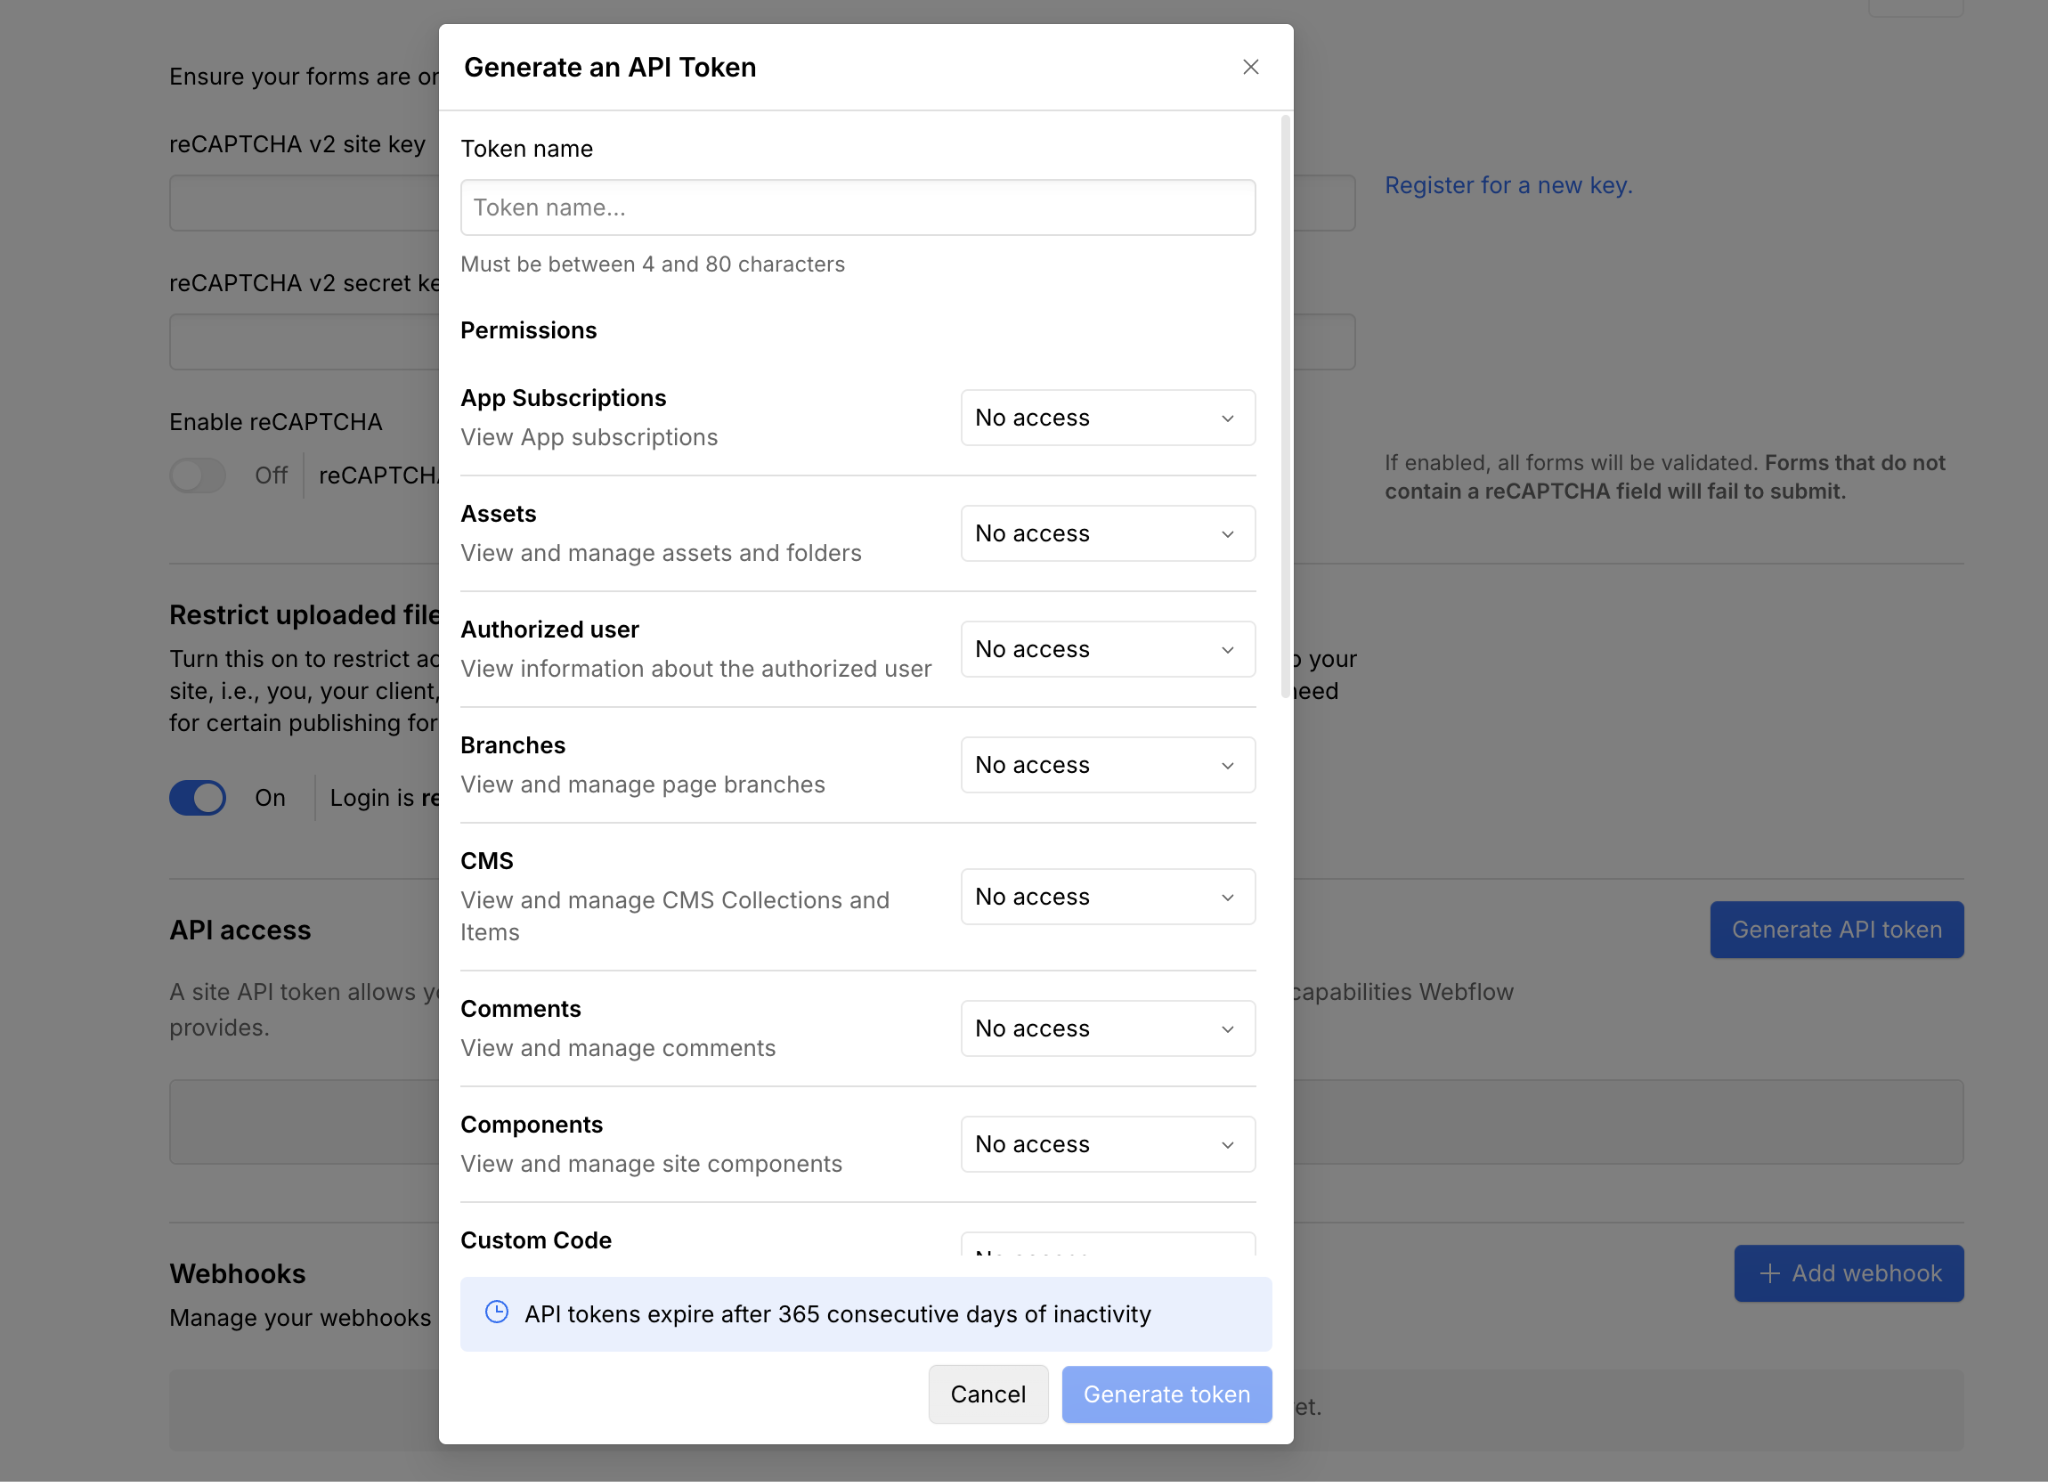
Click Generate API token. Enter a name that describes what this token does (for example, "CMS sync script" or "Blog automation"), then select the scopes you need. For reading and writing CMS content, select cms:read and cms:write. For publishing, add sites:publish.
Click Generate token, then copy the token immediately. Webflow only shows it once. Store it in a .env file or a secrets manager. Never hardcode it in source files.
The token string looks like: 1234567890abcdef.... You'll pass this value directly as your accessToken in the next step.
2. Install the Webflow JavaScript SDK
With your token ready, you need two things in your local environment: the webflow-api package and a place to put your credentials.
Create a new directory for your project and initialize it:
mkdir webflow-cms-demo && cd webflow-cms-demo
npm init -y
npm install webflow-api
The command above installs the webflow-api package from npm. This is the official Webflow JavaScript SDK. It wraps all Data API endpoints, handles Authorization headers automatically, and returns typed response objects.
Then, create a .env file in your project root:
WEBFLOW_API_TOKEN=your_token_hereThen create index.ts (or index.js if you're not using TypeScript):
import { WebflowClient } from "webflow-api";

const webflow = new WebflowClient({
  accessToken: process.env.WEBFLOW_API_TOKEN!,
});
The WebflowClient constructor accepts your access token and returns a client object with methods organized by resource: webflow.sites, webflow.collections, webflow.collections.items, and so on. All methods return Promises, so you can use await throughout your code.
3. Get your site ID
Your site ID is available directly in the Webflow dashboard. Go to your site's Site Settings, then look at the URL in your browser. It contains your site ID.
Alternatively, navigate to Site Settings > General, where the site ID is displayed explicitly.
Copy it and add it to your .env file:
WEBFLOW_SITE_ID=580e63e98c9a982ac9b8b741You'll reference process.env.WEBFLOW_SITE_ID in every subsequent call. There's no need to call the API to look this up.
4. List your collections and find a collection ID
With your siteId in hand, call webflow.collections.list() to see all collections on the site.
Paste the following into your file and run it to retrieve every collection on the site:
async function listCollections() {
  const collections = await webflow.collections.list({
    siteId: process.env.WEBFLOW_SITE_ID!,
  });
  console.log(JSON.stringify(collections, null, 2));
}

listCollections();
The response returns an array of collection objects. Each has an id, a displayName, a singularName, and a slug. It also returns the fields array: the full schema of each collection, with field types, display names, and validation rules.
Each collection object in the response looks like this:
{
  "collections": [
    {
      "id": "580e63fc8c9a982ac9b8b745",
      "displayName": "Blog Posts",
      "singularName": "Blog Post",
      "slug": "posts",
      "fields": [
        {
          "type": "PlainText",
          "displayName": "Title",
          "slug": "title",
          "isRequired": true
        }
      ]
    }
  ]
}
Copy the id from the collection you want to work with. This is your collectionId. For Option-type fields, note the validations.options array inside the field definition. Each option has an auto-generated id that you'll need when creating items with that field populated.
Store the collection ID in your .env file:
WEBFLOW_COLLECTION_ID=580e63fc8c9a982ac9b8b745The fields array shows the full schema for that collection. If the collection uses Option-type fields, each option inside validations.options has an auto-generated id. You will need those IDs when creating items that set an Option field value.
5. Create and read collection items
Creating and listing items both use the same collection ID.
Start by listing existing items to confirm your connection works:
async function listItems() {
  const result = await webflow.collections.items.listItems(
    process.env.WEBFLOW_COLLECTION_ID!,
    { limit: 10, offset: 0 }
  );
  console.log(`Total items: ${result.pagination?.total}`);
  console.log(JSON.stringify(result.items, null, 2));
}

listItems();
The limit parameter caps results at up to 100 per call. The offset parameter lets you page through collections with more than 100 items. The pagination object in the response contains total, limit, and offset. Use these to loop through all items in larger collections.
To create a new item, call webflow.collections.items.createItem(). The fieldData object must match the collection's schema.
Every collection has two default fields: name and slug, plus any custom fields you defined in the Designer:
async function createItem() {
  const newItem = await webflow.collections.items.createItem(
    process.env.WEBFLOW_COLLECTION_ID!,
    {
      isDraft: false,
      fieldData: {
        name: "My First API Post",
        slug: "my-first-api-post",
        // Add your custom field slugs here:
        // "post-summary": "Written via the CMS API",
      },
    }
  );
  console.log(`Created item ID: ${newItem.id}`);
}

createItem();
Setting isDraft: false means the item is staged for publishing but not yet live. The item will have a lastPublished value of null and isDraft of false. That's the "Queued to publish" state in the Webflow UI. It won't appear on your live site until you publish.
6. Publish items to your live site
Creating an item stages it. Publishing makes it live. You have two options: publish specific items or publish the entire site.
To publish specific items only:
async function publishItem(itemId: string) {
  const result = await webflow.collections.items.publishItem(
    process.env.WEBFLOW_COLLECTION_ID!,
    {
      itemIds: [itemId],
    }
  );
  console.log(`Published: ${JSON.stringify(result)}`);
}

publishItem("YOUR_ITEM_ID_HERE");
This call targets a single item (or multiple items in the array) and publishes only those, leaving everything else on the site untouched. Use this when you're pushing individual content updates programmatically: blog posts, product descriptions, team member bios.
To publish all staged content across the entire site at once:
async function publishSite() {
  await webflow.sites.publish(process.env.WEBFLOW_SITE_ID!, {
    publishToWebflowSubdomain: true,
  });
  console.log("Site published");
}

publishSite();
Site-wide publishing is limited to one successful publish per minute by the API's endpoint-specific rate limit. For bulk content migrations or scheduled releases where you want everything to go live at once, site-wide publishing is the right call. For ongoing content workflows where items publish independently, use the item-level publish endpoint.
After publishing, visit your live Webflow site and confirm the new item appears. If it does, your CMS API pipeline is working end-to-end.
What causes Webflow CMS API calls to fail?
CMS API failures fall into four categories: authentication errors that prevent any request from reaching the server; permission errors due to missing token scopes; ID errors caused by using the wrong identifier; and publishing gaps where items are created but never appear on the live site.
Each has a distinct fix.
Requests return 401 Unauthorized
A 401 response means the API rejected your authentication. The three most common causes are a malformed token, an expired token, or the wrong token for the wrong site.
Check the Authorization header value in your request. It must be formatted as Bearer YOUR_TOKEN with a capital B and a single space. If you're using the SDK, double-check that process.env.WEBFLOW_API_TOKEN is actually populated. Log its value before the client call. An undefined environment variable is passed to the SDK as "undefined" and fails silently during the auth check.
Tokens expire after 365 days of inactivity. If a token hasn't been used in a year, it's invalid. Go to Site Settings > Apps & integrations > API access, revoke the old token, and generate a fresh one.
Requests return 403 Forbidden
A 403 response means your token is authenticated but doesn't have permission for the operation you're attempting. Webflow tokens are scoped at generation time. You can't add scopes to an existing token.
Check which scopes the failing request requires in the API reference. CMS read operations require cms:read. Creating or updating items requires the cms:write permission. Publishing requires sites:publish.
If the token is missing any of these, revoke it and create a new one with the correct scopes. Up to 5 tokens can exist per site, so you can create a new one before revoking the old one if active integrations depend on it.
List items returns empty despite content existing in the Designer
The CMS API returns staged content by default. If you created items in the Designer but never published the site, the items exist, but their lastPublished field is null. The list items endpoint still returns them. They appear in the response as draft items.
If the list truly returns an empty result, confirm you're using the correct collectionId. Run webflow.collections.list() again and cross-reference the displayName against what you see in the Webflow Designer's CMS panel. A common mistake is copying the siteId where the collectionId should go. Both are hex strings of similar length.
Also, confirm the collection has at least one item. A brand-new collection with no items returns an empty array with pagination.total set to 0. That's valid behavior, not an error.
Items created via the API don't appear on the live site
Creating an item via createItem() stages it but does not publish it. The item exists in the CMS but has a lastPublished value of null. The live site won't show it until you explicitly publish.
Run the publishItem call with the item's id, then reload your live site. If the item still doesn't appear, check whether the collection itself has been published before. A collection must be published at the site level at least once for its items to be referenceable by other collections and visible on collection pages.
If you're making rapid item changes and hitting 429 rate-limit errors during bulk operations, the SDK handles exponential backoff automatically. If you're using raw fetch, implement your own retry loop that reads the Retry-After response header.
What to build next with the Webflow CMS API
Reading and creating items is the foundation. The CMS API goes further: bulk updates across hundreds of items, webhook-triggered publishing when external systems push content, localization workflows that sync translated content across multiple locales, and live content delivery via CDN without additional API calls.
Explore the CMS guide for a complete endpoint reference covering bulk item operations, field type specifications, and localization APIs.
Frequently asked questions
Do I need a paid Webflow plan to use the CMS API?
Not necessarily. Webflow's free Starter plan includes CMS (20 collections, 50 items). The Basic plan ($14/mo) is the one without CMS features; sites on Basic can authenticate and access site metadata via the API, but have no CMS collections to interact with. CMS, Business, and any plan with CMS enabled all work fully with the CMS API.
Can I create a new CMS collection through the API?
Yes, using POST /v2/sites/:site_id/collections. The request body requires displayName and singularName. The slug and fields array are both optional; slug will be auto-generated from the displayName if omitted. Option fields need metadata.options array; Reference fields need a metadata.collectionId. Collection schemas can have up to 60 fields total.
Why does publishItem succeed, but my item still shows as draft?
The publishItem endpoint marks the item live on your Webflow subdomain. If you're using a custom domain and it's not updating, confirm your custom domain is published via customDomains in the Publish Site endpoint payload. Webflow subdomain and custom domain publishing are separate targets.
What happens when I hit the rate limit?
The API returns a 429 error and a Retry-After header indicating how many seconds to wait. CMS and Business plans get 120 requests per minute. The JavaScript SDK retries automatically with exponential backoff. If you're using raw HTTP, read the Retry-After header and wait that duration before retrying.
Can I create items without publishing the entire site?
Yes. The publishItem endpoint publishes specific collection items without triggering a full site rebuild. Use POST /v2/collections/:collection_id/items/publish with an itemIds array. Site-wide publishing via POST /v2/sites/:site_id/publish is a separate operation and limited to once per minute.


