






Pixie - CMS Image Optimizer
Connect Pixie with Webflow to bulk-optimize CMS and Ecommerce images in place, and see where Webflow's own tools already cover the job.

Images uploaded to Webflow CMS collections often arrive at full resolution and stay that way until someone fixes each one by hand. The built-in image conversion tool converts images to WebP or AVIF, but it gives you no quality or dimension controls, and it replaces the originals. Otherwise, fixing hundreds of CMS images means downloading each image, compressing it, and re-uploading it.
Pixie removes that cycle. Once connected, it bulk-compresses CMS and Ecommerce images. It also resizes them and converts them to WebP. You pick Lossy or Lossless mode, target specific collections and image fields, and convert JPEG and PNG files to WebP. A companion extension resizes and crops assets directly inside Webflow.
Agencies get the most from this integration because every Pixie plan connects unlimited Webflow accounts and sites. Freelancers and content teams use it to keep frequently updated blogs fast without a developer. Store owners on Webflow Ecommerce can optimize product images and product-related images the same way.
How to integrate Pixie - CMS Image Optimizer with Webflow
What is Pixie - CMS Image Optimizer? Pixie is a Webflow Marketplace app published by Lil Big Things LLC. It optimizes images stored in Webflow CMS collections, asset libraries, and Ecommerce product catalogs. Compression runs through the vendor’s integration with TinyPNG. Pixie also resizes images to exact pixel dimensions and converts JPEG and PNG files to WebP.

Teams typically bring in Pixie for two jobs. The first is cleanup, when a CMS library has accumulated hundreds of full-resolution images that slow down pages. The second is upkeep, when a blog or store keeps adding new images, and nobody wants a manual compression step in the publishing routine. Pixie’s duplicate-optimization tracking skips files it has already optimized, so repeat runs do not re-process them.
The Pixie-Webflow integration supports two approaches. The Pixie app handles bulk image compression and WebP conversion without writing code, with controls for resizing CMS and Ecommerce images. The Pixie extension inside Webflow lets you resize and crop individual assets without leaving Webflow. The app covers collection-wide runs while the extension suits one-off asset fixes, and those are the only two paths, because Pixie documents no public API or webhooks. Before you install either one, check what Webflow already does: native asset compression and the Webflow MCP server cover part of the same ground, and the last two sections below walk through both.
Install the Pixie app
The Pixie app on the Webflow Marketplace is the primary integration path and requires no code. Lil Big Things builds and maintains the OAuth connection, and the app has run on the Webflow Data API v2 since the vendor’s March 2024 platform update. The Marketplace listing is live, public, and carries Webflow’s approved-app and enhanced-security badges.
To set up the integration:
- Create a Pixie account. Sign-up is free, no card is required, and paid plans run on a credit model.
- Connect your Webflow site through OAuth and pick the Add Sites option. Scope that access to a single site or a Workspace. Pixie’s setup guide recommends OAuth over API keys so the connection survives an API key reset.
- Choose Lossy (recommended) or Lossless optimization mode.
- Select the collections and individual image fields to optimize. Set resize dimensions where needed.
- Run a bulk pass on whole collections or a selective pass on specific items and fields.
One caveat on the vendor’s own documentation: its sign-up page still describes a Gumroad license key that arrives by email, and Pixie retired that billing route in June 2023 when it moved to native billing and to its current domain. Skip the license-key step and sign up on Pixie’s site instead.
Authorization is the step worth slowing down on. The listing names five permissions, and they read better as a group than one at a time:
- Read information about authorized users: identifies the account that granted the authorization, so Pixie can tie the connected sites to your Pixie login.
- Read and write CMS data: lets Pixie list Collection items and fields, then write the new image URL back into the field it replaced.
- Read site data and publishing: lets Pixie enumerate your sites and see publishing state, which is how it knows whether a change is still staged.
- Read and write Ecommerce store: extends the same treatment to product images and product-related images on an Ecommerce site.
- Read and write assets: the scope that actually replaces an image file, and the one to weigh most carefully, because it covers the whole asset library rather than only the collections you picked.
Pixie can be authorized for individual sites or for a whole Workspace, and a Workspace authorization covers every current and future site in it. You can see what a site has authorized at Site settings > Integrations tab > Authorized apps, and revoke from Site settings > Apps & integrations tab. Webflow’s Apps overview notes that elements an app added stay on your site after you revoke it, while custom code it added is removed at your next publish.
Once a site is connected, the app handles:
- Bulk and selective runs: optimize entire CMS collections, or target specific items and image fields when only part of a library needs work.
- WebP conversion: convert JPEG and PNG images to WebP in the same pass, so file type and file size change together.
- Ecommerce coverage: process product images and product-related images alongside ordinary CMS image fields.
- Duplicate-optimization tracking: skip files Pixie has already handled, so a repeat pass does not compress the same image twice.
- Log history: read back a record of every optimization change, which matters because the original files are replaced.
- Unlimited accounts and sites: connect as many Webflow accounts and sites as you need, on every Pixie plan.
Rich text images are not supported yet, and GIF and animated WebP support is on Pixie’s roadmap. For quick fixes on individual assets, the extension inside Webflow covers resizing and cropping.
Resize and crop assets inside Webflow
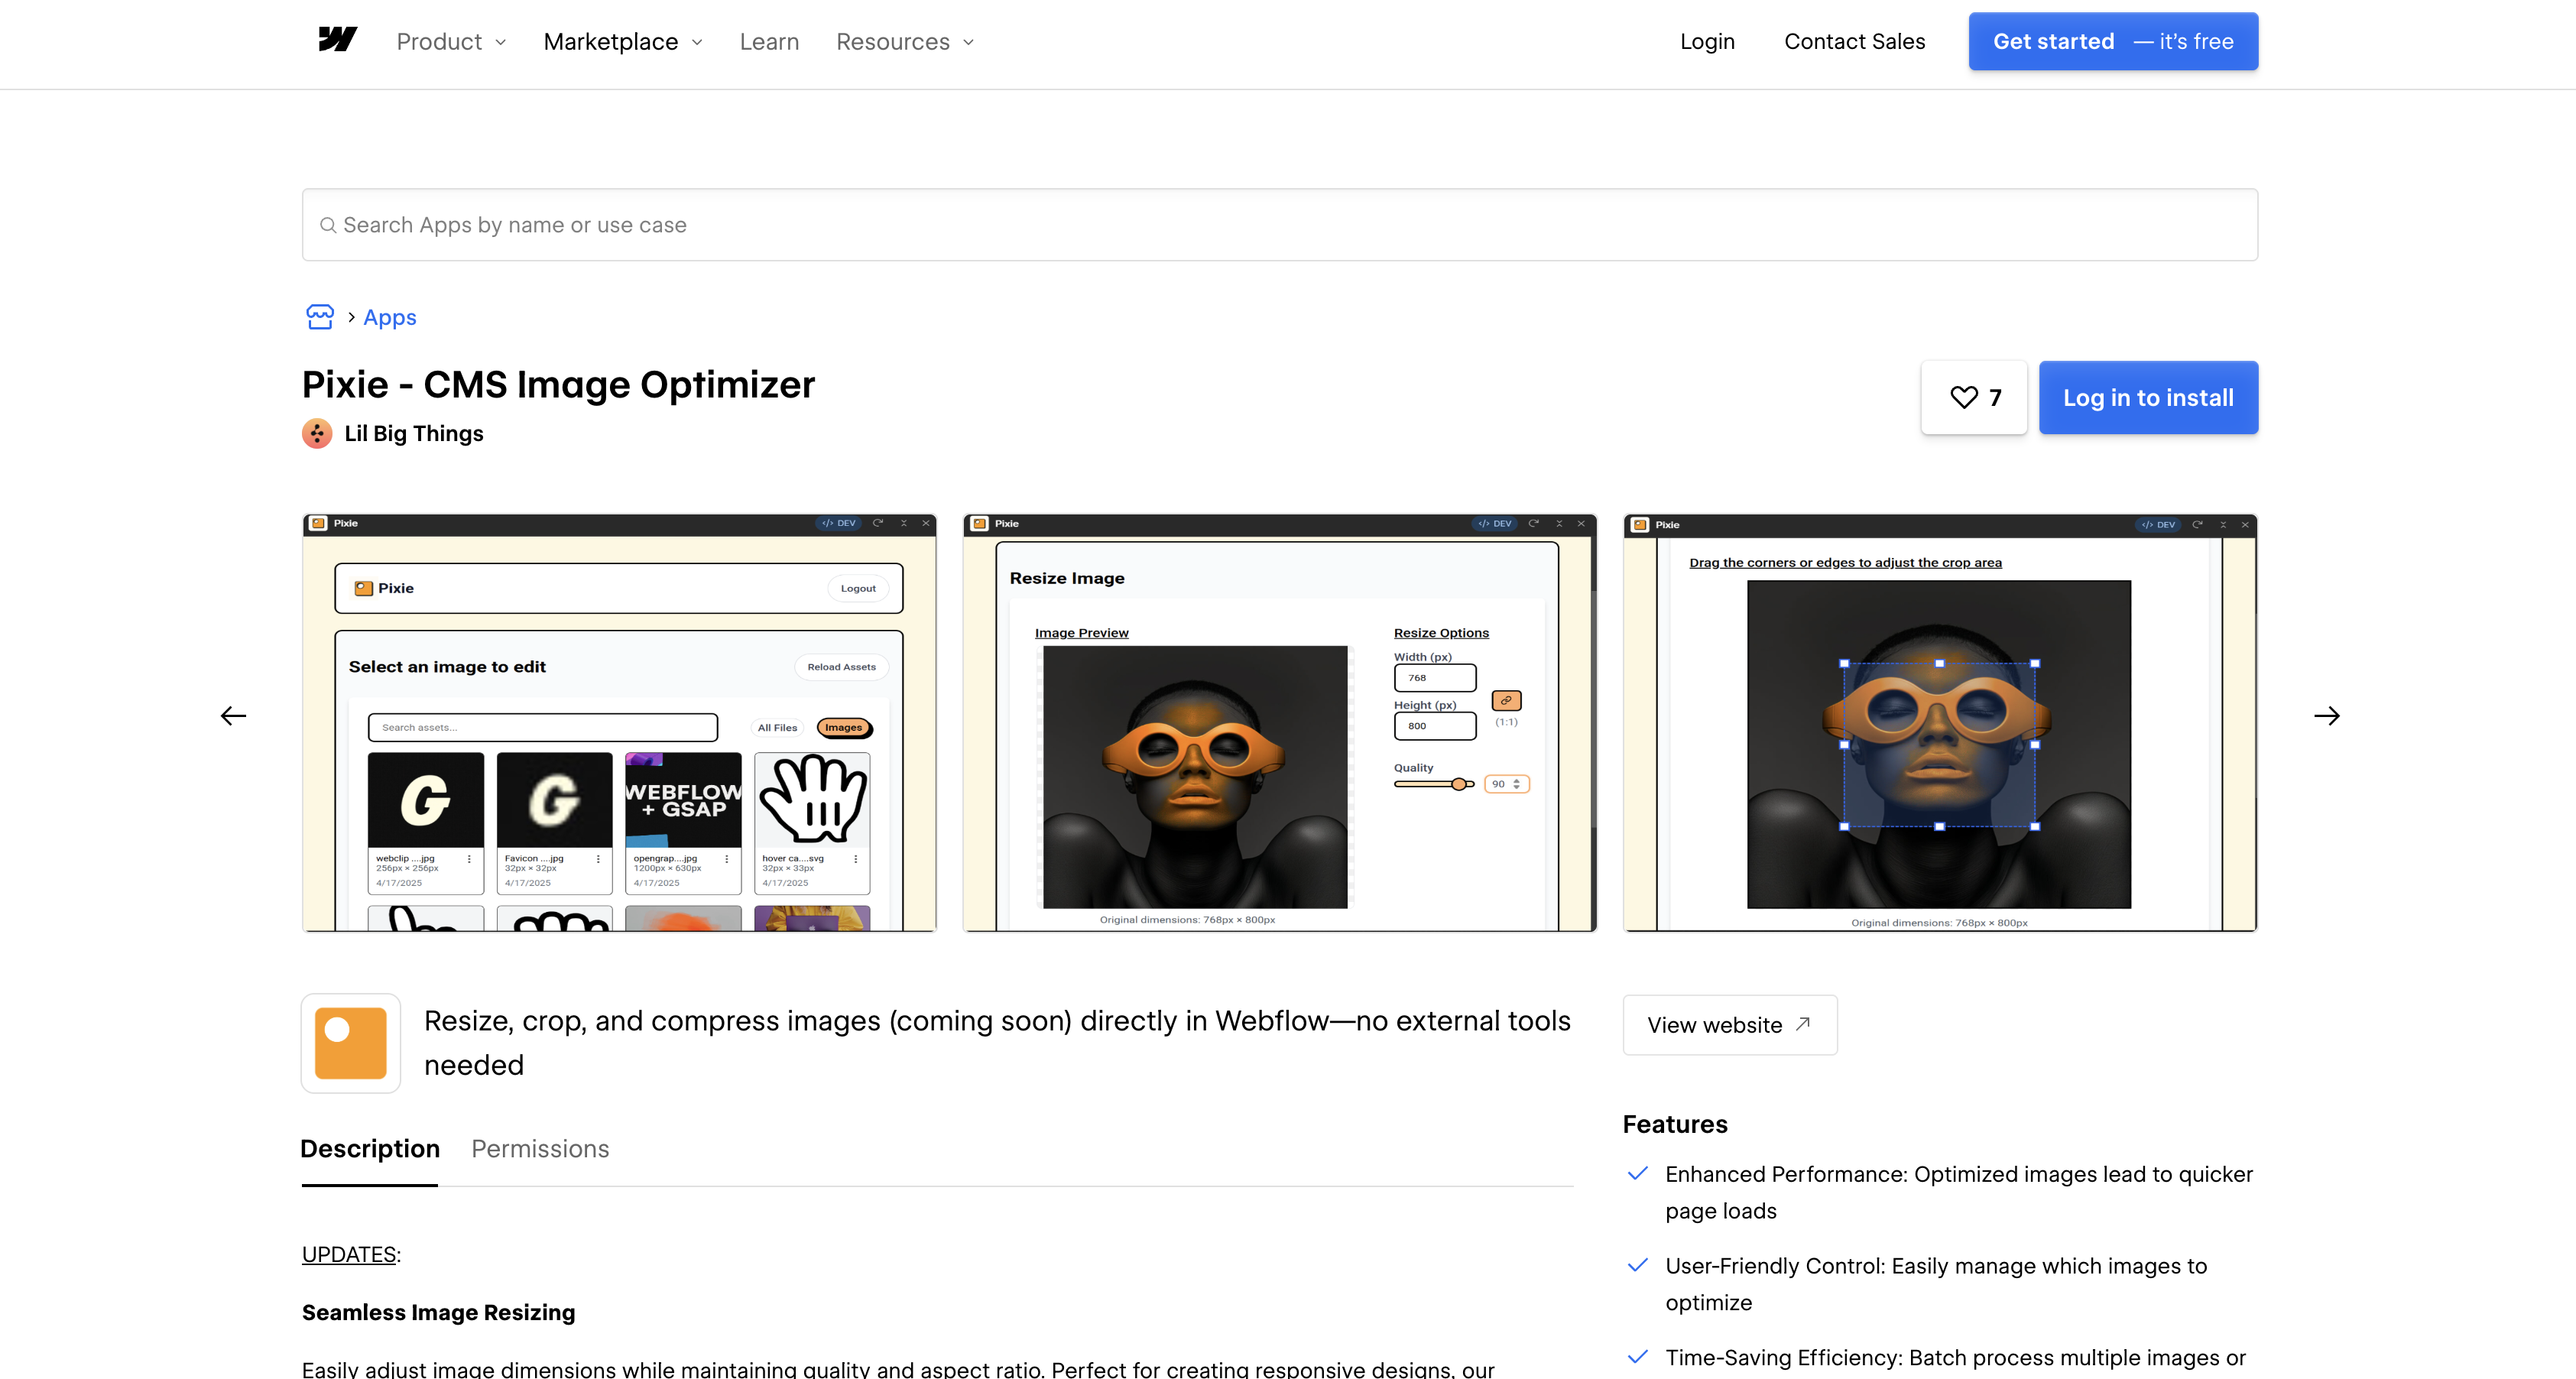
Pixie’s extension runs inside Webflow, so you can fix a single asset without opening the Pixie app or switching tools. The extension resizes and crops assets directly in Webflow. The cropping tool has a real-time preview and drag handles with pixel measurement. It works on both raster and SVG files.
To resize or crop an asset:
- Open the Apps panel in Webflow, search for Pixie, and click Install on site.
- Open the Pixie extension and select the asset you want to change.
Inside the extension you get:
- Exact pixel dimensions: set width and height directly, with an aspect ratio toggle for holding proportions while you resize.
- Cropping with drag handles: pull the crop area against a real-time preview that reports the exact pixel measurements as you go.
- Raster and SVG support: the same resize and crop controls apply to SVG files, not only to photographs and screenshots.
- An asset browser: filter by type, search by name, and page through a large library with lazy loading rather than one long scroll.
Compression inside the extension is listed as coming soon on the Marketplace listing. For now the extension handles dimensions while the Pixie app handles compression.
Compress CMS images with Webflow’s own tools
Webflow ships an image conversion tool that compresses existing JPEG, JPG and PNG assets by converting them to AVIF or WebP, and it runs across CMS Collections, not only the Assets panel. Open the Collections panel, click the more options icon, click Compress assets, choose a format, and republish afterwards. Webflow documents a request limit of 100 assets per request and 10 requests per minute, and recommends converting very large images one at a time.
The cost is that conversion replaces the original file in place and cannot be reversed inside Webflow, so download the originals or take a site backup first. Webflow also advises against converting OpenGraph images, which are not supported in either format. That irreversibility is the strongest practical argument for a tool that keeps its own record of what it processed.
Drive image and CMS work with the Webflow MCP server
If you already work through an AI client, the Webflow MCP server covers much of this without a third-party app holding scopes on your CMS. It is available on every Site plan including the free Starter plan, and it works inside each user’s existing role permissions. Its asset tool exposes compress_assets, which starts an asynchronous task compressing JPG, PNG and WebP assets to WebP or AVIF and replaces the files in place, rate limited to 10 calls per minute per site. The same connection lists assets, updates alt text, creates and bulk updates Collection items, and publishes.
Three documented limits shape how you script it. The CMS bulk update endpoint accepts 100 items per request, site publish operations are capped at one publish per minute, and each MCP authorization grants access to a single workspace, so a second workspace means re-authenticating.
Collection size sets the ceiling on all of it. The free Starter plan allows 50 CMS items, while the Premium plan carries 20,000 CMS items and 40 CMS Collections after the May 2026 plan change, up from the 10,000 the retired Business plan allowed. Any figure quoting a 10,000 item maximum predates that change.
So the split is narrower than the marketing on either side suggests. An agent on the MCP server already delivers Pixie’s headline claim, which is smaller CMS images in bulk, at no extra cost and with no extra scopes granted. Pixie earns an install when you need the parts Webflow does not do, which are resizing and cropping to specific pixel dimensions. Its log of what it already processed also matters more than it sounds, given that the native tool overwrites originals. If all you want is smaller files, use the built-in tool.
What you can build with the Pixie Webflow integration
Integrating Pixie with Webflow lets you optimize entire CMS image libraries in place without the download, compress, and re-upload cycle. The builds worth an install are the ones that turn on dimensions and repeatability rather than file size alone.
- Fast-loading blog collections: batch-optimize the image fields on a blog collection, so the images served through a Collection List are the compressed WebP versions once the site is published.
- Standardized editorial images: resize every hero and thumbnail in a collection to one width and height, so a layout stops reflowing when an author uploads an oversized photo.
- Client handoff cleanup: deliver a client site with every CMS image field resized to its display dimensions and converted to WebP before launch, with Pixie’s log history recording the changes.
- Compressed Ecommerce catalogs: compress and convert product images and product-related images, so category and product pages serve those files once the site is published.
- Multi-client agency maintenance: run recurring passes across every client site from one Pixie login, with duplicate-optimization tracking keeping repeat passes off files already handled.
- Agent-driven asset maintenance: point an MCP-connected assistant at a site to list its assets, compress the oversized ones and fill missing alt text, with Pixie reserved for resize and crop steps.
Automatic compression on new uploads is listed as coming soon on Pixie’s roadmap, so every run starts manually today. Every one of these patterns starts from a Collection schema you can address programmatically, so read the Webflow CMS API guide before you script any of it yourself.
Frequently asked questions
Yes. The Pixie listing on the Webflow Marketplace is published by Lil Big Things, is marked "Approved by Webflow," and carries the enhanced security and management badge. From the listing, click Add to site and select your Workspaces or sites. Then click Authorize app to grant Pixie the CMS, asset, and Ecommerce permissions it needs.
Not yet. Automated set-it-and-forget-it optimization is listed as coming soon on Pixie’s own guide, alongside thumbnail generation. Pixie documents no public API or webhooks that could trigger a run externally. Until the feature ships, start every optimization run yourself from the Pixie app.
Publish your site after a Pixie run. Pixie's official pages don't state whether it publishes changes automatically. Staged CMS item edits appear on the live site only after a publish, per the Collection items overview. Confirm the behavior for your setup with Pixie support at veer@littlebigthings.dev before running a large batch.
Pixie processes PNG, JPEG, and WebP files, per the pricing page. Supported field types are CMS image fields, CMS image gallery fields, Ecommerce product images, and product-related images. Images inside rich text fields are on the roadmap but not supported today. GIF and animated WebP support is coming soon.
Webflow’s built-in tool converts assets in bulk, but with fewer controls. It offers no lossless mode and no resize step, replaces the original assets, and should not be used on OpenGraph images. Pixie adds a Lossless mode, per-field resize settings, and duplicate tracking, and it keeps a log of what it has already processed. The section above on Webflow’s own tools covers the tradeoff in full.
Description
The Marketplace app targets specific CMS collections and image fields for bulk compression and WebP conversion. The in-Webflow extension resizes and crops single assets, so there is no download and re-upload cycle.
This integration page is provided for informational and convenience purposes only.

Unsplash
Connect Unsplash with Webflow to search, insert, and manage free stock photography without leaving your design environment.

SVGator
Connect SVGator with Webflow to generate and embed interactive SVG animations on any page without writing animation code from scratch.

StickPNG
Connect StickPNG, a free transparent PNG library, with Webflow to add pre-cut product images, logo overlays, and decorative elements to page compositions without manual background removal.

Pixabay
Connect Pixabay with Webflow to source and publish royalty-free images, videos, and illustrations on your site without per-asset licensing fees.

Pngtree
Connect Pngtree, a graphic design asset marketplace, with Webflow to add transparent PNGs, SVG illustrations, and background textures to pages, CMS collections, and campaign layouts.

Pexels
Connect Pexels, a free stock photo and video platform, with Webflow to source royalty-free visuals for pages, CMS collections, and video backgrounds without licensing fees.

Lottieflow by Finsweet
Connect Lottieflow by Finsweet with Webflow to add free, color-customizable Lottie animations to any page using the native Lottie element and Interactions panel.

Lordicon Animated Icons
Connect Lordicon Animated Icons with Webflow to play animated Lottie icons on hover, click, and scroll without a motion designer.

LottieFiles
Bring lightweight, scalable vector animations to your Webflow sites with LottieFiles — the platform that makes adding motion as simple as uploading an image.
Related integrations
Get started for free
Try Webflow for as long as you like with our free Starter plan. Purchase a paid Site plan to publish, host, and unlock additional features.
