

Marketo
Connect Adobe Marketo Engage, a B2B marketing automation platform, with Webflow to render lead capture forms, track visitor behavior with Munchkin, and trigger Smart Campaign workflows from page visits and form submissions.
Fast, branded B2B pages can capture conversions, but without native marketing automation, form submissions sit in the built-in database with no lead scoring, progressive profiling, or email nurture triggers. For demand generation teams, that gap means manual steps between every form fill and follow-up.
Connecting Marketo closes the gap. Forms render directly on your pages, submissions flow into Marketo's lead database, Smart Campaigns trigger on form fills or page visits, and Munchkin tracking ties anonymous behavior to known leads on conversion. The result is a single pipeline from web visit to CRM handoff, with no middleware required for the core workflow.
How to integrate Marketo with Webflow
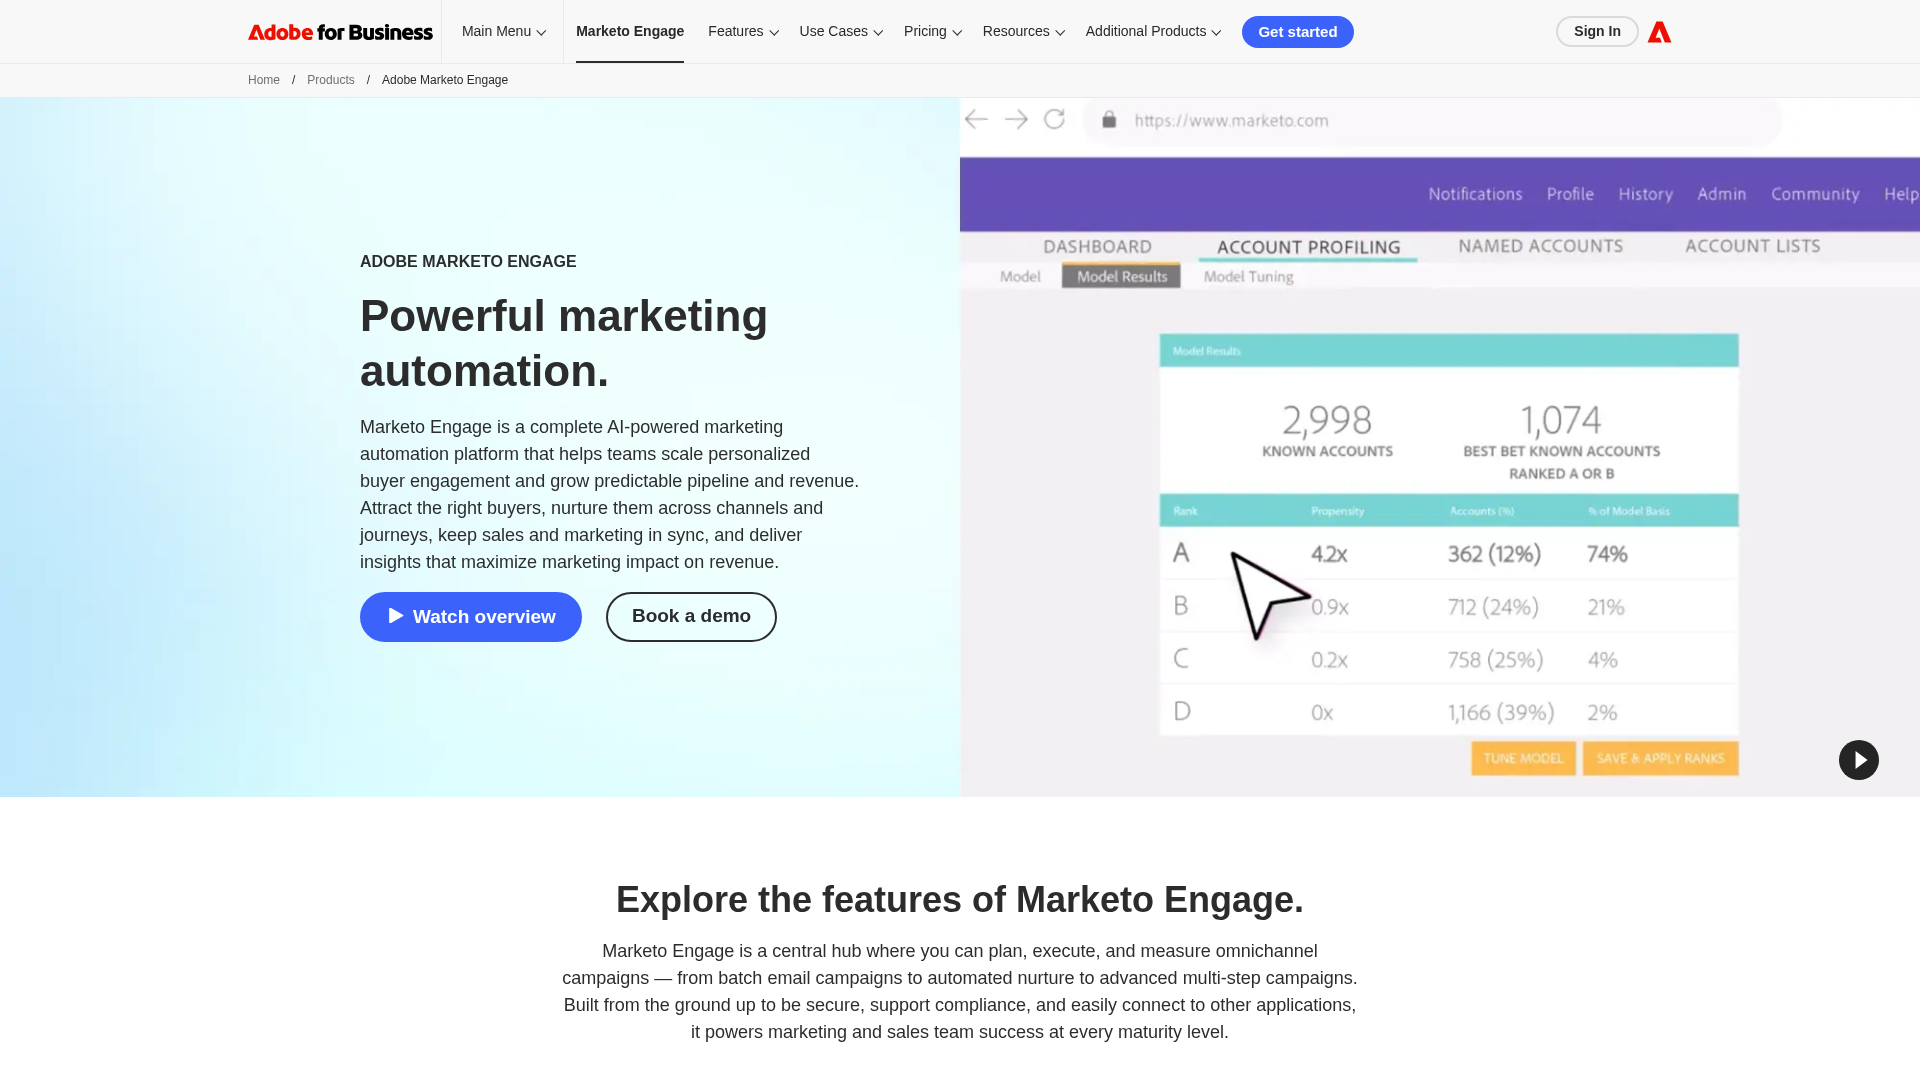
What is Marketo? Adobe Marketo Engage is a B2B marketing automation platform within Adobe Experience Cloud. It includes lead management, email campaigns, behavioral scoring, account-based marketing, and multi-channel engagement across the full buying journey. Marketo also provides a REST API, JavaScript-based form embedding, and a visitor tracking library called Munchkin.
Teams typically connect these two platforms when they need Webflow-hosted landing pages to feed leads directly into Marketo's scoring and nurture engine. The integration removes the manual handoff between web design and marketing operations, so form changes, tracking updates, and campaign page variants can go live without cross-team coordination.
You can connect Marketo and Webflow in four ways:
- The Adobe Marketo Engage app lets you design forms and route submissions without writing code.
- Custom code embeds let you add Munchkin visitor tracking and Marketo Forms 2.0 to any page.
- Zapier connects form submissions to Marketo lead creation and list management through automation workflows.
- The Webflow and Marketo APIs give you full control over lead syncing, Webflow CMS updates, Smart Campaign triggers, and event registration, but require server-side development.
Most implementations combine two or more of these methods depending on the complexity of the setup.
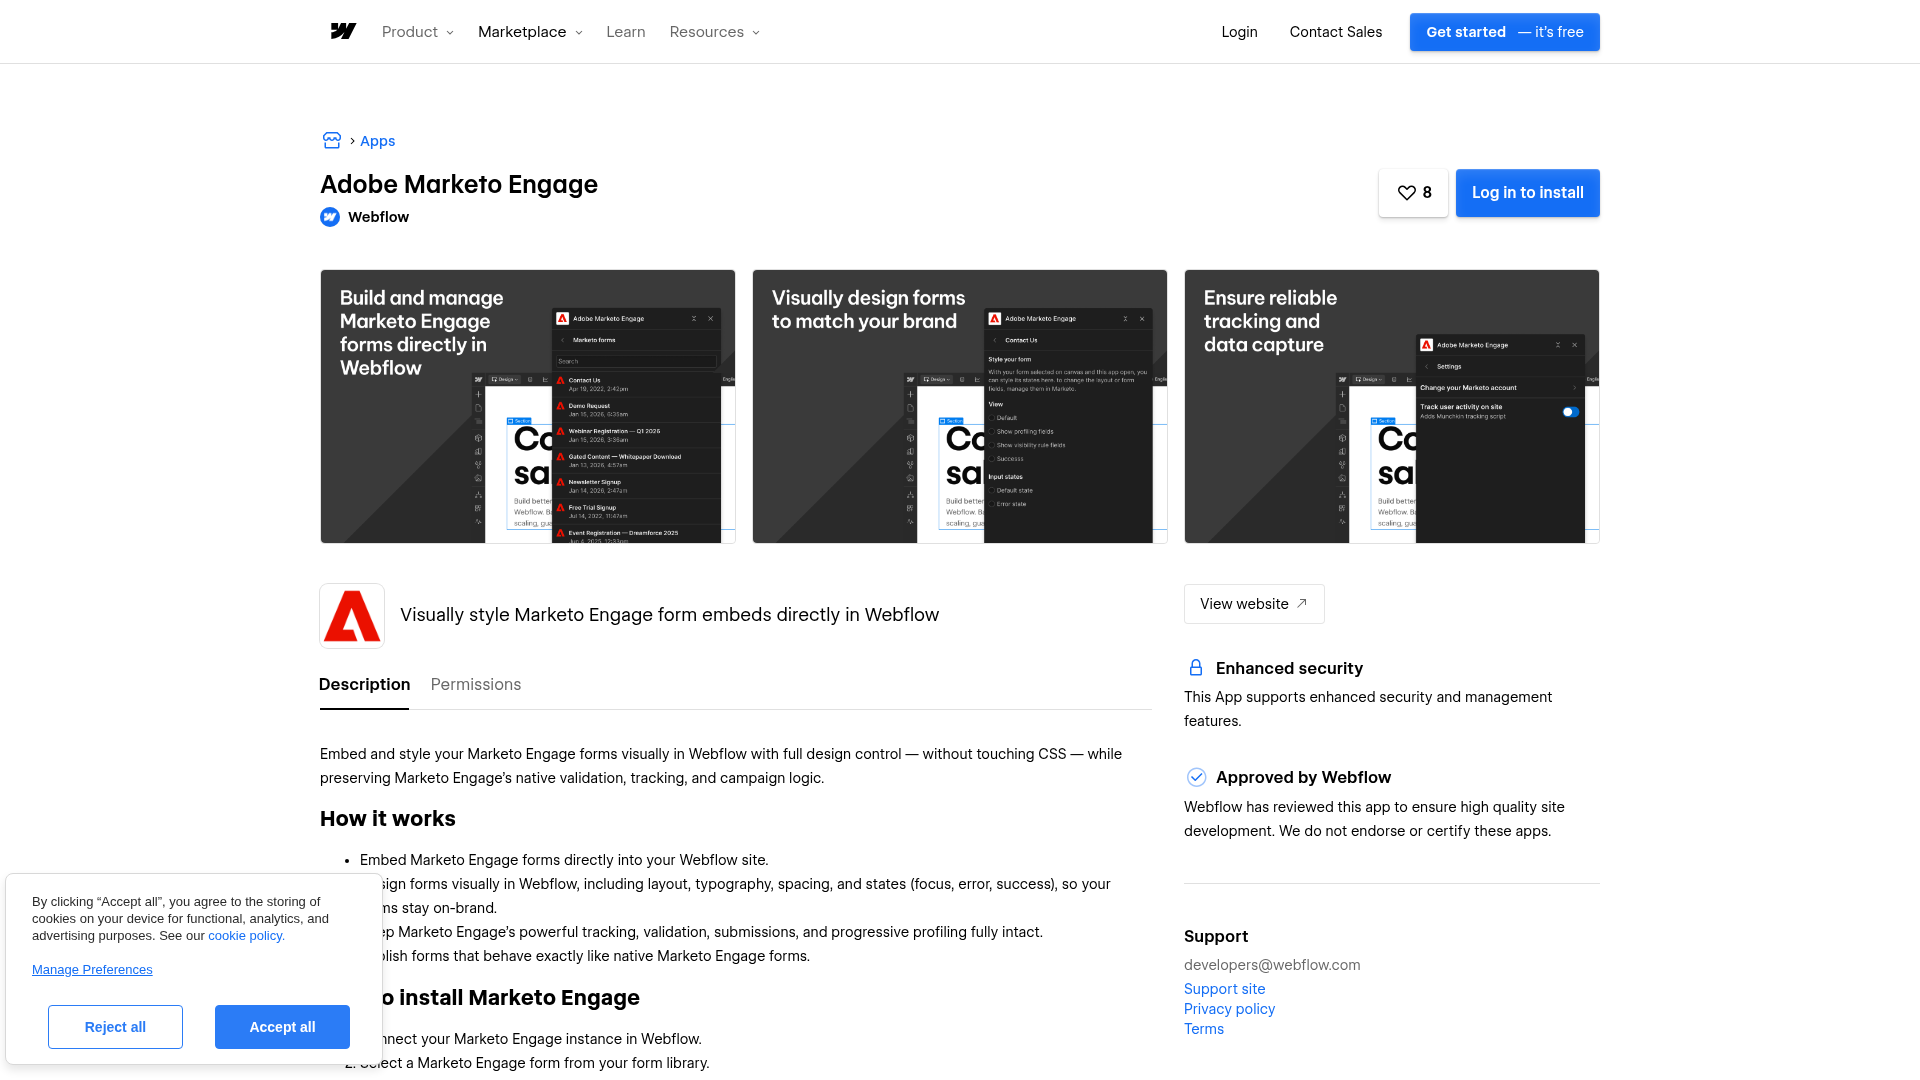
Install the Adobe Marketo Engage app
The Adobe Marketo Engage app is a co-developed integration with Adobe, available on the Webflow Apps Marketplace. You can design Marketo forms visually with a live preview, then publish to render fully functional Marketo forms on the live site. Submissions go directly to Marketo's lead database, and core Marketo form capabilities such as validation, progressive profiling, submission routing, and Smart Campaign triggers remain intact.
This is the recommended method when you need branded lead capture forms without writing custom embed code. The app is "Approved by Webflow" and has permissions for reading authorized user information, read/write CMS data, read/write custom code, and reading site data and publishing.
To set up the integration:
- Go to the Adobe Marketo Engage app listing on the Webflow Apps Marketplace and click Install.
- Authorize the app to access your site data and CMS.
- Connect your Marketo instance by entering your Marketo credentials when prompted.
- Add a Marketo form element to your page and configure the form fields using the visual interface.
- Publish the site to activate the live Marketo form.
On your pages, the app keeps these Marketo capabilities in place:
- Progressive profiling, which shows different fields to returning visitors based on what they have already submitted
- Form validation rules configured in Marketo
- Smart Campaign triggers that fire on form submission
- Thank-you page redirects or inline success messages
- Submission tracking and lead data routing to Marketo's database
The app is the closest match to using Marketo forms on a native Marketo page while keeping the design workflow in Webflow.
For new implementations, use this app instead of the legacy Marketo forms integration. The legacy approach operates through Workspace settings and does not provide the visual design workflow. See the full setup guide for detailed configuration steps.
Add Marketo tracking and forms with custom code
When you need site-wide visitor tracking or more control over form placement than the Marketplace app provides, you can add Marketo's JavaScript libraries directly to your site. This approach uses Munchkin for anonymous and known visitor tracking and Marketo Forms 2.0 for rendering forms inside Code Embed elements. Both methods work independently and do not require the Marketplace app.
Add Munchkin tracking to your site
Munchkin is Marketo's client-side JavaScript library that tracks page visits, link clicks, and visitor behavior. It creates anonymous lead records and associates them with known leads when a visitor fills out a Marketo form or clicks a tracked Marketo email link. Adding Munchkin to your site gives Marketo behavioral data for lead scoring, Smart Campaign triggers, and attribution.
To install Munchkin site-wide using custom code in head and body tags:
- In Marketo, go to Admin > Munchkin under the Integration section.
- Select Asynchronous for the tracking code type and copy the JavaScript snippet. Always use the code from your own account, since it contains your unique account identifier.
- Open Site Settings > Custom Code.
- Paste the Munchkin script into the Head Code field.
- Click Save, then publish the site.
To add Munchkin to specific pages only, open the target page, go to Page Settings > Custom Code, and paste the snippet into the Head field.
Munchkin supports configuration options for GDPR compliance. Setting anonymizeIP: true anonymizes recorded IP addresses. Setting cookieAnon: false prevents cookie creation for new anonymous leads. Using apiOnly: true (Munchkin v155+) lets you load the library before consent and only fire tracking after the visitor opts in. Munchkin cookies are domain-scoped, so anonymous activity across different domains does not automatically merge until the lead submits forms on both sites. These settings give you more control over how tracking behaves on your site.
Embed Marketo Forms 2.0
Marketo Forms 2.0 renders a Marketo-hosted form directly on your page. Submissions go straight to Marketo's lead database without middleware. Smart Campaigns trigger on submission, and progressive profiling works as it would on a native Marketo landing page. Form pre-fill does not work on external pages. Pre-fill only functions on native Marketo landing pages.
To embed a form:
- In Marketo, go to Marketing Activities, select your form (it must be in an approved state), then click Form Actions > Embed Code and copy the snippet.
- Drag a Code Embed element onto the canvas where you want the form to appear.
- Double-click the Code Embed element to open the HTML editor and paste the Marketo embed code.
- Click Save & Close, then publish the site.
The embed code follows this pattern:
<script src="//app-ab00.marketo.com/js/forms2/js/forms2.min.js"></script>
<form id="mktoForm_1057"></form>
<script>
MktoForms2.loadForm("//app-ab00.marketo.com", "785-UHP-775", 1057);
</script>
The three parameters in loadForm() are pre-populated with your account-specific values: the Marketo instance URL, your Munchkin ID, and the form version ID. You can customize the form's post-submission behavior using the Forms 2.0 API. For example, calling form.onSuccess() with return false prevents page redirect and lets you show an inline thank-you message instead.
To use the Code Embed element, you need a Core, Growth, Agency, or Freelancer Workspace, or an active Site plan. Custom code does not render in the canvas preview. You will only see the live form on the published site.
Embed a Marketo landing page with an iframe
If you have an existing Marketo landing page with complex form logic, you can embed the entire page inside your page using an iframe. This keeps all form processing within Marketo's infrastructure.
To add an iframe embed:
- Drag a Code Embed element onto the target page.
- Paste the following code, replacing the URL with your Marketo landing page address:
<iframe
  src="https://go.yourcompany.com/your-landing-page-name"
  width="100%"
  height="600"
  frameborder="0">
</iframe>
- Click Save & Close and publish the site.
Use this method when you want to keep the full landing page logic in Marketo rather than rebuild the experience in Webflow.
Always use the HTTPS version of the landing page URL to avoid browser security warnings. Pre-fill inside iframes requires passing the mkt_tok parameter from the parent page URL to the iframe source, which needs additional JavaScript.
Connect with Zapier
If you need to route form submissions to Marketo without installing embed code or building API integrations, Zapier offers direct Webflow-to-Marketo connections. It is useful for multi-step workflows that go beyond form capture, such as adding leads to specific Marketo lists, updating existing lead records, or syncing Marketo program data back into Webflow CMS collections.
Zapier offers a pre-built template that creates or updates Marketo leads from new form submissions. Verified triggers and actions include:
- Webflow form submission triggers Marketo lead creation or update
- Webflow form submission adds a lead to a specific Marketo list
- Marketo lead update triggers Webflow CMS item update
- New Marketo program creates a CMS item in a Webflow collection
- New Webflow ecommerce order creates or updates a Marketo lead
The workflows handle both lead capture and basic two-way syncing.
To set up a basic Zapier connection:
- Create a new Zap with the trigger set to Webflow > New Form Submission.
- Set the action to Marketo > Create or Update Lead.
- Map your form fields to the corresponding Marketo lead fields.
- Test and activate the Zap.
This gives teams a no-code option between form capture and lead creation.
If you add a custom form action URL to a form, native form submission notifications stop firing. Use the native App integrations rather than overriding the form action.
Build with the Webflow and Marketo APIs
For custom workflows that the Marketplace app and automation tools cannot handle, both platforms provide REST APIs. API integration is the right path for bidirectional CMS syncing, triggering Smart Campaigns from Webflow events, personalizing page content based on Marketo lead data, and syncing event registrations at scale. All Marketo REST API calls require server-side middleware, such as Vercel Functions, AWS Lambda, or Cloudflare Workers, because Marketo's API endpoints do not include browser origins in their CORS allow-list. Client-side JavaScript calls from custom code will fail.
These are the main APIs for this integration:
- The Marketo REST API handles lead creation, updates, Smart Campaign triggers, program membership, and custom activities
- The Webflow Data API handles CMS collection items and form submission retrieval
- Webflow webhooks trigger real-time events for form submissions, page publishes, and ecommerce orders
These APIs are the main building blocks for custom Webflow-Marketo workflows.
Marketo authenticates using 2-legged OAuth 2.0 with the Client Credentials grant. Tokens expire after one hour. The access_token query parameter is no longer supported. Pass the token in the Authorization: Bearer header instead. You can find your Client ID and Secret under Admin > Integration > LaunchPoint in Marketo, and your Identity URL and Base URL under Admin > Integration > Web Services.
Sync Webflow form submissions to Marketo leads
Register a webhook to listen for form submissions, then forward the data to Marketo's lead endpoints through your middleware. Use submitForm for new leads, since it generates a form-fill activity record that can fire Smart Campaign triggers.
To implement the sync:
- Register a
form_submissionwebhook viaPOST /v2/sites/{site_id}/webhookswith your middleware URL as the destination. - When your middleware receives the payload, extract the form field key/value pairs and the submitter's email address.
- Check for an existing lead in Marketo using
GET /rest/v1/leads.json?filterType=email&filterValues=<email>. - For new leads, submit via
POST /rest/v1/leads/submitForm.jsonto create a form-fill activity that fires Smart Campaign triggers. For existing leads, update viaPOST /rest/v1/leads.jsonwith theupdateOnlyoperation.
Use the submitForm endpoint instead of leads.json for new leads, since it generates a form-fill activity record. That record lets you trigger Smart Campaigns attributed to a specific program, which the standard sync endpoint does not.
Push Marketo data to Webflow CMS collections
Use Marketo webhooks to push lead or program data into CMS items whenever a Smart Campaign fires. Marketo webhooks are outbound HTTP calls that execute as flow steps in trigger campaigns.
To configure a Marketo-to-Webflow webhook:
- Store your Webflow API Bearer token and target Collection ID as My Tokens at the program level in Marketo, for example,
{{my.WebflowAPIToken}}and{{my.WebflowCollectionID}}. - In Marketo Admin > Webhooks, create a new webhook with the URL
https://api.webflow.com/v2/collections/{{my.WebflowCollectionID}}/items/live, request typePOST, and request token encoding set toJSON. - Set custom headers:
Authorization: Bearer {{my.WebflowAPIToken}}andContent-Type: application/json. - Build the payload template using Marketo lead tokens mapped to your collection field slugs:
{
  "fieldData": {
    "name": "{{lead.First Name}} {{lead.Last Name}}",
    "email": "{{lead.Email Address}}",
    "company": "{{lead.Company}}",
    "marketo-id": "{{lead.Id}}"
  },
  "isArchived": false,
  "isDraft": false
}
- Configure response mapping to write the returned item
idto a custom Marketo lead field. This lets subsequentPATCHcalls reference the correct CMS item for updates. - Add the Call Webhook flow step to a trigger campaign. Webhook calls only execute in trigger campaigns, not batch campaigns.
The webhook fires whenever the campaign's trigger condition is met, such as "Fills Out Form" or "Data Value Changes." For batch campaigns, add a Request Campaign flow step that targets a trigger campaign containing the webhook call.
Trigger Smart Campaigns from Webflow events
When a Webflow event, such as a form submission, order, or CMS update, should kick off a Marketo campaign workflow, your middleware can call Marketo's campaign trigger endpoint.
To set this up:
- Register a webhook for the relevant trigger type, for example,
form_submission. - In Marketo, configure a Smart Campaign with a "Campaign is Requested" trigger and set the source to "Web Service API."
- In your middleware, look up the Marketo lead ID using
GET /rest/v1/leads.json?filterType=email&filterValues=<email>. If the lead does not exist, create it first withPOST /rest/v1/leads.json. - Call
POST /rest/v1/campaigns/{campaignId}/trigger.jsonwith the lead ID and any optional My Tokens:
{
  "input": {
    "leads": [{ "id": 1002200 }],
    "tokens": [
      { "name": "{{my.WebinarTitle}}", "value": "Scaling Customer Engagement" }
    ]
  }
}
The trigger endpoint supports up to 100 leads per request. The Smart Campaign must have the "Campaign is Requested" trigger configured in Marketo before the API call will execute.
What you can build with the Marketo Webflow integration
Integrating Marketo with Webflow lets you run demand generation from your website without maintaining separate landing page tools or manual data handoffs.
- Build a resource library where each downloadable asset uses a Marketo form. Submissions create leads in Marketo with behavioral scores based on which assets they download, then route high-scoring leads to sales and enroll others in nurture sequences.
- Design event and webinar registration pages that sync attendees directly to a Marketo program. Marketo sends confirmation emails on registration, reminder sequences before the event, and follow-up campaigns based on attendance data.
- Use Munchkin tracking combined with Webflow Optimize to display industry-specific or account-specific content to known visitors. A returning lead from a target account sees messaging tailored to their company and funnel stage, driven by Marketo's lead data.
- Embed Marketo forms that ask different questions on each visit. A first-time visitor provides name and email, while a returning lead sees fields for company size and budget timeline. Over multiple interactions, Marketo builds a complete prospect profile without asking for everything upfront.
The integration can support both simple lead capture and more advanced lifecycle marketing workflows.
If you need more control over bidirectional data syncing or custom campaign logic, the API integration path covers those cases.
Frequently asked questions
Use Marketo forms if you need lead scoring, progressive profiling, or Smart Campaign triggers on submission. Native Webflow forms submit to Webflow's own backend and do not create Marketo leads or fire Marketo workflows without a separate connector like Zapier or a webhook-to-API integration.
The Adobe Marketo Engage app renders actual Marketo forms on your Webflow pages, preserving core Marketo form functionality such as progressive profiling, validation, submission routing, and Smart Campaign triggers while giving you visual design control in Webflow.
Yes. Munchkin is client-side JavaScript that is fully compatible with Webflow's hosting. Paste the script into Site Settings > Custom Code > Head Code and publish. It tracks page visits, link clicks, and associates anonymous visitor records with known leads on form fill.
Two things to watch: ad blockers and browser privacy features (Safari ITP, Firefox ETP) can intercept Munchkin, and the tracking cookie is domain-scoped, so visitors across multiple domains are not merged automatically.
No. Marketo's REST API endpoints do not include browser origins in their CORS allow-list, so client-side JavaScript calls from Webflow will fail. All Marketo API calls must go through server-side middleware such as Vercel Functions, AWS Lambda, or Cloudflare Workers.
Marketo's client-side libraries, Munchkin and Forms 2.0, work directly on Webflow pages, but any integration that uses
POST /rest/v1/leads.jsonor similar endpoints needs a server-side layer. See Marketo's integration best practices for architectural guidance.No. Form pre-fill only works on native Marketo landing pages created through the Insert Element option. When you embed Marketo Forms 2.0 on an external page like Webflow, pre-fill is not supported. Progressive profiling, which shows different fields to returning visitors, does work on embedded forms and through the Marketplace app.
Use Munchkin's built-in privacy controls to handle GDPR consent on your Webflow site. Set
apiOnly: truein the Munchkin init configuration to load the library without firing any tracking, then callvisitWebPageexplicitly only after the visitor gives consent. SetcookieAnon: falseto block cookie creation for new anonymous visitors. AddanonymizeIP: trueto anonymize recorded IP addresses.For opt-out links, appending
?marketo_opt_out=trueto any URL sets a cookie that disables all Munchkin tracking for that visitor. See Marketo's privacy settings documentation for the full list of options. These settings give you more control over how tracking behaves on your Webflow site.
Description
Design Marketo forms visually in Webflow using the co-developed app, embed tracking scripts, or connect both platforms through APIs and automation tools.
This integration page is provided for informational and convenience purposes only.

Mailjet
Connect Mailjet with Webflow to automate email campaigns, sync form submissions, and send transactional emails.
Ortto
Connect Ortto to Webflow and capture leads from your website without rebuilding forms on another platform.
AtomPark Software
Connect AtomPark with Webflow to route form submissions to bulk email and SMS campaigns
ConnectMagic
Connect ConnectMagic with Webflow to sync form submissions and ecommerce events to Klaviyo for email marketing automation, abandoned cart recovery, and customer segmentation.
Campaign Monitor
Connect Campaign Monitor with Webflow to automate subscriber capture from form submissions, trigger email sequences based on website activity, and sync customer data between platforms.
Flodesk
Connect Flodesk, an email marketing platform, with Webflow to capture subscribers using embedded forms, automation workflows, or direct API integration.
SendGrid
Webflow doesn't include native SendGrid connectivity, so you'll connect the platforms through embedded signup forms, automation tools, or custom API implementations.
Brevo
Connect Brevo, a marketing and sales platform, with Webflow to sync form submissions to email lists, send transactional emails, track visitor behavior, and automate campaign workflows.
Constant Contact
Connect Constant Contact, an email marketing and automation platform, with Webflow to capture form subscribers, sync contacts to email lists, and trigger automated campaigns from site activity.
Related integrations
Get started for free
Try Webflow for as long as you like with our free Starter plan. Purchase a paid Site plan to publish, host, and unlock additional features.
