






Google Ads
Connect Google Ads, Google's advertising platform, with Webflow to create Performance Max campaigns, install conversion tracking, and report on ad performance without leaving Webflow.

Google Ads for Webflow helps teams create and manage Google Ads campaigns directly in Webflow, bringing campaign creation, conversion tracking, and performance reporting into a single workspace. The app handles automatic tag insertion, Performance Max campaign management, and real-time metrics without writing code, while tag-based methods and API integrations extend what the app provides for deeper tracking needs.
Built for marketing managers, agency professionals, e-commerce operators, and startup founders, this integration fits teams that want to reduce platform switching, improve conversion attribution, and give Google's AI better data for bid optimization.
How to integrate Google Ads with Webflow
What is Google Ads? Google Ads is an advertising platform that places ads across Google Search, YouTube, Gmail, Maps, and a network of partner websites. Advertisers set budgets, define targeting criteria, and pay per click or conversion. Performance Max, the campaign type supported by Google Ads for Webflow, uses Google's AI to distribute ads across all Google channels automatically.
Teams connect Google Ads to Webflow when they want to manage campaigns alongside the pages those campaigns drive traffic to. The combination is especially useful for lead generation sites where form submissions need to be tracked as conversions, and for e-commerce stores where purchase data feeds back into Google's bidding algorithms.
The Google Ads-Webflow integration supports 4 approaches:
- The Google Ads for Webflow app handles campaign creation, automatic tag insertion, and performance dashboarding without code.
- Tag-based tracking methods let you install Google Tag Manager or the Google tag directly for conversion tracking and remarketing.
- Zapier connects Webflow form submissions and orders to Google Ads conversion uploads and audience lists.
- The Webflow Data API and Google Ads API give you full control over offline conversion uploads, audience syncing, and CMS-driven ad feeds, but require server-side development.
Most implementations combine two or more of these methods depending on the complexity of the setup.
Install the Google Ads for Webflow app
The Google Ads for Webflow app is the official app for Google Ads for Webflow, built by Webflow in partnership with Google. It lets you create and manage Performance Max campaigns, track clicks, impressions, conversions, and cost, and pull creative assets from the Webflow asset library, all without leaving Webflow. The app is currently in beta and has 1,000+ installs. Users must have the designer role assigned in Webflow to install it.
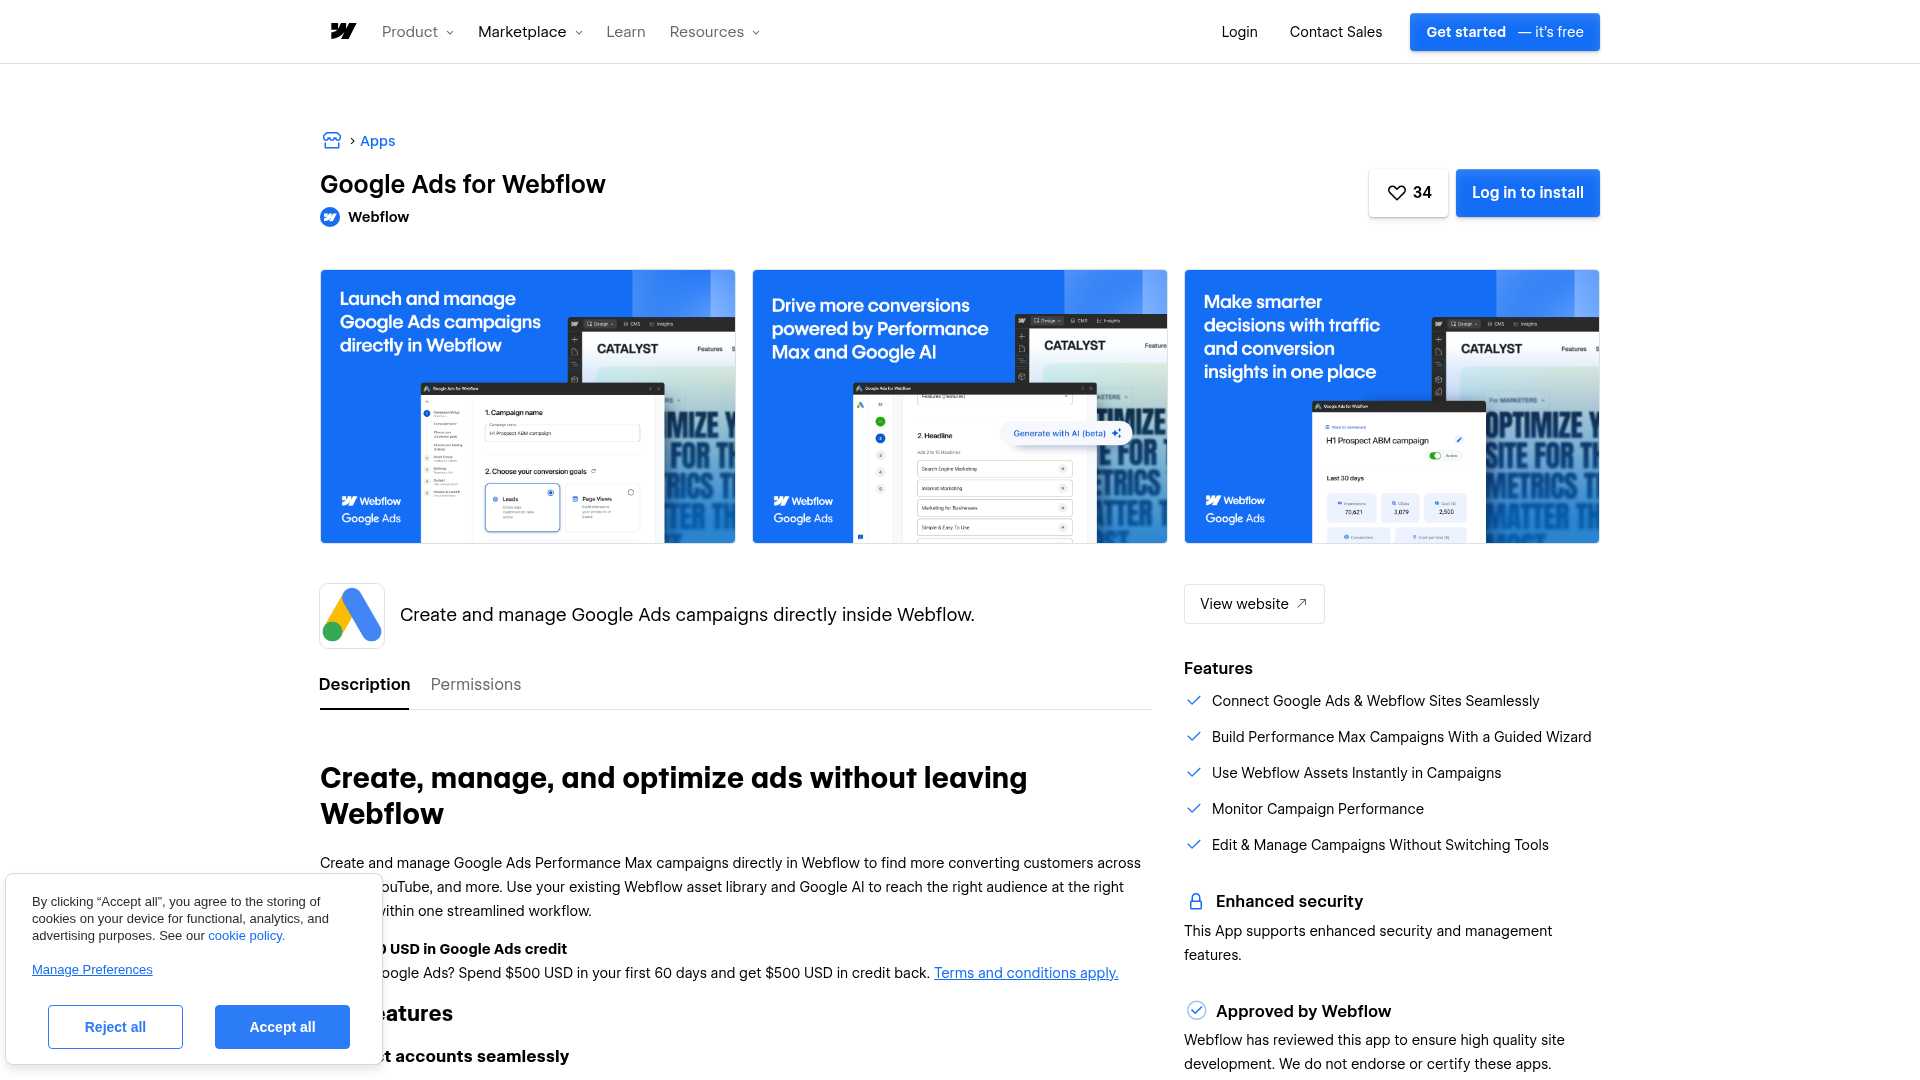
To set up the integration:
- Go to the Google Ads for Webflow marketplace listing and click Install App.
- Choose the Webflow site(s) to connect.
- Link an existing Google Ads account or create a new one using the in-app prompts, then click Connect App.
- Open the app from the Apps panel in Webflow.
- Create a Performance Max campaign by configuring your conversion goal (form submission or page view), budget, geographic and language targeting, final URLs, and creative assets (headlines, descriptions, images, logos).
- Preview and publish the campaign.
The app provides these capabilities once a campaign is live:
- Automatic Google Tag insertion for conversion tracking (the tag is added after campaign launch, not at install time)
- In-Webflow dashboard showing clicks, impressions, conversions, and cost
- Campaign pause, enable, and budget editing directly inside Webflow
- Support for Enhanced Conversions when enabled on the Google Ads account
- Beta access to Google Ads Gen AI for generating headlines, descriptions, and image assets from site content
- Connection of multiple Webflow sites to a single Google Ads account
The app only supports Performance Max campaigns. Standard Search, Display, Shopping, and Video campaign types are not available through it. Teams that need granular keyword-level control should use the full Google Ads interface for campaign management and pair it with one of the tag-based tracking methods below.
Add Google Ads tracking with code and tag methods
For teams that manage campaigns in the Google Ads interface and only need Webflow to handle conversion tracking, several tag-based methods work without the marketplace app. These methods are also the right fit if you run campaign types the app does not support, such as Search or Display campaigns.
All tag-based methods require a paid Webflow site plan (Basic, CMS, or Business) for custom code in head and body tags. The one exception is URL-based conversion tracking, which works on all plans including free.
Track conversions with URL-based tracking (no code required)
URL-based conversion tracking requires no tag installation on your Webflow site and works on all Webflow plans, including free. Configuration is done in the Google Ads interface, with one Webflow-side step: setting your form to redirect to a thank-you page URL in Webflow's form settings.
To set up URL-based tracking:
- In Google Ads, go to the conversions table and select + Create event.
- Name the event and select Create without code.
- Choose the trigger type (page visit or form completion) and enter the thank-you page URL.
- Click Save event, then Select events, then Save and continue.
- In Webflow, configure the form to redirect to the thank-you page URL after submission in the form settings panel.
This method is less precise than tag-based tracking because it relies on page visits rather than actual event firing. It works well for simple lead generation funnels with a single conversion action.
Install Google Tag Manager with the Google Site Tools app
The Google Site Tools app connects Google Tag Manager, GA4, and Google Search Console to a Webflow site through a guided OAuth flow. It automatically injects scripts without any manual code placement.
To set up GTM through the app:
- Open the Webflow App Marketplace and install the Google site tools app.
- Log in with your Google account within the app.
- Select your GTM container from the app interface.
- Confirm GTM, Analytics, and Search Console are active via the app dashboard.
Once GTM is connected, all Google Ads tags are managed inside GTM's dashboard. No further Webflow code changes are required. This approach also makes it straightforward to configure multiple tracking pixels (Facebook, LinkedIn, Google Ads) from a single GTM container.
Install Google Tag Manager manually
If you prefer not to use the Google Site Tools app, you can paste GTM code snippets directly into Webflow's site settings.
To install GTM manually:
- Go to tagmanager.google.com, create a new account and container (select Web), and copy both code snippets from the installation instructions.
- In Webflow, open your project and go to Site settings > Custom Code.
- Paste the
<script>snippet into the Head Code section. - Paste the
<noscript>snippet into the Footer Code section. - Save and publish your site.
- In GTM, create a Google Ads Conversion Tracking tag with the appropriate triggers (such as a page view on your thank-you page).
- Create a Conversion Linker tag with an All Pages trigger. This tag must fire before any conversion tags execute.
- Publish the GTM container.
The Conversion Linker tag stores first-party cookies that preserve GCLID parameters across page navigation. Without it, GCLID can be lost during form submission redirects, breaking attribution.
Use the thank-you page redirect for form tracking
Webflow uses AJAX for form submissions, which means the page does not reload when a form is submitted. Standard conversion tags will not fire on AJAX submissions. The official Webflow documentation describes the thank-you page redirect as the most reliable approach for form conversion tracking.
To configure form tracking with a thank-you page:
- Create a dedicated thank-you page in Webflow.
- In Webflow's form settings, configure the form to redirect to that page after submission.
- Open Page settings for the thank-you page and go to Custom Code.
- Paste the Google Ads conversion event snippet into the Footer Code section.
- In Google Ads, configure the conversion action to count visits to the thank-you page URL.
This method works with both GTM-based and direct tag implementations.
Embed the Google tag directly
You can also paste the Google tag (gtag.js) directly into Webflow's custom code settings, without using GTM or the Code Embed element.
To embed the Google tag:
- In Google Ads, copy the
gtag.jssnippet containing your conversion ID (AW-XXXXXXXXXX). - In Webflow, click the three-dot icon on your project, then go to Settings > Custom Code > Head Code.
- Paste the global site tag (this loads on every page).
- For conversion events on specific pages, go to the page's settings > Custom Code > Footer Code and paste the event snippet.
- Enable auto-tagging in Google Ads under Admin > Account settings > Auto-tagging.
Opt for GTM over direct tag embedding for better tracking accuracy and easier management. Direct embedding is appropriate when GTM is not an option.
Connect with Zapier
Automation platforms can connect Webflow events to Google Ads actions without building a custom backend. Zapier offers the clearest documented Webflow-to-Google Ads path, with pre-built templates and dedicated triggers and actions for both platforms.
Zapier supports these Webflow and Google Ads workflows:
- Webflow New Form Submission (instant) triggers offline conversion uploads or Customer Match list additions in Google Ads
- Webflow New Order (instant) triggers conversion uploads tied to e-commerce purchases in Google Ads
- Google Ads New Campaign (polling) creates or updates Webflow CMS items when new campaigns are created
Pre-built Zapier templates cover common patterns:
- Send an offline conversion to Google Ads for form submission in Webflow
- Add a contact to a Google Ads Customer Match list for form submission in Webflow
- Create Webflow items from new Google Ads lead form entries
- Send an offline conversion to Google Ads for new order in Webflow
Zapier is a good fit for teams that need to pass form data or order data to Google Ads but do not want to build and maintain a server-side integration.
Build with the Webflow and Google Ads APIs
For use cases that go beyond what the app, tags, or automation support, the Webflow Data API and Google Ads API provide full programmatic control. This path requires server-side development, OAuth authentication, and a backend intermediary (such as AWS Lambda or Cloudflare Workers) to handle CORS restrictions on Webflow's frontend.
The relevant APIs include:
- The Google Ads API (v24) handles offline conversion uploads, campaign management, audience syncing, and reporting via GAQL queries
- Webflow's Data API handles Webflow CMS collections and form submissions
- Webflow webhooks trigger real-time events when forms are submitted, CMS items are published, or orders are placed
The Google Ads API does not support webhooks for campaign data. Any Google Ads-to-Webflow sync (such as writing campaign performance metrics into CMS items) requires polling.
Upload offline conversions from Webflow forms
Offline conversion uploads connect a downstream event (a closed sale, a qualified lead) back to the original ad click using the GCLID captured at form submission time.
To implement offline conversion uploads:
- Add a hidden field to your Webflow form that captures the
gclidURL parameter via JavaScript. - Register a
form_submissionwebhook with the Webflow API:POST /v2/sites/{site_id}/webhookswithtriggerType: "form_submission". - Create a
ConversionActionresource in the Google Ads API with typeUPLOAD_CLICKS:POST /v24/customers/{customer_id}/conversionActions:mutate. - When the webhook fires, extract the
gclidand user data from the payload and store them in your CRM or database. - When the downstream conversion occurs, upload it:
POST /v24/customers/{customer_id}:uploadClickConversionswith thegclid,conversionActionresource name,conversionDateTime, andconversionValue.
Set partial_failure to true for all conversion upload requests. Batch multiple conversions per request (up to 2,000 per request) for efficiency.
Sync CMS items to Google Ads feeds
Webflow CMS content can serve as a data source for Dynamic Search Ads page feeds or ad customizer data.
To sync CMS items to Google Ads:
- Register a
collection_item_publishedwebhook in Webflow to receive notifications when CMS items go live. - On webhook receipt, fetch the updated items:
GET /v2/collections/{collection_id}/items. - Transform CMS field data, mapping
slugto page URL and category fields to custom labels. - Upload the data to Google Ads:
POST /v24/customers/{customer_id}/feedItems:mutate.
This pattern keeps ad content in sync with CMS updates automatically. It works for sites that publish product pages, service listings, or blog content through the Webflow CMS and want ads to reflect the latest inventory.
Sync audience lists with Customer Match
Webflow form submissions can feed Google Ads audience lists for remarketing.
To implement audience syncing:
- Register a
form_submissionwebhook targeting your server endpoint. - Normalize and SHA-256 hash user identifiers (email in lowercase, phone in E.164 format) from the webhook payload.
- Upload hashed data to Google Ads using the Data Manager API. As of April 2026, this is the required path for Customer Match uploads, replacing
OfflineUserDataJobServicefor developers who have not uploaded Customer Match data in the last 180 days. - Include the
consent.ad_user_datafield reflecting actual user consent status. This is required for GDPR and DMA compliance.
User lists show a size of zero until they reach at least 100 members. After that threshold, the displayed size is rounded to two significant digits.
What can you build with the Google Ads Webflow integration?
Integrating Google Ads with Webflow lets you run paid acquisition campaigns and measure their impact on site conversions without switching between separate platforms.
- Lead generation with conversion attribution: Build landing pages in Webflow with forms that redirect to thank-you pages, track form submissions as Google Ads conversions, and feed that data into Performance Max bid optimization. You.com uses this pattern to move from idea to live campaign faster and tailor messaging for specific audiences.
- E-commerce remarketing campaigns: Sync Webflow e-commerce product data to Google Merchant Center using the native product feed, then create Performance Max campaigns that retarget visitors who viewed specific products. Purchase events feed back into Google's bidding algorithms through GA4.
- CMS-driven ad content: Publish blog posts, service pages, or product listings through Webflow CMS and automatically sync that content to Google Ads as Dynamic Search Ads page feeds. When CMS items are updated, the corresponding ad content updates through the API pipeline.
- Multi-client agency setup: Agencies like Proctor + Stevenson use the integration to set up Google Ads conversion tracking and campaigns for clients entirely within Webflow. URL-based tracking requires no custom code and works on all Webflow plans, while the marketplace app handles tag insertion automatically for clients on paid plans.
If you need more control over offline conversion pipelines or audience syncing, the API integration path covers those cases with full flexibility.
Frequently asked questions
No. The app supports Performance Max campaigns only. Search, Display, Shopping, and Video campaign types are not available through it. Teams that need keyword-level bidding controls should manage those campaigns in the full Google Ads interface and use one of the tag-based tracking methods described above for conversion tracking in Webflow.
Webflow uses AJAX for form submissions, which prevents standard conversion tags from firing because the page does not reload. The official integration documentation describes two workarounds. Configure the form to redirect to a dedicated thank-you page and place the conversion snippet on that page. Alternatively, implement GTM with custom triggers and a Conversion Linker tag that fires on all pages before any conversion tags.
Yes, if your site has visitors from the EEA, UK, or Switzerland. Google Consent Mode v2 has been mandatory since March 2024 for GDPR and Digital Markets Act compliance. Without it, tracking data from those users cannot be legally collected. Use a certified Consent Management Platform such as Cookiebot, CookieYes, or the Webflow Consent Pro app. The Webflow integration page covers the compliance requirements in detail.
Not currently. The Google Tag Gateway routes measurement data through your Webflow domain's CDN, but it is not compatible with tags set by the Google Ads for Webflow app, the Google Site Tools app, or custom code implementations. To use Tag Gateway, configure the Google tag through Webflow's native Apps & Integrations settings, then republish your site. Tag Gateway is also not available on self-hosted (exported) Webflow sites.
Go to the Google Ads for Webflow marketplace listing, click Install App, and connect your Google Ads account. You need the designer role in Webflow to install the app. The setup guide in the Webflow Help Center walks through installation, campaign creation, and dashboard configuration step by step. New Google Ads users who spend $500 USD within their first 60 days may be eligible for $500 USD in ad credit.
Description
Google Ads connects to Webflow through a native app that handles campaign creation, automatic tag insertion, and in-Webflow performance dashboards.
This integration page is provided for informational and convenience purposes only.
Google site tools for Webflow
Google site tools for Webflow is Webflow's own app for reading GA4 and Search Console data inside Webflow and adding your Google Tag Manager script without code.

Data Goat (by Flow Ninja)
Data Goat shut down in November 2024. Replace its tracking with Webflow Analyze or a marketplace analytics app, GA4 scripts you install through Code Embed, and the Webflow Data API v2 for form data server-side.

Countdown Bar Timer
Connect Countdown Bar - Timer with Webflow to add urgency-driven countdown timers to landing pages, product pages, and sitewide promotions.
Smartarget Reviews
Connect Smartarget Reviews with Webflow to display curated customer testimonials and star ratings on your site without building a review system from scratch.
TripleChecker
Connect TripleChecker, an automated proofreading tool, with Webflow to scan your published site for spelling errors, grammar mistakes, and broken links on a recurring schedule.
Cookie Consent
Connect Cookie Consent, a GDPR and CCPA compliance app, with Webflow to add configurable cookie banners that block third-party scripts until visitors make a consent choice.
Gemini
Connect Google Gemini to Webflow to add AI text generation, image analysis, and automated content pipelines to your site.
Datadog
Connect Datadog with Webflow to monitor real user performance, track frontend errors, and run synthetic uptime checks on your published site.
Braintrust
Connect Braintrust with Webflow to monitor AI-powered features on your site and sync evaluation data into your CMS.
Related integrations
Get started for free
Try Webflow for as long as you like with our free Starter plan. Purchase a paid Site plan to publish, host, and unlock additional features.
