

Click to Call
Connect Click to Call with Webflow to add a floating phone button that lets visitors call your business directly from any page.
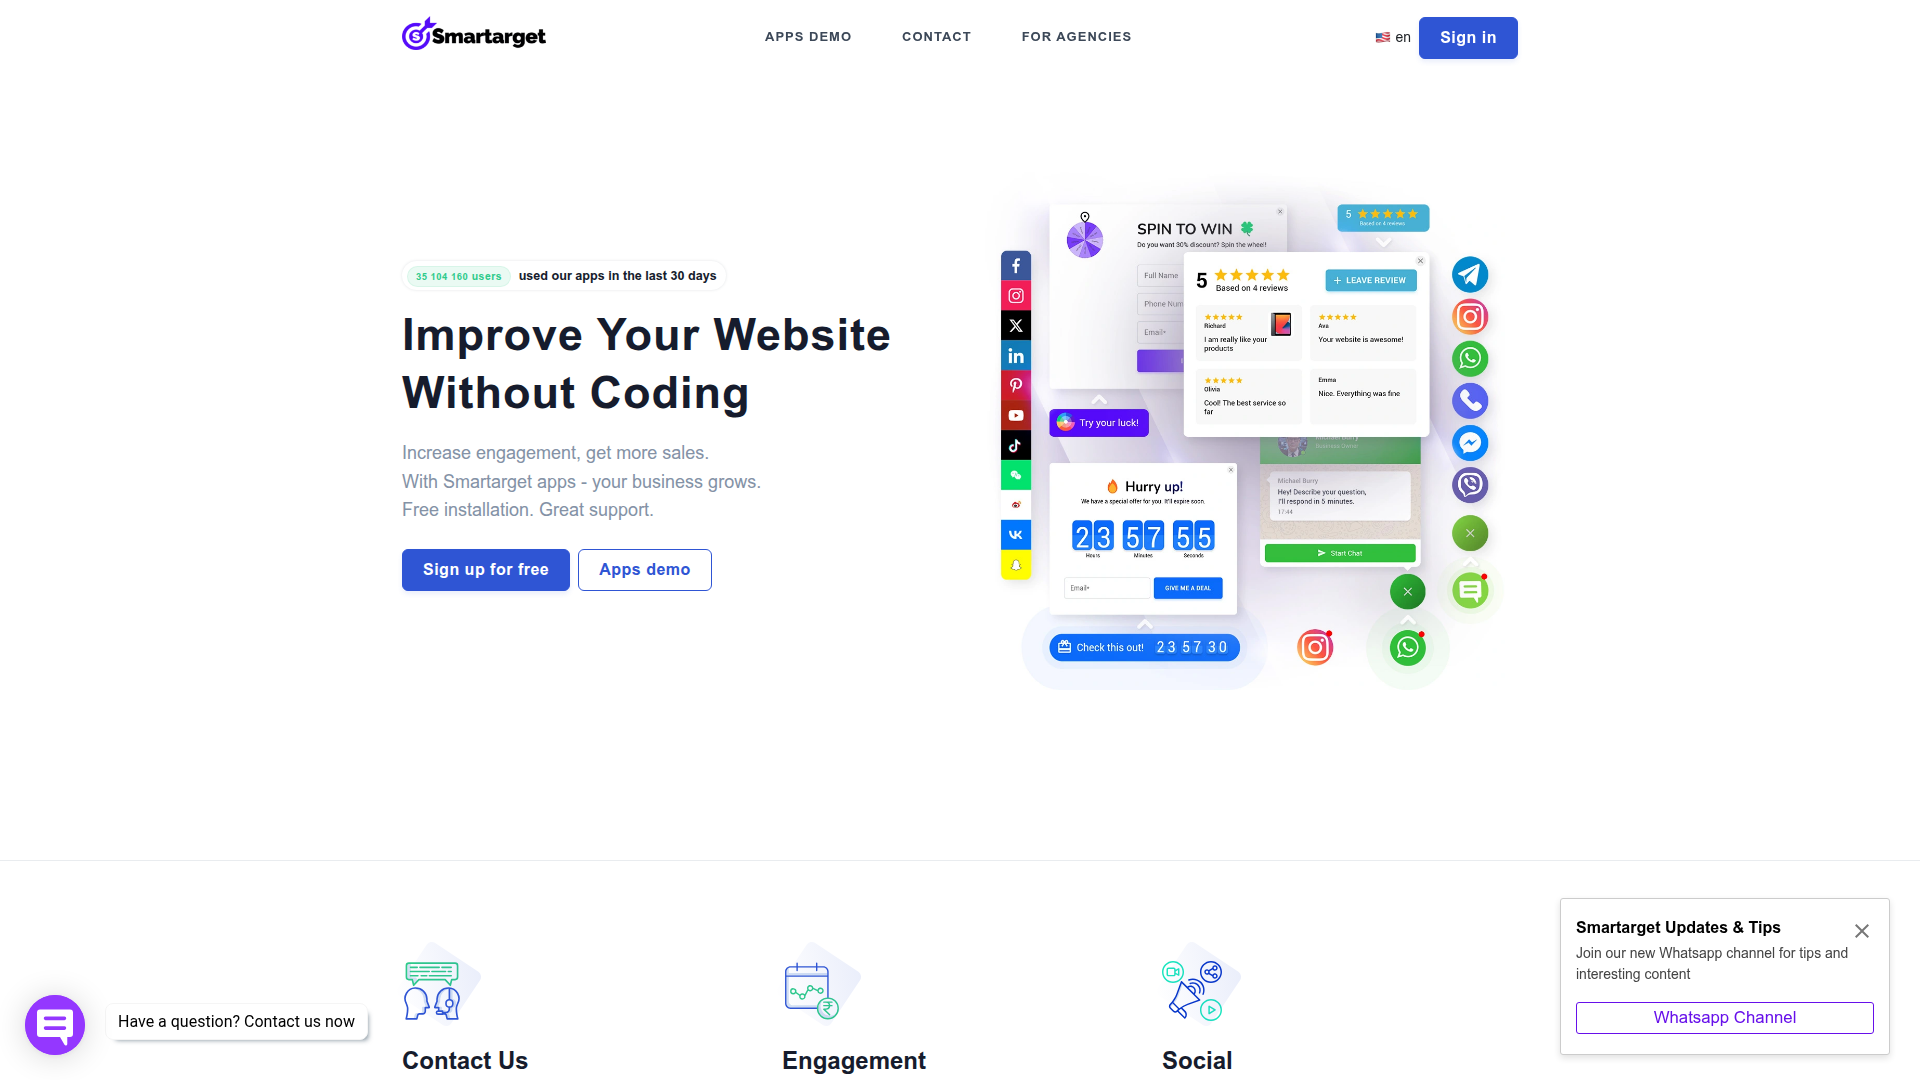
Click to Call by Smartarget drops a floating phone button onto your site that triggers the native dialer on mobile with a single tap and displays your number prominently on desktop. You set the name, role, profile photo, and brand colors from a separate dashboard, so once it's installed, you don't need to touch your site again.
It's a fit for service businesses, agencies, healthcare providers, real estate teams, legal firms, and e-commerce operators who close deals over the phone. If you're a freelancer or agency owner, you can add it to client projects in minutes without writing custom code.
How to integrate Click to Call with Webflow
What is Click to Call? Click to Call is a Smartarget widget that adds a floating phone button to any website. Visitors tap or click the button to call a business directly, bypassing contact forms. The widget supports custom positioning, brand colors, call-to-action text, and an agent profile with a name, role, and photo.
Pair Click to Call with your site when you need a visible, persistent way for visitors to reach someone by phone. Service businesses with high-intent traffic, like plumbers, lawyers, or real estate agents, use it to connect with visitors who are ready to talk but unlikely to fill out a form. You can set up the widget in about five minutes, and it requires no ongoing maintenance on your site.
You can install Click to Call in two ways:
- The Click to Call app installs from the Apps Marketplace and handles script injection without touching code.
- Custom code embedding lets you paste the Smartarget JavaScript snippet into specific locations for site-wide or page-level control.
Most implementations use the marketplace app or a manual embed, depending on how much control you need over widget placement.
Install the Click to Call app
The Click to Call app on the Apps Marketplace is the simplest path to a working integration. It handles script injection automatically when you install and authorize it for your site. Configuration changes you make in the Smartarget dashboard apply without republishing. This method works well if you want the call button on every page and prefer to avoid pasting code. The app has been reviewed and approved, though that review does not constitute an endorsement.

To set up the integration:
- Go to the Click to Call marketplace listing and click install.
- Authorize the app for your site. The app requests permission to read and write custom code and read site data and publishing.
- Open the Smartarget dashboard to configure your phone number, widget appearance, position, and call-to-action text.
- Publish your site to see the widget live.
The app gives you:
- A floating phone button across all published pages
- One-tap calling on mobile devices via the native dialer
- Phone number display on desktop (calling apps like Skype or FaceTime will launch if configured)
- Customizable widget appearance, position, colors, call-to-action text, and agent profile
The widget only appears on your published site, not in the Designer canvas. Test it in an incognito browser window after publishing. You need a paid Site plan because the app uses custom code injection, which isn't available on free Starter plans.
Add Click to Call with custom code
If you want finer control over where the widget appears, or if you prefer to manage the script yourself, paste the Smartarget JavaScript snippet directly into your site. This approach uses the same widget and Smartarget dashboard for configuration. The difference is that you choose the exact placement location.
You need a Smartarget account (free, no credit card required) and a paid Site plan that supports custom code.
To get your script from Smartarget:
- Sign up at smartarget.online.
- Configure your Click to Call widget in the Smartarget dashboard: phone number, appearance, position, and call-to-action text.
- Go to Integrations in the dashboard.
- Copy the JavaScript
<script>tag. Don't include<html>,<body>, or<head>wrapper tags.
Once you have the script, choose one of three placement options depending on the scope you need.
Site-wide placement with custom code in site settings
This option loads the widget on every page, which is the standard setup for a floating call button. Place the script in the footer code section so it loads after all page content and keeps initial page render fast.
To add the script site-wide using custom code in head and body tags:
- Open Site Settings from your dashboard.
- Click the Custom Code tab.
- Scroll to Footer Code.
- Paste the
<script>tag from Smartarget. - Click Save changes.
- Publish your site.
The footer code section has a 50,000-character limit. The Smartarget snippet is well within that limit.
Single-page placement with page settings
If you only want the call button on a specific page, like a contact page or pricing page, place the script in that page's custom code settings instead.
To add the script to one page:
- Select the target page.
- Open Page Settings.
- Scroll to Custom Code and find the Before
</body>tag section. - Paste the
<script>tag. - Save and publish your site.
This keeps the widget off pages where a floating phone button would be distracting or unnecessary.
Inline placement with a Code Embed element
For precise visual positioning within a specific section, use a Code Embed element. This places the widget exactly where you add the element on the canvas. You can also add a Code Embed element inside a CMS collection template to display the widget on dynamic pages like service listings.
To embed the script inline:
- Open the Add panel.
- Drag a Code Embed element onto the canvas in the desired location.
- Double-click the element to open the code editor.
- Paste only the
<script>tag. Don't include<html>,<body>, or<head>tags, or the page layout will break. - Save and publish your site.
All widget customization happens in the Smartarget dashboard, not in the Designer. To change colors, position, or call-to-action text after installation, update settings in the Smartarget dashboard. If you installed through the marketplace app, configuration changes in the Smartarget dashboard apply automatically without republishing. For manual embed installations, some changes may require updating the script on your site.
Advanced: manage custom code programmatically
If you manage multiple sites or build Apps, the Data API and Custom Code API give you direct control over script registration and injection. This approach needs server-side development and OAuth authentication. It's relevant if you're an agency already managing custom code across many client sites.
Smartarget doesn't offer a public API, webhooks, or developer endpoints. That means this workflow doesn't configure Click to Call in Smartarget and doesn't create a Smartarget-specific integration layer. It only covers script management on your site after you obtain the script from the Smartarget dashboard.
The APIs can still help if you're managing site code centrally:
- The Custom Code API lets you register and apply scripts to sites and pages
- The Sites API handles site retrieval and publishing
- Webhooks trigger real-time events like form submissions for connecting to other systems
Custom Code API endpoints exclusively accept OAuth tokens obtained through the OAuth Code Grant Flow. Site tokens and Workspace tokens don't work with these endpoints.
Manage script injection via API
This sequence covers script management without opening the dashboard.
To manage script injection programmatically:
- Obtain an OAuth token with these scopes:
custom_code:read,custom_code:write,sites:read,sites:write,pages:read,pages:write. - Retrieve your site ID with
GET https://api.webflow.com/v2/sites. - Register a script with the appropriate Custom Code API endpoint.
- Retrieve currently applied scripts with
GET https://api.webflow.com/v2/sites/:site_id/custom_code. - Apply the script site-wide with
PUT https://api.webflow.com/v2/sites/:site_id/custom_code. Include all scripts you want active in the request body. Omitting a previously applied script removes it. - Publish the site with
POST https://api.webflow.com/v2/sites/:site_id/publish.
Each site supports up to 800 registered scripts. The publish endpoint allows one successful publish per minute. For full endpoint reference and authentication details, see the Custom Code API documentation.
What can you build with the Click to Call integration?
Integrating Click to Call gives visitors a direct phone line to your team without redesigning pages or adding server-side code.
- Service business landing pages: Add a persistent call button to a service site where visitors need immediate help. Mobile users tap once to call. Desktop users see the number displayed prominently without scrolling to the footer.
- Real estate listing pages: Place the widget on property detail pages built with Collection List elements so buyers can call an agent directly from any listing. Each CMS-driven page gets the same floating button through a single template placement.
- Healthcare and legal practice sites: Add a call button on appointment or consultation pages where visitors prefer voice contact over form submissions. The agent profile feature lets you display a practitioner's name and photo so callers know who they're reaching.
- E-commerce pre-purchase support: Add the widget to product or pricing pages where shoppers have questions about specifications, sizing, or compatibility. A visible call option reduces drop-off from unanswered questions.
If you need more control over script management across many sites, the API option can help with your deployment workflows.
Frequently asked questions
Yes. Click to Call requires custom code access, which is only available on paid Webflow site plans. Free Starter plans do not support custom code injection. A Smartarget account is free with no credit card required, but the widget cannot load on a live Webflow site without a paid hosting plan.
On desktop, the widget displays your phone number. If the visitor has a calling app configured (such as Skype or FaceTime), clicking may launch that app. Otherwise, the number appears for manual dialing. On mobile, the button triggers the native phone dialer with a single tap. The marketplace listing describes desktop behavior as "displaying your phone number."
Yes. Instead of placing the script in site-wide footer code, use page-level custom code settings or a Code Embed element on individual pages. This limits the widget to specific pages like a contact or pricing page.
All customization happens in the Smartarget dashboard, not inside Webflow. You can configure the phone number, button position (left or right), colors, call-to-action text, and an agent profile with a name, role, and photo. Make changes in the dashboard before copying the script, or update settings after installation. Changes made through the marketplace app version apply automatically without republishing.
Third-party scripts do not render in the Webflow canvas or preview. The widget only appears on your live published site. After adding the code, publish your site and test in an incognito browser window. If the widget still does not appear, check the browser developer console for JavaScript errors and confirm your Smartarget account configuration is saved and active.
Description
Adds a floating click-to-call phone button to your Webflow site through the Apps Marketplace or by adding a JavaScript embed, with widget appearance configured in the Smartarget dashboard.
This integration page is provided for informational and convenience purposes only.
Tidio
Connect Tidio, a customer service platform with live chat and AI, with Webflow to add a chat widget, automate visitor responses with the Lyro AI agent, and capture leads through proactive triggers.
Twilio
Connect Twilio with Webflow to add SMS, voice, WhatsApp, and email communication to your site.
Chatbot
Connect Chatbot, an AI chatbot platform by Text, Inc., with Webflow to add a 24/7 chat widget for lead qualification, visitor support, and conversation-driven data collection.
HelpDesk
Connect HelpDesk with Webflow to turn form submissions into trackable support tickets with automated routing, agent assignment, and status tracking.

Pensil
Embed Pensil community forums, live sessions, and discussion boards directly in your Webflow site.
Customer.io
Connect Customer.io, a customer engagement platform, with Webflow to turn form submissions and page visits into behavioral triggers for automated email, SMS, and in-app messaging campaigns.
Copilot
Connect Microsoft Copilot Studio, a platform for building and deploying custom AI agents, with Webflow to add conversational chat interfaces for support, lead qualification, and FAQ automation.
ChatGPT
Connect ChatGPT with Webflow to add AI-powered chat, content generation, and form processing to your site.
Connect WhatsApp, Meta's business messaging platform, with Webflow to add chat buttons, trigger automated messages from form submissions and orders, and build real-time customer communication into any page.
Related integrations
Get started for free
Try Webflow for as long as you like with our free Starter plan. Purchase a paid Site plan to publish, host, and unlock additional features.
