






Claude
Connect Claude to Webflow through the MCP server to design, manage content, read traffic data, and automate site work.

Webflow gives you the canvas, the CMS, and the publishing pipeline. With Claude integration, you can automatically read your traffic data, catch broken links, or rewrite hundreds of meta descriptions with ease.
Claude does that work against a live Webflow site through the Webflow MCP server, which Webflow runs and maintains. Once you add the Webflow connector in Claude, you can design and build pages, manage CMS content, read traffic data, audit a site, and deploy Webflow Cloud apps from plain-language prompts.
This fits agencies running dozens of client sites, marketing teams that need copy variants fast, e-commerce operators writing product descriptions at volume, and developers building AI features on Webflow-hosted pages.
How to integrate Claude with Webflow
What is Claude? Claude is Anthropic's AI assistant, available in a browser, in the Claude Desktop app, and as Claude Code in a terminal. It reaches outside systems through the Model Context Protocol, and that is how it works with Webflow.
You have three ways to connect Claude and Webflow. The Webflow MCP server is the one built for working on your site: Claude builds layouts, edits CMS content, reads traffic data, and audits pages from a prompt. Zapier and Make hand Webflow form submissions and CMS events to Claude for background processing, and the Webflow and Claude APIs give you full control in your own code, with the server side running on Webflow Cloud.
Most teams start with the MCP server and add an automation platform or a custom build only when a job has to run on its own, with nobody prompting it.
1. Connect Claude to the Webflow MCP server
This is the official route and the one that reaches most of your site. The Webflow MCP server runs remotely, authorizes over OAuth, and stores no API keys on your machine.
It implements Anthropic's Model Context Protocol, exposing Webflow's own APIs as tools Claude can call. Every action stays inside the Webflow permissions and roles you already have, and on Team and Enterprise plans the Site Activity Log records what an agent changed.
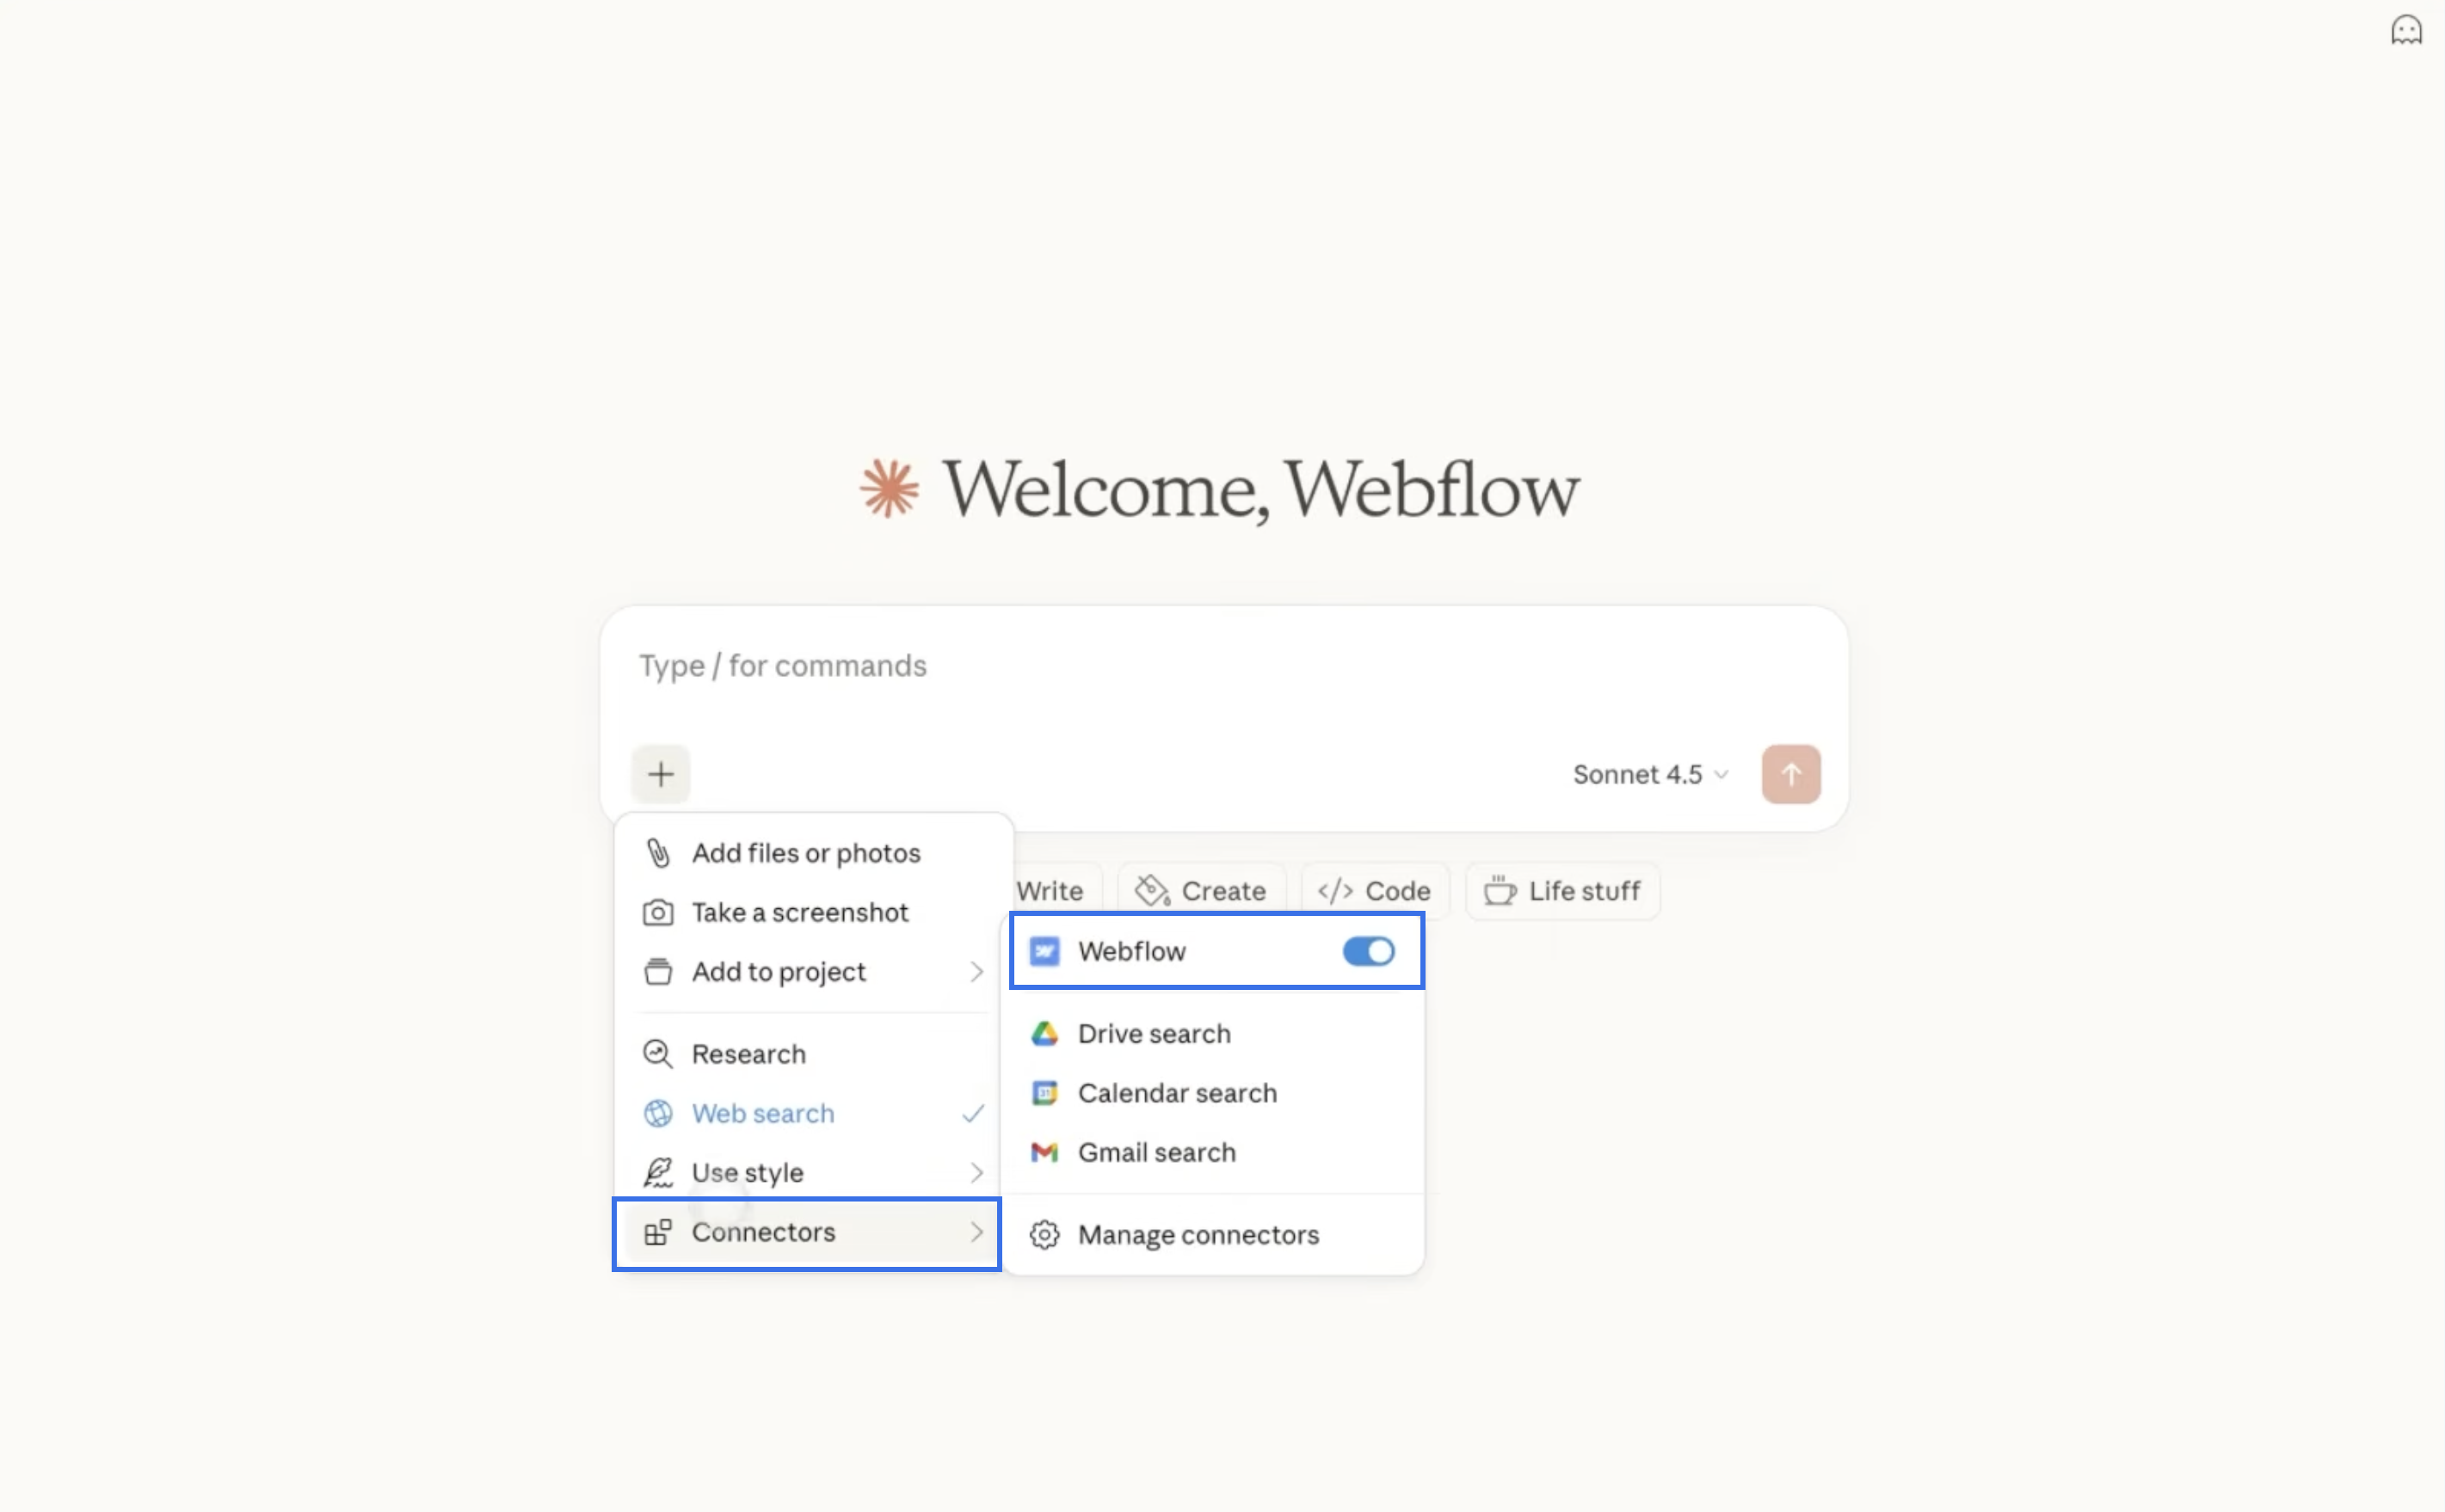
In Claude, add the Webflow connector from a Chat or Code session:
- Click the plus icon, hover over Connectors, and choose Add connector.
- Search for Webflow, choose the Webflow connector, and click Connect.
- Confirm the callback URL
https://claude.ai/api/mcp/auth_callbackand click Continue. - Choose the sites and Workspaces Claude should reach, click Authorize App, and follow the prompt back to Claude.
Anyone with a site role other than Reviewer can connect, and the server respects each person's existing role permissions. It is available on every Site plan, including the free Starter plan. Claude asks you to approve each action it wants to take in Webflow unless you change that under Claude > Customize > Connectors > Webflow, where you can block or always allow specific actions.
In Claude Code, you can also add the server from the terminal with claude mcp add --transport http webflow https://mcp.webflow.com/mcp, then run /mcp and authorize in the browser window that opens. Webflow also documents a manual connector setup and other MCP clients.
The same server powers site management from ChatGPT, Codex, Cursor, and Devin Desktop (formerly Windsurf), so the capability is not tied to one tool.
What the MCP server does
Webflow documents the tools in groups, and Claude picks the right ones from your prompt:
- Design and build: Build responsive sections and grids, add and edit elements, create classes and combo classes, write site and page custom code, author components with props, variants, and slots, create interactions built on GSAP, and, on a Team or Enterprise plan, work in isolated page branches.
- Design systems: Define variables, color schemes, typography scales, and spacing systems, and upload, replace, or remove a site's custom font files.
- Content and pages: Create collections, define fields, run bulk item updates, publish and unpublish the items that feed your Collection Lists, manage assets and forms, edit meta titles and descriptions, control sitemap inclusion, handle schema markup, and read or add comments.
- Audits: Scan pages and CMS items for broken links, missing alt text, and outdated information, then apply the corrections Claude can make safely.
- Analyze: Read sessions, users, and pageviews over a date range, rank top pages, break traffic down by country, browser, or source, and measure engagement events and time on page.
- Webflow Cloud: Manage full-stack apps built from a GitHub repository, including environments, deployments, custom domains, and build and runtime logs, so Claude can find a failed build and redeploy it.
- Automate: Chain steps into repeatable runs, from applying designs out of Figma or Claude Design to migrating legacy styles into variables and applying one change across several sites.
- Governance: Give a site its own Agent Instructions, keep every agent inside your existing permissions and roles, and, on a Team or Enterprise plan, review agent changes in the Site Activity Log.
The Analyze group reads from Webflow Analyze, an add-on available on paid Site plans. Page branches and the Site Activity Log need a Team or Enterprise plan. The rest works on any site you can authorize.
Two extras cut the prompting work. Webflow publishes a prompt library covering SEO metadata audits, keyword optimization, variable refactors, link fixing, and breakpoint work, plus a set of installable agent skills that Claude invokes on its own when a request matches: bulk CMS update, site audit, asset audit, link checker, accessibility audit, and safe publish among them. Install the skills with npx skills add webflow/webflow-skills.
When Claude needs your site open
Most of this runs with no browser tab open at all. Creating and editing elements, components, styles, and variables, and managing CMS content, pages, assets, and fonts all go through the Data API.
A short list of capabilities depends on a live design session, and those need the MCP Bridge App running from the Apps panel: capturing visual snapshots of elements, and reading or changing the current selection, page, mode, branch, canvas, and breakpoints. The Bridge App installs itself to your authorized sites during OAuth, so there is nothing extra to hunt down. You launch it only when you want one of those few things, and it can sit minimized once it connects. For an unattended run, have Claude publish to a staging domain and check the result there instead.
What the MCP server cannot do
The limits are documented, and they matter before you plan a workflow around this:
- Interactions: Claude creates and edits interactions built on GSAP but not Classic interactions, so a site still on Classic needs those built by hand.
- Fonts: Only uploaded custom font files are managed here. Google and Adobe Fonts stay in site settings, though you can download Google font files and upload them.
- Localization: Existing CMS items and static content in secondary locales are readable and editable, but Claude cannot create new localized CMS items.
- Access settings: Claude cannot add users or assign roles on a site or Workspace. It works within the permissions you already hold.
- One workspace per authorization: Switching workspaces means re-authenticating, which for a connector client like Claude means removing the connector and installing it again.
- Webflow Cloud secrets: Deployments work only for apps connected to a GitHub repository, and the server never accepts or returns secret environment variable values, so you set those yourself.
Publishing works the way it always has: Claude's edits sit in your site until you publish, exactly like your own.
2. Connect with Zapier or Make
Automation platforms connect Webflow events to Claude for background processing, the asynchronous work that happens after someone fills in a form or an item appears in a collection. Data flows one way, from your Webflow trigger through Claude to a downstream action.
Claude has no trigger modules on Zapier or Make. A Webflow event or another service starts the automation, and Claude responds inside that workflow.
Four patterns cover most of what teams build here:
- Form triage: A form submission triggers Claude to analyze, classify, or draft a reply to the submission before a human sees it.
- CMS enrichment: A new CMS item triggers Claude to write meta descriptions, summaries, or translations and write them back to the item.
- Content from external data: An outside data source triggers Claude to produce structured content, then creates a new live CMS item on your site.
- Downstream routing: Claude's output goes on to a CRM, a spreadsheet, or an email, so the result lands where the team already works.
These patterns suit background processing better than a live chat interface, and both platforms handle them.
Setting up a Webflow-to-Claude workflow on Zapier
Zapier has Claude actions for sending a message and managing files, and Webflow triggers for new form submissions, new and updated orders, and comment activity. Check the connection page for the current module list before you build.
To build a form-to-Claude workflow:
- Create accounts on Zapier and Anthropic's API platform (you need an API key for Zapier).
- Create a new Zap with the Webflow > New Form Submission trigger.
- Add the action Anthropic (Claude) > Send Message and map your form fields into the prompt.
- Add a final action to route Claude's output, such as sending a Gmail reply or creating an Airtable row.
- Test and activate the Zap.
To write Claude's output back to your CMS, add a Webflow > Create Item or Update Item action, and check that your site plan has room for the extra CMS items.
Setting up a Webflow-to-Claude workflow on Make
Make exposes Claude actions and searches alongside Webflow triggers, actions, and searches, so both sides of the flow have explicit modules.
To build a CMS enrichment workflow:
- Create a new scenario on Make with the Webflow > Watch Events trigger, set to fire on form submissions or new collection items.
- Add a Claude > Create a Prompt module and configure it with a system prompt and mapped Webflow data.
- Add a Webflow > Update an Item module to write Claude's response back to a CMS field.
- Test the scenario and set it to run on a schedule or in real time.
Choose Make when you want a visual automation builder and explicit Webflow modules on both sides of the flow.
3. Build with the Webflow and Claude APIs
For full control over how Claude and your site interact, build custom integrations against both APIs. You write the server-side code, and Webflow Cloud gives it a home on your site: a Next.js or Astro app mounted on a path such as /app, with your Claude API key stored as a secret environment variable instead of in page code. On Starter and Basic Site plans the app is served from a webflow.io domain, and custom domain mounting needs a higher plan.
You can use these APIs together:
- Messages API: The Anthropic Messages API handles text generation and streaming responses, and the Message Batches API handles bulk processing.
- Data API: The Webflow API (Data API v2) handles CMS collections, items, forms, and site publishing.
- Webhooks: Webflow webhooks fire on real-time events like form submissions, new CMS items, and site publishes.
- API version: Webflow deprecated API v1 on March 31, 2025, and it no longer receives maintenance or support, so use v2 endpoints only.
Together these cover the core patterns in custom Claude and Webflow builds, and the three below account for most of them.
Streaming Claude responses from Webflow Cloud
A chat interface you build yourself can call the Claude Messages API with "stream": true and render the text as it arrives. The API key stays in your server code and never reaches the browser.
To implement it on Webflow Cloud:
- Create a Next.js app, mount it on a path of your site in Webflow Cloud, and add your Anthropic API key as a secret environment variable.
- Add a Route Handler that calls
POST /v1/messageswith"stream": trueand streams the text back to the browser. Webflow Cloud mounts the route under your mount path, but browser fetch calls must include that prefix themselves, as in/app/api/chat. - Keep the conversation history in the browser and send it with every request, because the Claude API is stateless.
- Deploy the app, publish your site, and test the chat at its mount path.
Webflow Cloud runs framework apps on Cloudflare Workers, which start code in lightweight V8 isolates instead of containers, so the same app can also take on the CMS and form jobs below.
Generating and publishing CMS content
A content generation pipeline calls Claude to produce structured content, then writes it directly to a CMS collection on your site and publishes it.
To implement CMS content generation:
- Call
POST /v1/messageswith a prompt instructing Claude to return valid JSON that matches your CMS collection fields. - Parse the response and send it to
POST /v2/collections/{collection_id}/items/insertto create a draft CMS item. - Call
POST /v2/collections/{collection_id}/items/publishwith the new item's ID to publish it.
async function generateAndPublishPost(topic) {
  const response = await anthropic.messages.create({
    model: "claude-sonnet-5-5",
    max_tokens: 16000,
    messages: [{
      role: "user",
      content: `Write a blog post about "${topic}". Return ONLY valid JSON:
      { "title": string, "body": string (HTML), "slug": string, "metaDescription": string }`
    }]
  });
  const textBlock = response.content.find((block) => block.type === "text");
  const content = JSON.parse(textBlock.text);

  const createRes = await fetch(
    `https://api.webflow.com/v2/collections/${COLLECTION_ID}/items/insert`,
    {
      method: "POST",
      headers: {
        "Authorization": `Bearer ${WEBFLOW_TOKEN}`,
        "Content-Type": "application/json"
      },
      body: JSON.stringify({
        items: [{ fieldData: {
          name: content.title,
          slug: content.slug,
          "post-body": content.body,
          "meta-description": content.metaDescription
        } }]
      })
    }
  );
  const { items } = await createRes.json();

  await fetch(
    `https://api.webflow.com/v2/collections/${COLLECTION_ID}/items/publish`,
    {
      method: "POST",
      headers: {
        "Authorization": `Bearer ${WEBFLOW_TOKEN}`,
        "Content-Type": "application/json"
      },
      body: JSON.stringify({ itemIds: [items[0].id] })
    }
  );
}
Field slugs in fieldData have to match your collection's configured field slugs exactly. Retrieve them first with GET /v2/collections/{collection_id}. The staged endpoint creates items as drafts by default, and they don't go live until you call the publish endpoint.
For bulk operations, the Claude Message Batches API (POST /v1/messages/batches) processes requests asynchronously at 50% of standard API prices.
Processing form submissions with Claude
A webhook-driven pipeline triggers Claude whenever someone submits a form on your site, then routes the processed result into your CMS or an external service.
To implement form processing:
- Register a webhook via
POST /v2/sites/{site_id}/webhookswith"triggerType": "form_submission"pointing to your Webflow Cloud route's URL. - In the route, verify the
x-webflow-signatureheader (HMAC-SHA256) before processing. - Extract the form data from the webhook payload and pass it to
POST /v1/messagesfor classification, summarization, or response drafting. - Write the result to a CMS collection, send it via email, or route it to a CRM.
const crypto = require('crypto');
function verifyWebflowSignature(secret, timestamp, body, providedSignature) {
  if (Date.now() - Number(timestamp) > 300000) return false; // older than 5 minutes
  const message = `${timestamp}:${body}`;
  const expectedSignature = crypto
    .createHmac('sha256', secret)
    .update(message)
    .digest('hex');
  try {
    return crypto.timingSafeEqual(
      Buffer.from(expectedSignature, 'hex'),
      Buffer.from(providedSignature, 'hex')
    );
  } catch {
    return false; // length mismatch or malformed hex
  }
}
Your webhook endpoint has to return a 200 response quickly. Offload slow Claude processing to a queue so you don't hit timeouts. For high-volume form processing, use Claude Haiku 5.5 (claude-haiku-5-5), the fastest and lowest-cost model in Anthropic's current lineup.
What you can build with the Claude Webflow integration
Connecting Claude to your site through the MCP server lets you automate content production and site upkeep without rebuilding on a custom stack:
- Bulk CMS content at scale: Generate dozens or hundreds of CMS items from a single prompt session. On a real estate client project, one Webflow developer used the MCP server to produce 50 coherent property listing pages in 30 minutes after Claude analyzed the structure of 10 existing entries. The same pattern works for product pages, team bios, and city-specific landing pages.
- SEO audits with direct fixes: Claude reads your pages and CMS items, identifies meta titles over 60 characters or missing keywords, proposes corrections, and applies them. In a published case study, one agency saved 4 to 6 hours auditing their own site and roughly half a day on an 80-plus-page client site with 200 CMS items.
- Traffic reporting on demand: Ask how this month's traffic compares with last month's, which pages drew the most sessions, which engagement events fire most, and how long visitors spend on your site, then have Claude act on the answer in the same session.
- Design to live page: Hand Claude a design from Figma or Claude Design and have it apply the variables, styles, and layout to your site, then review the page before you publish it.
The fastest way to start is the Webflow connector in Claude: authorize your sites once, then design, edit, audit, and report in plain language. When a job needs your own code, build a Claude chat interface on Webflow Cloud.
Frequently asked questions
No. Any API key placed in client-side JavaScript is visible to anyone who inspects the page source or opens browser developer tools. Keep the key in server code, for example as a secret environment variable in a Webflow Cloud app, and route every Claude API call through it.
Yes, through two paths. The Webflow MCP server lets Claude create collections, define fields, and run bulk item updates in the Webflow CMS from natural language prompts, with no code. It cannot create new localized CMS items, though it can read and update existing ones in secondary locales. For custom backends, the Webflow Data API v2 gives you full create, read, update, and delete access, so your own server code can call Claude and write the output programmatically.
The MCP server works on every Site plan, including the free Starter plan, and anyone with a site role other than Reviewer can connect it. Reading traffic data needs Webflow Analyze, an add-on on paid Site plans. Claude API access for custom builds is billed separately through an Anthropic API account, independent of Claude subscriptions.
The MCP server is a site management tool. You use it in Claude to work on your own site through natural language: design changes, CMS operations, audits, and traffic reports. Each authorization covers a single workspace, so switching workspaces means removing and reinstalling the connector. A custom API integration is your own server code, for example a Webflow Cloud app, calling the Claude Messages API for jobs that run without someone prompting them, such as form processing and content pipelines. Pick the MCP server for work on your site and the API path for automated or visitor-facing features you build yourself.
No. Claude asks you to approve each action it wants to take in Webflow, and you can block or always allow specific actions under Claude > Customize > Connectors > Webflow. Edits also stay unpublished until you or Claude publish the site, the same as changes you make yourself.
Description
Work on your Webflow site with Claude through the official Webflow connector, which runs on the Webflow MCP server. Build pages, manage CMS content, read traffic data, and audit or publish sites from plain-language prompts.
This integration page is provided for informational and convenience purposes only.

MeldAPI
Connect MeldAPI with Webflow to sync data from external apps into CMS collections automatically, without writing code.

Superflow
Connect Superflow, a website QA and visual feedback platform, with Webflow to collect pinned client feedback and run AI QA on staging and published pages.

Wized
Connect Wized, a low-code JavaScript framework, with Webflow to turn static sites into reactive web applications that authenticate users and call APIs.

albato

IDX with Firebase Studio
Connect IDX with Firebase Studio with Webflow to add application features to a Webflow front end.

BuildShip
Connect BuildShip with Webflow to run backend workflows from form, CMS, e-commerce, and other site events.

Boost.space
Connect Boost.space, a centralized data platform, with Webflow to sync CMS items, form submissions, and orders through one record database.

Byteline
Connect Byteline with Webflow to integrate Webflow eCommerce data with various platforms through OAuth-authenticated synchronization.
Webflow Pack for Coda
Connect Webflow with Coda to sync CMS collections as spreadsheet-style tables, manage content, and automate workflows without switching platforms.
Related integrations
Get started for free
Try Webflow for as long as you like with our free Starter plan. Purchase a paid Site plan to publish, host, and unlock additional features.
