



Client portals where admins and customers see different dashboards are among the most common things agencies build in Webflow, and since User Accounts went away in January 2026, the architecture for them has changed entirely.
Webflow User Accounts sunsetted on January 29, 2026. For developers building role-gated portals, where customers see their dashboard, admins see theirs, and unauthenticated users hit the login page, the recommended replacement is a Webflow Cloud App with Clerk handling auth.
You get role-gated routes, session tokens, a Clerk Dashboard for managing users, and all of it lives on your Webflow domain.
One thing worth flagging before we start: Clerk middleware protects routes at the edge, but that alone is not enough. A critical vulnerability (CVE-2025-29927) showed that a single header can bypass Next.js middleware.
We’ll cover how to add data-access-layer verification, so your portal is actually secure, not just superficially gated.
What do you need to build a role-gated portal on Webflow Cloud?
You need a Clerk account and a Webflow Cloud App scaffolded with Next.js.
Here's the full list before you touch a line of code:
- A Clerk account (the free Hobby plan covers up to 50,000 monthly retained users per app, which is sufficient for most portals).
- A Webflow site. Webflow Cloud works on the free Starter plan, but mounting your app to a custom domain requires a Premium site plan or higher.
- The Webflow CLI:
npm install -g @webflow/webflow-cli. Requires Node.js 22.13.0 or higher. - Basic familiarity with Next.js App Router. You need to know what Server Components and Route Handlers are before the middleware logic makes sense.
No third-party auth knowledge required. Clerk abstracts the JWT verification, session management, and OAuth plumbing. You configure roles in a JSON editor in their dashboard, and the session token carries those roles to your app on every request.
Once these are in place, the setup runs in five steps.
5 steps to add Clerk auth and role-based access to a Webflow Cloud App
The steps below cover scaffolding, environment configuration, session token customization, route protection, and page-level verification, in that order. Each step builds on the last; skipping one leaves a gap in your security model.
We’ll build a portal with two roles: admin (full access) and client (restricted access). The structure works for any number of roles. Just extend the TypeScript types and route matchers.
Here's how to build it.
1. Scaffold the Cloud App and install Clerk
If you haven't scaffolded a Webflow Cloud App yet, do that first:
webflow auth login
webflow cloud init
The CLI prompts you for a project name and scaffolds a Next.js app with wrangler.json, next.config.ts, open-next.config.ts, and webflow.json already configured.
Once the scaffold exists, install Clerk:
npm install @clerk/nextjs@clerk/nextjs ships both the client-side React components and the server-side SDK. The server SDK runs in V8 isolates, so it works in Cloudflare Workers without any runtime polyfills or compatibility flags. I've tested this with the OpenNext adapter and had no issues.
What you have after this step: A Webflow Cloud App with Clerk installed and ready for environment configuration.
2. Add your environment variables
Your app needs two Clerk keys and four redirect URLs. Add them to .env.local for local development, then mirror the same values in your Webflow Cloud environment before deploying.
Create .env.local in your project root:
NEXT_PUBLIC_CLERK_PUBLISHABLE_KEY=pk_live_your_key_here
CLERK_SECRET_KEY=sk_live_your_key_here
NEXT_PUBLIC_CLERK_SIGN_IN_URL=/sign-in
NEXT_PUBLIC_CLERK_SIGN_UP_URL=/sign-up
NEXT_PUBLIC_CLERK_SIGN_IN_FALLBACK_REDIRECT_URL=/dashboard
NEXT_PUBLIC_CLERK_SIGN_UP_FALLBACK_REDIRECT_URL=/dashboard
Find both keys in your Clerk Dashboard under API Keys. The publishable key is safe to expose in the browser (with the NEXT_PUBLIC_ prefix). The secret key must stay server-side only. Never commit it.
Add the same keys to your Webflow Cloud environment before deploying. In your Webflow site settings, navigate to Webflow Cloud, open your environment, and add both under Environment Variables.
Then wrap your root app/layout.tsx with <ClerkProvider>:
// app/layout.tsx
import { ClerkProvider } from '@clerk/nextjs'

export default function RootLayout({ children }: { children: React.ReactNode }) {
  return (
    <ClerkProvider>
      <html lang="en">
        <body>{children}</body>
      </html>
    </ClerkProvider>
  )
}
<ClerkProvider> makes authentication state available to every Server Component, Client Component, and Route Handler in the tree. Without it, auth() returns null, and nothing works.
What you have after this step: Clerk wired into the app. Run npm run dev. You should see no console errors related to Clerk.
3. Configure the session token to carry roles
Clerk stores user roles in publicMetadata. By default, that metadata isn't included in the session token, so your app would need an extra API call on every request to check the role. To avoid that, you embed the metadata directly in the session token.
In the Clerk Dashboard, navigate to Sessions in the left sidebar.
Under Customize session token, open the Claims editor and enter:
{
  "metadata": "{{user.public_metadata}}"
}
Save it. From this point onward, every session token Clerk issues includes the user's public metadata as a metadata claim. The auth() helper in Next.js reads this claim directly from the session, with zero extra network requests.
Next, create a TypeScript type for your roles so the compiler can catch typos.
Defining your TypeScript role types
In your project root, create types/globals.d.ts:
// types/globals.d.ts
export {}

export type Roles = 'admin' | 'client'

declare global {
  interface CustomJwtSessionClaims {
    metadata: {
      role?: Roles
    }
  }
}
Add whatever roles your portal needs. I keep this type next to the route definitions so they stay in sync when roles change.
Creating the checkRole() helper
Create a reusable checkRole() helper in utils/roles.ts:
// utils/roles.ts
import { type Roles } from '@/types/globals'
import { auth } from '@clerk/nextjs/server'

export const checkRole = async (role: Roles) => {
  const { sessionClaims } = await auth()
  return sessionClaims?.metadata.role === role
}
checkRole('admin') returns true if the signed-in user's session claim matches. False otherwise. I use this in every Server Component and Server Action that touches sensitive data, not just in the middleware.
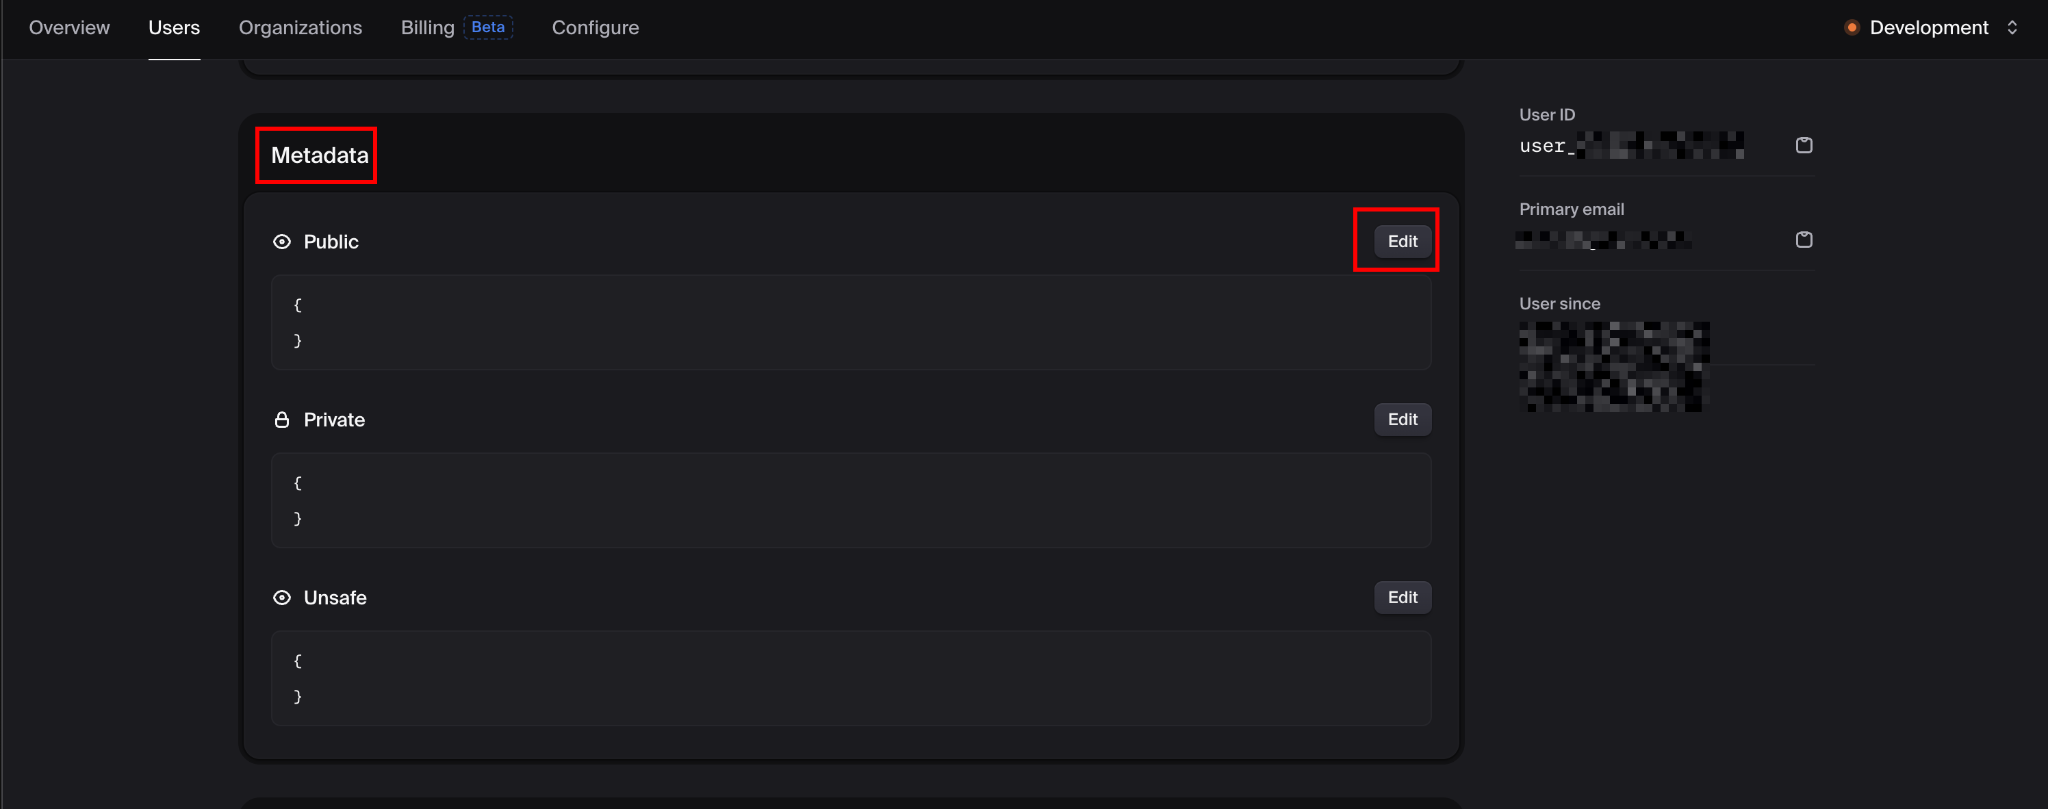
To assign a role to a user manually: go to Dashboard → Users, select the user, scroll to User metadata, click Edit next to Public, and add:
{
  "role": "admin"
}
Later in the guide, I'll add a Server Action that lets admins assign roles to other users without accessing the dashboard.
What you have after this step: Role metadata embedded in every session token. checkRole() is available anywhere in your app.
4. Protect routes with clerkMiddleware()
Route protection lives in middleware.ts at your project root. The full clerkMiddleware() reference documents every option, including token-type protection and multi-domain support.
Next.js 16 deprecates middleware.ts in favor of proxy.ts, but do not make that switch on Webflow Cloud. proxy.ts runs on the Node.js runtime and cannot opt into Edge, and Webflow Cloud supports Edge runtime middleware only. Keep the file named middleware.ts on every Next.js version:
// middleware.ts
import { clerkMiddleware, createRouteMatcher } from '@clerk/nextjs/server'
import { NextResponse } from 'next/server'

const isPublicRoute = createRouteMatcher(['/sign-in(.*)', '/sign-up(.*)'])
const isAdminRoute = createRouteMatcher(['/admin(.*)'])
const isClientRoute = createRouteMatcher(['/dashboard(.*)'])

export default clerkMiddleware(async (auth, req) => {
  // Allow sign-in and sign-up pages through without auth
  if (isPublicRoute(req)) return

  // Protect all dashboard routes — redirect to sign-in if unauthenticated
  if (isClientRoute(req)) {
    await auth.protect()
  }

  // Admin routes require the admin role specifically
  if (isAdminRoute(req)) {
    const { sessionClaims, redirectToSignIn } = await auth()

    if (sessionClaims?.metadata.role !== 'admin') {
      const homeUrl = new URL('/', req.url)
      return NextResponse.redirect(homeUrl)
    }
  }
})

export const config = {
  matcher: [
    '/((?!_next|[^?]*\\.(?:html?|css|js(?!on)|jpe?g|webp|png|gif|svg|ttf|woff2?|ico|csv|docx?|xlsx?|zip|webmanifest)).*)',
    '/(api|trpc)(.*)',
  ],
}
createRouteMatcher() accepts path patterns in the same format as Next.js matcher patterns. The (.*) at the end matches all sub-routes: /admin, /admin/users, /admin/settings/billing.
auth.protect() redirects unauthenticated users to the sign-in URL you set in NEXT_PUBLIC_CLERK_SIGN_IN_URL. For admin routes, I check the role from sessionClaims directly and redirect to the home page rather than sign-in, because a signed-in client user hitting /admin should land somewhere useful, not on a login screen.
One thing: don't put your data fetching logic in a Server Component and then gate it only with middleware. Middleware runs before the page renders, but CVE-2025-29927 showed that, under certain conditions, headers can bypass Next.js middleware in older versions. Verify auth again at the data layer in the next step.
What you have after this step: Unauthenticated users redirected from dashboard and admin routes. Authenticated non-admins are blocked from /admin. Try hitting /dashboard in incognito. You should land on /sign-in.
5. Build the role-gated dashboard pages
The middleware handles the redirect. The page-level check handles the security. I always do both.
Start with the client dashboard at app/dashboard/page.tsx:
// app/dashboard/page.tsx
import { auth } from '@clerk/nextjs/server'
import { redirect } from 'next/navigation'
import { UserButton } from '@clerk/nextjs'

export default async function DashboardPage() {
  // Second check — do not rely on middleware alone
  const { userId, sessionClaims } = await auth()
  if (!userId) redirect('/sign-in')

  const role = sessionClaims?.metadata.role

  return (
    <main>
      <header>
        <h1>Client Portal</h1>
        <UserButton afterSignOutUrl="/" />
      </header>

      <section>
        <h2>Your Projects</h2>
        <p>Role: {role ?? 'No role assigned'}</p>
        {/* Render role-specific content here */}
      </section>

      {role === 'admin' && (
        <section>
          <h2>Admin Controls</h2>
          <a href="/admin">Open Admin Panel</a>
        </section>
      )}
    </main>
  )
}
The auth() call on the page re-reads the session claims directly. Unlike a middleware redirect, which fires before the page renders, this check runs inside the Server Component itself, so it still fires even if a request somehow bypasses the middleware layer.
Building the admin panel
Now the admin panel at app/admin/page.tsx:
// app/admin/page.tsx
import { redirect } from 'next/navigation'
import { checkRole } from '@/utils/roles'
import { clerkClient } from '@clerk/nextjs/server'

export default async function AdminPage() {
  // Double-check even though middleware already redirected non-admins
  const isAdmin = await checkRole('admin')
  if (!isAdmin) redirect('/')

  const client = await clerkClient()
  const { data: users } = await client.users.getUserList({ limit: 50 })

  return (
    <main>
      <h1>Admin Panel</h1>
      <table>
        <thead>
          <tr>
            <th>Name</th>
            <th>Email</th>
            <th>Role</th>
            <th>Actions</th>
          </tr>
        </thead>
        <tbody>
          {users.map((user) => (
            <tr key={user.id}>
              <td>{user.firstName} {user.lastName}</td>
              <td>
                {user.emailAddresses.find(e => e.id === user.primaryEmailAddressId)?.emailAddress}
              </td>
              <td>{(user.publicMetadata.role as string) ?? 'none'}</td>
              <td>
                <form action={setUserRole}>
                  <input type="hidden" name="userId" value={user.id} />
                  <input type="hidden" name="role" value="admin" />
                  <button type="submit">Make Admin</button>
                </form>
                <form action={setUserRole}>
                  <input type="hidden" name="userId" value={user.id} />
                  <input type="hidden" name="role" value="client" />
                  <button type="submit">Make Client</button>
                </form>
              </td>
            </tr>
          ))}
        </tbody>
      </table>
    </main>
  )
}
The getUserList call defaults to 10 users, which is why the example passes { limit: 50 }. For portals with larger user bases, add offset pagination to the clerkClient().users.getUserList() call and render pages of results.
Adding the role management server action
The Server Action that updates roles goes in app/admin/_actions.ts:
// app/admin/_actions.ts
'use server'

import { checkRole } from '@/utils/roles'
import { clerkClient } from '@clerk/nextjs/server'

export async function setUserRole(formData: FormData) {
  // Verify the acting user is admin — never trust the client
  if (!(await checkRole('admin'))) {
    return { error: 'Not authorized' }
  }

  const client = await clerkClient()
  const userId = formData.get('userId') as string
  const role = formData.get('role') as string

  try {
    await client.users.updateUserMetadata(userId, {
      publicMetadata: { role },
    })
    return { success: true }
  } catch (err) {
    return { error: String(err) }
  }
}
The checkRole('admin') call inside the Server Action is the critical part. Even if someone crafts a direct POST to /admin and bypasses the middleware redirect, the action verifies the session on the server before touching any data. This is the data-access-layer pattern that closes the CVE-2025-29927 gap.
Adding sign-in and sign-up pages
Finally, add sign-in and sign-up pages using Clerk's hosted UI components.
Create app/sign-in/[[...sign-in]]/page.tsx:
// app/sign-in/[[...sign-in]]/page.tsx
import { SignIn } from '@clerk/nextjs'

export default function SignInPage() {
  return (
    <main style={{ display: 'flex', justifyContent: 'center', padding: '4rem 0' }}>
      <SignIn />
    </main>
  )
}
Mirror this for app/sign-up/[[...sign-up]]/page.tsx with <SignUp />. The [[...sign-up]] folder name uses Next.js's optional catch-all routing, which is what Clerk's hosted components need to handle their internal navigation steps (e.g., email verification and SSO callbacks).
Deploy when ready:
webflow auth login
webflow cloud deploy
What you have after this step: A fully role-gated portal. Unauthenticated users hit /sign-in. Authenticated clients land on /dashboard. Admins get /dashboard plus /admin with user management. Every sensitive data operation double-checks the role on the server side.
What trips developers up when adding auth to Webflow Cloud
Most auth issues in this setup fall into one of four categories.
Here's what causes each and how to fix it.
auth()returns null in a Server Component
The <ClerkProvider> in app/layout.tsx is missing or is inside a Client Component ('use client'). <ClerkProvider> must be a server-side root. Move it to the outermost layout and make sure the layout file has no 'use client' directive at the top.
Roles not appearing insessionClaims.
The Clerk Dashboard → Sessions → Customize session token step was skipped or saved incorrectly. Open the Claims editor, confirm it contains { "metadata": "{{user.public_metadata}}" }, and save again.
The claim is embedded at session creation. Users who were already signed in before you added the claim won't have it until they sign out and back in.
middleware.tsis not running in production
The middleware config.matcher array controls which paths run through clerkMiddleware(). If /dashboard isn't in the matcher pattern, the middleware never fires for those routes, and protection silently disappears. Verify the matcher includes your portal paths. The regex in the example above covers all non-static routes by default.
The admin panel is accessible to client users despite the middleware
This almost always means the isAdminRoute pattern doesn't match the actual route. A pattern of /admin only matches /admin exactly, not /admin/users. Use /admin(.*) to match all sub-routes.
Add a console.log(req.nextUrl.pathname) in the middleware temporarily to confirm what path is hitting the check.
Connect your portal to a data layer
You now have a client portal that signs users in, assigns them roles, and shows them only what they're supposed to see. The admin panel lets you manage roles without directly accessing the Clerk Dashboard. Once a portal has more than a handful of users, you'll want this.
The natural next layer is data. I pair this auth setup with a database binding in Webflow Cloud (either the built-in SQLite storage or an external service like Supabase), so the dashboard displays actual client-specific records rather than placeholder content.
Explore Webflow + Firebase for an alternative full-stack approach that combines real-time data and authentication in a single service.
Explore Webflow + Authy to layer time-based one-time passwords onto your Clerk sign-in flow for portals that require two-factor authentication.
Frequently asked questions
Does Clerk work on Webflow Cloud's Cloudflare Workers runtime?
Yes. Clerk's @clerk/nextjs SDK runs on V8 isolates, which is the runtime Cloudflare Workers uses. Webflow Cloud's OpenNext adapter handles the bridge between Next.js and the Workers environment, and Clerk's session verification is compatible with it. I've deployed this stack to production on Webflow Cloud without needing any compatibility flags or polyfills.
Is middleware enough to protect sensitive routes?
No, and CVE-2025-29927 proved it. Middleware at the edge is your first line of defense and handles the UX redirect, but it can be bypassed under certain conditions in older versions of Next.js. The correct pattern is middleware for redirects plus checkRole() or auth() verification at every data access point: Server Components, Server Actions, and Route Handlers. Together, the two layers give you defense-in-depth.
Do I need to manage JWT tokens manually?
No. Clerk handles token issuance, rotation, and verification automatically. The auth() helper reads the session token from the request headers and returns the decoded claims. You never touch the raw JWT. The only configuration you do is telling Clerk what to embed in the token via the Claims editor in the dashboard.