


Getting a Gemini AI assistant onto a Webflow page is a solved problem if your site has Webflow Cloud. The key stays server-side, the endpoint shares your domain, and no CORS configuration is required.
If you’ve tried adding an AI feature, you most likely hit two walls: the Gemini API key can't live in frontend code where any visitor can lift it from the network tab, and setting up a separate proxy service means configuring CORS headers before you can write a line of chat logic.
A third-party Worker solves the key problem but moves infrastructure outside the Webflow ecosystem, and every Gemini response has to cross an origin boundary back to the page.
Webflow Cloud takes a different path. Your Gemini proxy runs as a Next.js endpoint on your Webflow site's domain. The frontend calls /app/gemini (a relative path, same origin), so there's no CORS to configure at all.
Your key stays server-side, the integration lives entirely within the Webflow ecosystem, and visitors get a multi-turn AI assistant without any infrastructure overhead.
This guide builds that assistant end-to-end: the Cloud app handles authentication, conversation history, and the system prompt; the Webflow page handles the UI.
3 ways to add Gemini to a Webflow site
Three paths exist for connecting Gemini to Webflow. Webflow Cloud keeps everything on the same domain and inside the Webflow ecosystem. A Cloudflare Worker proxy works if your team is already on Cloudflare and is comfortable with manual CORS configuration.
Automation platforms like Zapier or Make handle backend workflows that trigger on events rather than serving real-time visitor responses.
The right approach depends on whether you need visitor-facing real-time responses or event-driven backend workflows:
All three share one requirement: the API key must never be exposed to the browser.
This guide covers the Webflow Cloud path in full. It gives you complete control over the system prompt, conversation history, and how responses are displayed.
What do you need to add Gemini to a Webflow site with Webflow Cloud?
You need four things: a Gemini API key, a Webflow site with Cloud access, a GitHub account for deployment, and Node.js 20 or later on your machine.
Once all four are confirmed, the setup takes a few minutes. Here's each one.
A Gemini API key from Google AI Studio
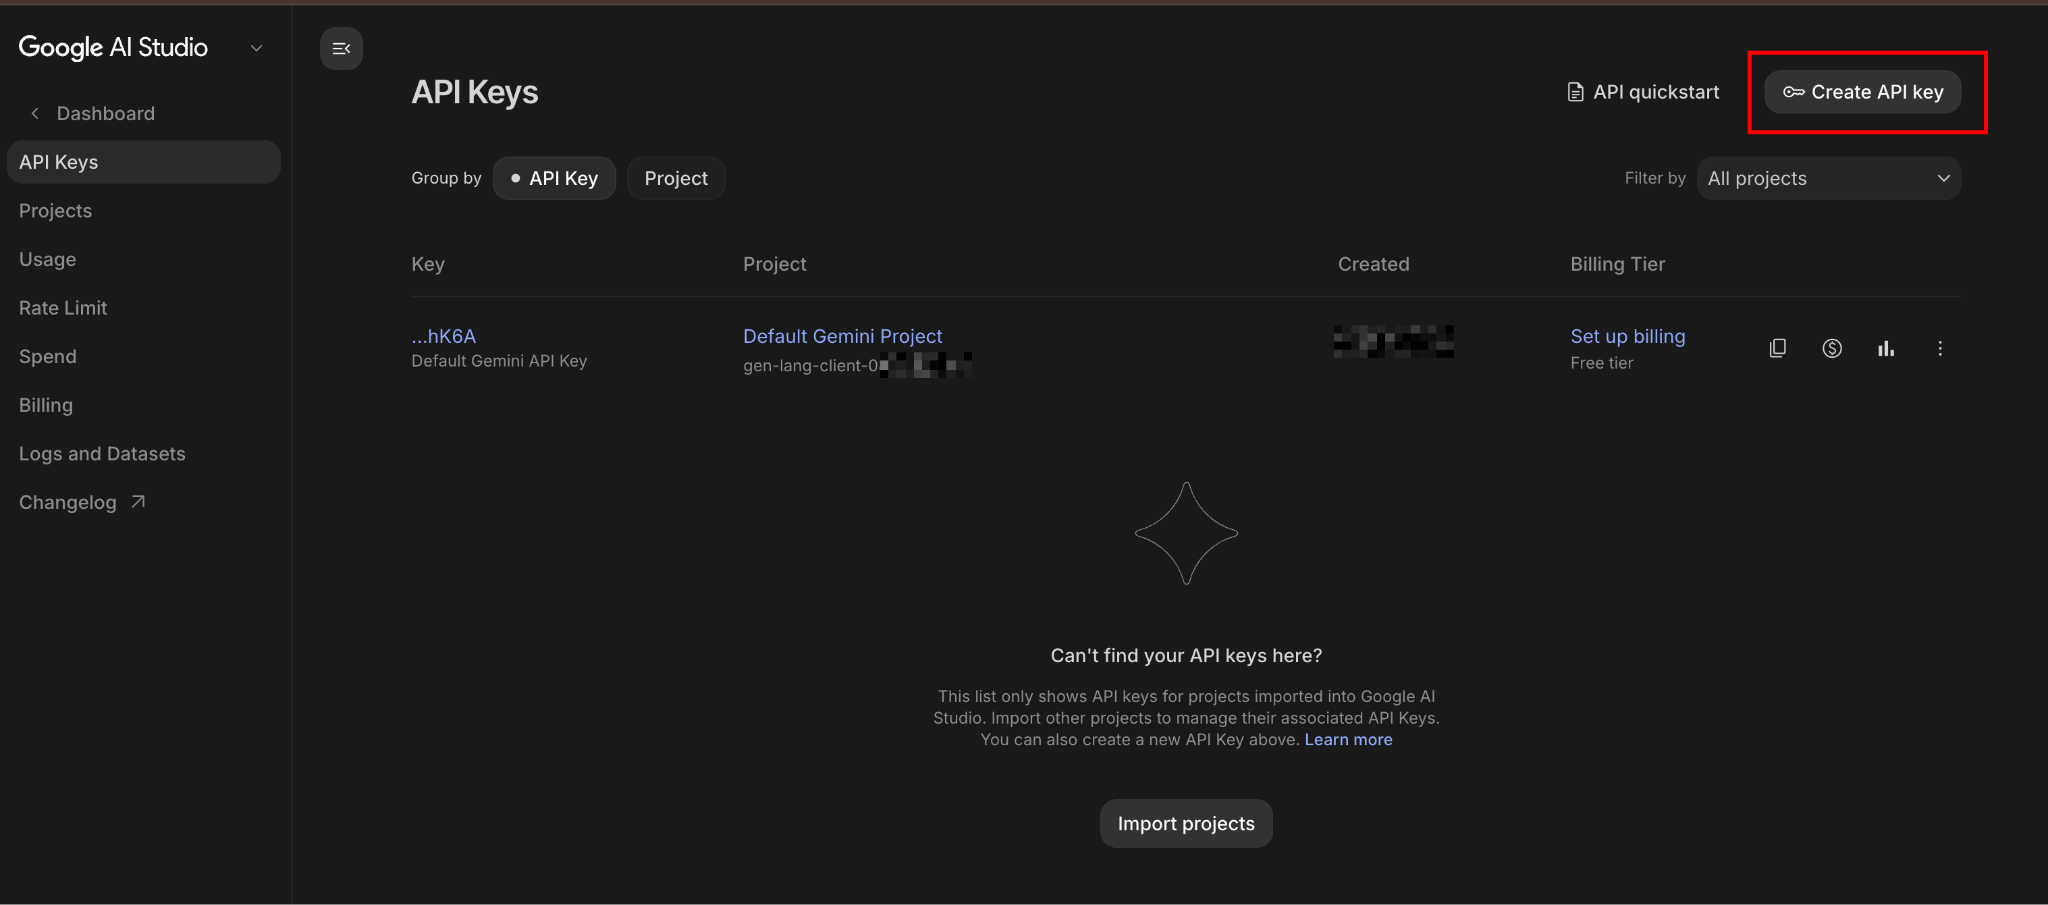
Navigate to Google AI Studio and sign in with your Google account. In the left sidebar, click API Keys, then Create API key. Select an existing Google Cloud project or create a new one. Copy the key immediately and store it in a password manager. You'll add it to Webflow Cloud's environment variable store, not to any browser-accessible code.
On the free tier: Gemini's free usage limits have been adjusted several times. Before committing to the free tier for a production feature, check your current limits in AI Studio. The paid tier unlocks substantially higher limits.
A Webflow site with Webflow Cloud access
Webflow Cloud is Webflow's hosting platform for full-stack apps deployed alongside your Webflow site. It's available on all paid Webflow site plans. Check Webflow's pricing page for current plan details and usage-based billing.
The key advantage of this use case is that your Cloud app deploys at a mount path on your Webflow site's domain (yoursite.webflow.io/app or your custom domain). No cross-origin requests, no CORS configuration.
A GitHub account
Webflow Cloud uses GitHub for CI/CD. A push to your connected repository triggers every deployment. You don't need GitHub experience beyond basic commits and pushes.
Create a free account at github.com if you don't have one. During setup, you'll connect Webflow Cloud to a specific repository and branch. From there, every commit to that branch automatically triggers a new deployment. You can also trigger deploys manually from the Webflow Cloud dashboard.
Node.js 20 or later
Check your version with node --version. The Node.js website has current installers. Node.js runs on your local machine for the CLI tools and local development preview. Webflow Cloud itself runs on Cloudflare's edge Workers runtime, not on Node.js, so Node compatibility on your machine and in the cloud deployment are separate concerns.
The CLI scaffolding, the local preview server (webflow cloud dev), and the build step all require a local Node 20+ installation.
Once all four are in place, the setup takes under 30 minutes. Here's the full walkthrough.
5 steps to add a Gemini AI assistant with Webflow Cloud
The build splits into two parts: a Webflow Cloud app that proxies requests to Gemini (Steps 1–4) and a chat interface on your Webflow page that communicates with it (Step 5). The proxy handles authentication and conversation formatting; the UI handles display.
Steps 1 through 3 run in your terminal. Steps 4 and 5 happen inside Webflow.
1. Get your Gemini API key and set up your project
If you haven’t the first step is to retrieve your Gemini API key in the left sidebar, and click Create API key.
One important choice: the Google Cloud project you attach the key to determines which billing account gets charged and where your usage limits apply. Use a dedicated project for each Webflow integration rather than a shared project already running other services. Mixing keys from different projects under one billing account makes rate-limit debugging significantly harder.
2. Initialize a Webflow Cloud app
Install the Webflow CLI and scaffold a new Cloud app.
Run these commands in your terminal:
npm install -g @webflow/webflow-cli
webflow cloud init
During webflow cloud init, the CLI prompts you to:
- Select a framework: choose Next.js (Webflow Cloud requires Next.js 15 (and higher) or Astro)
- Set a mount path: use
/app(this makes your endpoint available atyoursite.webflow.io/app/gemini) - Authenticate with your Webflow account and select your site
The CLI scaffolds the project with webflow.json, next.config.js, open-next.config.ts, and the required directory structure.
The mount path is set in next.config.js:
// next.config.js (generated by CLI — verify basePath matches your mount path)
module.exports = {
  basePath: '/app',
  assetPrefix: '/app',
};
Confirm the basePath matches the mount path you entered during init. If they don't match, asset references and API calls will resolve to the wrong paths after deployment.
Initialize your Git repository
Initialize a Git repository and push to a new GitHub repo:
git init
git add .
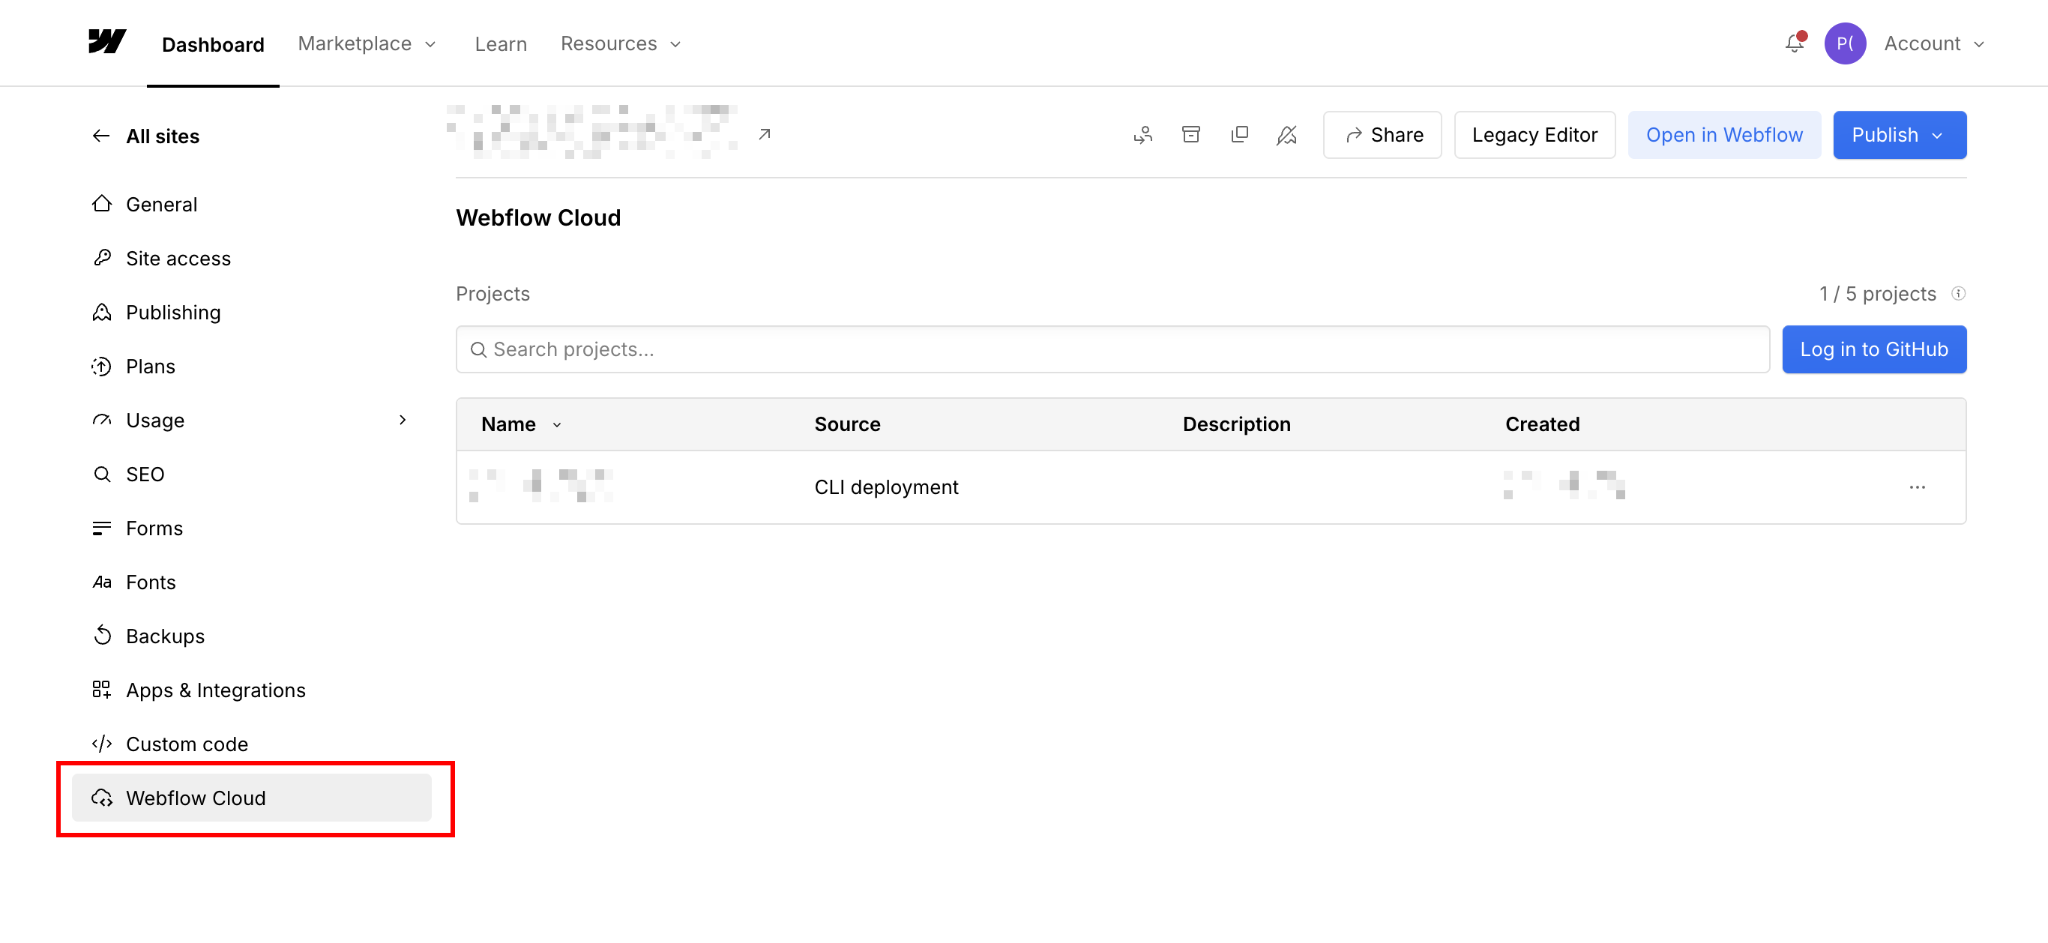
git commit -m "init webflow cloud app"Create a repo on GitHub and push to it. Then connect the repo in the Webflow Cloud dashboard by going to your site's Cloud tab, clicking Create New Project, and following the prompts to link your GitHub repo and set the mount path.
Once connected, deploy with the CLI:
webflow auth login
webflow cloud deploy
Or push to your connected GitHub branch. Webflow Cloud detects the push and deploys automatically.
Expected outcome: Your Cloud app deploys successfully. The deployment log in the Webflow dashboard shows a green status.
3. Write the Gemini proxy endpoint
In your project's app directory, create a new Route Handler file:
app/
  gemini/
    route.js      ← create this file
Paste the following into route.js:
export const runtime = 'edge';

export async function POST(request) {
  const GEMINI_API_KEY = process.env.GEMINI_API_KEY;
  const SYSTEM_PROMPT =
    process.env.SYSTEM_PROMPT ||
    'You are a helpful assistant on this website. Answer visitor questions accurately and concisely.';

  if (!GEMINI_API_KEY) {
    return Response.json({ error: 'API key not configured' }, { status: 500 });
  }

  let body;
  try {
    body = await request.json();
  } catch {
    return Response.json({ error: 'Invalid request body' }, { status: 400 });
  }

  const { message, history } = body;

  if (!message) {
    return Response.json({ error: 'No message provided' }, { status: 400 });
  }

  // Gemini uses role: "user" | "model" — not "assistant"
  const contents = [
    ...(history || []),
    { role: 'user', parts: [{ text: message }] },
  ];

  const geminiResponse = await fetch(
    'https://generativelanguage.googleapis.com/v1beta/models/gemini-2.5-flash:generateContent',
    {
      method: 'POST',
      headers: {
        'x-goog-api-key': GEMINI_API_KEY,
        'Content-Type': 'application/json',
      },
      body: JSON.stringify({
        system_instruction: {
          parts: [{ text: SYSTEM_PROMPT }],
        },
        contents,
      }),
    }
  );

  const data = await geminiResponse.json();

  if (!data.candidates?.[0]) {
    console.error('Gemini error:', JSON.stringify(data));
    return Response.json(
      { error: data.error?.message || 'Unexpected response from Gemini' },
      { status: 500 }
    );
  }

  const reply = data.candidates[0].content.parts[0].text;

  return Response.json({ reply });
}
Three things this endpoint does that a minimal implementation doesn't:
- It merges the full conversation
historyarray into every request, so Gemini maintains context across turns. Without this, each message is treated as a new conversation. - It reads the system prompt from an environment variable, so you can customize the assistant's behavior per site without touching code.
- It guards against malformed Gemini responses before accessing nested properties. Gemini occasionally returns error objects in place of candidates.
Notice there are no CORS headers in this code. There's no need. The Webflow frontend and this endpoint share the same domain, so the browser treats it as a same-origin request.
Commit your changes
Commit and push to trigger a redeployment:
git add .
git commit -m "add gemini route handler"
git push
Expected outcome: The deployment completes in the Webflow dashboard. You can test the endpoint with a POST request to https://yoursite.webflow.io/app/gemini from a tool like Bruno or Postman.
4. Add your API keys as environment variable secrets
In the Webflow dashboard, navigate to your site's Cloud settings tab. Select your deployment environment and open Environment Variables.
Add two variables:
Set GEMINI_API_KEY to Secret to encrypt and mask the value. Anyone with access to your Webflow site can view plain environment variables in the dashboard, so secrets are the right setting for API credentials.
Environment variables in Webflow Cloud are available only at runtime, not at build time. process.env.GEMINI_API_KEY in the route handler accesses the value at request time, which is correct for this use case.
After adding the variables, trigger a new deployment from the dashboard. Changes to environment variables require a redeploy to take effect.
Expected outcome: Retest your endpoint. The 500 "API key not configured" error should be gone, and Gemini should return a real response.
5. Add the chat interface to your Webflow page
On the Webflow page where the assistant will live, add a Code Embed element from the Add Panel (the + icon in the left sidebar). This element holds the chat UI's HTML and CSS inline.
Inside the Code Embed, paste this markup:
<div id="gemini-chat" style="
  font-family: inherit;
  max-width: 480px;
  border: 1px solid #e5e7eb;
  border-radius: 12px;
  overflow: hidden;
  display: flex;
  flex-direction: column;
  height: 480px;
">
  <div id="chat-messages" style="
    flex: 1;
    overflow-y: auto;
    padding: 16px;
    display: flex;
    flex-direction: column;
    gap: 12px;
    background: #f9fafb;
  "></div>

  <div style="
    display: flex;
    gap: 8px;
    padding: 12px 16px;
    background: #fff;
    border-top: 1px solid #e5e7eb;
  ">
    <input
      id="chat-input"
      type="text"
      placeholder="Ask a question..."
      style="
        flex: 1;
        padding: 8px 12px;
        border: 1px solid #d1d5db;
        border-radius: 8px;
        font-size: 14px;
        outline: none;
      "
    />
    <button
      id="chat-send"
      style="
        padding: 8px 16px;
        background: #1a1a2e;
        color: #fff;
        border: none;
        border-radius: 8px;
        font-size: 14px;
        cursor: pointer;
      "
    >Send</button>
  </div>
</div>
Styles are inline to avoid conflicts with Webflow's stylesheet. Adjust colors and sizing to match your design system. The IDs (gemini-chat, chat-messages, chat-input, chat-send) are referenced by the JavaScript below. Don't change them.
In Site Settings → Custom Code → Footer Code, paste this script:
<script>
(function() {
  // Relative path — no CORS, same domain as your Webflow site
  const ENDPOINT = '/app/gemini';

  const messagesEl = document.getElementById('chat-messages');
  const inputEl    = document.getElementById('chat-input');
  const sendBtn    = document.getElementById('chat-send');

  if (!messagesEl || !inputEl || !sendBtn) return;

  // In-memory conversation history (resets on page reload)
  let history = [];

  function appendMessage(role, text) {
    const isUser = role === 'user';
    const wrapper = document.createElement('div');
    wrapper.style.cssText = `display:flex;justify-content:${isUser ? 'flex-end' : 'flex-start'};`;

    const bubble = document.createElement('div');
    bubble.style.cssText = `
      max-width:80%;padding:10px 14px;
      border-radius:${isUser ? '12px 12px 2px 12px' : '12px 12px 12px 2px'};
      background:${isUser ? '#1a1a2e' : '#fff'};
      color:${isUser ? '#fff' : '#111'};
      font-size:14px;line-height:1.5;
      border:${isUser ? 'none' : '1px solid #e5e7eb'};
      white-space:pre-wrap;
    `;
    bubble.textContent = text;
    wrapper.appendChild(bubble);
    messagesEl.appendChild(wrapper);
    messagesEl.scrollTop = messagesEl.scrollHeight;
  }

  async function sendMessage() {
    const userText = inputEl.value.trim();
    if (!userText) return;

    inputEl.value = '';
    sendBtn.disabled = true;
    sendBtn.textContent = '...';
    appendMessage('user', userText);

    // Typing indicator
    const typingId = 'typing-' + Date.now();
    const typingEl = document.createElement('div');
    typingEl.id = typingId;
    typingEl.style.cssText = 'color:#6b7280;font-size:13px;padding:4px 0;';
    typingEl.textContent = 'Thinking…';
    messagesEl.appendChild(typingEl);
    messagesEl.scrollTop = messagesEl.scrollHeight;

    try {
      const response = await fetch(ENDPOINT, {
        method: 'POST',
        headers: { 'Content-Type': 'application/json' },
        body: JSON.stringify({ message: userText, history }),
      });

      const indicator = document.getElementById(typingId);
      if (indicator) indicator.remove();

      if (!response.ok) {
        const err = await response.json().catch(() => ({}));
        appendMessage('model', 'Error: ' + (err.error || response.statusText));
      } else {
        const data = await response.json();
        appendMessage('model', data.reply);

        // Update history for multi-turn context
        history.push({ role: 'user',  parts: [{ text: userText }] });
        history.push({ role: 'model', parts: [{ text: data.reply }] });
      }
    } catch (err) {
      const indicator = document.getElementById(typingId);
      if (indicator) indicator.remove();
      appendMessage('model', 'Connection error. Check your internet connection and try again.');
      console.error('Fetch error:', err);
    } finally {
      sendBtn.disabled = false;
      sendBtn.textContent = 'Send';
      inputEl.focus();
    }
  }

  sendBtn.addEventListener('click', sendMessage);
  inputEl.addEventListener('keydown', function(e) {
    if (e.key === 'Enter' && !e.shiftKey) { e.preventDefault(); sendMessage(); }
  });
})();
</script>
Publish your site. Open it at your published URL (not the Designer preview, as custom code doesn't execute in the canvas) and type a message. Gemini should respond. Ask a follow-up question that references the first answer to confirm that the multi-turn context is working.
Expected outcome: The chat widget appears on the page. The first message returns a Gemini reply. A second message that references the first confirms that the multi-turn context is working correctly.
What causes Gemini integration to fail on Webflow Cloud?
Most failures trace back to three causes after the initial setup: an API key not being picked up by the endpoint, rate limits on the free tier, and the Gemini message format being confused with OpenAI's structure.
Each failure produces a distinct symptom. Start with the symptom you're seeing.
Endpoint returns 500 after deployment: API key not found
The route handler reads process.env.GEMINI_API_KEY at runtime. If the endpoint returns 500 with "API key not configured," one of two things happened: the environment variable wasn't set before deployment, or it was added after the last deployment, and a redeploy hasn't run.
In the Webflow Cloud dashboard, confirm GEMINI_API_KEY is listed under Environment Variables with type Secret. Then trigger a new deployment. Changes to environment variables require a full redeploy. They don't hot-reload.
429 errors during development
You're hitting Gemini's rate limit on the free tier. The free tier has per-minute and per-day limits that vary by model. During development, these get hit fast if you're sending test messages in quick succession.
Options: add a short delay between test calls, switch to a paid tier, or check your current limits in Google AI Studio under the API key's project. Production traffic on a public site should be on the paid tier to prevent visitors from seeing rate-limit errors during peak usage.
The conversation loses context after the first reply
Gemini doesn't store session state. Every request must include the full conversation history for the multi-turn context to work. If Gemini responds but then treats the second message as a new conversation, the history array in the frontend JavaScript doesn't update correctly.
Check the history.push(...) calls at the end of the sendMessage function. Both the user message and the model reply must be pushed after each successful response.
The structure must be:
{ role: 'user',  parts: [{ text: userText }] }
{ role: 'model', parts: [{ text: data.reply }] }
Note that Gemini uses the role "model", not "assistant" like OpenAI. This is the single most common mistake when adapting an existing OpenAI integration.
System prompt instructions are partially ignored or inconsistent
Gemini follows system prompts, but vague instructions produce inconsistent results. "Be helpful and concise" is too broad.
More effective patterns:
- Give it a persona: "You are a support assistant for [Company]. You only answer questions about our products."
- Set explicit limits: "Keep all responses under 120 words. Do not speculate about topics outside your context."
- Define what to do when stumped: "If you don't know the answer, say so directly rather than guessing."
Test the system prompt across a range of user inputs, including edge cases, before going live. The SYSTEM_PROMPT environment variable means you can iterate on this without touching code: update the variable, redeploy, and test again.
What to build next with Webflow Cloud
This guide covered the core pattern: a Webflow Cloud Route Handler proxying requests to Gemini, with no CORS configuration required because the endpoint shares your site's domain.
The same pattern works for any external API that needs a server-side key: OpenAI, Anthropic (Claude), weather APIs and payment processors.
Explore Webflow + Gemini for use cases, community examples, and related integrations that pair well with this setup.
Frequently asked questions
Is Gemini's free tier suitable for a production Webflow site?
Probably not at any meaningful traffic volume. Free tier limits vary by model and change frequently. A handful of concurrent visitors sending messages can quickly exhaust per-minute limits. For production, use the paid tier and set a budget cap in Google Cloud. Check current limits in AI Studio before launch.
How is the Gemini API request format different from OpenAI's?
Gemini uses the role "model," while OpenAI uses the role "assistant". Gemini also wraps text in parts: [{ text: "..." }] instead of a flat content string. Swapping OpenAI's messages array directly into a Gemini request fails silently. The structure parses without error, but Gemini returns an unexpected response.
Does the AI assistant retain memory across sessions or page reloads?
No. The history array lives in memory and clears on every page reload. Within a session, multi-turn context works because the full history is sent with every request. For persistent memory across sessions, store and retrieve conversation history from Webflow Cloud's SQLiteor Key Value Store.
Can I use Astro instead of Next.js for the Cloud app?
Yes. Webflow Cloud supports both frameworks. The Astro equivalent uses server endpoint syntax, with an export async function POST({ request, locals }) that accesses env vars via locals.runtime.env.GEMINI_API_KEY. Our Webflow blog post on API wrappers with Webflow Cloud uses Astro and is a solid setup reference.
Can the Gemini assistant read from Webflow CMS collections?
Not directly. Gemini only knows what you send in the system prompt or conversation history. Fetch CMS collection items via the Webflow Data API in your route handler and inject them into the system prompt before the Gemini call. Requires a CMS plan or higher to access the Data API.


