


When an order comes through on a Webflow e-commerce site, the confirmation email can do more than confirm. With SendGrid and a Cloudflare Worker, you can template it fully, populate it dynamically, and apply whatever conditional logic your store needs.
Webflow's native order confirmation email handles the basics well. It fires automatically on every purchase, gets the receipt to the customer, and requires zero setup. But if you need extensive customization, you need more.
The template editor lets you adjust colors and copy, but the structure is fixed. Dynamic product images, conditional messaging based on order value, and separate templates for different product lines or tiers require stepping outside Webflow's native email system, which is where SendGrid comes in.
This guide covers three paths to get there, then walks through the Cloudflare Worker implementation in full. That’s the approach that gives you complete control over the email template, sender domain, and any conditional logic.
4 ways to send custom order confirmation emails from Webflow
Four approaches exist, ranging from no-code automation to full programmatic control. All three use SendGrid as the email provider. The right choice depends on how much customization you need and whether your team can write code.
All three require a SendGrid account:
This guide covers the Cloudflare Worker path in full. It gives you complete control over the email template, sender domain, and any conditional logic; things automation platforms don't expose at the field level.
What do you need to send order confirmation emails from Webflow with SendGrid?
Four things need to be in place for the integration to work: a Webflow e-commerce site, a verified SendGrid sender domain, a scoped SendGrid API key, and a Cloudflare account for the Worker.
If any of these are missing, the integration either won't fire or will send emails that land in spam.
Webflow site on an e-commerce plan
Webflow's native ecommerce features, including the ecomm_new_order webhook trigger, are only available on E-commerce site plans. If your site runs on a standard CMS or Business plan and uses a third-party checkout (Stripe, Shopify Buy Button, etc.), the e-commerce webhook won't fire.
Confirm your plan in Project Settings before continuing.
SendGrid account with a verified sender domain
Emails sent from an unverified domain are highly likely to end up in spam. SendGrid requires you to verify your sending domain before transactional emails reliably reach inboxes. This involves adding DNS records (CNAME entries) to your domain provider.

One important note on SendGrid's pricing before you start: SendGrid discontinued its free tier in July 2025. There's a 60-day trial (100 emails per day), but after that, you'll need a paid plan. Essentials starts at $19.95/month for up to 50,000 emails, or $34.95/month for up to 100,000 emails.
If you're testing with a single address rather than a full domain, SendGrid's Single Sender Verification works for development but is not suitable for production volumes.
SendGrid API key with Mail Send permission
Create a restricted API key in SendGrid under Settings → API Keys. When setting permissions, enable Mail Send → Full Access. Do not use a full-access key in production.
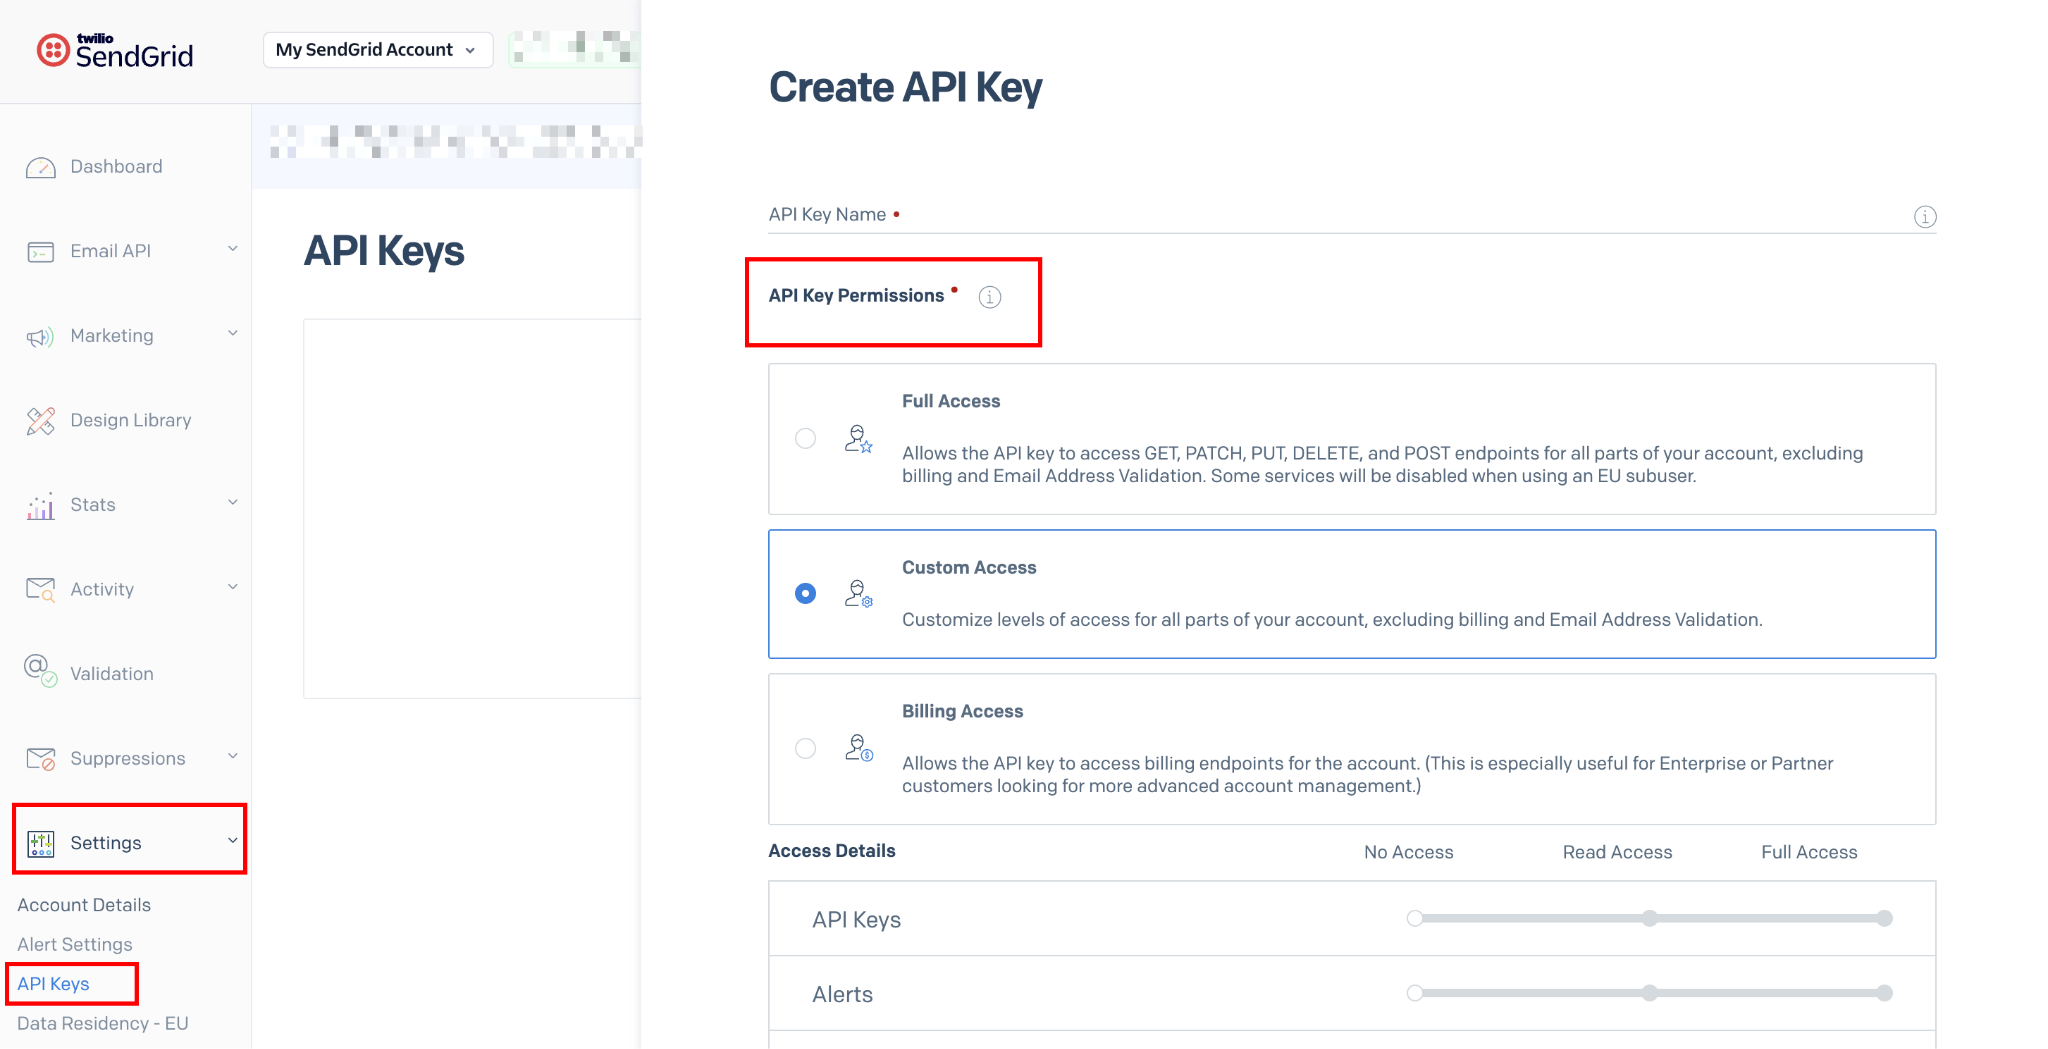
A scoped key limits the blast radius if credentials are ever exposed.
Cloudflare account (free tier is sufficient)
The same Cloudflare account and Wrangler CLI setup used for any Worker deployment applies here. Free tier provides 100,000 requests per day; more than enough for any realistic order volume. If you already have a Worker running from another integration, this deploys as a separate Worker at a separate URL.
Once all four are in place, the build takes about an hour. Here's the full process.
5 steps to send order confirmation emails from Webflow with SendGrid
The integration connects three systems: Webflow fires a webhook on every new order, a Cloudflare Worker receives that webhook and parses the order data, and SendGrid sends the confirmation email using a template you control.
The Worker is the secure middle layer. It keeps your SendGrid API key off the client and handles any data formatting before the email is sent.
1. Verify your sender domain in SendGrid
Log in to your SendGrid account and navigate to Settings → Sender Authentication, and click Authenticate Your Domain.
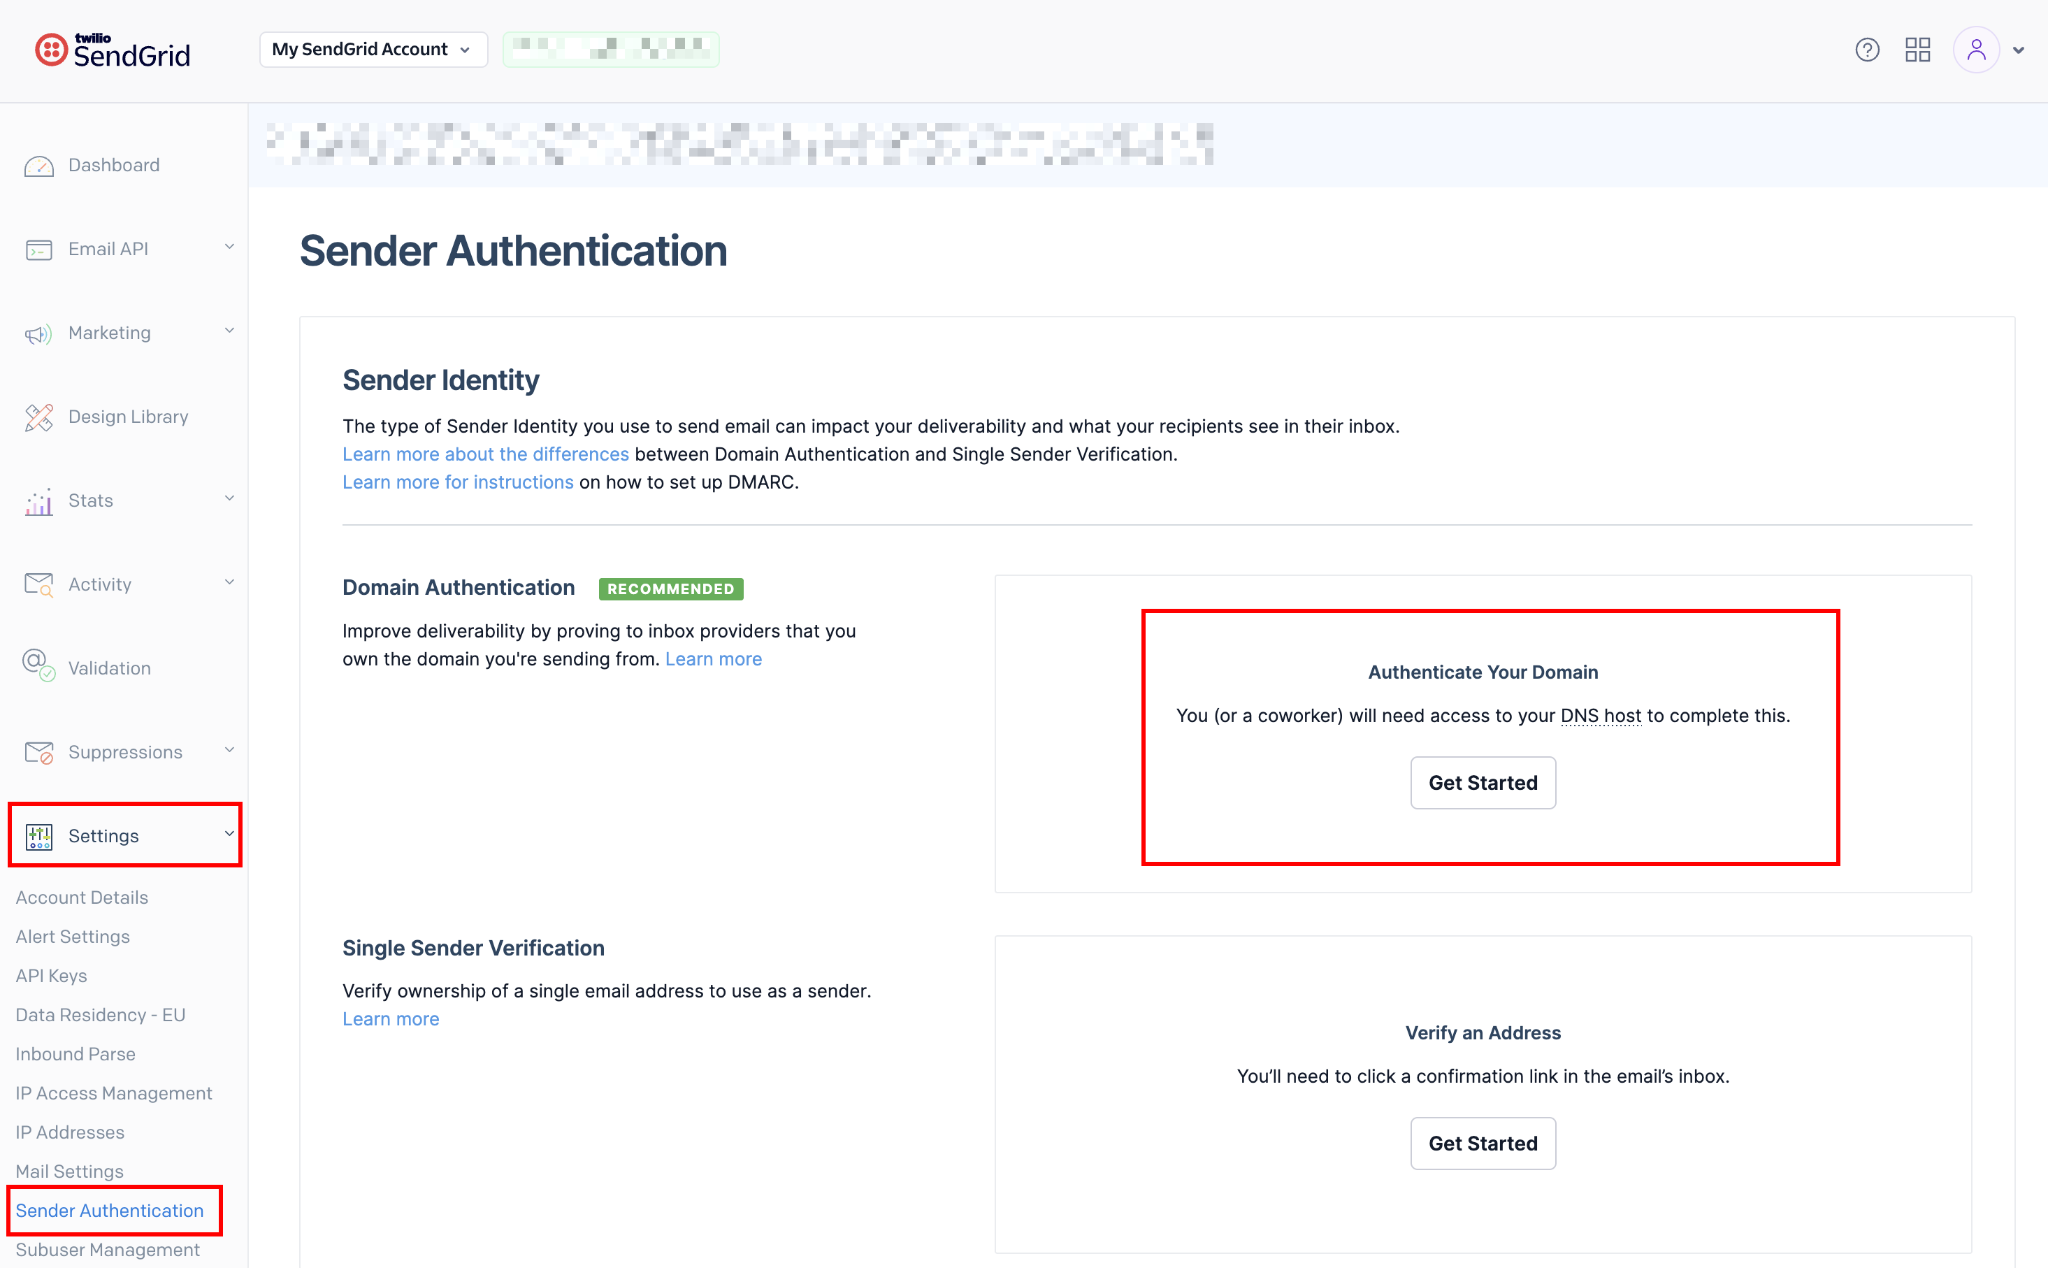
SendGrid prompts you to select your DNS host from a dropdown. Choose your registrar (Cloudflare DNS, GoDaddy, Namecheap, Route 53, etc.) or select "Other" if yours isn't listed.
Enter the domain you'll send from; typically, your main domain (yourcompany.com) or a dedicated transactional subdomain (mail.yourcompany.com). With Automated Security enabled (the default), SendGrid generates four DNS records: three CNAME records for mail routing and link branding, plus one TXT record for DMARC.
Add all four DNS records to your DNS provider exactly as displayed. Do not modify the values. Then click Verify in SendGrid.
DNS propagation typically completes within 5–30 minutes. If verification fails, wait 10 minutes and try again. The most common cause of failure is a CNAME value that's been modified or truncated by the DNS provider's input field.
Expected outcome: SendGrid shows a green "Verified" badge next to your domain. Every email sent from that domain will pass SPF and DKIM checks, which is the primary factor in avoiding spam folders.
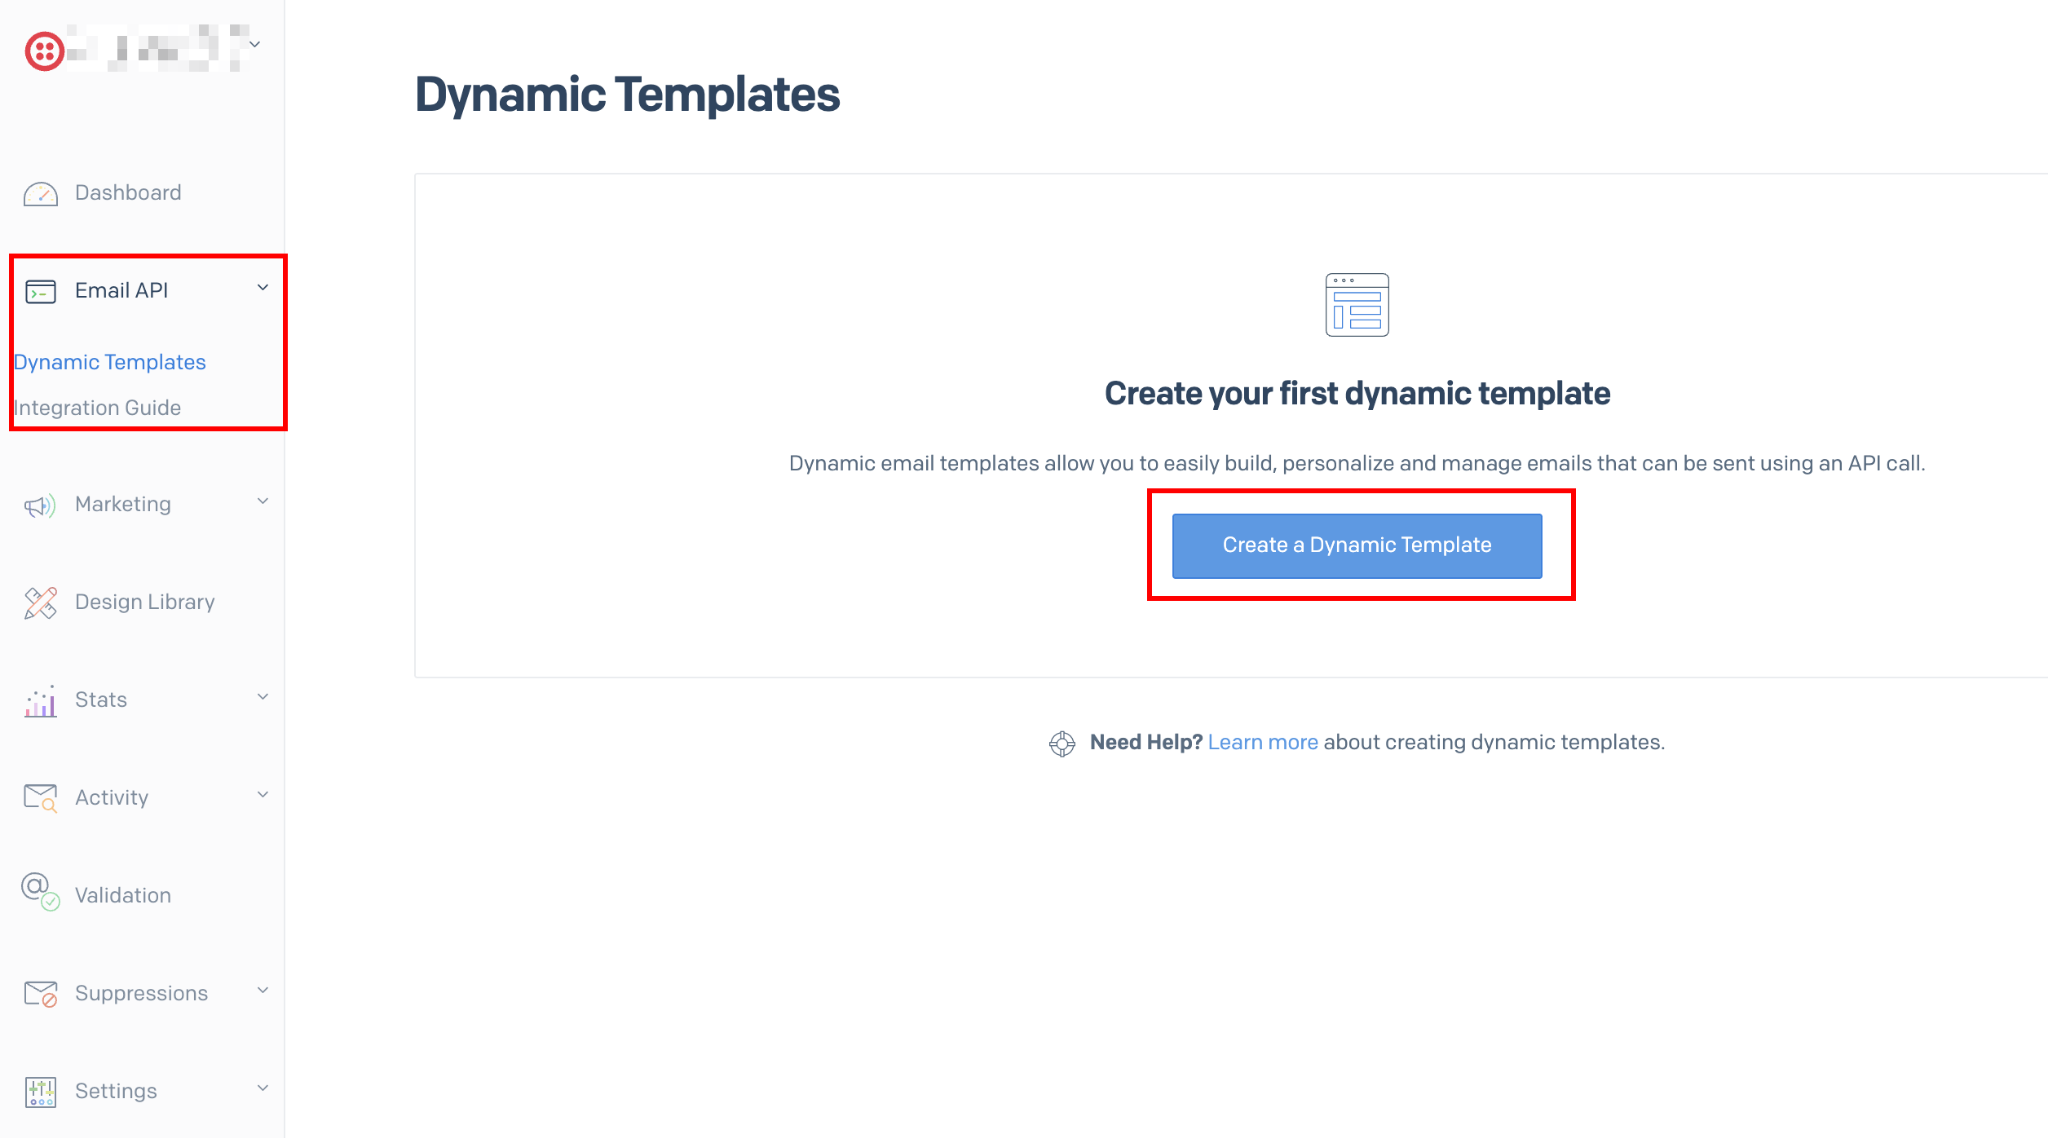
2. Create a SendGrid dynamic template for the order email
SendGrid's dynamic templates separate the email's visual structure from the data that populates it. You design the template once, then pass order-specific data (customer name, items, totals) from the Worker each time an order comes in.
The template uses Handlebars syntax for variables: {{customerName}}, {{orderId}}, and {{#each lineItems}} for looping over products.
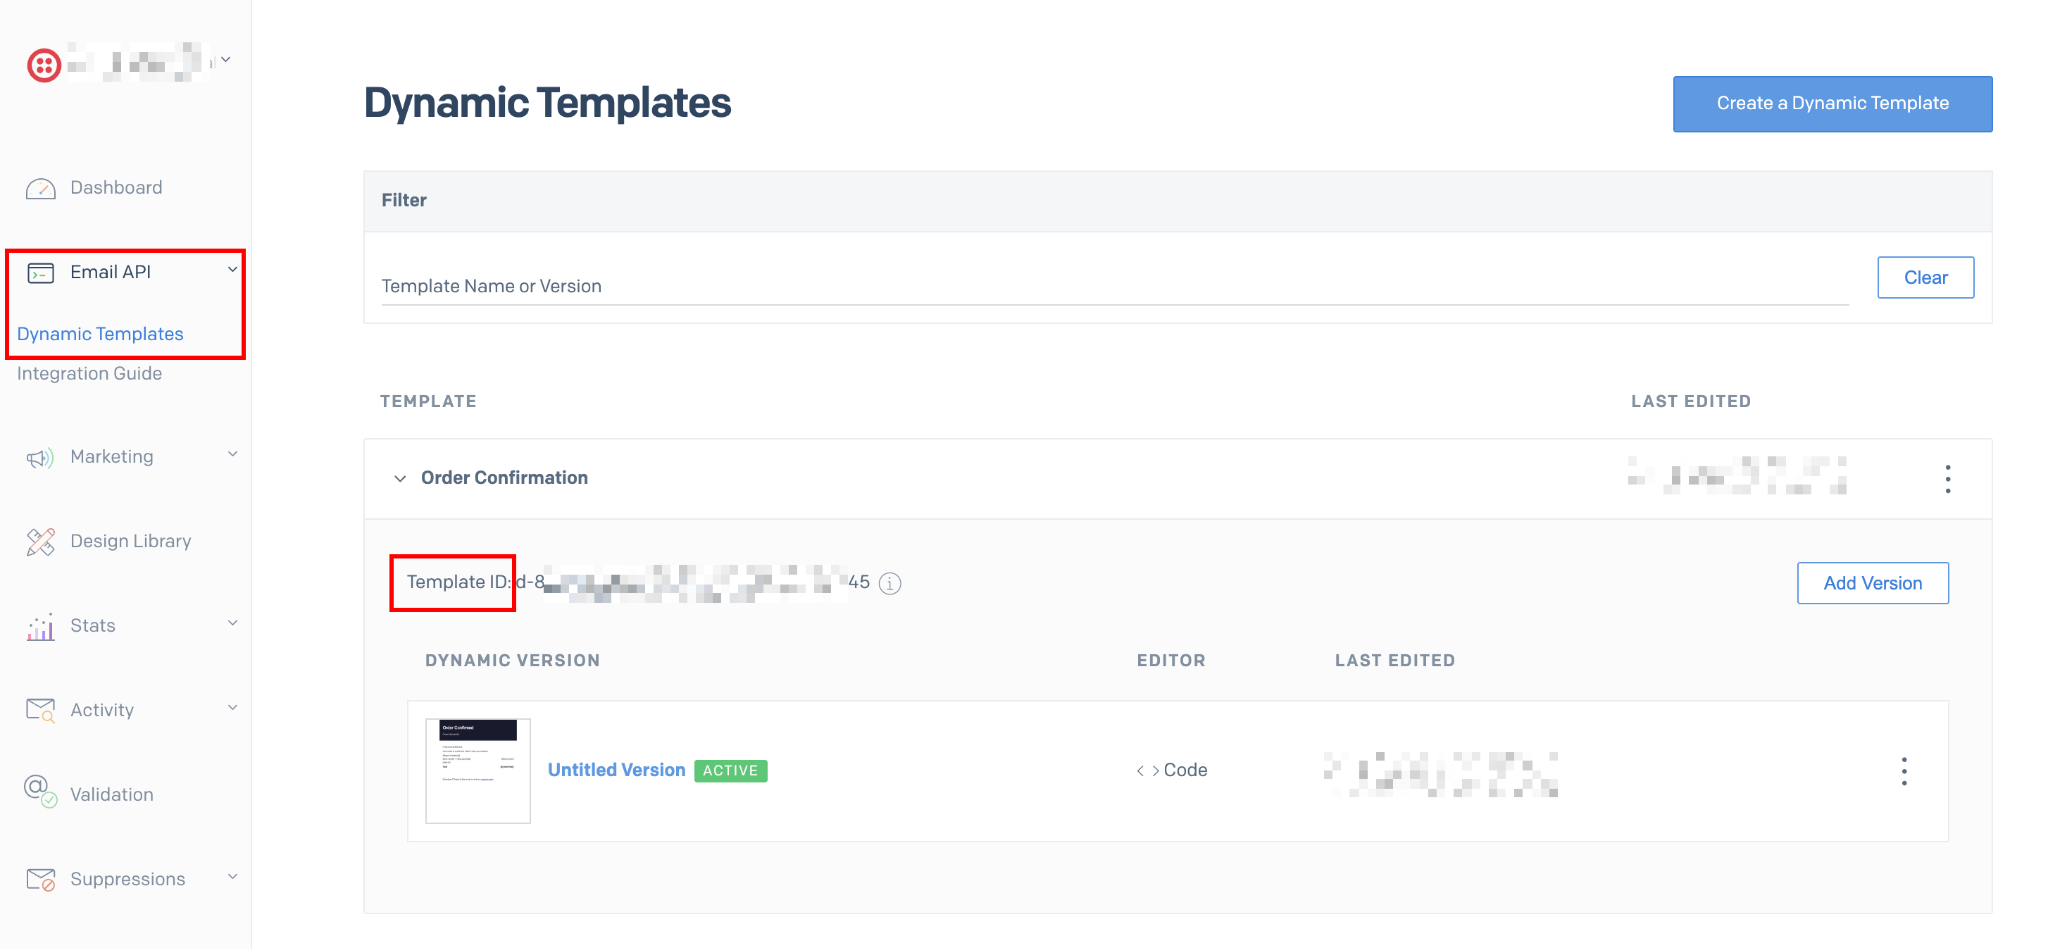
Navigate to Email API → Dynamic Templates in the SendGrid sidebar. Click Create a Dynamic Template, give it a name such as "Order Confirmation," then click Add Version to open the template editor.
Choose Code Editor if you're comfortable with HTML, or Design Editor for a drag-and-drop layout. For a production order email, the Code Editor gives you more precise control over the HTML structure and ensures your design renders consistently across email clients.
A minimal order confirmation template using Handlebars:
<!DOCTYPE html>
<html>
<head>
  <style>
    body { font-family: sans-serif; color: #111; max-width: 600px; margin: 0 auto; }
    .header { background: #1a1a2e; color: #fff; padding: 24px; }
    .section { padding: 24px; }
    .item-row { display: flex; justify-content: space-between; padding: 8px 0; border-bottom: 1px solid #eee; }
    .total-row { display: flex; justify-content: space-between; padding: 16px 0; font-weight: bold; }
  </style>
</head>
<body>
  <div class="header">
    <h1>Order Confirmed</h1>
    <p>Order #{{orderId}}</p>
  </div>

  <div class="section">
    <p>Hi {{customerName}},</p>
    <p>Your order is confirmed. Here's what you ordered:</p>

    {{#each lineItems}}
    <div class="item-row">
      <span>{{this.name}} × {{this.quantity}}</span>
      <span>${{this.price}}</span>
    </div>
    {{/each}}

    <div class="total-row">
      <span>Total</span>
      <span>${{orderTotal}}</span>
    </div>
  </div>

  <div class="section">
    <p>Questions? Reply to this email or visit our <a href="{{supportUrl}}">support page</a>.</p>
  </div>
</body>
</html>
After saving the template, copy the Template ID. It's a string starting with d- displayed at the top of the template detail page. You'll reference this in the Worker as an environment secret.
Expected outcome: The template is saved in SendGrid with a Template ID. Previewing it with sample data shows the Handlebars variables correctly populated with placeholder values.
3. Deploy a Cloudflare Worker to receive the webhook and call SendGrid
The Worker is a lightweight script that sits between Webflow and SendGrid. It receives the incoming POST webhook, parses the order data, formats it for the SendGrid template, and sends the email. It also keeps your API key off the client. Nothing sensitive is exposed to the browser.
Make sure you are logged in to Cloudflare before running the commands below: npx wrangler login. Wrangler is installed locally by the scaffold command in the next step; no global install is needed.
Scaffold a new Worker:
npm create cloudflare@latest -- order-confirmationSelect "Hello World example," "Worker only," and "JavaScript."
Choose "No" when asked to deploy immediately.
cd order-confirmationReplace src/index.js with this Worker:
export default {
  async fetch(request, env) {
    if (request.method !== 'POST') {
      return new Response('Method not allowed', { status: 405 });
    }

    let payload;
    try {
      payload = await request.json();
    } catch {
      return new Response('Invalid JSON payload', { status: 400 });
    }

    const { customerInfo, purchasedItems, totals, orderId } = payload.payload;

    // Guard: Webflow always sends customerInfo.email, but defensive check is good practice
    if (!customerInfo?.email) {
      console.error('Missing customer email in webhook payload:', JSON.stringify(payload));
      return new Response(JSON.stringify({ error: 'No customer email in payload' }), {
        status: 400,
        headers: { 'Content-Type': 'application/json' },
      });
    }

    // Price values from Webflow are numeric strings representing cents (e.g., "1999" = $19.99) — cast with Number() before dividing
    const lineItems = (purchasedItems || []).map(item => ({
      name: item.productName || 'Product',
      quantity: item.count || 1,
      price: ((Number(item.variantPrice?.value) || 0) / 100).toFixed(2),
      image: item.variantImage?.url || null,
    }));

    const orderTotal = ((Number(totals?.total?.value) || 0) / 100).toFixed(2); // totals.total includes tax and shipping; totals.subtotal does not

    const sgResponse = await fetch('https://api.sendgrid.com/v3/mail/send', {
      method: 'POST',
      headers: {
        'Authorization': `Bearer ${env.SENDGRID_API_KEY}`,
        'Content-Type': 'application/json',
      },
      body: JSON.stringify({
        personalizations: [
          {
            to: [{ email: customerInfo.email, name: customerInfo.fullName }],
            dynamic_template_data: {
              customerName: customerInfo.fullName || 'Customer',
              orderId: orderId || 'N/A',
              lineItems,
              orderTotal,
              supportUrl: env.SUPPORT_URL || 'https://yoursite.com/support',
            },
          },
        ],
        from: {
          email: env.FROM_EMAIL,
          name: env.FROM_NAME,
        },
        template_id: env.SENDGRID_TEMPLATE_ID,
      }),
    });

    if (!sgResponse.ok) {
      const errorBody = await sgResponse.text();
      console.error('SendGrid error:', sgResponse.status, errorBody);
      return new Response(
        JSON.stringify({ error: 'Email send failed', details: errorBody }),
        { status: 500, headers: { 'Content-Type': 'application/json' } }
      );
    }

    return new Response(JSON.stringify({ success: true, orderId }), {
      status: 200,
      headers: { 'Content-Type': 'application/json' },
    });
  },
};
Two things to note about the payload mapping.
- First, the array field inside payload.payload is purchasedItems, not a generic orderItems. Note the two-level structure: the raw webhook body is { triggerType, payload: { ... } } — destructure from payload.payload, not from the top-level body.
- Second, price values are numeric strings representing cents:
"1999"means $19.99. Dividing by 100 and calling.toFixed(2)converts that to a display-ready string.
Each item in purchasedItems also includes a variantImage.url field. The image URL is mapped into lineItems here so you can render product thumbnails directly in your SendGrid template.
Add webhook signature verification before going to production. Webflow includes an x-webflow-signature header with each webhook request. Verify it in the Worker before processing the payload to prevent spoofed requests.
Webflow's developer docs cover the HMAC-SHA256 verification pattern. This is a one-time addition and should be in place before your first real customer order goes through.
Now add your secrets:
npx wrangler secret put SENDGRID_API_KEY
npx wrangler secret put SENDGRID_TEMPLATE_ID
npx wrangler secret put FROM_EMAIL
npx wrangler secret put FROM_NAME
npx wrangler secret put SUPPORT_URL
Enter each value when prompted. FROM_EMAIL must be an address on your verified SendGrid domain. SENDGRID_TEMPLATE_ID is the d- string from Step 2.
Deploy:
npx wrangler deployCopy the Worker URL from the output: https://order-confirmation.<your-subdomain>.workers.dev. This is the endpoint Webflow will POST to.
Expected outcome: The Worker is live and returns a 405 for non-POST requests. Secrets are stored with masked values in the Cloudflare dashboard under Workers & Pages → your worker → Settings → Variables and Secrets.
4. Register the order webhook in Webflow
The simplest way to register a webhook is to do so directly in Webflow's site settings. Go to Project Settings → Integrations → Webhooks, click Add Webhook, select ecomm_new_order as the trigger type, and paste your Worker URL as the destination. No API calls or token scoping needed.
Run this curl command, replacing YOUR_SITE_ID, YOUR_SITE_TOKEN, and YOUR_WORKER_URL with your actual values:
curl -X POST https://api.webflow.com/v2/sites/YOUR_SITE_ID/webhooks \
  -H "Authorization: Bearer YOUR_SITE_TOKEN" \
  -H "Content-Type: application/json" \
  -d '{
    "triggerType": "ecomm_new_order",
    "url": "https://order-confirmation.YOUR-SUBDOMAIN.workers.dev"
  }'
Your Site ID appears in the URL when you're in the Webflow Designer (https://webflow.com/design/SITE_ID) or under Project Settings → General → Site ID.
A successful response returns a webhook object with an id field. Save this ID. You'll need it if you ever want to update or delete the webhook registration.
To verify the webhook was registered, list your site's active webhooks:
curl https://api.webflow.com/v2/sites/YOUR_SITE_ID/webhooks \
  -H "Authorization: Bearer YOUR_SITE_TOKEN"
Expected outcome: The response includes your webhook with triggerType: "ecomm_new_order" and your Worker URL. Webflow will now POST to that URL on every new order.
5. Test the full order flow
The most reliable test is a real order placed on your published site using a test payment method. Webflow's ecommerce sandbox mode accepts Stripe's test card numbers (4242 4242 4242 4242, any future expiry, any CVC).
Before going live, turn off Webflow's native order confirmation email in Project Settings → Ecommerce → Emails to avoid sending customers two copies.
Place a test order. Within a few seconds, Webflow fires the webhook. Check two places simultaneously:
Cloudflare Worker logs: In the Cloudflare dashboard, navigate to Compute → Workers & Pages → your Worker → Logs. Click Begin Log Stream before placing the order. You should see the incoming POST request logged within 5 seconds of checkout completion.
Your inbox: Check the email address you used at checkout. The order confirmation should arrive within 10–15 seconds.
If the email arrives but formatting looks off, edit the template in SendGrid's template editor and republish it; no Worker redeployment needed. Template changes take effect immediately.
If no webhook appears in the logs, the most likely cause is that the webhook wasn't registered successfully. Repeat Step 4 and list your webhooks to confirm.
Expected outcome: A fully formatted order confirmation email lands in the test inbox within 15 seconds of order placement, populated with the correct customer name, product names, quantities, and total.
What causes order confirmation emails to fail in Webflow?
Most failures fall into four categories: the webhook not firing, the Worker not receiving the payload, SendGrid rejecting the request, or emails being delivered but landing in spam. The symptom in each case is visible; the cause usually isn't.
Here's how to work through each one.
Webhook fires, but Worker shows no incoming request
Symptom: The test order completes in Webflow, but nothing appears in the Worker's log stream.
Cause: The webhook URL stored in Webflow doesn't match your deployed Worker URL, or the webhook registration didn't complete successfully.
Fix: List your site's registered webhooks using the curl command from Step 4 and confirm the URL matches your Worker URL exactly, including the https:// prefix and no trailing slash. If the URL is wrong, delete the old webhook registration using DELETE https://api.webflow.com/v2/webhooks/{webhook_id} (the delete endpoint takes only the webhook ID, no sites/ prefix) and re-register with the correct URL.
Also, to confirm, the triggerType is ecomm_new_order, not form_submissions or any other event type.
The worker receives the webhook, but SendGrid returns a 403
Symptom: Worker logs show the incoming request and the Webflow payload, but the SendGrid response is 403 Forbidden.
Cause: The SendGrid API key stored in the Worker secret doesn't have the Mail Send permission, or the key was deleted/regenerated in SendGrid and the Worker secret wasn't updated.
Fix: In SendGrid, navigate to Settings → API Keys, and verify that your key exists and that Mail Send → Full Access is enabled. If the key was regenerated, run npx wrangler secret put SENDGRID_API_KEY again with the new key value and redeploy.
Emails arrive but land in spam
Symptom: The Worker logs show a 202 response from SendGrid (successful send), but the email ends up in the recipient's spam folder.
Cause: The sending domain isn't fully verified in SendGrid's Sender Authentication, or the FROM_EMAIL domain doesn't match the verified domain. A 202 from SendGrid means the email was accepted for delivery, not that it reached the inbox.
Fix: Go to Settings → Sender Authentication in SendGrid and confirm your domain shows a green Verified status. If it shows as unverified, re-check that all three CNAME records were added correctly at your DNS provider. Use MXToolbox to verify the CNAMEs are resolving.
Confirm that FROM_EMAIL uses the exact domain you verified, not a subdomain variant that wasn't included in the authentication.
Emails send for test orders, but not real customer orders
Symptom: Every test order triggers the email, but real customer orders occasionally don't.
Cause: Webflow's webhook delivery has a retry mechanism, but it's not indefinite. If your Worker returns a non-2xx response (due to a transient error), Webflow retries a limited number of times before dropping the event.
Fix: Ensure your Worker always returns a 2xx response, even when the SendGrid call fails. Log the failure internally and return 200 to Webflow so it doesn't retry unnecessarily. For production, consider logging failed sends to a Cloudflare KV namespace or external logging service so you can replay them manually.
For higher-order volumes, add idempotency by storing processed orderId values in a Cloudflare KV namespace. Before calling SendGrid, check whether that orderId has already been processed. If it has, return 200 without sending. This prevents duplicate emails on webhook retries without requiring external infrastructure.
Build more with Webflow E-commerce and SendGrid
For teams building more complex post-purchase workflows (referral triggers, loyalty point allocation, upsell sequences), Webflow's developer documentation covers the full Orders API and the complete list of ecommerce webhook events.
If parts of your team need to manage email workflows without touching the Worker, Webflow's SendGrid integration covers the no-code automation paths worth reviewing in parallel.
Frequently asked questions
Does this integration require a paid Webflow plan?
Yes. The ecomm_new_order event is only available on Webflow's E-commerce site plans. Standard site plans (Starter, CMS, Business) don't include native ecommerce features. If you're selling through a third-party cart embedded on a Webflow site, the Webflow webhook won't fire. You'd need to handle the confirmation email at the cart provider level instead.
Does the Webflow order webhook include all the product details I need?
For most order emails, yes. The ecomm_new_order payload includes the customer's full name and email, a purchasedItems array (product name, quantity, unit price in cents, and variant image URL per item via variantImage.url), order totals, shipping address, and the order ID. Product images are available directly in the payload. Each item in purchasedItems carries a variantImage.url field that you can pass straight into your SendGrid template. The Worker code in Step 3 maps this into lineItems[].image for exactly this purpose.
Can I turn off Webflow's native order confirmation email and send confirmations only through SendGrid?
Yes, partially. In Project Settings → Ecommerce → Emails, you can toggle individual email notifications. Turn off the native order confirmation email to avoid sending customers two copies. Note that Webflow's fulfillment notification email (sent when you mark an order as fulfilled) is a separate toggle. Leave that one enabled, or replace it with a second SendGrid Worker route if you want to customize it as well.


