


Getting Zapier, Airtable, and Webflow to sync reliably is straightforward once you know which settings actually matter.
The Zapier-to-Airtable sync is one of the most reliable automation stacks in the Webflow ecosystem — until it isn't. When it breaks, the symptoms are critical: records appear in Airtable but don't show up on your live site, CMS updates in Airtable aren't reflecting in Webflow, or your Zaps throw cryptic ValidationError: Validation Failure messages that offer no clear path to a fix.
This guide walks through the six most common reasons the Zapier-Airtable-Webflow sync breaks, and how to fix each.
If your Zap ran successfully before and then stopped, or if you're setting one up from scratch and hitting walls, start with the diagnostic table below to identify your specific failure mode.
Why does the Zapier-to-Airtable sync break in Webflow?
Every Zapier-Airtable-Webflow sync traces to one of six root causes, and the symptom you're seeing points directly to which one. Match your situation to the table below, then jump to the corresponding fix.
Match your symptom to the row, then jump to the corresponding fix.
Fix #1: Items not showing on your live site
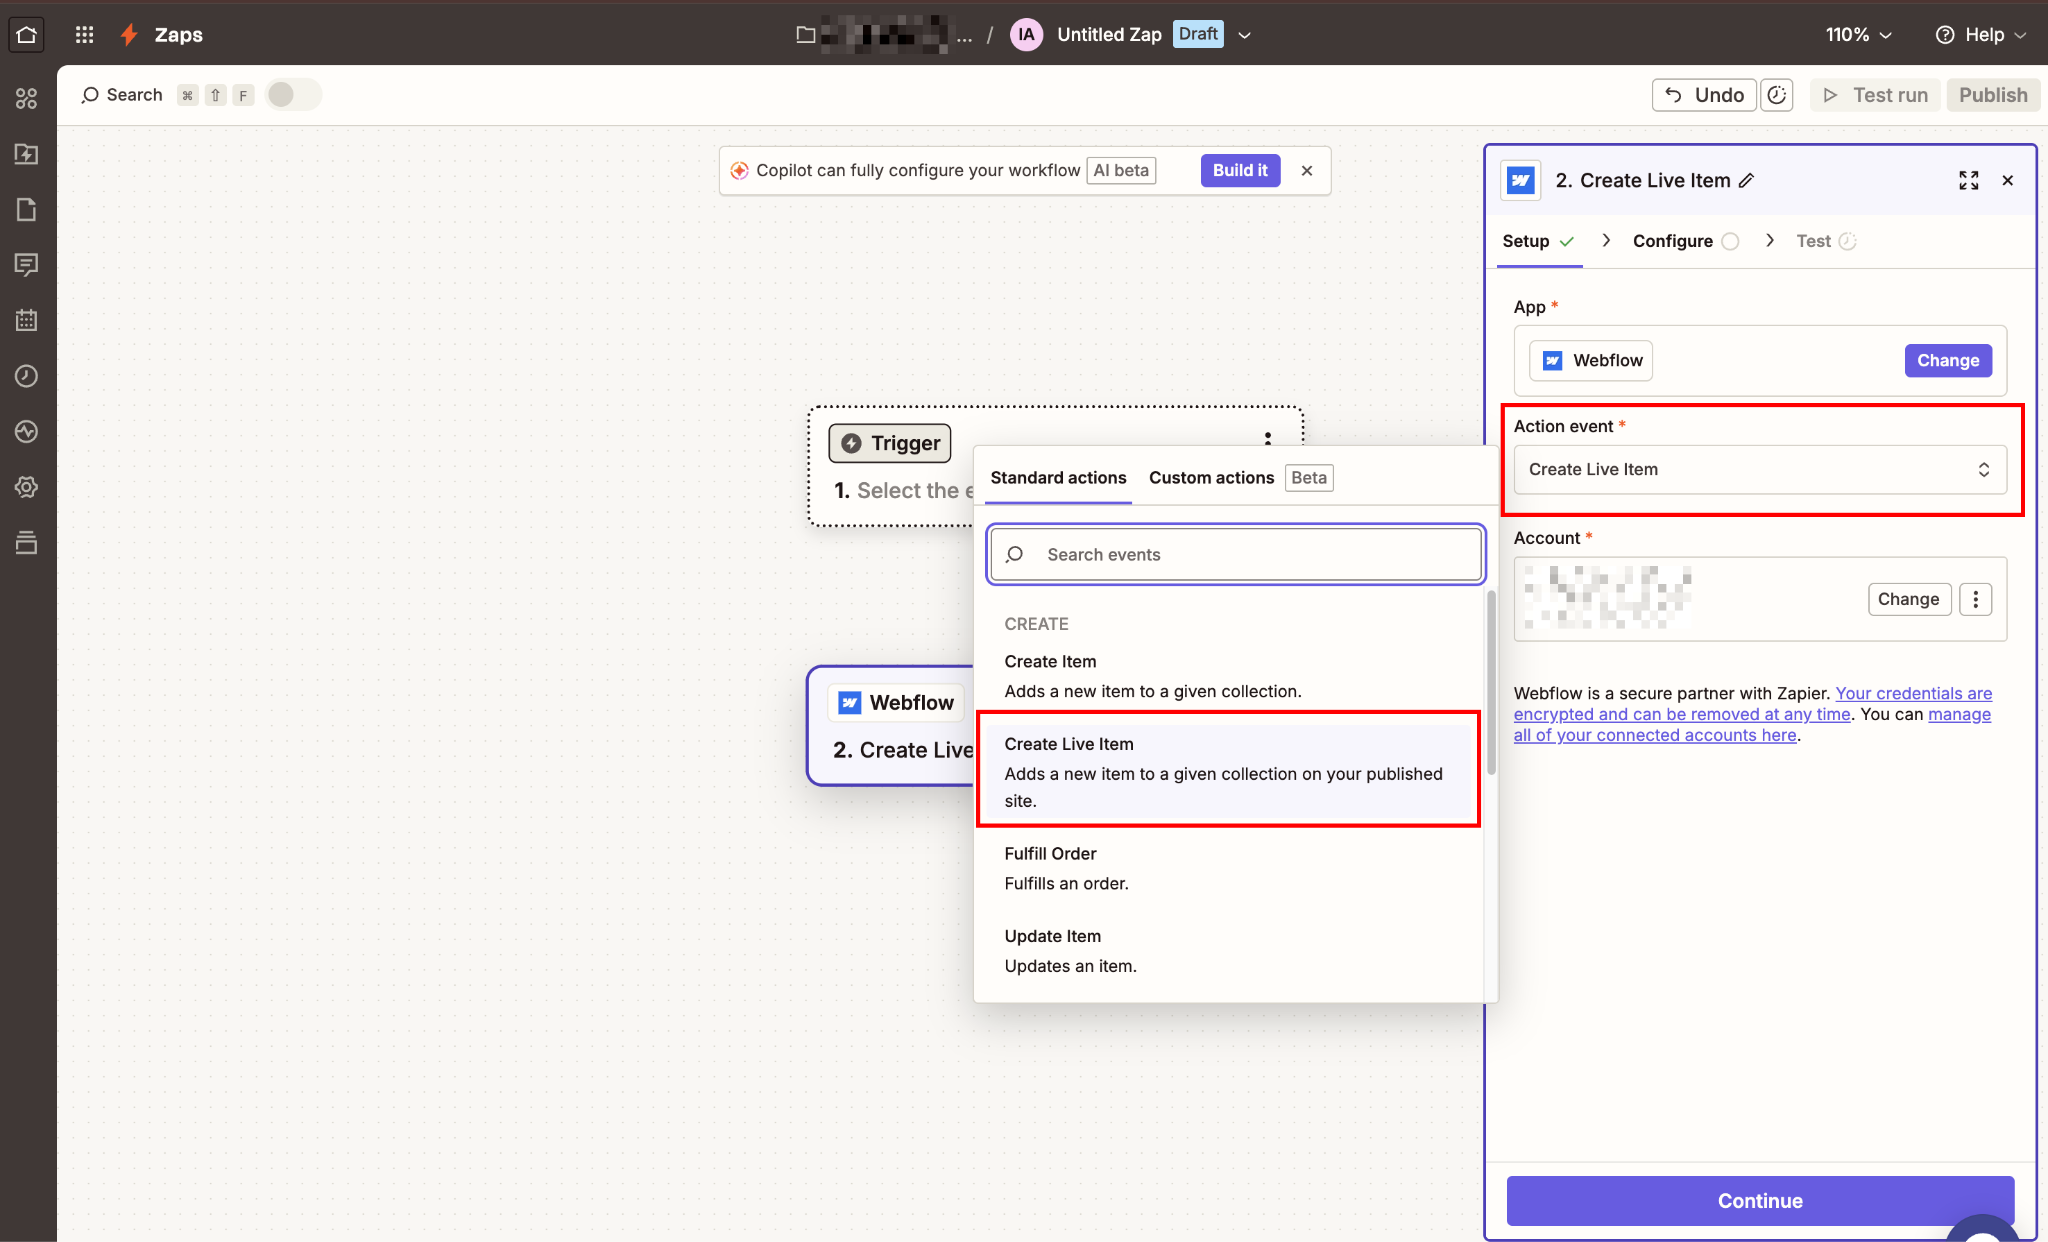
The Zap succeeded (the task count increased and there were no errors), but the CMS item isn't visible on your published Webflow site. This is almost always one setting: "Create Item" vs "Create Live Item." Here's the difference and how to switch.
Zapier has two distinct actions for creating Webflow CMS items:
- Create Item: Adds the item to your CMS collection as a draft. It will not appear on your live site until it’s manually published.
- Create Live Item: Adds the item directly to your published site collection.
When you first set up a Zap and select the Webflow action step, "Create Item" is often the default selection. It runs successfully, the task completes, and you see the item sitting in your CMS in draft state, but it never makes it to the live site.
How to fix it:
- Open your Zap in Zapier and click into the Webflow action step
- In the Action Event dropdown, change "Create Item" to "Create Live Item"
- Re-map your Airtable fields to the Webflow CMS fields; switching the action type resets the field mapping in Zapier
- Test the Zap with a real Airtable record to confirm the item appears on your published site.
Syncing more than ~60 records at once? Webflow's v2 API enforces a rate limit of 60 requests per minute on standard site plans. Bulk Zap runs (importing a large Airtable base or triggering many records in quick succession) will hit this limit and either fail or throw errors without a clear message.
Add a Delay step between your Airtable trigger and Webflow action (Zapier's built-in Delay → Delay For → 1 second) to throttle the flow and stay under the rate limit.
Important note: If you need to review records before they go live, for example, you're running a directory where submissions need approval, stick with "Create Item" intentionally and build an approval workflow in Airtable.
When a record is approved, a second Zap using the "Update Live Item" action can publish it to your site.
Fix #2: ValidationError (validation failure)
This is the error that generates the most forum threads and the fewest useful answers. The error message itself, "The app returned ValidationError: Validation Failure", tells you nothing about which field is broken.
The fix is almost always one of five things.
Work through this list in order.
Problem A: Missing required fields (name, slug, _archived, _draft)
Every Webflow CMS collection has four system-required fields that Zapier must receive, even if they're not part of your collection's visible fields:
NameSlug_archived_draft
A Zap that works fine when first built can break after you rename a collection field in Webflow. If you renamed your "Name" field to "Title," Webflow's API still expects the value at the original key name. Still, Zapier's interface shows your renamed label, which can cause the original API key to get lost in the mapping.
Fix: In your Zap's action step, click "Refresh Fields" to force Zapier to re-fetch your collection schema. Confirm all four system fields are mapped:
name: Map to the Airtable field that holds the item nameslug: Map to a URL-safe version of the name (lowercase, hyphens only, no spaces). If your Airtable doesn't have a slug field, add a Zapier Formatter step before the Webflow action: Formatter → Text → Convert Case → Lowercase, then Formatter → Text → Replace — replace spaces with hyphens._archived→ set toFalse_draft→ set toFalse(to publish immediately) orTrue(to keep as draft)
A note on what these values actually do, as getting them wrong creates a confusing failure mode:
The most common mistake: accidentally setting _archived: True on new records. Items exist in the CMS but never appear on the site, and nothing in Zapier's task log flags them as errors.
Once all four system fields are mapped and the Zap is retested, the ValidationError caused by missing fields will be resolved. If the error persists, move to Problem B as the issue is in a different field type.
Problem B: Date fields in the wrong format
Webflow's API requires dates in ISO 8601 format: 2024-09-17T10:22:24.000Z. If your Airtable date field is formatted as 09/17/2024 or September 17, 2024, the Zap will throw a ValidationError on that field.
Fix: Add a Zapier Formatter step between your Airtable trigger and Webflow action. Use Formatter → Date/Time → Format, and output the date as YYYY-MM-DDTHH:MM:SS.000Z.
Problem C: Option field values are case-mismatched
If your Webflow CMS has an Option (select) field, the value you send from Airtable must match the option text in Webflow exactly, including capitalization. If your Webflow option is "Published" and Airtable sends "published", the Zap fails with a ValidationError.
Fix: Check every Option and Color field in your Webflow collection and confirm the values in Airtable match exactly, character for character. One pattern that catches people: Airtable single-select values with trailing spaces. Copy the value from Airtable into a plain-text editor to check.
Problem D: Rich text / Markdown format mismatch
Airtable stores long text and rich text in Markdown format. Webflow's Rich Text field expects HTML. Sending raw Markdown to a Webflow Rich Text field will either fail with a ValidationError or render Markdown syntax as literal characters on your site.
Fix: Add a Formatter by Zapier step between your Airtable trigger and Webflow action. Set the Action Event to Text, then set Transform to Convert Markdown to HTML. Map your Airtable long-text field to the Input, then pass the Formatter output to your Webflow Rich Text field.
This works on all Zapier plans and requires no code. If you need finer control over the HTML output, for example, stripping certain tags or handling custom Markdown extensions, use a Code step instead.
On paid Zapier plans, you can import the \marked npm package directly:
const { marked } = await import('marked');
const html = marked(inputData.markdownContent);
return { html };
Pass HTML from this Code step to your Webflow Rich Text field.
Problem E: Isolating the broken field by process of elimination
If you've worked through Problems A-D and still see a ValidationError, Zapier's error response is truncated and won't identify the specific field.
The fastest debugging method:
- Remove all field mappings from your Webflow action step except
name,slug,_archived, and_draft. - Test the Zap. If it succeeds, the broken field is one you removed.
- Add fields back one at a time, testing after each addition until the error returns. The last field you added is the problem.
The field that causes the error when re-added is your culprit. Once identified, apply the appropriate fix from Problems A–D above based on the field type.
If none of those patterns match, check Webflow's API documentation for the accepted format for that specific field type. Some custom field types have non-obvious value constraints not covered here.
Fix #3: Multi-reference fields not syncing
Multi-reference and linked record fields are the #1 source of broken Airtable-Webflow Zaps, due to a documented limitation: Zapier's native Webflow integration cannot map multi-reference fields.
This trips up almost everyone the first time. You build the Zap, map all your fields, and it looks like everything is connected, but multi-reference fields silently fail or throw a ValidationError.
There are two paths forward, depending on your needs.
Option A: Use a Zapier Webhook to pass Webflow Item IDs directly (technical)
Webflow's API does accept multi-reference values via a webhook action, but only if you format them correctly as an array of Webflow CMS Item IDs, not Airtable Record IDs.
The key distinction is that you need to store your Webflow Item IDs in Airtable, then look them up and pass them in the correct format.
Here’s the process:
- In Airtable, create a dedicated field for each reference collection to store Webflow Item IDs (for example, a
Webflow Category IDsfield). - Populate this field with the actual Webflow CMS Item IDs from your referenced collection. You can retrieve these via the Webflow API or by exporting them using a tool like Make.
- In your Zap, replace the native Webflow action step with a Webhooks by Zapier action set to "POST."
- Set the webhook URL to your Webflow API endpoint:
https://api.webflow.com/v2/collections/{collection_id}/items/live
Finding yourcollection_id: In Webflow's Designer, go to CMS → click your collection name → look at the URL in your browser. The alphanumeric string after /collections/ is your collection ID.
Alternatively, make a GET request to https://api.webflow.com/v2/sites/{site_id}/collections with your API token. The response lists every collection and its ID. Your site_id is in the URL when you open your project in the Designer.
Finally, in the request body, format your multi-reference field as a JSON array:
{
  "fieldData": {
    "name": "{{name}}",
    "slug": "{{slug}}",
    "categories": ["{{webflow_category_id_1}}", "{{webflow_category_id_2}}"]
  }
}
Add your Webflow API token as a Authorization: Bearer YOUR_API_TOKEN header.
Option B: Switch to PowerImporter or Whalesync (no-code)
If you're syncing multi-reference or linked records regularly and want a solution that doesn't require webhook configuration, both PowerImporter and Whalesync handle multi-reference fields natively.
PowerImporter manages one-way Airtable-to-Webflow sync; Whalesync supports real-time two-way sync. Either removes the multi-reference limitation entirely without custom code.
Fix #4: Images and attachments not transferring
Airtable is receiving all your form data from Webflow, but the image or file upload field is always empty. The image column shows a blank row even though you can see the attachment in Webflow's form submission.
This is caused by Webflow's "Restrict upload file access" setting, which is enabled by default. When this is on, the file URLs generated by Webflow form uploads are protected. Zapier cannot read them, and Airtable's attachment field gets an empty or error value.
Fix:
- In your Webflow project, go to Project Settings → Apps & Integrations.
- Find the Restrict upload file access toggle and turn it off.
Re-test your form submission. Webflow will now generate public file URLs that Zapier can pass to Airtable's attachment field.
Security consideration: Turning off restricted file access means the upload URLs become publicly accessible. For non-sensitive file types (headshots, product images, PDFs for public distribution), this is generally acceptable.
For sensitive documents, use an embedded Airtable form directly in Webflow instead. This route file uploads directly to Airtable without going through Zapier, keeping access controls in Airtable's hands.
Fix #5: Form triggers broke after the v2 API migration
Webflow officially deprecated the v1 API on March 31, 2025. After that date, v1 connections receive no maintenance or support. Zapier sent migration notices to affected users in late 2024 asking them to reconnect ahead of that cutoff, which is why many sites broke in early 2025 rather than exactly on March 31.
This broke a common pattern: a footer form (like a newsletter signup) that's shared across 20 pages as a component is now treated as 20 separate forms, each with its own ID. Previously, a single Zap targeting "Newsletter Signup" would capture all instances.
After v2, you'd need a separate Zap trigger for each instance, or an alternative approach.
Here’s how to fix it.
Step #1: Reconnect your Webflow account in Zapier
Start here regardless of which symptoms you're seeing:
- In Zapier, go to My Apps → search for Webflow → click Reconnect.
- Follow the OAuth flow to reauthorize Webflow. This upgrades your connection to v2.
Once reconnected, your Webflow account in Zapier will show as a new connection with v2 authorization. Any Zap still pointing to the old connection will need to be updated to use this new one.
Step #2: Update each Zap using a Webflow trigger
With your account reconnected, update each affected Zap to use the new v2 connection:
- Open the affected Zap and click the Webflow trigger step.
- Select the correct form from the updated dropdown. Note: Zapier now lists forms by instance ID rather than by name. If your form appears as a cryptic ID, test it by submitting the form and checking which instance receives the submission.
If the form dropdown still shows cryptic IDs, submit a test form entry on your live site, then return to Zapier and re-test the trigger step. It will surface the most recent submission so you can confirm you've selected the right instance.
Step #3 (for forms shared across multiple pages): Use Webhooks instead of the native trigger
If you have a component-based form that appears across many pages and need a single Zap to catch all submissions:
- Go to Webflow Project Settings → Apps & Integrations → scroll to Webhooks.
- Add a new webhook with the trigger type set to Form Submission.
- Set the destination URL to your Zapier "Catch Hook" URL (Webhooks by Zapier action).
This webhook fires for every site-wide form submission, regardless of which page or instance triggered it. You can then use Zapier's Filter step to route submissions by form name if needed.
Fix #6: Airtable updates aren't reflecting in Webflow
You edited a record in Airtable, but the Webflow CMS item didn't update. Or you updated a record 20 minutes ago, and it still hasn't changed.
Two separate issues cause this.
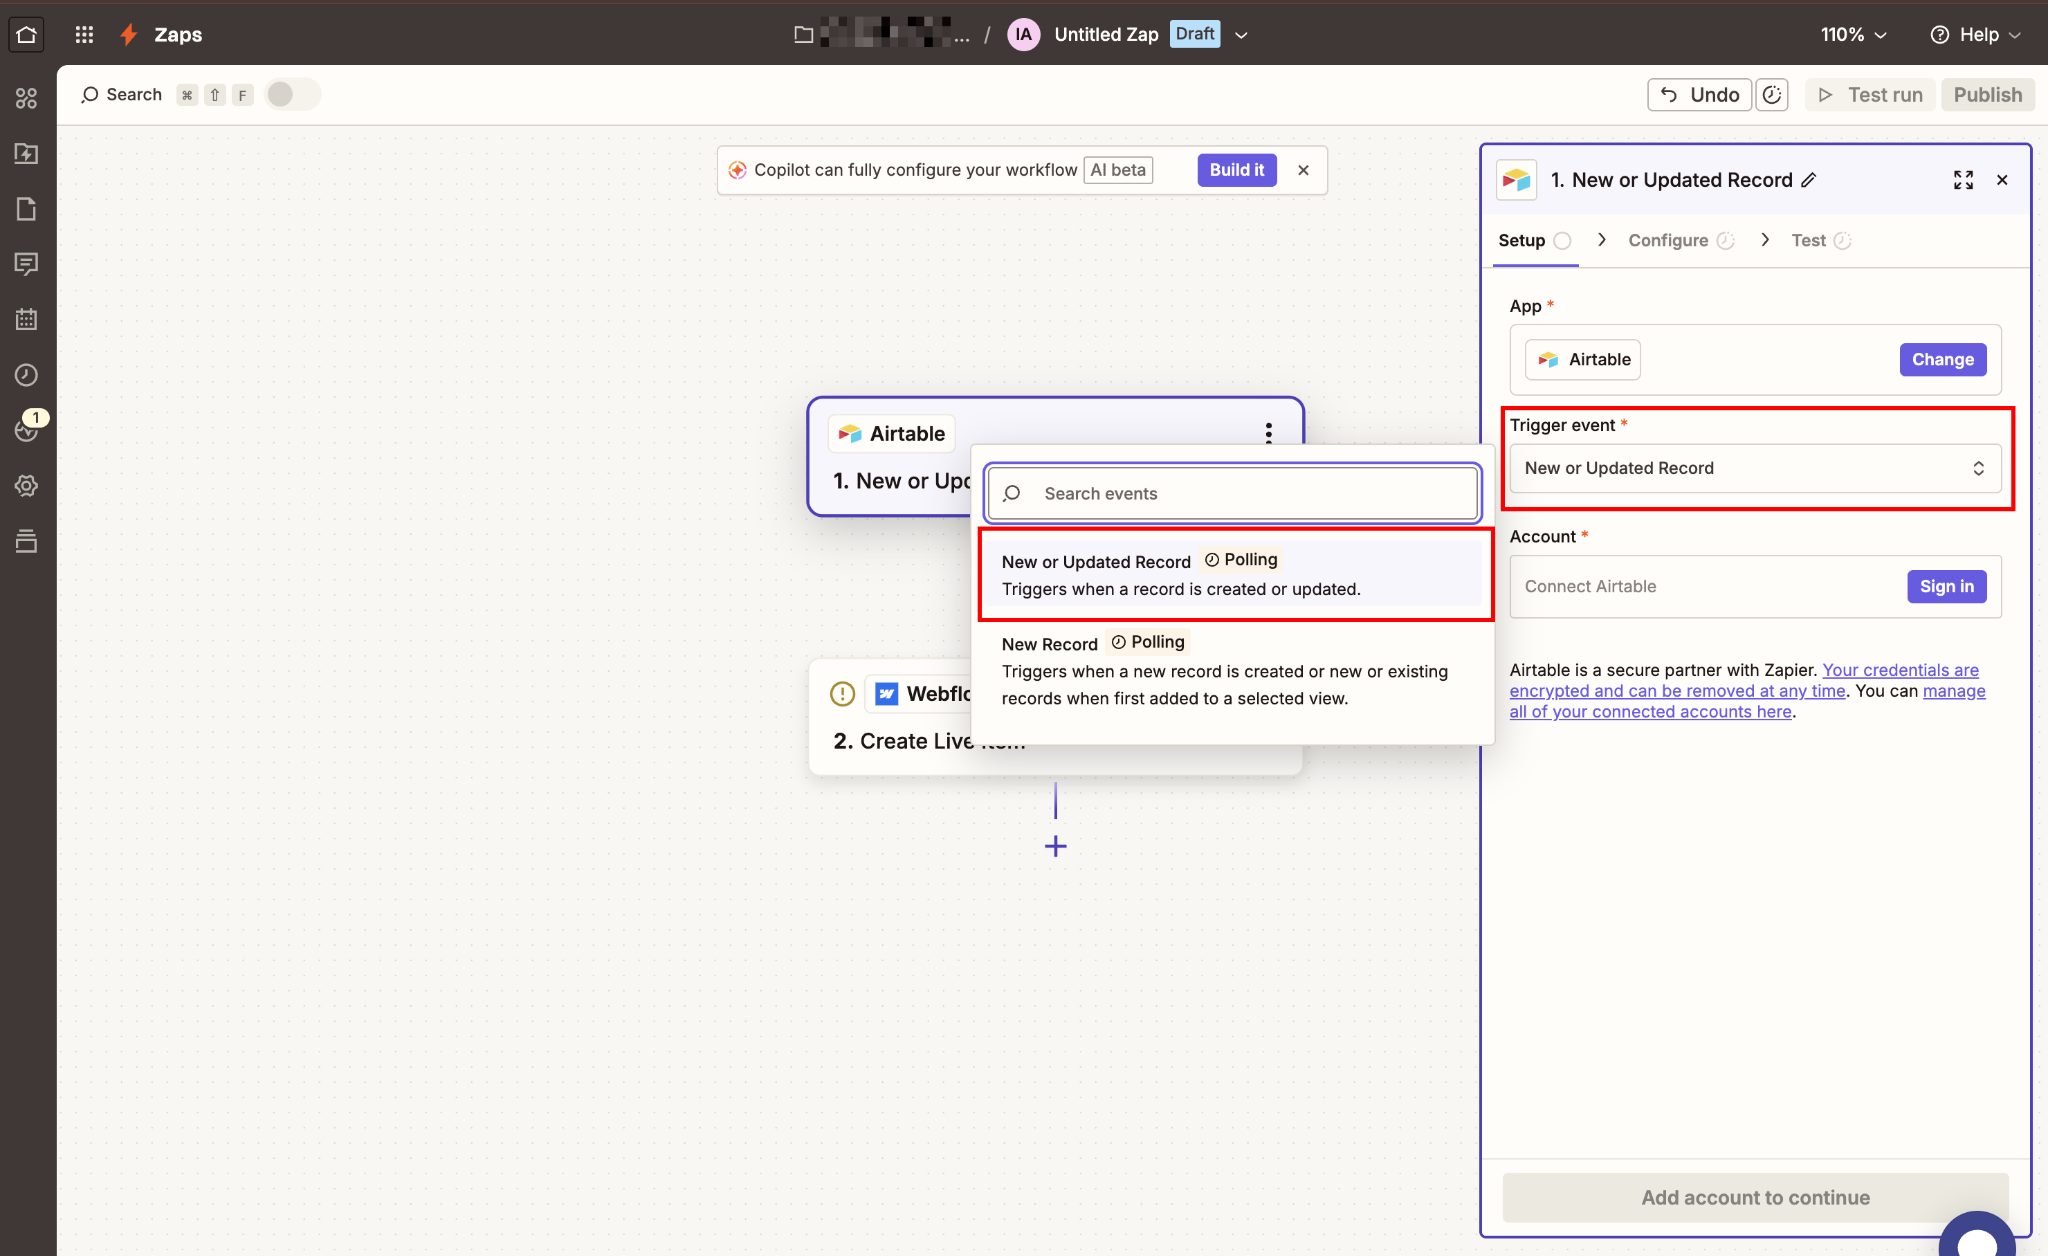
Issue A: Your Zap is configured to trigger on "New Record," not on "Updated Record"
The most common Airtable→Webflow Zap template uses New Record in View as the trigger. This only fires when a new row is added. It does nothing when an existing row is edited.
Fix: Change your Airtable trigger from "New Record" to "New or Updated Record." This fires on both new rows and edits to existing rows.
Important: pair this with Webflow's "Update Live Item" action (not "Create Live Item"). To update an existing item, Zapier needs the Webflow CMS Item ID. Add a field in Airtable to store the Webflow Item ID when the item is first created, then use that stored ID as the reference for updates.
Here's how to set that up:
- In your "Create Live Item" Zap, the Webflow action step returns the new item's ID in the response data. It appears as
Item IDin Zapier's output fields. - Add a second action step after the Webflow action: Update Record in Airtable.
- Map the
Item IDfrom the Webflow response to your dedicated Airtable field (e.g.,Webflow Item ID).
Now every new record created via Zapier automatically writes its Webflow Item ID back to Airtable. Your update Zap can reference this field reliably.
One more thing to check: The "New or Updated Record" trigger only fires for records visible in the Airtable View your Zap is watching. If a record is edited but filtered out of that View, the Zap won't fire, and it will look like the fix isn't working.
Make sure the View your trigger watches includes every record you want to sync, with no filters that could exclude edited rows.
Issue B: Zapier's polling delay
Zapier triggers for Airtable are polling-based, not instant.
The interval depends on your plan:
Free and Starter users on this stack should plan for up to a 15-minute delay. This is expected behavior, not a Zap or connection issue.
For use cases that need faster sync (live inventory, event registrations, time-sensitive form data), the options are:
- Upgrade to a Zapier Professional plan for 1-minute polling.
- Replace Zapier with Whalesync, which uses real-time webhooks and syncs Airtable changes to Webflow within seconds.
- Use Make (formerly Integromat) with an Airtable webhook trigger for near-real-time performance.
If your use case tolerates the polling delay, no change is needed, as the sync will catch up within your plan's interval. If the delay is a problem, Whalesync or Make with a webhook trigger are the cleanest paths to near-real-time behavior without rebuilding your Zapier stack entirely.
When Zapier isn't the right tool for the job
Zapier handles most Airtable-Webflow sync cases well. When it doesn't (multi-reference fields at scale, real-time bidirectional sync, or complex field transformations), the right move is usually a purpose-built tool rather than more Zapier middleware.
Explore Webflow's Data API docs for API-level control over your CMS, custom endpoints, bulk operations, and programmatic publishing.
Frequently asked questions
Can Zapier sync multi-reference fields between Airtable and Webflow?
Not natively. Zapier's built-in Webflow action steps do not support mapping to multi-reference fields. You can work around this using Webhooks by Zapier with a custom POST request that passes Webflow Item IDs as an array, but this requires storing Webflow Item IDs in Airtable and formatting the request body manually. If you need multi-reference sync without custom code, both PowerImporter and Whalesync handle it natively.
Why does my Zap show "Success" but the item isn't on my live Webflow site?
You're using the "Create Item" action instead of "Create Live Item." "Create Item" adds the record to your CMS collection as a draft that requires manual publishing. Switch the action to "Create Live Item" to automatically publish the item to your live site. If you intentionally want a review step, keep "Create Item" and build a separate approval-triggered Zap that uses "Update Live Item" to publish once approved.
How long does it take for Airtable record changes to appear in Webflow via Zapier?
It depends on your Zapier plan. Free plans poll Airtable every 15 minutes. Starter plans poll every 15 minutes. Professional and above polls every 1 minute. There's no real-time option in Zapier for Airtable triggers, as they're all polling-based. For near-real-time Airtable-to-Webflow sync, use Whalesync or Make with an Airtable webhook trigger.
My Zap worked fine for months, then suddenly broke in early 2025. What happened?
Webflow officially deprecated its v1 API on March 31, 2025. Zapier sent migration notices in late 2024 asking users to reconnect ahead of that date, which is why many Zaps broke in late 2024 or early 2025, before the hard deprecation date. The fix is to reconnect your Webflow account in Zapier (My Apps → Webflow → Reconnect) and update each affected Zap to use the new v2 connection.


