




The UserVoice widget is a browser-only script, so embedding it on Webflow is easy. The real work is signing a JWT so the feedback carries a verified identity.
UserVoice's feedback widget is a browser-only JavaScript SDK. It loads asynchronously from your account's own subdomain and talks straight to UserVoice from the visitor's browser, which is why dropping it onto a Webflow site is mostly a copy-and-paste job.
The paste-in part is easy. The real work starts when the widget has to know who the visitor is. Passing user traits is a single call, but reaching a private forum or a restricted portal, and showing feedback as coming from a verified author, needs a token signed on a server with a secret key. A static Webflow site has nowhere to sign it.
Here is the path a request travels, from the embed to UserVoice's servers:
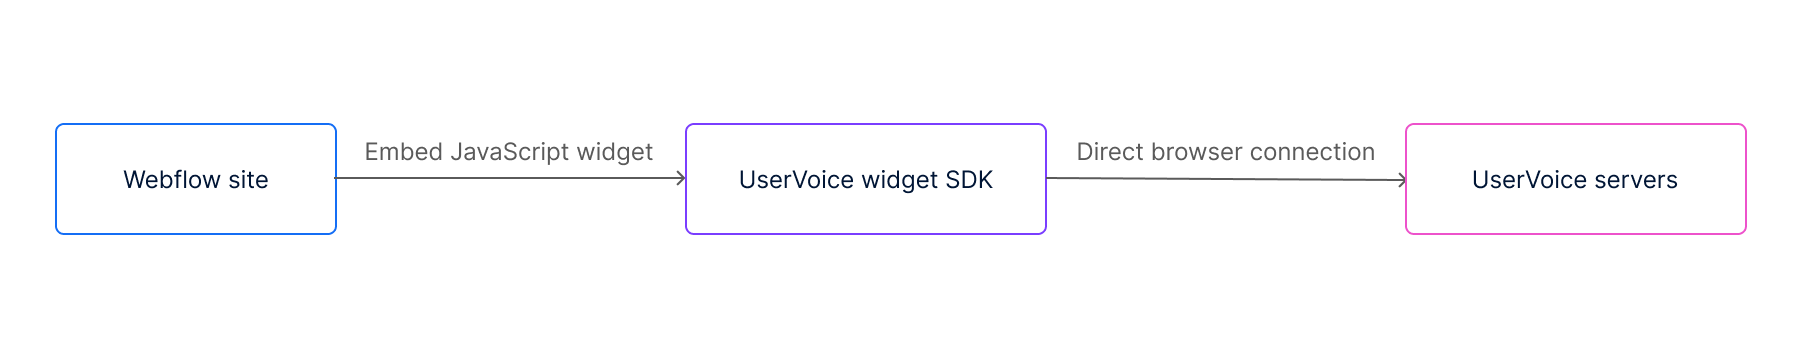
That direct browser-to-UserVoice connection is the anonymous baseline. To sign the token, this guide adds a Webflow Cloud app, which runs on the edge as a Cloudflare Worker and can hold the secret and sign with Web Crypto.
We build it in six steps: an anonymous widget on a published Webflow site first, then identified users, then a signed token that opens private forums and verified identity. One note before starting. The In-App Widget is a paid UserVoice Discovery feature, and the company now positions itself as a customer intelligence platform, though the widget itself is still live and documented.
What do you need to embed UserVoice feedback widgets in Webflow?
You need a UserVoice account on a plan that includes the In-App Widget, a Webflow site to embed it on, and, for verified identity, a Webflow Cloud app that can sign a token on the server rather than in the browser.
Here is everything to have in place before you paste a single line of code:
- A UserVoice account with the In-App Widget enabled, available on Discovery Pro and Premium
- Your widget subdomain and JavaScript SDK Key, from Admin Console > Settings > Widgets
- A Webflow site where you can edit Custom Code and publish
- For verified identity, a Webflow Cloud project running Next.js and your UserVoice SSO secret key
- Node.js 22 or later locally, if you build the Webflow Cloud app
With the account, keys, and site access in hand, the build starts with the anonymous widget and layers identity on top of it.
6 steps to embed UserVoice feedback widgets in Webflow
Embedding UserVoice in Webflow moves in two arcs. The first three steps put an anonymous widget on your published site with custom code. The last three identify the visitor and prove that identity with a server-signed token.
Each step below carries the code and the exact console location it comes from.
1. Turn on the widget and copy your embed code
The widget is a browser SDK that UserVoice generates per account, so you cannot hand-write the loader URL. It carries both your subdomain and a JavaScript SDK Key that scopes the widget to your workspace.
In the UserVoice Admin Console, open Settings > Widgets. Set the starting experience to Post Idea, or to NPS if you have that add-on, then pick a trigger position and accent color. UserVoice assembles the snippet in Step 2 of that screen.
The generated code looks like this, with your own subdomain and key filled in:
UserVoice = window.UserVoice || [];
(() => {
  const uv = document.createElement('script');
  uv.type = 'text/javascript';
  uv.async = true;
  // Replace {subdomain} and {JS key} with the values from Settings > Widgets.
  uv.src = 'https://{subdomain}.uservoice.com/widget_environment/{JS key}.js';
  const s = document.getElementsByTagName('script')[0];
  s.parentNode.insertBefore(uv, s);
})();

UserVoice.push(['set', {
  accent_color: '#458dd6',
  trigger_color: 'white',
  forum_id: '209871', // Optional: defaults to your account's default forum
}]);
UserVoice.push(['addTrigger', { mode: 'post_idea', trigger_position: 'bottom-right' }]);
The JavaScript SDK Key sits under the Advanced setup section of the same Widgets screen. Copy the whole block. With the loader in hand, you have exactly what UserVoice expects, and the next step moves it into Webflow.
2. Add the widget to your Webflow site's custom code
A Webflow site has no build step for third-party scripts, so the widget goes in through Custom Code, where Webflow injects it into every published page for you.
Footer placement matters here. The snippet inserts itself before the first script element on the page, so it wants the document mostly parsed before it runs, and header code can fire too early to find that anchor.
Paste the loader into the Footer Code field wrapped in a script tag, like this:
<!-- Webflow: Site Settings > Custom Code > Footer Code -->
<script>
  UserVoice = window.UserVoice || [];
  (function () {
    var uv = document.createElement('script');
    uv.type = 'text/javascript';
    uv.async = true;
    uv.src = 'https://{subdomain}.uservoice.com/widget_environment/{JS key}.js';
    var s = document.getElementsByTagName('script')[0];
    s.parentNode.insertBefore(uv, s);
  })();
</script>
Save, then publish the site. Custom Code ships only on published pages, so the widget will not show on the Designer canvas or a staging preview until you publish. Once you do, the feedback trigger renders in the corner of every live page.
3. Place the widget inline or on a custom trigger
The default trigger is a floating tab, but most Webflow layouts want feedback tied to a specific button or embedded inside a section. UserVoice reads two HTML attributes for that, documented in its widget customization guide.
Add an Embed element in the Designer and paste one of these:
<!-- Inline embed: drops the Post Idea widget into a section -->
<div data-uv-embed="post_idea" data-uv-height="325px" data-uv-width="100%"></div>

<!-- Custom trigger: any element opens the widget on click -->
<a href="/contact" data-uv-trigger>Send feedback</a>
The data-uv-embed div renders the widget inline, while data-uv-trigger turns any element into a launcher. If you prefer to wire triggers in JavaScript, addTrigger takes a selector and a mode instead.
This binds the widget to a button that already lives in your layout:
UserVoice.push(['addTrigger', '#feedback-button', {
  mode: 'post_idea',
}]);
Publish again and click through. At this point the widget collects ideas from anyone who visits, with no sense yet of who they are, which the next step changes.
4. Pass user and account traits with identify()
An anonymous idea is hard to act on. When a visitor is signed in, identify() attaches their email, name, and account so feedback arrives with context instead of a blank profile.
Call it after the loader, using the data your app already holds. The email and a user id are always required, while the account object is optional, and its id and name become required only when you include it.
Push the traits right after the widget loads:
UserVoice.push(['identify', {
  email: 'john.doe@example.com', // Required: the user's email address
  id: 123,                       // Required: unique id from your app
  name: 'John Doe',
  type: 'Owner',                 // Segment users by type
  account: {
    id: 456,                     // Required: unique account id
    name: 'Acme, Co.',           // Required: account name
    plan: 'Enhanced',
  },
}]);
One caveat from UserVoice's own docs: traits pushed this way stay hidden until the user actually interacts with UserVoice, by voting, commenting, posting an idea, or giving an NPS score. The Identify method also proves nothing about who the user is, which is where the choice between the two identity paths appears.
The two ways to attach identity differ in what they can do and where they run:
For a public forum, identify() is enough. For a private forum, a site-wide restricted portal, or any time the identity has to be trusted, the signed token in the next step is what you reach for.
5. Sign a UserVoice JWT SSO token on Webflow Cloud
A signed token turns an unverified claim into a trusted identity, because UserVoice checks it against a secret only your server and UserVoice share. That signing cannot happen on a static Webflow site, so this step introduces a Webflow Cloud app running as a Cloudflare Worker.
First, get the key. In UserVoice, the SSO key lives in the User Authentication area of the Web Portal settings, and it is also shown in Widget Settings under Advanced Setup. Store it in Webflow Cloud as a secret environment variable named USERVOICE_SSO_KEY. UserVoice requires the HS256 algorithm, so the Route Handler signs with HMAC-SHA256 through the Web Crypto API rather than a Node JWT library.
Create a Route Handler that builds and signs the token:
// app/api/uservoice/sso/route.ts
import { NextResponse, type NextRequest } from "next/server";

function base64url(input: string | ArrayBuffer): string {
  const bytes =
    typeof input === "string"
      ? new TextEncoder().encode(input)
      : new Uint8Array(input);
  let binary = "";
  for (const b of bytes) binary += String.fromCharCode(b);
  return btoa(binary)
    .replace(/\+/g, "-")
    .replace(/\//g, "_")
    .replace(/=+$/, "");
}

export async function POST(request: NextRequest) {
  const { guid, email, name } = (await request.json()) as {
    guid: string;
    email: string;
    name: string;
  };

  // Read the SSO secret at runtime from Webflow Cloud's environment.
  const secret = process.env.USERVOICE_SSO_KEY as string;

  const header = { alg: "HS256", typ: "JWT" };
  const payload = {
    guid,                 // Required: a unique id, never the email
    email,                // Required: used for notification emails
    display_name: name,
    exp: Math.floor(Date.now() / 1000) + 60 * 60, // UNIX timestamp
  };

  const signingInput =
    `${base64url(JSON.stringify(header))}.${base64url(JSON.stringify(payload))}`;

  // UserVoice requires the HS256 signing algorithm.
  const key = await crypto.subtle.importKey(
    "raw",
    new TextEncoder().encode(secret),
    { name: "HMAC", hash: "SHA-256" },
    false,
    ["sign"]
  );

  const signature = await crypto.subtle.sign(
    "HMAC",
    key,
    new TextEncoder().encode(signingInput)
  );

  const token = `${signingInput}.${base64url(signature)}`;
  return NextResponse.json({ token });
}
The handler reads the secret inside the function body so it resolves in the request context, the pattern Webflow documents for runtime configuration. It sets guid to a unique id rather than the email, which UserVoice requires, and stamps an exp claim as a UNIX timestamp so the token expires. The result is an endpoint that returns a freshly signed token for the current user.
6. Set the signed token on the widget for verified identity
The last step hands the token to the widget. Setting the sso option before the widget launches is what lets it reach private forums and a restricted site, and what marks the user as a verified author.
Fetch the token from your handler, then set it before adding the trigger:
// In a Client Component, after the user signs in.
// Webflow Cloud exposes the mount path at runtime; do not read next.config.
const baseUrl = process.env.NEXT_PUBLIC_BASE_PATH ?? "";

const res = await fetch(`${baseUrl}/api/uservoice/sso`, {
  method: "POST",
  headers: { "Content-Type": "application/json" },
  body: JSON.stringify({ guid: user.id, email: user.email, name: user.name }),
});
const { token } = await res.json();

// Hand the signed token to the widget before it launches.
UserVoice.push(['set', { sso: token }]);
UserVoice.push(['addTrigger', {}]);
The baseUrl prefix matters on Webflow Cloud because the app mounts at a base path such as /app, so a bare path would resolve against the wrong root. Read it at runtime from process.env.NEXT_PUBLIC_BASE_PATH, the mount path Webflow Cloud exposes, rather than importing next.config, which does not work on the platform. Set the sso option before addTrigger, the order UserVoice's JWT SSO documentation shows, so the widget reads the token as it launches. Signed-in users now reach private forums and appear as verified authors on every idea and vote.
What causes UserVoice widgets to fail in Webflow? Tips to troubleshoot
Most UserVoice problems in Webflow trace to where the code lives, whether the visitor is identified, and whether a private forum is expecting a token the widget never received.
Each symptom below pairs its cause with the fix.
The widget never appears on the published site
Cause: The loader was pasted into Header Code instead of Footer Code, the {subdomain} or {JS key} placeholder was never replaced with real values, or the site was saved but not published.
Fix: Move the loader to Site Settings > Custom Code > Footer Code, then open your browser Network panel and confirm the widget_environment script actually requests from your real subdomain using the JavaScript SDK Key in Settings > Widgets. A 404 there means a placeholder is still in the code. Custom Code ships only on published pages and only on a paid Site plan, so a free Starter site or an unpublished staging preview looks empty even when the snippet is correct. Republish after every change, because Webflow does not push custom code to the live domain until you do.
Signed-in users still show as anonymous
Cause: The identify() call ran before the user did anything the widget records, or a required field is missing from the payload, so UserVoice has nothing to attach the traits to.
Fix: Confirm the email and the user id are present in the call, and that any account object you pass carries its required id and name. Because the SDK loads asynchronously, check in the browser console that identify() runs after the loader has finished rather than before, since a call fired too early is dropped. Then remember that traits surface only after the person votes, comments, posts an idea, or answers an NPS prompt, so trigger one of those and reopen the widget to confirm the data landed instead of assuming the call failed silently.
The SSO token is rejected and users stay logged out
Cause: The token was signed with the wrong algorithm or a stale key, guid was set to the email address instead of a unique id, or exp was sent as something other than a UNIX timestamp.
Fix: Sign with HS256 using the SSO key from the User Authentication area of your Web Portal settings, set guid to a stable unique id rather than the email, include the email separately, and pass exp as a UNIX timestamp. Because the signing key is a secret, do the signing in your Webflow Cloud Route Handler with the Web Crypto API, never in browser code where the key would be exposed. Finally, set the sso option before addTrigger so the widget reads the token in the right order, since one set afterward is ignored.
The private forum widget shows nothing
Cause: The forum is private or the whole site is restricted, so the anonymous widget has no identity to authorize and renders empty instead of falling back to a public view.
Fix: Supply a signed SSO token as shown in steps five and six, and confirm the signed guid maps to a user who actually has access to that private forum, since a valid token for a user without permission still returns nothing. Private forums and restricted sites cannot fall back to anonymous access, so the token is the only path that opens them. Check the Network panel for the widget identity request and confirm it carries your token; if the request goes out anonymous, the sso option was set after addTrigger or the signing endpoint returned an error the widget swallowed.
What you can build with UserVoice and Webflow
With the widget embedded and identity signed on the edge, the next moves push feedback deeper into your stack and pull UserVoice data back into your Webflow Cloud app.
The common next step is server-to-server work. Instead of only collecting ideas in the browser, your Webflow Cloud app can create suggestions, sync users, and read feedback through UserVoice's back-end APIs when something happens on the server, such as a new signup or a closed deal.
The UserVoice developer platform documents the Admin API for data access and the Idea Collection API for custom capture forms, both of which pair cleanly with the Route Handler pattern from step five.
Explore Webflow + UserVoice for the full breakdown of embed options, from a single Code Embed on a static page to API-driven workflows that sync feedback across your stack.
For the server-side pieces that sit behind a signed token, from environment secrets to Route Handlers, Webflow's developer docs cover how a Webflow Cloud app runs on the edge.
Frequently asked questions
Is the UserVoice feedback widget still available?
Yes. UserVoice has repositioned as a customer intelligence platform, but the In-App Widget remains a documented feature on Discovery Pro and Premium plans, with the NPS widget offered as an add-on. The Post Idea widget, custom triggers, and inline embeds all work as described in this guide.
Can I embed UserVoice on a regular Webflow site without Webflow Cloud?
Yes. The anonymous widget and identify() traits need only Webflow's Custom Code field. Webflow Cloud enters the picture when you must sign an SSO token server-side, because a static site has nowhere to keep the secret key or run the signing code.
Why sign a JWT instead of just passing the user's email?
Passing an email through identify() is an unverified claim that anyone could set. A JWT signed with your SSO secret proves the identity to UserVoice, and it is the only way to use the widget with private forums or a restricted, site-wide portal. UserVoice requires the HS256 algorithm for the signature.
What is the difference between identify() and SSO?
The identify() call attaches unverified user and account traits and works on public forums. An SSO token passes a cryptographically signed identity that UserVoice trusts, which private forums and restricted sites require. You can pass identify() traits alongside a signed SSO token when you need both context and verification.
Does the widget need a paid UserVoice plan?
The In-App Widget is part of UserVoice Discovery Pro and Premium, and the NPS widget is a separate add-on. There is no free, anonymous-only tier for the widget, so confirm your plan includes it before wiring the embed into Webflow.