


When a Webflow order comes in, Zapier can have it logged in Airtable before the confirmation email lands.
Connecting Webflow's e-commerce platform to Airtable via Zapier means every new order automatically creates a record with customer details, order information, and product data; no manual logging required. Once the Zap is live, your order data is in Airtable within seconds of a purchase, ready for reporting, fulfillment tracking, or whatever your operation runs on.
In this guide, we cover the exact Zap configuration, field-mapping strategy, and how to handle Webflow's order data structure to build automation that runs 24/7.
What do you need to automate e-commerce orders from Webflow to Airtable via Zapier?
Three accounts need to be in place before you configure anything in Zapier: an active Webflow e-commerce store with at least one order, a Zapier account, and a pre-configured Airtable base. If any of these are missing, either the trigger won't fire, or the action will have nowhere to send the data.
Verify each one before moving to Step 1.
Webflow requirements
Your Webflow store needs to be live and have processed at least one real or test order before Zapier can pull sample data for field mapping.
Here’s what you need:
- Active Webflow e-commerce plan (Standard, Plus, or Advanced)
- Published e-commerce site with at least one product
- At least one test order placed through your store (Zapier needs sample data to configure the trigger)
If your store hasn't had any orders yet, place a test order before moving to Step 2. Zapier requires sample data to configure the trigger, and the test will fail without it.
Zapier requirements
The base workflow (Webflow trigger → Airtable record) fits within Zapier's free plan. The optional Code by Zapier step in the troubleshooting section requires a paid plan.
Here’s what you need:
- Zapier account (free plan supports 100 tasks/month and two-step Zaps; sufficient for the core workflow in this guide)
- Multi-step Zaps, including the Code by Zapier parsing step in the troubleshooting section, require a paid plan (starting at $19.99/month billed annually)
Connect your Webflow and Airtable accounts to Zapier using OAuth. No API keys required for either connection.
Airtable requirements
Your Airtable base needs to exist before you configure the Zap. Zapier's field-mapping UI is populated from your existing table structure.
Confirm access to these before you proceed:
- Airtable account (free plan works; 1,000 records per base)
- Pre-configured base and table with columns matching your Webflow order fields (more on structure below)
Be sure to set up the base structure.
5 steps to automate e-commerce orders from Webflow to Airtable via Zapier
The workflow has three moving parts: an Airtable base that receives the data, a Webflow trigger that fires on new orders, and an Airtable action that creates the record. Build the Airtable structure first.
Zapier's field-mapping UI is populated from your existing table, so creating it beforehand makes Steps 3 and 4 significantly faster.
1. Set up the Airtable base structure
Before connecting Zapier, create an Airtable base that mirrors your Webflow order data. Zapier will map order fields to these columns, so structure matters.
Navigate to Airtable and create a new base called "Webflow Orders" (or whatever naming convention fits your workflow).
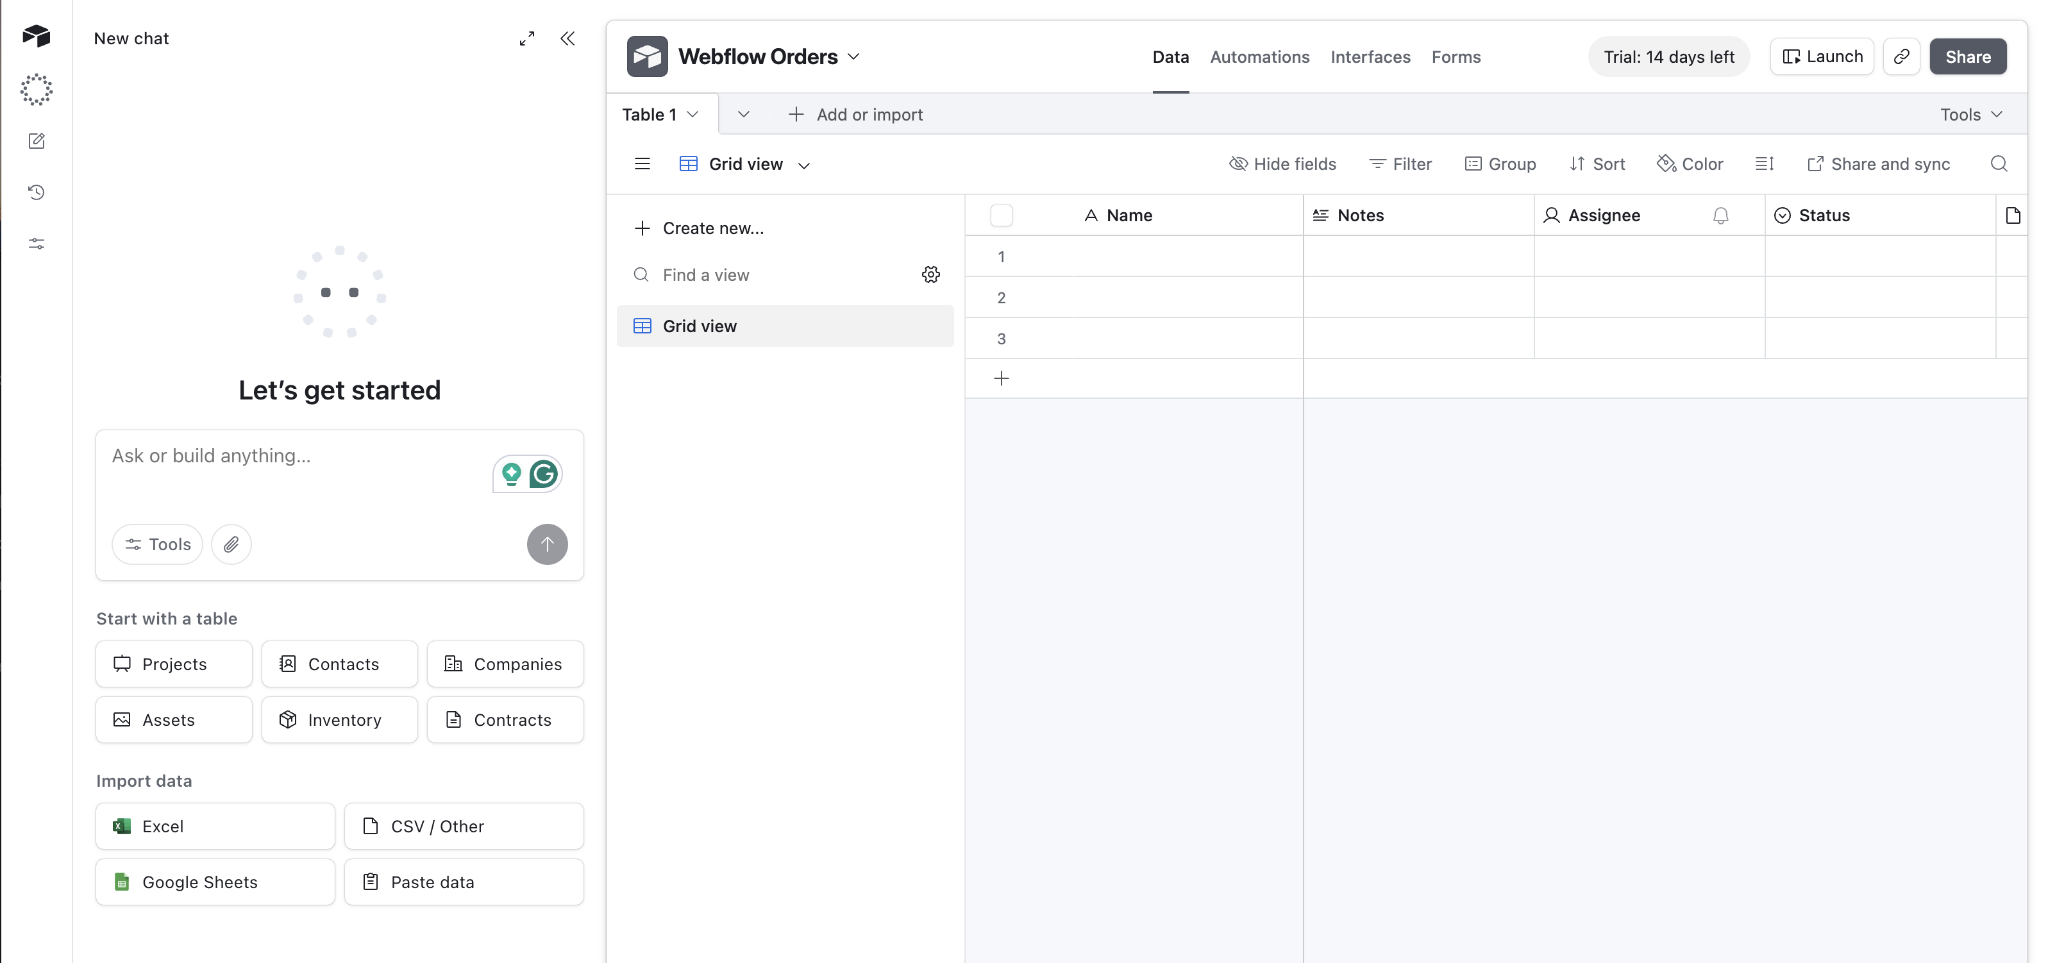
Add a table called "Orders" with these recommended fields:
- Order ID (Single line text):Webflow's unique order identifier
- Order Number (Number):Human-readable order number
- Customer Name (Single line text): Billing name from Webflow
- Customer Email (Email):Customer's email address
- Order Total (Currency):Total order amount
- Order Status (Single select): Pending, Fulfilled, Refunded, Cancelled
- Order Date (Date): When the order was placed
- Shipping Address (Long text): Full shipping address
Here are some optional but useful fields:
- Customer Phone (Phone number): Contact number
- Payment Method (Single line text):Stripe, PayPal, etc.
- Tracking Number (Single line text): Shipment tracking
- Notes (Long text): Internal order notes
- Purchased Items (Long text): Product details
This structure captures core order data. You can add custom fields based on your workflow (tags for order sources, calculated fields for profit margins, linked records to customer databases), whatever your operation requires.
Why pre-configure the base? Zapier's Airtable action requires selecting an existing base and table. Field mapping works through dropdowns populated from your Airtable structure. Creating the base first streamlines Zap configuration and prevents mapping errors.
2. Create the Zap and configure the Webflow trigger
Log in to Zapier and create a new Zap. The workflow architecture is straightforward: Webflow triggers on a new order → Airtable creates a record.
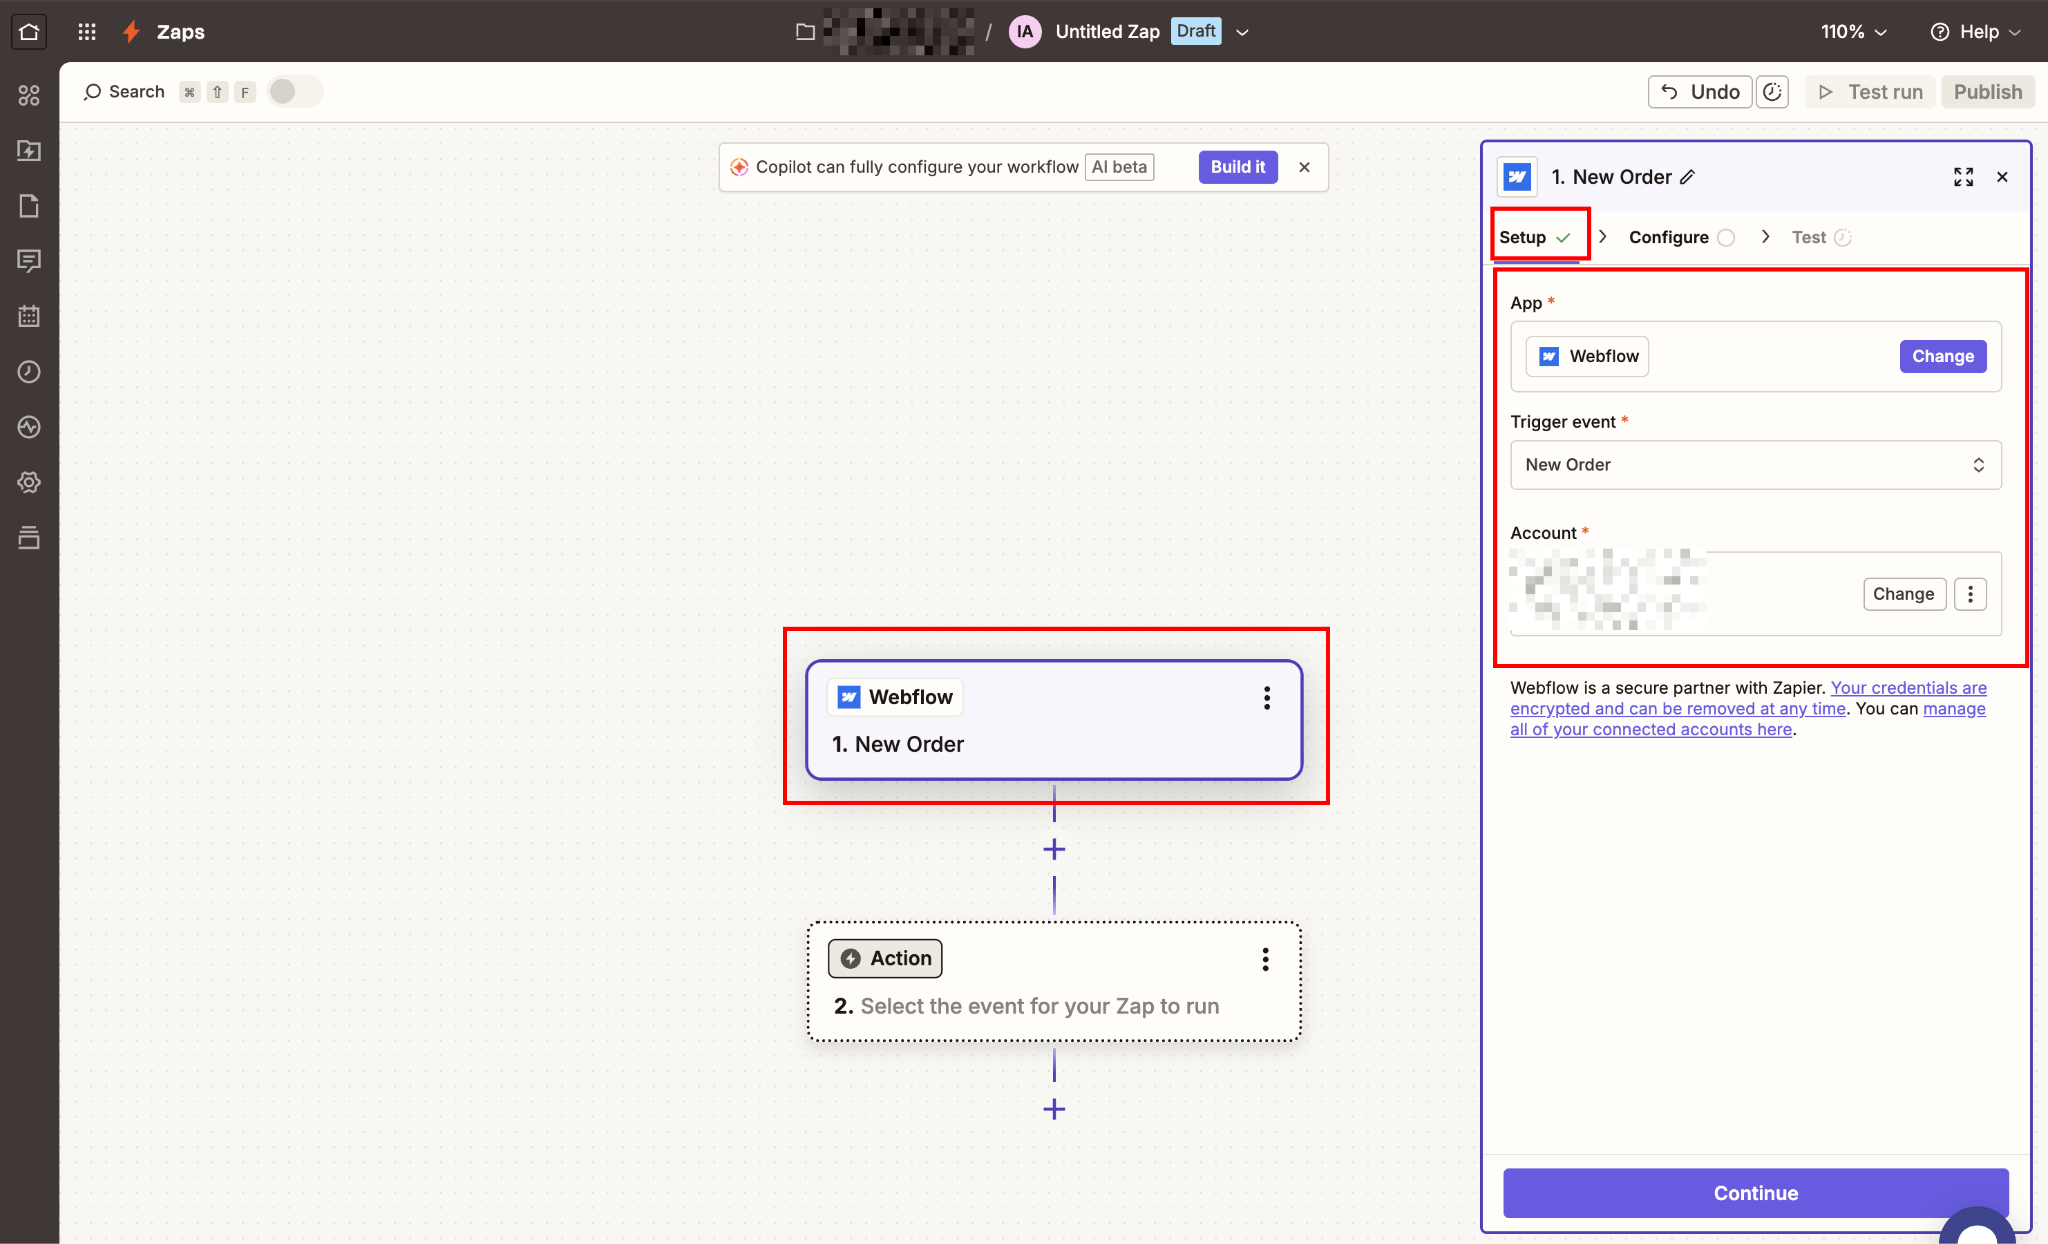
In Zapier, create a new Zap and configure the trigger:
- Click "Create Zap" from your Zapier dashboard
- In the trigger step, search for "Webflow" and select it as your app
- Choose "New Order" as the trigger event (this fires when a new order is placed on your store)
- Click "Continue"
Then, connect your Webflow account.
Connecting your Webflow account
Zapier uses OAuth to connect to Webflow. You'll authorize through Webflow's login screen, not an API key.
When prompted to connect your account:
- Click "Sign in to Webflow"
- A browser window opens showing Webflow's authorization screen
- If you're already logged into Webflow, it skips password entry and goes straight to permissions
- Review the access permissions (Zapier will read order data; it cannot modify your site)
- You can limit Zapier access to specific sites or workspaces using the dropdown selectors.
- Click "Authorize access."
Zapier redirects back with your Webflow account connected. You'll see your account name displayed in the trigger configuration.
After connecting your account, Zapier prompts you to select which Webflow site to monitor:
- Choose your e-commerce site from the "Site" dropdown
- Click "Test trigger."
Your Webflow store must have at least one order in the system. Zapier pulls a sample order to populate field mappings. If no orders exist, the test fails, and you cannot proceed. Place a test order through your store if necessary. You can refund it later.
When the test succeeds, Zapier displays order data, including the customer's name, email, order total, purchased items, and timestamps. Review this data to confirm it's pulling the correct information from your store.
Note on trigger timing:The Webflow "New Order" trigger is an instant trigger. It fires via webhook the moment an order is placed, on all Zapier plans including free. There is no polling delay for this specific trigger.
3. Add an Airtable action to create records
With the trigger configured, add an action step that creates an Airtable record for each new Webflow order.
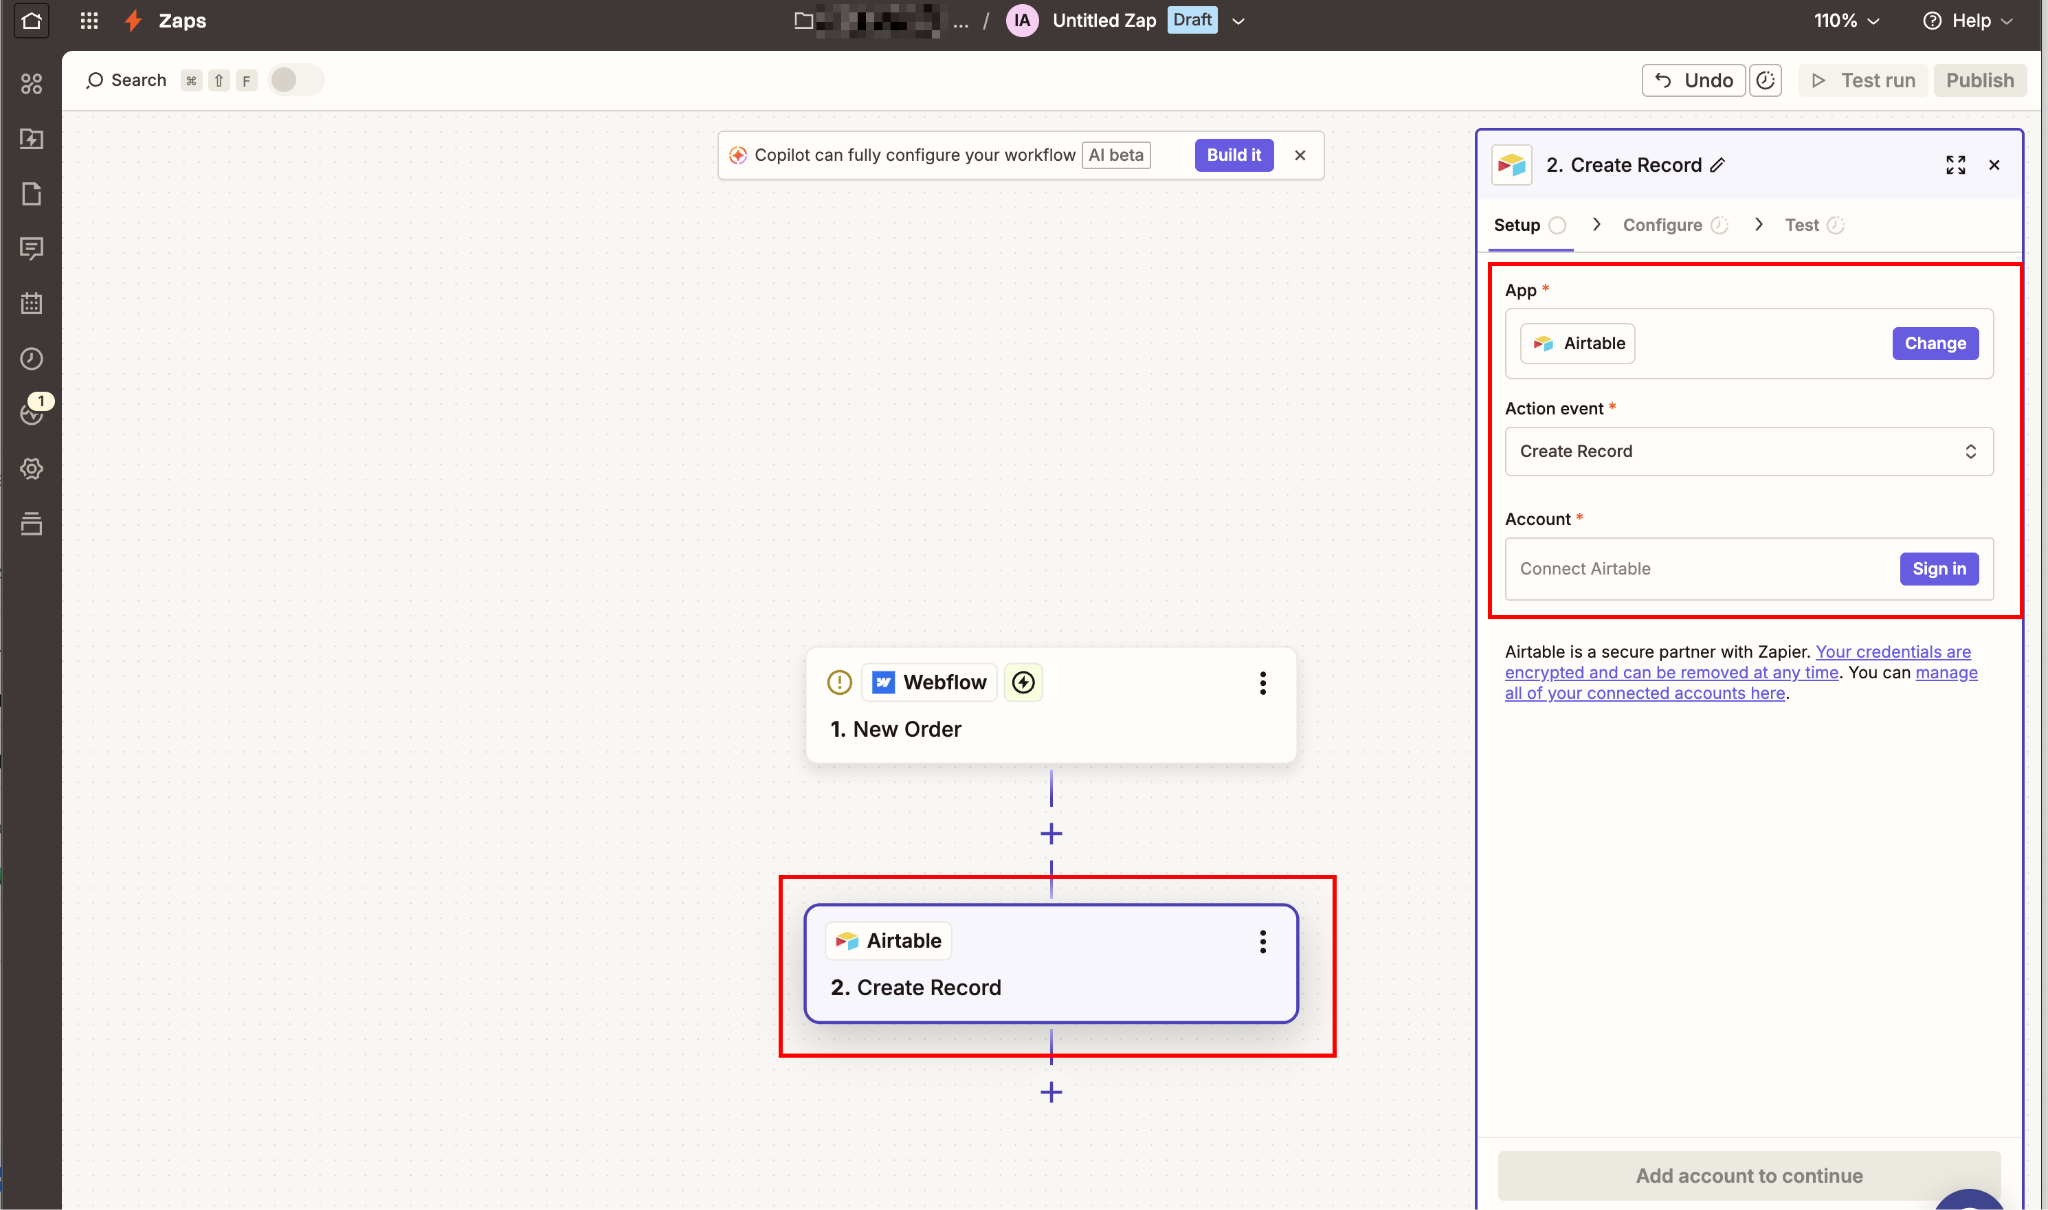
Add an action step and configure it to write to Airtable:
- Click the "+" button to add an action step
- Search for "Airtable" and select it
- Choose "Create Record" as the action event (this creates a new row in your specified table)
- Click "Continue"
Likewise, connect your Airtable account.
Connecting your Airtable account
Connect your Airtable account using OAuth:
- Click "Sign in to Airtable"
- Enter your Airtable credentials in the popup window
- Authorize Zapier to access your Airtable bases
- Zapier redirects back with your account connected
Now, select Base and Table.
Airtable's action step requires you to specify where to create the record:
- "Base" dropdown: Select "Webflow Orders" (or whatever you named your base)
- "Table" dropdown: Select "Orders."
Zapier now loads all fields from your Airtable table, ready for mapping.
4. Map Webflow order data to Airtable fields
This is where order data flows from Webflow into your Airtable structure. Zapier presents each Airtable field you created, and you map corresponding Webflow order data to populate it.
For each Airtable field, click into the input box. Zapier displays a dropdown showing all data points from the Webflow trigger.
Select the matching field.
Here are some standard field mappings:
- Order ID: Select "1. Order ID" from Webflow trigger data
- Order Number: Select "1. Order Number" from Webflow trigger data
- Customer Name: Select "1. Customer Name" from Webflow trigger data
- Customer Email: Select "1. Customer Email" from Webflow trigger data
- Order Total: Select "1. Order Total" from Webflow trigger data
- Order Status: Select "1. Status" from Webflow trigger data
- Order Date: Select "1. Accepted On" from Webflow trigger data (this is when the order was placed)
- Shipping Address: Select "1. Shipping Address Street 1" and manually add "1. City", "1. State", "1. Zip" using Zapier's text formatter if you want a combined address string, or create separate Airtable columns for each address component
Map each field by clicking into the Airtable input box and selecting the matching Webflow trigger data from the dropdown.
Setting shipping addresses
You have two choices for shipping addresses:
Option A (Single combined field): In the Airtable "Shipping Address" field, manually type the address structure:
1. Shipping Address Street 1
1. City, 1. State 1. Zip
Zapier automatically inserts the actual values when the Zap runs. This creates a formatted address string, such as "123 Main St, San Francisco, CA 94102," in Airtable.
Option B (Separate fields): Create individual Airtable columns (Street, City, State, Zip) and map each Webflow address field to its corresponding column. This approach enables better filtering and sorting in Airtable, but requires more columns.
Airtable only returns fields with values during testing. If your test order is missing data (for example, no phone number was collected), that field won't appear in Zapier's dropdown. This is expected behavior. When a real order includes that data, Zapier will map it correctly.
If a field is critical but missing from your test data, either:
- Place a new test order with complete information
- Manually select a different test record in Zapier using the "Load more" option
- Trust the mapping and test with a real order (riskier approach)
Option A is the faster setup and works well for display purposes. Option B is better if you need to filter or sort records by city, state, or region. Worth the extra columns if your operations are geographically distributed.
Handling missing fields
Webflow's order data structure includes extensive fields — billing vs. shipping addresses, tax amounts, discount codes, and fulfillment status. Review the full trigger output and decide which fields your Airtable base needs.
Common fields to consider:
- Billing vs. shipping address (they can differ if gifting)
- Customer phone number (optional in Webflow checkout)
- Order notes or special instructions
- Discount codes applied
- Tax amount and shipping cost (separate from order total)
Map only what you need. Overmapping creates cluttered Airtable records.
Once all fields are mapped, move to Step 5 to test the full workflow end-to-end before activating.
5. Test the complete workflow and activate
Before activating your Zap, test the end-to-end workflow to verify data flows correctly from Webflow to Airtable.
Here’s how to run a test:
- Click "Test action" in the Airtable step
- Zapier creates a new record in your Airtable base using the sample Webflow order
- Check Airtable; you should see a new row with mapped order data
- Verify all fields populated correctly (customer name, email, order total, etc.)
When the test succeeds, and Airtable shows correct data, activate your Zap:
- Click "Publish" in the top-right corner
- Turn the Zap "On"
- Zapier begins monitoring your Webflow store for new orders
From this point forward, every new order placed on your Webflow site automatically creates an Airtable record within seconds.
Error handling
If a Zap run fails (e.g., Airtable rejects a field value or Webflow sends unexpected data), Zapier holds the run rather than discarding it. Failed runs appear in your Zap History and can be replayed once you fix the underlying issue.
Set up email notifications in Zapier's account settings to alert you when runs fail. For order automation, silent failures are more damaging than loud ones.
What causes Webflow-to-Airtable Zaps to fail?
Most failures come down to four things: Webflow's order data not matching what Zapier expects, field-mapping mismatches in Airtable, duplicate records from multiple trigger events, or Airtable field type configurations.
In most cases, the symptom is a Zap that runs without errors but produces incorrect or missing data.
Here's how to diagnose each one.
Zap triggers multiple times for the same order
Symptom: A single Webflow order creates duplicate Airtable records.
Cause: Webflow fires both "New Order" and "Updated Order" events when order status changes. If you have multiple Zaps triggered by different events, they may fire in the same order.
Solution: Use only the "New Order" trigger for creating Airtable records. If you need to track status changes, create a separate Zap using "Updated Order" trigger with an "Update Record" action instead of "Create Record."
Better yet, use Airtable's "Create or Update Record" action (available in Zapier) configured to search by Order ID. This prevents duplicates by updating existing records instead of creating new ones.
No sample data appears in the Zapier test
Symptom: When testing the Webflow trigger, Zapier shows "No data found."
Cause: Your Webflow store has no orders in the system.
Solution: Place a test order through your Webflow checkout:
- Add a product to the cart
- Complete checkout process (use Stripe test mode if available)
- Confirm the order appears in Webflow's order dashboard
- Return to Zapier and click "Test trigger" again
The sample order provides Zapier with the data structure needed for field mapping.
Airtable field not appearing in Zapier dropdown
Symptom: Created a field in Airtable, but it doesn't show in Zapier's mapping options.
Cause: Zapier caches Airtable field lists. New fields added after connecting may not appear immediately.
Solution:
- Click the "Refresh fields" button in Zapier's Airtable action step
- If that fails, disconnect and reconnect your Airtable account
- Verify the field exists in the correct table (Zapier shows fields from the selected table only)
After refreshing, re-check your field mapping in the Airtable action step. Existing mappings may have shifted if fields were renamed or reordered in Airtable.
Order total shows as the wrong currency or format
Symptom: Order total appears as "500" instead of "$5.00" in Airtable.
Cause: Webflow stores amounts in cents (500 = $5.00), or the Airtable field type is incorrect.
Solution:
- Set the Airtable field type to "Currency" with the appropriate currency symbol
- If Webflow passes cents, add a Formatter step in Zapier to divide by 100 before sending to Airtable
- Check Webflow's order data in Zapier test—if it shows "5.00", Airtable field formatting is the issue
If Webflow's test order data shows a formatted dollar value (e.g., "$5.00") but Airtable still displays it incorrectly, the issue is the Airtable field type. Change it to Currency and set your symbol and precision before testing again.
What to automate next
Order data in Airtable is the foundation. Most teams use it as the starting point for inventory management, customer segmentation, or fulfillment reporting. A few natural extensions from here:
For more complex multi-product order parsing or conditional routing, Make (formerly Integromat) handles nested data structures that Zapier's two-step free tier can't. The Webflow-Make integration supports the same trigger model with more granular control over how order items are processed.
For a full breakdown of what Zapier can connect to in your Webflow store, see the Webflow + Zapier integration page, which covers every available trigger and action.
Frequently asked questions
Do I need a paid Zapier plan for this integration?
Mostly. The core two-step workflow (Webflow trigger → Airtable action) fits within Zapier's free plan at 100 tasks per month. The Code by Zapier parsing step in the troubleshooting section pushes the Zap to three steps, which requires a paid plan starting at $19.99/month billed annually.
Can I update existing Airtable records instead of always creating new ones?
Yes. Change your Airtable action from "Create Record" to "Create or Update Record" (also called "Upsert" in some versions of Zapier). Configure it to search by Order ID or Order Number. If a match exists, Zapier updates that record; if not, it creates a new one. This is particularly useful if you're syncing order status changes. When Webflow marks an order as fulfilled, the Zap updates the existing Airtable record rather than creating a duplicate.


