






Joonbot
Add a rule-based Joonbot chatbot to Webflow with one script embed, then send its answers to Webflow CMS items through Zapier or your own webhook.

Webflow forms collect fixed fields and store each submission in Site settings. Branching, answer scoring, and adaptive questions require an additional tool. A visitor comparing plans or applying for a job sees the same static form as everyone else. Joonbot adds scripted conversations that adapt to each response.
Connecting Joonbot with Webflow puts a branching conversation on any page. Joonbot has no Webflow app and publishes no Webflow-specific documentation, so the pairing runs on three generic pieces: a script embed, a Zapier connector, and outgoing webhooks. Through Zapier or a webhook endpoint you host, answers can become draft or live Webflow CMS collection items without anyone retyping them.
Marketing managers use the pairing on paid landing pages where a static form underperforms. Recruiters embed screening bots on Webflow careers pages, and support leads deploy FAQ bots to cut repeat tickets. Freelancers and agencies add it to client sites when the brief asks for more leads without a CRM build.
How to integrate Joonbot with Webflow
What is Joonbot? Joonbot is a no-code chatbot builder for websites. You assemble each chatbot from question, message, and action blocks in a flowchart builder. The logic is rule-based, so you script every scenario in advance, and no AI model generates replies. The product is live and taking signups, but its developer docs and published case studies have not been updated in years, so test any feature you depend on before you commit.
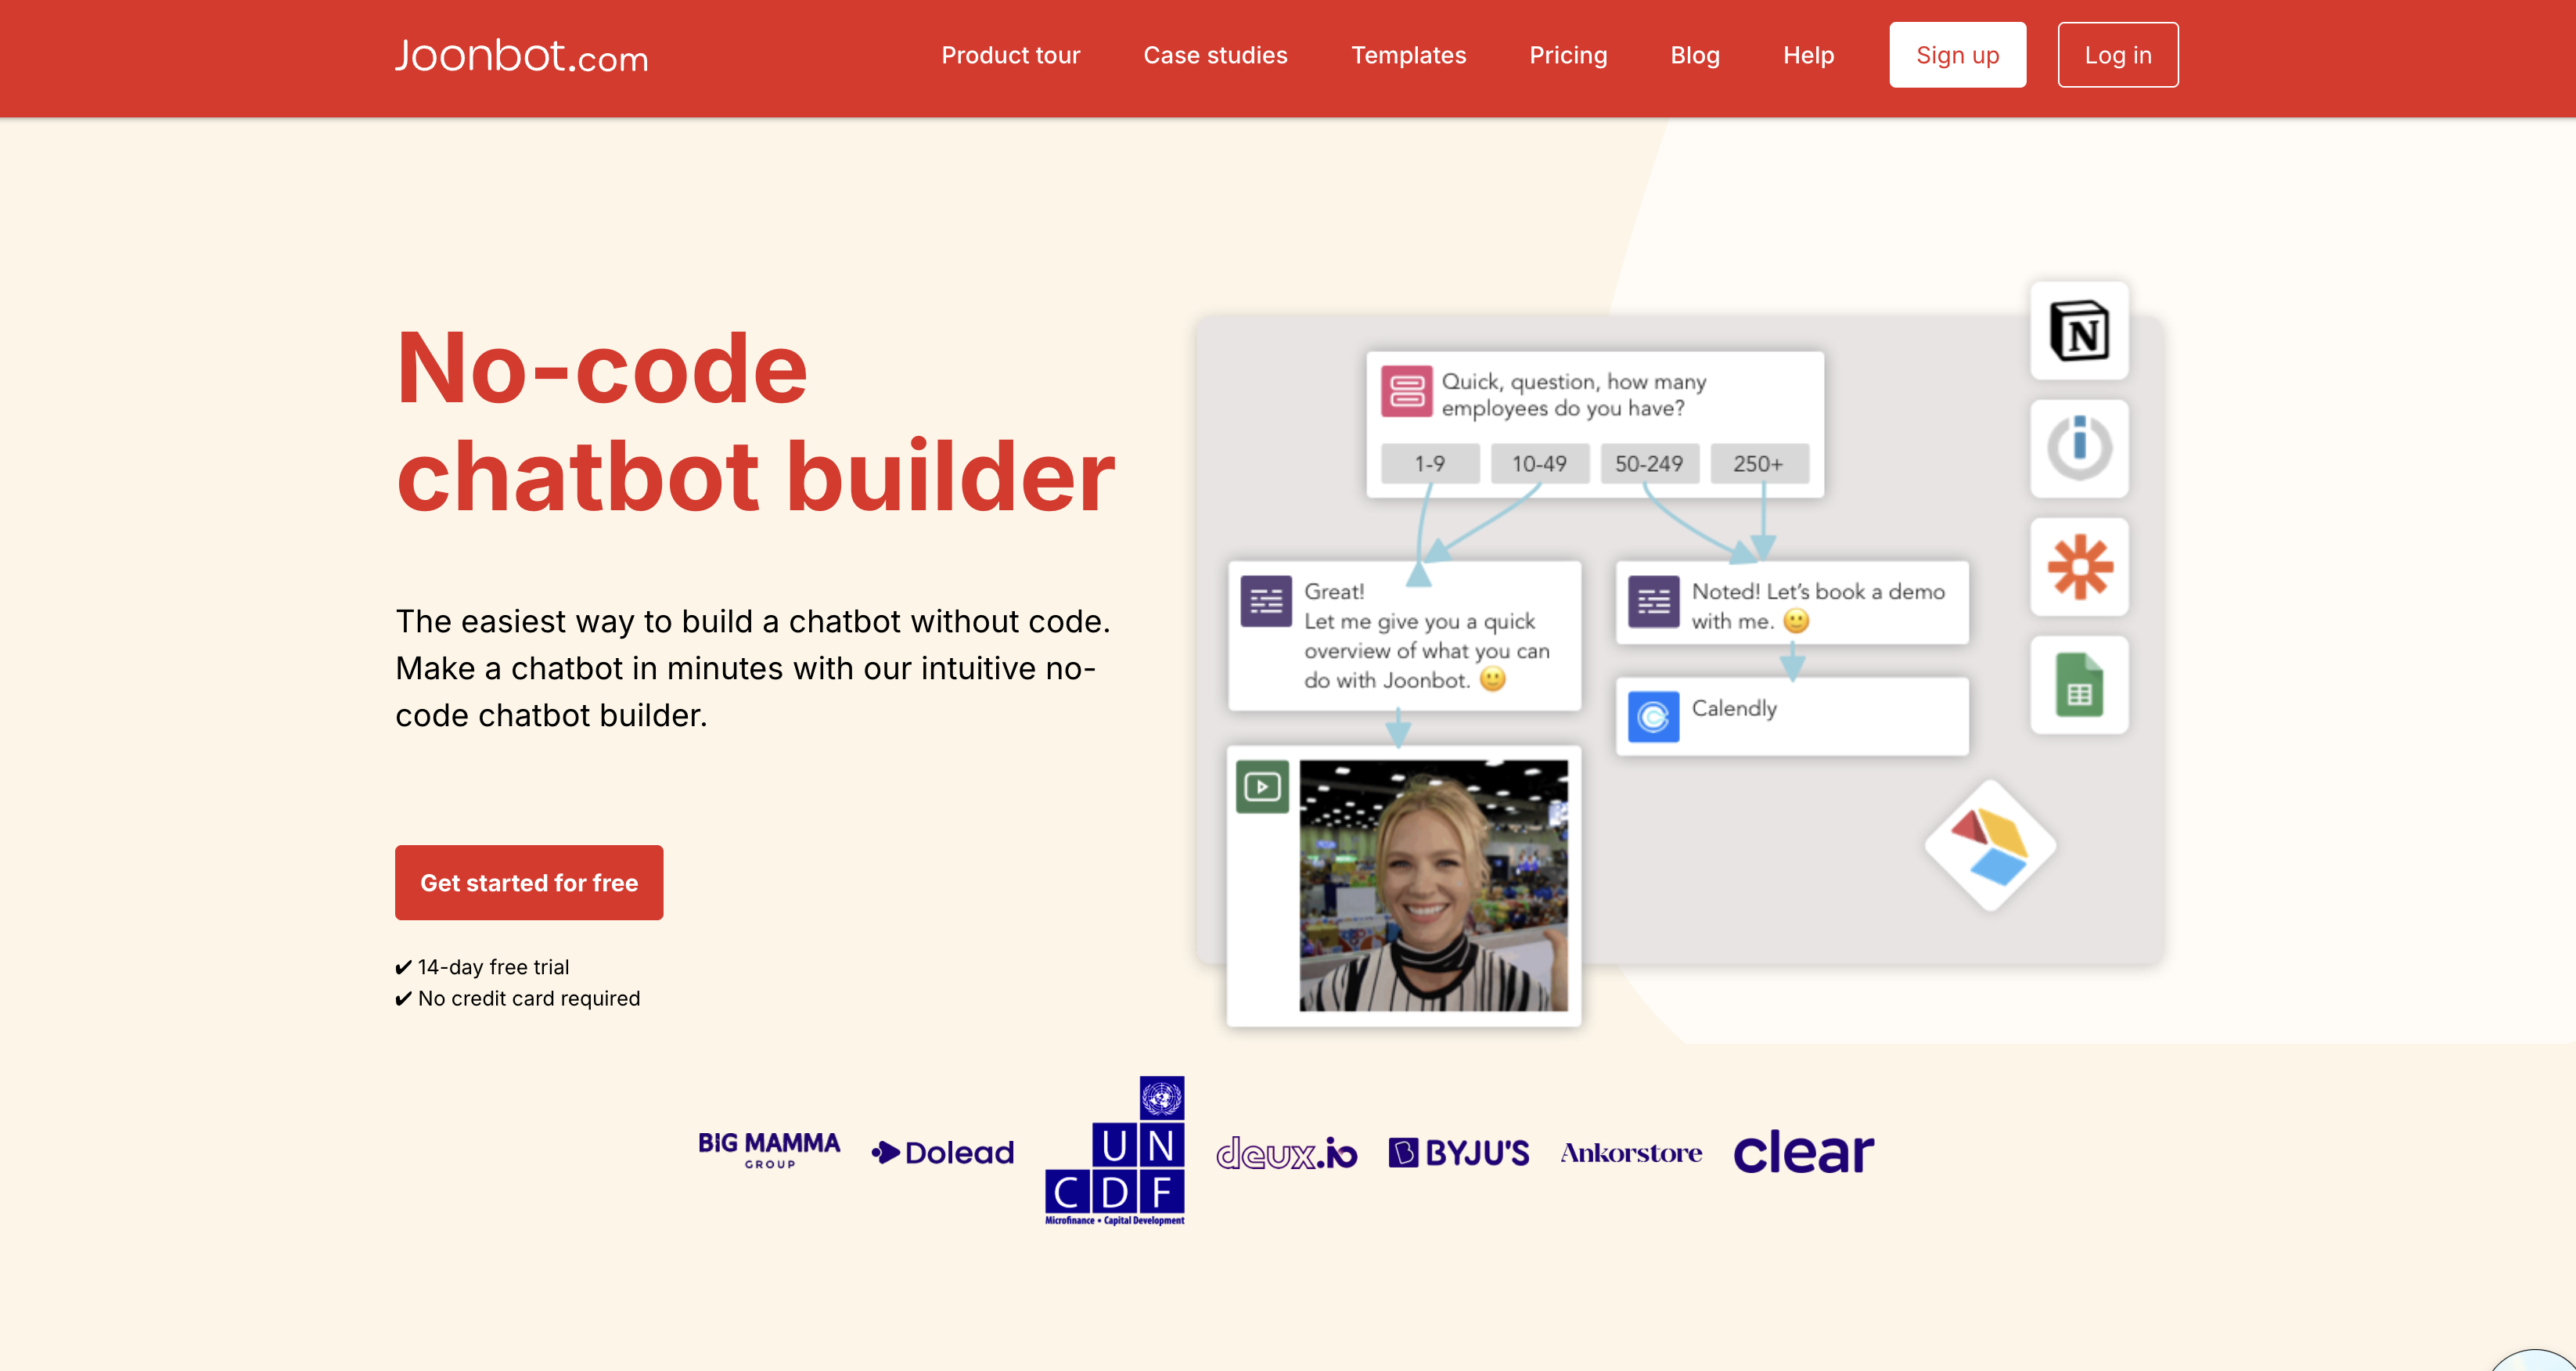
Teams pair the two when a Webflow page needs to ask follow-up questions instead of collecting a form. A pricing page bot answers plan questions and offers a booking through Joonbot's Calendly integration. A careers page bot pre-screens candidates before it reveals the application link. Joonbot's published case studies cover support deflection, recruiting, and product recommendation, though the ones we checked date from 2019 to 2021.
The sections below cover chatbot placement and CMS routing with Zapier or the Webflow Data API and Joonbot webhooks. Most implementations combine two or more of these methods depending on the complexity of the setup.
Add the Joonbot embed code with Code Embed elements and custom code
Joonbot installs with a short script snippet that you copy from the Share step of the Joonbot dashboard. The snippet loads the Joonbot loader asynchronously, and the loader draws the chatbot inside an iframe. Where you paste it in Webflow decides the scope. A Code Embed element scopes the chatbot to one section, page settings to one page, and head or footer code to every page. Each location accepts up to 50,000 characters, per the custom code docs. You need a paid Site plan, or a Core, Growth, Agency, or Freelancer Workspace, to add custom code in any of them.
The script supports these formats on Webflow pages:
- A floating widget that sits in a page corner as a persistent chat bubble
- A modal popup that opens when a visitor clicks a button you add
- An inline iframe embed placed as a piece of page content
- A full-page chatbot, which Plus plan accounts can also serve from a custom domain
- Hidden fields that read
utm_source,utm_medium,utm_campaign, or the full page URL for campaign tracking
On the Webflow side, custom code needs one of the plans above; check Joonbot pricing for which formats your Joonbot plan includes.
Embed a chatbot in one section with a Code Embed element
An inline quiz in a blog post or a recommendation bot on a product page belongs inside the page layout. A Code Embed keeps that conversation within one section. The element accepts HTML, CSS in <style> tags, and JavaScript in <script> tags, but no server-side languages. Script tags appear as a placeholder on the canvas; the live chatbot appears on the published site.
To embed the chatbot:
- In Joonbot, build the flow and copy the embed code from the Share step.
- In Webflow, open the Add panel and drag a Code Embed element onto the canvas.
- Paste the code, then save and close the modal.
- Publish the site. The chatbot renders on the published site, while the canvas shows a placeholder for the script.
To run different chatbots on different pages, place a separate Code Embed element with its own Joonbot snippet on each page.
Deploy the widget site-wide with head or footer code
Code stored in Site settings applies to all published pages, which lets a floating widget follow visitors throughout the site. External <script> tags in the <head> can slow page loads, so the custom code documentation suggests the async or defer attribute. Footer code renders before </body>, which keeps the chatbot script out of the render path.
To deploy site-wide:
- Go to Site settings > Custom code.
- Paste the Joonbot script into the Footer code section, or into Head code if you add
defer. - Click Save changes and publish the site.
Page-level code loads after this site-wide code, so a page-specific bot can coexist with a global widget.
Show the chatbot on selected pages with page-level custom code
A plan-comparison bot may belong only on your pricing page. The page's custom code section confines the script to that page. Joonbot also supports URL-based targeting from its own settings, so you can scope a bot from either side.
To add page-level code:
- In the Pages panel, hover over the target page and click the Page settings icon.
- Scroll to Custom code and paste the script into the Inside
<head>tag section. - Save the page settings and publish the site.
Joonbot's product tour still lists page-visit triggering as "Coming soon!", so page-level Webflow code is the dependable way to limit a bot to specific pages today.
Connect Joonbot to Webflow CMS with Zapier
Zapier has a Joonbot connector. The connector supports one-way data flow from Joonbot into Webflow through a single trigger, Zapier Block Reached. It fires when a visitor reaches the Zapier integration block in a bot scenario. You need Joonbot Starter or higher, plus a Webflow Site plan with CMS access. Zapier's Webflow setup guide still names the older CMS site plan, which Webflow has since folded into its current plans. You can start from Zapier's pairing page.
The pairing supports these flows:
- Joonbot Zapier Block Reached → Webflow Create Item, which stages a draft lead for review
- Joonbot Zapier Block Reached → Webflow Create Live Item, which publishes the record immediately
- Joonbot Zapier Block Reached → Webflow Find Item, then Update Item, which changes a field such as Status on an existing record
- Flows in the other direction, such as a Webflow form submission starting something in Joonbot, are not possible because the connector has no Joonbot actions
To set up the integration:
- In the Joonbot flow builder, add a Zapier integration block at the point where a lead is qualified.
- In Zapier, choose Joonbot as the trigger app, select Zapier Block Reached, and pick the bot.
- Connect Webflow through Apps > + Add connection and grant Zapier permission.
- Choose Webflow > Create Item, then select the site and the collection.
- Map each answer variable you named on the Joonbot question blocks to a collection field. The
nameandslugfields are required.
The same Zapier guide notes that reference and multi-reference fields cannot be mapped, so keep the leads collection flat. Use Create Live Item when the record should show up in a Collection List on the published site without a manual publish step.
Build with Joonbot webhooks and the Webflow Data API
Joonbot documents one developer feature, outgoing webhooks, and publishes no public REST API. Its developer docs are a single Webhooks page last updated about six years ago, so confirm payload behavior against a test bot. A webhook block, available on the Plus plan, POSTs conversation data to an endpoint you host. That endpoint calls the Webflow Data API v2 to create, update, or read CMS items. Joonbot never talks to Webflow directly on this path: your function is the bridge. This path suits developers who need deduplication, lookups, or field logic that Zapier cannot express.
These APIs are available:
- Joonbot webhooks POST collected answers, under the variable names you set, such as
emailandphone_number, plus the fullconversation, in asynchronous or synchronous mode - The Data API reference covers CMS collection items and form submissions
- Webflow webhooks trigger real-time events between systems
Use /v2/ paths only; the v1 API stopped receiving maintenance on March 31, 2025. Authenticate with a site token, which only site administrators can create, up to five per site.
Write chatbot answers to a CMS collection from an asynchronous webhook
Webhook processing can run as a background task while the conversation continues. This asynchronous mode suits data collection. Your function receives the Joonbot payload, reshapes it, and creates a collection item. Payload keys come from the variable name you set on each question block, so name them to match your collection field slugs. The developer docs call this field "Save answer to", while the current builder labels it "Save answers in the variable".
To implement this:
- Go to Site settings > Apps & integrations > API access, click Generate API token, and give the CMS API read and write access. Copy it now; the token shows only once.
- Deploy an HTTPS endpoint, such as a serverless function, that accepts JSON POST requests.
- In Joonbot, add a webhook block after the last question, paste the endpoint URL, set any custom headers, and choose asynchronous mode.
- In the function, build the request body and call
POST https://api.webflow.com/v2/collections/{collection_id}/items:
{
  "isDraft": true,
  "fieldData": {
    "name": "Chatbot lead",
    "slug": "chatbot-lead-1042",
    "email": "visitor@example.com"
  }
}
- Publish staged items with
POST /v2/collections/{collection_id}/items/publish, or skip drafts by posting to/v2/collections/{collection_id}/items/liveinstead.
For high-volume bots, batch records through POST /v2/collections/{collection_id}/items/bulk to replace per-conversation requests.
Return CMS data into the conversation with a synchronous webhook
The conversation pauses while your endpoint processes a synchronous webhook and returns its reply. The endpoint must return a 2xx status with JSON. It can return a responses array for display, or key-value pairs that set conversation variables. A product recommendation bot can ask three preference questions, then use a live CMS item for the matching product URL.
To implement this:
- Generate a site token with read-only CMS API access under Site settings > Apps & integrations > API access.
- In the function, read the answers from the Joonbot payload and call
GET /v2/collections/{collection_id}/items/liveto fetch published items. - Filter the items by the visitor's answers and return a 2xx response whose JSON keys become conversation variables.
- In Joonbot, set the webhook block to synchronous mode and follow it with a URL redirection block that uses the returned variable.
The visitor waits on this round trip, so keep the lookup fast and fall back to a default page if the endpoint returns an error.
What you can build with Joonbot and Webflow
The examples below cover lead generation, recruiting, support, and product recommendations without a custom chat frontend or replacement for Webflow forms.
- Lead qualification on landing pages: A widget on a Webflow campaign page asks qualifying questions, scores them with logic jumps, and offers a Calendly slot to high scorers. Each qualified lead reaches a "Leads" collection through the Zapier Create Item action.
- Recruitment screening on careers pages: An inline chatbot pre-qualifies candidates before showing the application link. Jacques Raud Consulting reported in 2019 that it saw 130% more spontaneous applications over three months, and Yun Partners reported a 40% application completion rate the same year.
- Support deflection on FAQ and product pages: A 24/7 FAQ bot answers repeat questions from a scripted tree and frees the inbox for edge cases. RunEvent's bot answered 88% of questions automatically, an 8:1 ticket-deflection ratio.
- Product recommendation quizzes: A bot on a Webflow product page asks preference questions, scores the answers, and redirects to a matching page, the approach Jamie & I used for outfits. A synchronous webhook can pull the target URL from live CMS items and keep URLs in the CMS.
If you need to deduplicate leads or look up CMS data mid-conversation, the webhook path handles both. To build that bridge, start with our CMS API guide.
Frequently asked questions
Use one of the Webflow plans listed in the custom-code section above. On the Joonbot side, the Free plan caps you at 100 conversations in total, and Zapier and webhooks need a paid Joonbot plan.
It can, like any third-party chat widget. Our site performance guide on the Webflow blog states that "Any third-party scripts, chatbots, and tracking scripts will take a major toll on your performance score" when they block rendering. Place the Joonbot snippet in Footer code so it loads before
</body>, or addasyncordeferto the<script>tag as the custom code documentation recommends. The snippet Joonbot generates already inserts its loader withasyncset, and the loader draws the chat inside a lazily loaded iframe, but test your published page to measure the real effect.Yes. Use the page-level, Code Embed, or Joonbot URL-targeting setup described above.
Yes. Follow the Zapier setup above on the Joonbot Starter plan or higher. If you only need the data offline, Joonbot also lets you export conversations as CSV from its Results tab.
Load it through a consent manager instead of pasting it straight into custom code. With the OneTrust app, paste the Joonbot snippet into the app's Blocked Scripts section rather than Webflow's custom code settings, so it waits for consent. The Consent Pro app also blocks scripts before consent, though Webflow's article on it does not cover third-party snippets, so follow the app's own setup for the Joonbot tag. Consent for the widget is your responsibility. Webflow adds no cookies to customer sites, and Joonbot's privacy policy makes customers responsible for obtaining explicit consent from users.
Description
Paste the Joonbot script into a Code Embed element or site-wide custom code, then route answers to the CMS with Zapier or a webhook endpoint.
This integration page is provided for informational and convenience purposes only.
ManyChat
Connect ManyChat, a chat marketing and messenger automation platform, with Webflow to route form submissions into messaging flows and trigger conversations across Instagram, Messenger, and WhatsApp.

Unbounce
Unbounce and Webflow work together through a popup script, a subdomain CNAME, and Zapier or webhook lead sync. Here is what each method covers and what it does not.

Zendesk Chat (Zopim)
Connect Zendesk Messaging, a live chat and AI-powered support platform, with Webflow to add a chat widget, bot responses, help center search, and persistent conversations to any page.
Zendesk
Connect Zendesk, a cloud-based customer service platform, with Webflow to add live chat, AI-assisted messaging, and ticket creation to any page on your site.

Website Toolbox Forum
Connect Website Toolbox Forum, a hosted community discussion platform, with Webflow to embed threaded forums, user management, and moderation tools on any page without backend code.

UserVoice
Connect UserVoice's powerful feedback management platform with Webflow to collect user insights, prioritize feature requests, and build customer-driven websites. Transform visitor feedback into actionable improvements with voting systems, roadmap transparency, and seamless design integration.

Trustpilot
Connect Trustpilot, an independent review platform, with Webflow to display TrustBox widgets on high-intent pages and send review invitations via embeds or APIs.
Storylane
Connect Storylane, a demo automation platform, with Webflow to embed interactive product tours as inline demos, click-to-launch overlays, or popup modals on landing pages and CMS-driven galleries.

POWr chat
Add a Webflow Chat Plugin to your website without coding or headaches.
Related integrations
Get started for free
Try Webflow for as long as you like with our free Starter plan. Purchase a paid Site plan to publish, host, and unlock additional features.
