

iubenda
Connect iubenda, a privacy compliance platform, with Webflow to add cookie consent banners, generate privacy and cookie policies, log form-based consent records, and support Google Consent Mode v2 across jurisdictions.
iubenda generates privacy and cookie policies, displays geo-targeted consent banners, and logs every consent interaction in a searchable database. Connecting it to Webflow adds a compliance layer to every page, blocks cookies before consent, and supports Google Consent Mode v2 out of the box.
This combination fits freelancers and agencies building compliant client sites, marketing teams running ad-supported pages, and compliance officers who need audit-ready consent records for GDPR, CCPA, and LGPD.
How to integrate iubenda with Webflow
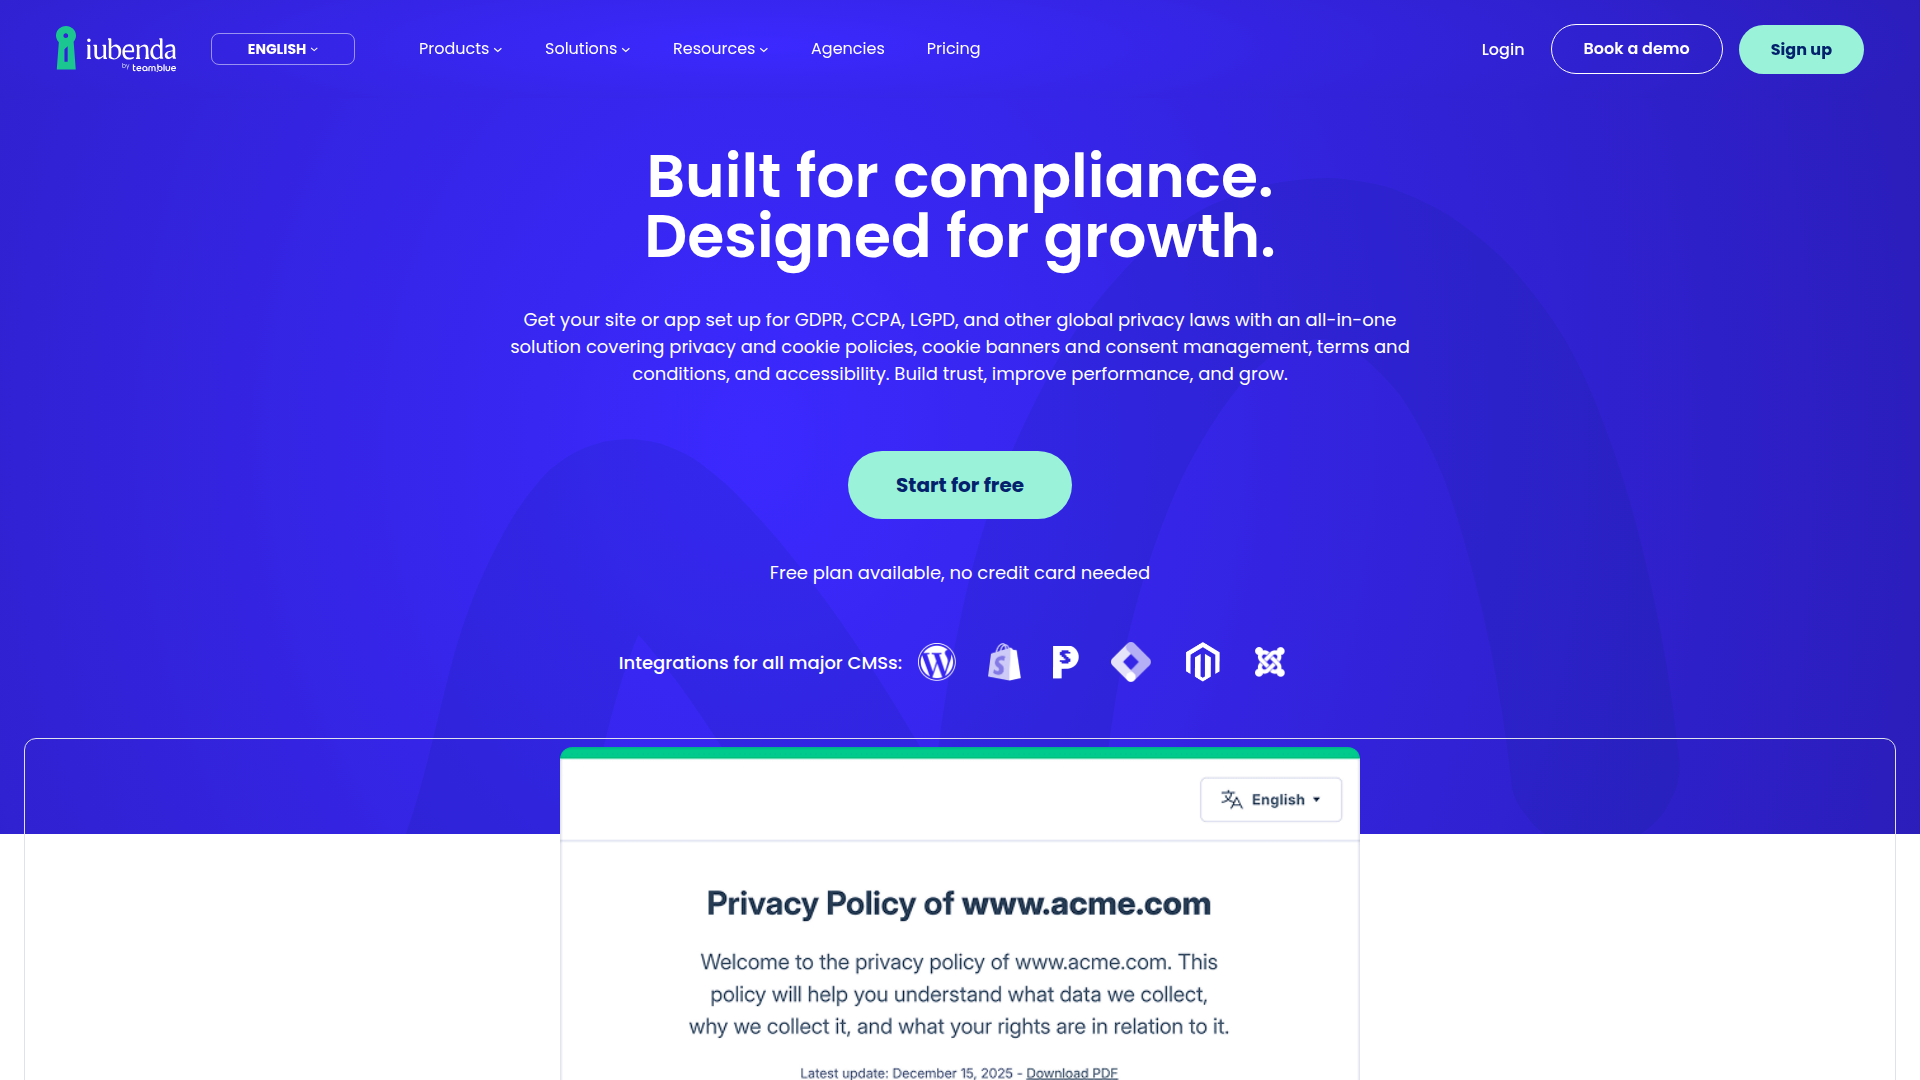
What is iubenda? iubenda is a privacy compliance platform that generates privacy policies, cookie policies, and terms and conditions from a library of 2,400+ legal clauses in up to 27 languages. It also includes a consent management platform (CMP) with cookie banner display, prior blocking, consent logging, Google Consent Mode v2, and IAB TCF 2.2 support, and is a Google-certified CMP Partner used by over 150,000 businesses.
Teams connect iubenda with Webflow to manage privacy compliance across jurisdictions in a single dashboard. A typical setup adds a cookie consent banner site-wide and embeds a privacy policy link in the footer. Some teams also log form-based consent for GDPR audits. The right approach depends on how much automation you need.
You can connect iubenda to Webflow in three ways:
- Custom code injection handles cookie banners, privacy policy widgets, and consent database connections without server-side development.
- Zapier lets you automatically log form submissions as consent records in iubenda's Consent Database.
- The Data API and iubenda APIs let you manage script deployment, consent record management, and privacy policy syncing, but require server-side development.
Most implementations start with custom code injection. Add automation or API integrations when you need form consent logging or multi-site management.
Add iubenda to Webflow with custom code
iubenda does not have a Marketplace app. You add iubenda by pasting generated snippets into custom code in head and body tags sections or Code Embed elements. This covers three distinct features: the cookie consent banner (site-wide), the privacy policy display (per-page or site-wide), and consent logging for forms. All custom-code and Code Embed methods need a paid site plan (Basic or above). The direct-link method works on the free plan. For a full reference, see the integration page for iubenda.
Add the cookie consent banner
The cookie consent banner displays automatically on every page. It handles consent collection, geo-targeting, prior blocking of cookies, and Google Consent Mode v2. You configure the banner once in iubenda, paste one snippet into the site-wide head code, and publish. iubenda's Webflow cookie banner guide covers the full process.
To set up the cookie consent banner:
- Log in to your iubenda dashboard and select your site.
- Go to Privacy and Cookie Policy > Edit, find the Cookie Policy box, and click Activate cookie policy > Save changes.
- Navigate to Privacy Controls and Cookie Solution and click Generate now.
- Customize the banner appearance, text, and position in the configuration panel.
- Click Save and Copy to get your snippet.
- In Webflow, go to Site settings > Custom Code tab.
- Paste the snippet into the Head Code field as the first item, above any other scripts.
- Click Save Changes and publish your site.
The banner won't appear in the canvas or preview mode. You have to publish the site to test it. Place the snippet first in the head code field — analytics or advertising scripts above it may fire cookies before the consent banner initializes.
iubenda offers two snippet formats. The remote configuration snippet loads settings from iubenda's CDN and is the recommended option. The extended snippet embeds the configuration inline. Both work identically once pasted into the head code.
After the banner is active, configure prior blocking to prevent cookies from loading before consent. iubenda's auto-blocking feature handles most third-party scripts automatically. For scripts that auto-blocking doesn't detect, use manual tagging. If you manage scripts through Google Tag Manager, iubenda provides a dedicated GTM template. It works well for sites with complex tracking setups.
Native Video elements for Vimeo or YouTube embeds may not be detectable by auto-blocking. Replace the native Video element with a Code Embed element containing the raw <iframe> code so auto-blocking can manage it. This workaround matters only for scripts the auto-blocker cannot directly edit.
Display the privacy policy
iubenda provides three methods for showing your privacy policy on your site, documented in the privacy policy Webflow guide. Each method suits different needs.
To add a privacy policy widget (modal overlay):
- In your iubenda dashboard, go to Privacy and Cookie Policy > Embed.
- Copy the code under the Add a widget to the footer tab.
- In the Designer, drag a Code Embed element into your footer or any section.
- Paste the widget code, then click Save & Close and publish.
This creates a clickable button that opens the full privacy policy in a modal overlay. The policy content updates automatically when you edit it in iubenda. You can place the Code Embed element inside a Symbol to reuse it across pages. This method keeps the policy on-site without creating a separate page.
To link directly to the hosted policy (works on the free plan):
- In your iubenda dashboard, go to Privacy and Cookie Policy > Embed.
- Copy the URL under the Use a direct link tab.
- Select a text element in your footer and paste the URL into the Link Settings URL field.
This is the only method that works on the free plan. It sends users to the iubenda-hosted policy page rather than displaying it on your site. Pick it when you can't use custom code.
To embed the full policy text as page content:
- Copy the code under the Embed the text in the body tab in iubenda.
- Create a new page named "Privacy Policy."
- Add a Code Embed element to the page body, paste the snippet, and publish.
This method renders the policy as native site content. You need a paid site plan and an iubenda Pro or Ultra license. Choose it when you want the policy to live directly inside your site's page structure.
Connect the consent database to forms
GDPR compliance may require logging who consented, when, and under what policy version for each form submission. iubenda's Consent Database records these details. The Consent Database for Webflow guide walks through the full setup.
To connect a form to iubenda's Consent Database:
- Open your project and navigate to the form.
- Add
nameattributes to every form field (e.g., set the email field name toemail_user). - Add a checkbox field for privacy policy acceptance and set its name to
Privacy_acceptance. - Add an ID attribute
submit_buttonto the submit button. - Add an ID to the form element itself (e.g.,
form_test). - Follow the connection steps in iubenda's guide to link the form to your Consent Database.
You'll need a paid site plan and a paid iubenda plan. This is the direct setup for teams that need proof of form-based consent inside iubenda.
Connect iubenda and Webflow with Zapier
Zapier has a pre-built template for direct Webflow-to-iubenda connections. It gives you a no-code path for automating consent logging from form submissions.
Zapier offers a pre-built template called "Record consents on iubenda for new Webflow form submissions" that connects the two platforms in minutes. This is the easiest automation path when you need form consent records without writing any server-side code.
To set up the Zapier integration:
- Go to the Webflow + iubenda template on Zapier.
- Authenticate both your Webflow and iubenda accounts.
- Select the form that triggers the workflow.
- Map form fields to iubenda's consent record fields (subject email, legal notice identifier, proof content).
- Test the Zap and turn it on.
When a visitor submits the form, Zapier detects the submission via the New Form Submission trigger and fires a Create a New Consent action in iubenda. The consent record lands in iubenda's Consent Database with the subject details, legal notice reference, and timestamp. This gives non-technical teams an easy way to automate consent records.
Build with the Webflow and iubenda APIs
If you manage multiple sites or build agency tools, you can use the API path to handle consent records and script deployment. You'll need server-side middleware such as a Cloudflare Worker or AWS Lambda function.
Use these API surfaces:
- iubenda's Consent Database HTTP API handles consent record creation, retrieval, and subject management at
https://consent.iubenda.com - iubenda's Privacy Policy API can return policy content for embedding when the policy and plan are eligible
- The Data API handles forms, webhooks, site publishing, and CMS collections
- The Custom Code API handles script deployment
- Webhooks trigger real-time events when forms are submitted
iubenda's API requires an Advanced or Ultimate plan. The Custom Code API needs OAuth tokens — site or workspace tokens won't work for custom code endpoints. These are the main components for custom integrations.
Log form consent via webhook and middleware
You can build a real-time consent logging pipeline by combining a webhook with iubenda's Consent Database API. When a visitor submits a form, the webhook fires to your middleware, which then creates a consent record in iubenda.
To implement this:
- Register a webhook on your site for the
form_submissiontrigger type, pointing to your middleware endpoint:
curl -X POST "https://api.webflow.com/v2/sites/{site_id}/webhooks" \
  -H "Authorization: Bearer YOUR_ACCESS_TOKEN" \
  -H "Content-Type: application/json" \
  -d '{
    "triggerType": "form_submission",
    "url": "https://your-middleware.com/handle-consent"
  }'
- In your middleware, parse the form submission payload and forward it to iubenda's Consent Database:
POST https://consent.iubenda.com/consent
ApiKey: IUBENDA_API_KEY
Content-Type: application/json

{
  "subject": {
    "id": "user-email-or-hash",
    "email": "user@example.com"
  },
  "legal_notices": [
    { "identifier": "privacy_policy" }
  ],
  "proofs": [
    {
      "content": "Webflow form submission payload",
      "form": "newsletter-signup"
    }
  ]
}
- Optionally, write the consent record to a CMS collection for internal reference.
This creates a verifiable audit trail with subject identity, timestamp, legal notice version, and proof of submission. It's useful when you need real-time processing outside of no-code tools.
Deploy iubenda scripts programmatically with the Custom Code API
If you run an agency managing multiple sites, you can inject iubenda's cookie banner script without opening each site's settings. The Custom Code API lets you register and apply scripts via API calls.
To deploy the iubenda script:
- Register iubenda's CDN script as a hosted script on the target site:
POST https://api.webflow.com/v2/sites/{site_id}/registered-scripts/hosted
Authorization: Bearer OAUTH_TOKEN
Content-Type: application/json

{
  "hostedLocation": "https://cdn.iubenda.com/cs/iubenda_cs.js",
  "displayName": "iubenda Cookie Solution",
  "version": "1.0.0",
  "location": "footer"
}
- Register the
_iub.csConfigurationinline script separately (it has to load before the CDN script):
POST https://api.webflow.com/v2/sites/{site_id}/registered-scripts/inline
Authorization: Bearer OAUTH_TOKEN
Content-Type: application/json

{
  "sourceCode": "<script>var _iub = _iub || []; _iub.csConfiguration = {\"siteId\": XXXXXX, \"cookiePolicyId\": YYYYYY, \"lang\": \"en\"};</script>",
  "displayName": "iubenda Configuration",
  "version": "1.0.0",
  "location": "header"
}
- Apply both scripts to the site using
PUT /v2/sites/{site_id}/custom-code, then publish withPOST /v2/sites/{site_id}/publish.
Only OAuth tokens can call the Custom Code API. Replace XXXXXX and YYYYYY with the actual siteId and cookiePolicyId from the target site's iubenda dashboard. This approach helps when you're managing multiple sites as an agency or app developer.
Sync privacy policy content to the CMS
You can render your privacy policy as native CMS content instead of an iframe or external link. If your policy is eligible for iubenda's Privacy Policy API, you can pull the policy text and write it to a CMS collection item.
To implement this:
- Fetch the policy content from iubenda:
GET https://www.iubenda.com/api/privacy-policy/{public_id}
A successful response can return { "success": true, "content": "... policy HTML ..." }. Verify your policy tier and API eligibility in iubenda's official Privacy Policy API documentation before implementing this flow.
- Write or update the content in a CMS collection item.
PATCH https://api.webflow.com/v2/collections/{collection_id}/items/{item_id}
Authorization: Bearer WEBFLOW_SITE_TOKEN
Content-Type: application/json

{
  "fieldData": {
    "name": "Privacy Policy",
    "policy-content": "[policy text from iubenda response]",
    "last-updated": "2025-06-01T00:00:00Z"
  }
}
- Publish the updated CMS item using the CMS publish flow, then run this sync daily or weekly with a serverless function or automation tool. This keeps CMS content current when iubenda updates the policy.
You'll need a paid site plan, and your policy and plan have to be eligible for iubenda's Privacy Policy API. It's a good fit when you want policy text managed as native site content.
What can you build with the iubenda Webflow integration?
Integrating iubenda with Webflow lets you run a privacy-compliant site across multiple jurisdictions — no legal team needed to draft and maintain policies.
- GDPR-compliant e-commerce checkout: Add a cookie consent banner that blocks Google Analytics, Meta Pixel, and payment processor scripts until a customer consents. iubenda's geo-targeting shows the right banner for EU visitors and a different configuration for US visitors.
- Lead generation forms with audit-ready consent records: Build a newsletter signup or contact form and log every submission in iubenda's Consent Database via Zapier or the API. Each record captures who consented, when, and under what policy version. You end up with an audit trail ready for GDPR or CCPA inquiries.
- Multi-language privacy policy pages: If you use localization, pull iubenda-generated policies in multiple languages via the API. Write each translation to the correct CMS locale. Visitors see the policy in their language as native site content rather than an external link.
- Agency compliance workflow for client sites: Deploy iubenda's cookie banner script across dozens of client sites using the Custom Code API. You won't have to open each site's settings individually. Pair this with iubenda's agency program for volume pricing across your client portfolio.
If you need more control over consent record syncing, real-time webhook processing, or multi-site script management, the API integration path covers those cases.
Frequently asked questions
Yes, for the cookie banner and custom-code or embed-based features. Custom code injection in site settings requires a paid site plan (Basic or above). The only free-plan method is linking to your iubenda-hosted privacy policy with a standard hyperlink. See iubenda's Webflow cookie banner guide for plan details.
Go to Site settings > Custom Code tab > Head Code field. Paste the snippet as the first item in the field, above any other scripts. Analytics or advertising scripts placed above it may fire cookies before the consent banner loads. After pasting, click Save Changes and publish your site. The banner will not appear until after publishing. iubenda's setup guide walks through each step.
Yes. iubenda's auto-blocking feature automatically activates and manages Google Consent Mode v2 (Advanced mode) for Google-related scripts. This works on all iubenda plans, including the free tier. Advanced Consent Mode sends consent signals to Google even when users decline cookies. This enables modeled conversion data in Google Ads and Analytics. No extra configuration is needed beyond the standard banner setup. See iubenda's Consent Mode v2 documentation for technical details.
No. Custom code injected via site settings does not render in the canvas or preview mode. You must publish your site to see and test the cookie banner. This applies to all consent management scripts, not just iubenda. If the banner does not appear after publishing, verify the snippet placement in the Head Code field. Also confirm your iubenda cookie policy is activated. iubenda's Webflow guide includes troubleshooting steps.
Use the Zapier template "Record consents on iubenda for new Webflow form submissions". Authenticate your Webflow and iubenda accounts, select the form, map the fields, and activate the Zap. Each form submission triggers a consent record in iubenda's Consent Database automatically. This requires paid accounts on both Zapier and iubenda.
Description
iubenda adds geo-targeted cookie consent banners, auto-generated privacy policies, and GDPR/CCPA consent logging to Webflow through custom code injection.
This integration page is provided for informational and convenience purposes only.
Consent Pro by Finsweet
Connect Consent Pro with Webflow to manage cookie consent and privacy compliance directly inside your Webflow project.
Axeptio
Connect Axeptio, a consent management platform, with Webflow to add customizable cookie consent banners and block tracking scripts until visitors opt in.

DataGrail Consent
Connect DataGrail Consent with Webflow to manage cookie consent and stay compliant with GDPR, CCPA, and other privacy regulations.
Clawdia AI
Generate legal documents like privacy policies, terms of service, and client contracts without hiring a lawyer for every template. Clawdia AI provides contract drafting, document generation, and legal guidance specifically for US-based small and medium-sized businesses. Set up your Clawdia AI and Webflow integration by installing the Clawdia AI app from the Webflow Marketplace. This link-based integration opens Clawdia's external dashboard where you generate documents, export them as PDFs, and upload them to Webflow CMS Collections or static pages.
Flowstar Age Verification
Connect Flowstar Age Verification with Webflow to add age verification gates to sites for alcohol, cannabis, tobacco, or adult content.
DocuSign
Integrate DocuSign's e-signature platform with Webflow to send signature requests and track document status from your website. Send signature requests, track document status, and collect legally binding agreements through automated API-triggered workflows.
Osano Cookie Consent
Implement GDPR and CCPA-compliant cookie consent on your Webflow site with Osano's powerful consent management platform, enabling automatic cookie blocking, customizable consent banners, and comprehensive compliance reporting without coding.
Iubenda Privacy & Cookie Policy
Automate privacy compliance for your Webflow site with Iubenda's comprehensive privacy and cookie policy solutions. Generate GDPR, CCPA, and LGPD-compliant policies, display customizable cookie banners, and manage user consent — all without complex coding.
Openli (formerly Legal Monster)
Connect Openli’s automated compliance platform with Webflow to add GDPR-compliant cookie consent banners and privacy management while maintaining complete design control over consent experiences.
Related integrations
Get started for free
Try Webflow for as long as you like with our free Starter plan. Purchase a paid Site plan to publish, host, and unlock additional features.
