






Forminit
Connect Forminit, a headless form backend, with Webflow to handle file uploads, spam filtering, UTM tracking, and submission routing to tools like Slack, HubSpot, and Salesforce.

Connect Forminit to your Webflow site and get powerful form handling with file uploads, spam protection, and detailed analytics.
What is Forminit?
Forminit is a form backend service that handles everything that happens after a user clicks “Submit.” Instead of building your own server to process form data, Forminit receives submissions, validates them, stores the data, and can notify you or connect to other apps without writing backend code.
You build the form in Webflow, and Forminit takes care of the rest.
Why Use Forminit with Webflow?
Webflow’s native forms work well for simple use cases, but Forminit unlocks advanced capabilities
Requirements
- Webflow account on Starter plan or higher. Custom code access is required.
- Forminit account: sign up free at https://forminit.com
Setup Guide
Step 1: Get Your Form ID and Endpoint
- Create a new form in Forminit.
- Copy your Form ID and Form Endpoint.
- Set authentication mode to Public.

Step 2: Add the Forminit Script to Your Page
- In Webflow, go to Pages.
- Select your page.
- Open Page Settings.
- Scroll to Before
</body>tag. - Paste the code below.
- Replace
YOUR-FORM-IDwith your actual Form ID, for exampleva0igelxfw9.
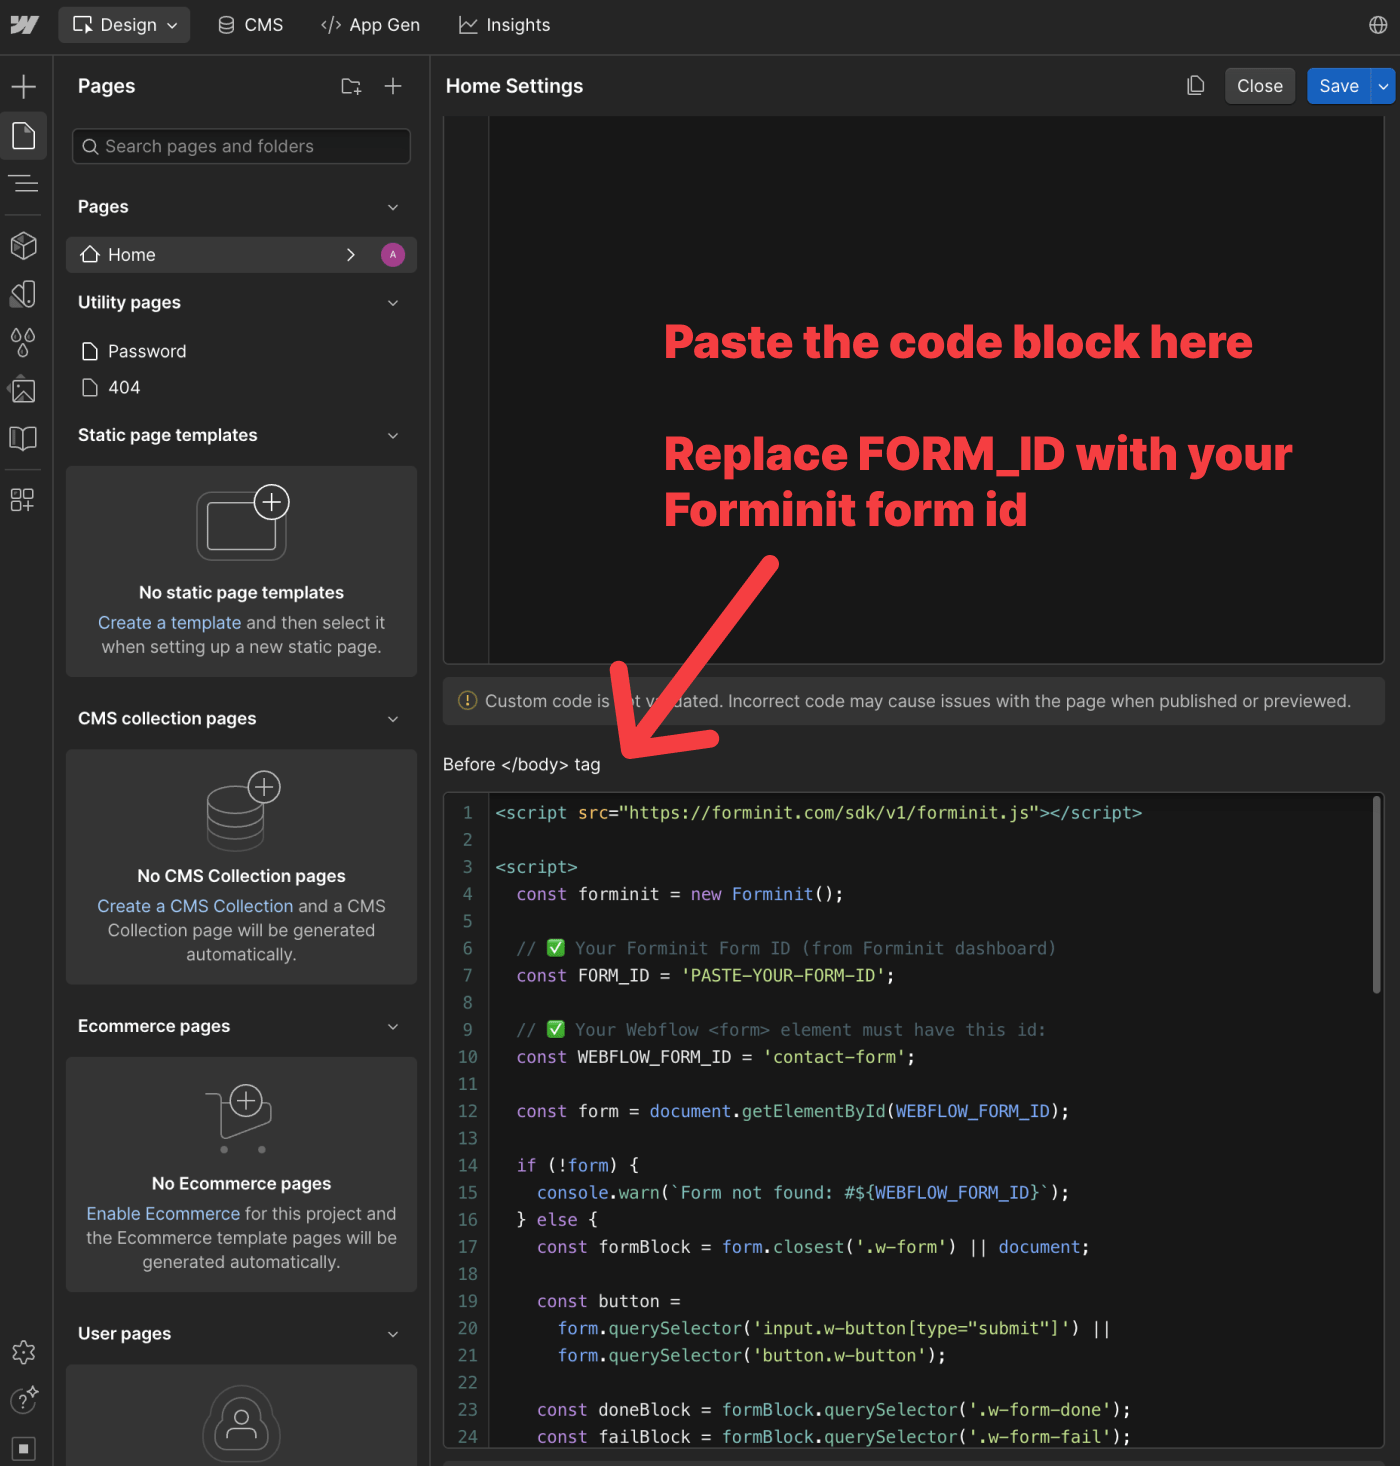
Paste the code below into your Webflow Page Settings.
<script src="https://forminit.com/sdk/v1/forminit.js"></script>

<script>
  const forminit = new Forminit();

  // Your Forminit Form ID from the Forminit dashboard
  const FORM_ID = 'YOUR-FORM-ID';

  // Your Webflow <form> element must have this ID
  const WEBFLOW_FORM_ID = 'contact-form';

  const form = document.getElementById(WEBFLOW_FORM_ID);

  if (!form) {
    console.warn(`Form not found: #${WEBFLOW_FORM_ID}`);
  } else {
    const formBlock = form.closest('.w-form') || document;

    const button =
      form.querySelector('input.w-button[type="submit"]') ||
      form.querySelector('button.w-button');

    const doneBlock = formBlock.querySelector('.w-form-done');
    const failBlock = formBlock.querySelector('.w-form-fail');

    const show = (el) => { if (el) el.style.display = 'block'; };
    const hide = (el) => { if (el) el.style.display = 'none'; };

    hide(doneBlock);
    hide(failBlock);

    const originalLabel = button
      ? (button.tagName === 'INPUT' ? button.value : button.textContent)
      : '';

    form.addEventListener('submit', async (event) => {
      event.preventDefault();

      hide(doneBlock);
      hide(failBlock);

      if (button) {
        button.disabled = true;

        if (button.tagName === 'INPUT') button.value = 'Sending...';
        else button.textContent = 'Sending...';
      }

      const formData = new FormData(form);
      const { data, redirectUrl, error } = await forminit.submit(FORM_ID, formData);

      if (button) {
        button.disabled = false;
        if (button.tagName === 'INPUT') button.value = originalLabel;
        else button.textContent = originalLabel;
      }

      if (error) {
        show(failBlock);
        return;
      }

      // Optional: Redirect to a thank-you page
      // You can configure redirectUrl in your Forminit form settings
      // if (redirectUrl) {
      //   window.location.href = redirectUrl;
      // }

      form.reset();
      form.style.display = 'none';
      show(doneBlock);
    });
  }
</script>
Step 3: Add a Form Block
- Open the Add Elements panel. Keyboard shortcut:
A. - Drag a Form Block onto your page.
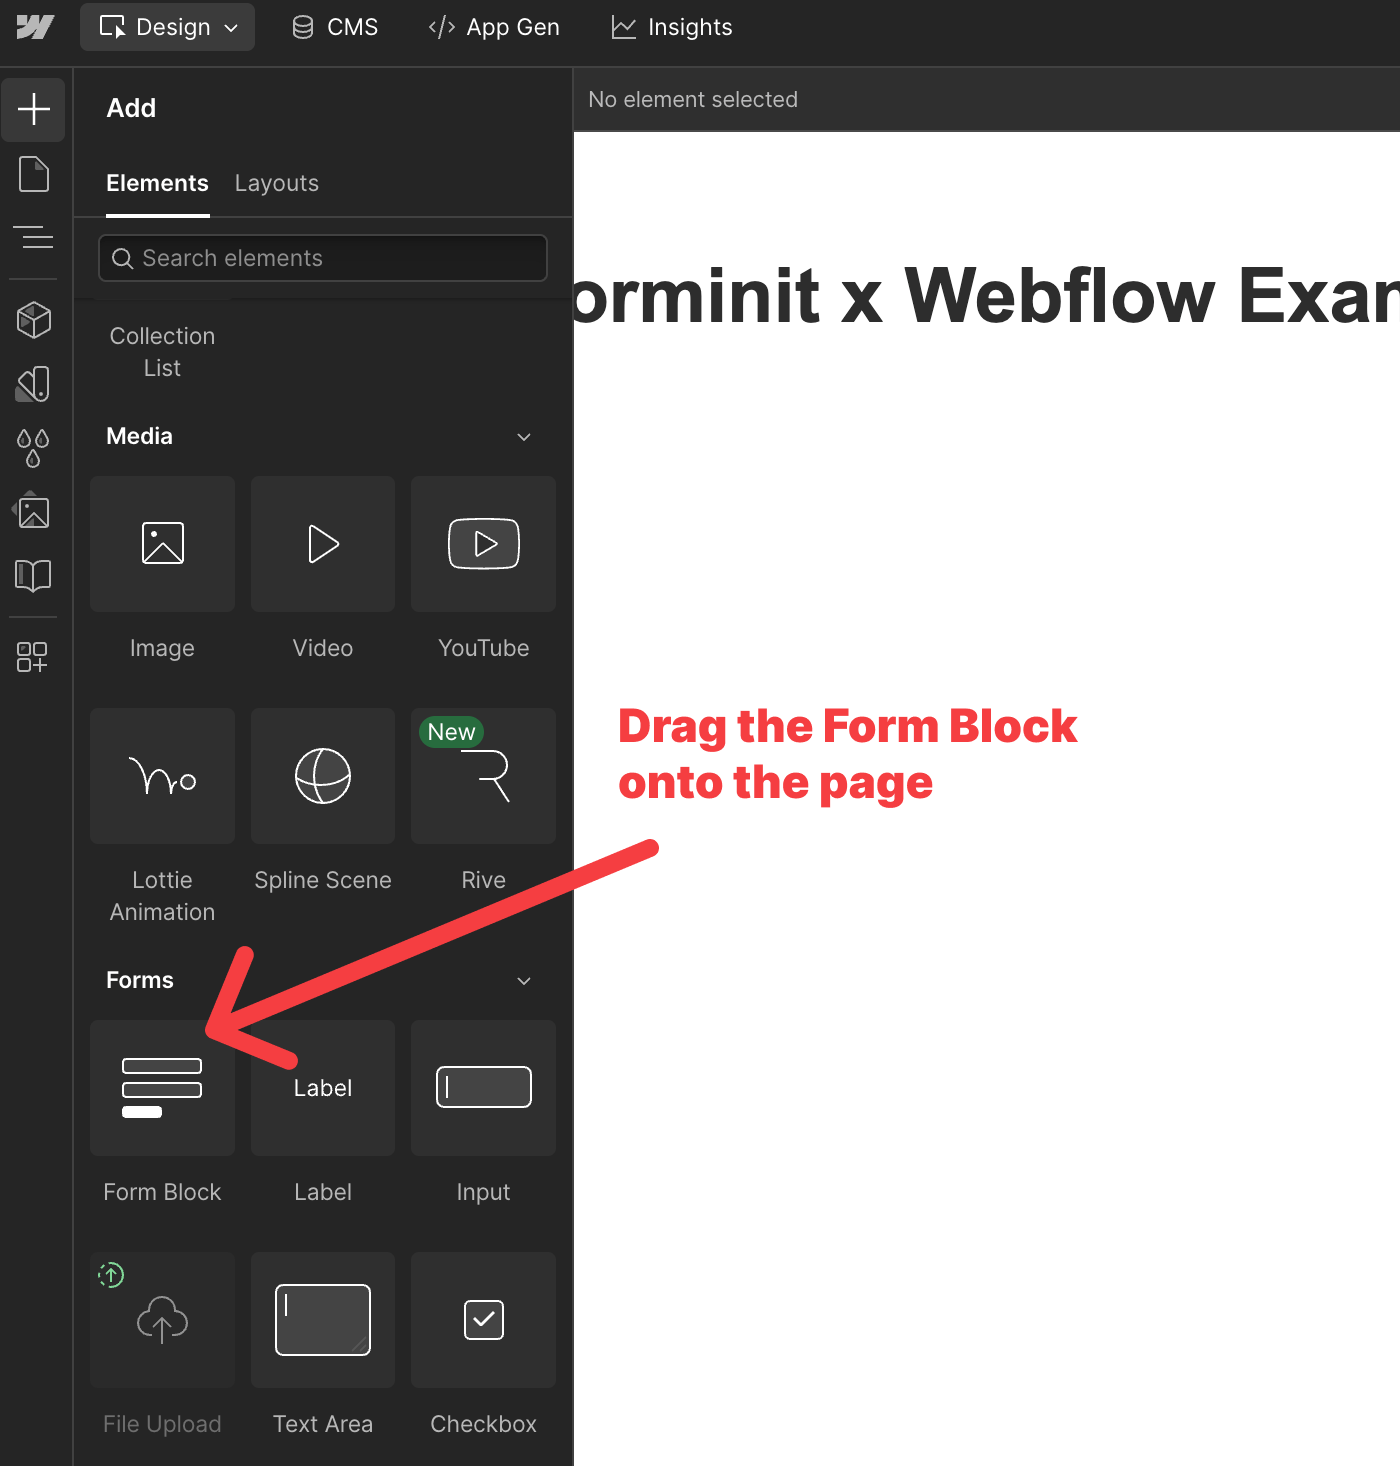
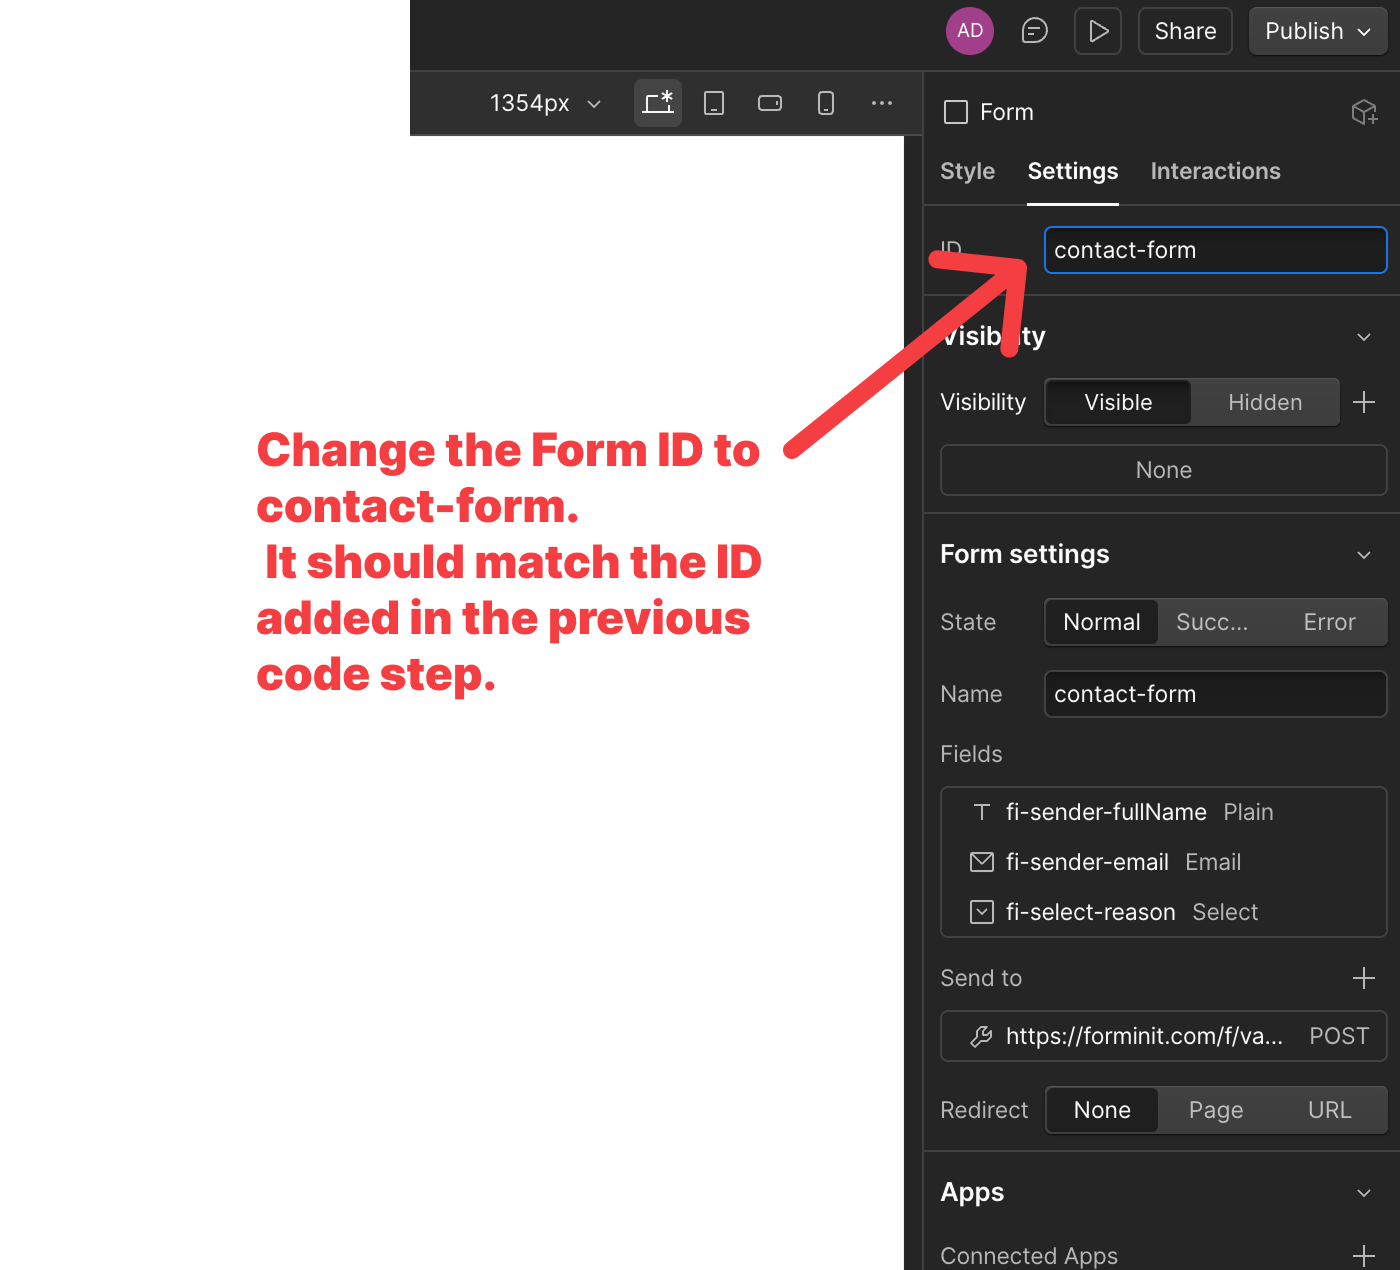
Step 4: Set the Form ID
- Select the
<form>element inside your form block. - In the Element Settings panel, set the ID to
contact-form.
This must match the ID in your script:
const WEBFLOW_FORM_ID = 'contact-form';
Step 5: Configure the Form Action
- Select the form block.
- Open Form Settings.
- Under Send To, remove any existing webhooks or email notifications.
- Add a Custom Action.
- Paste your Forminit form endpoint.
- Set method to POST.

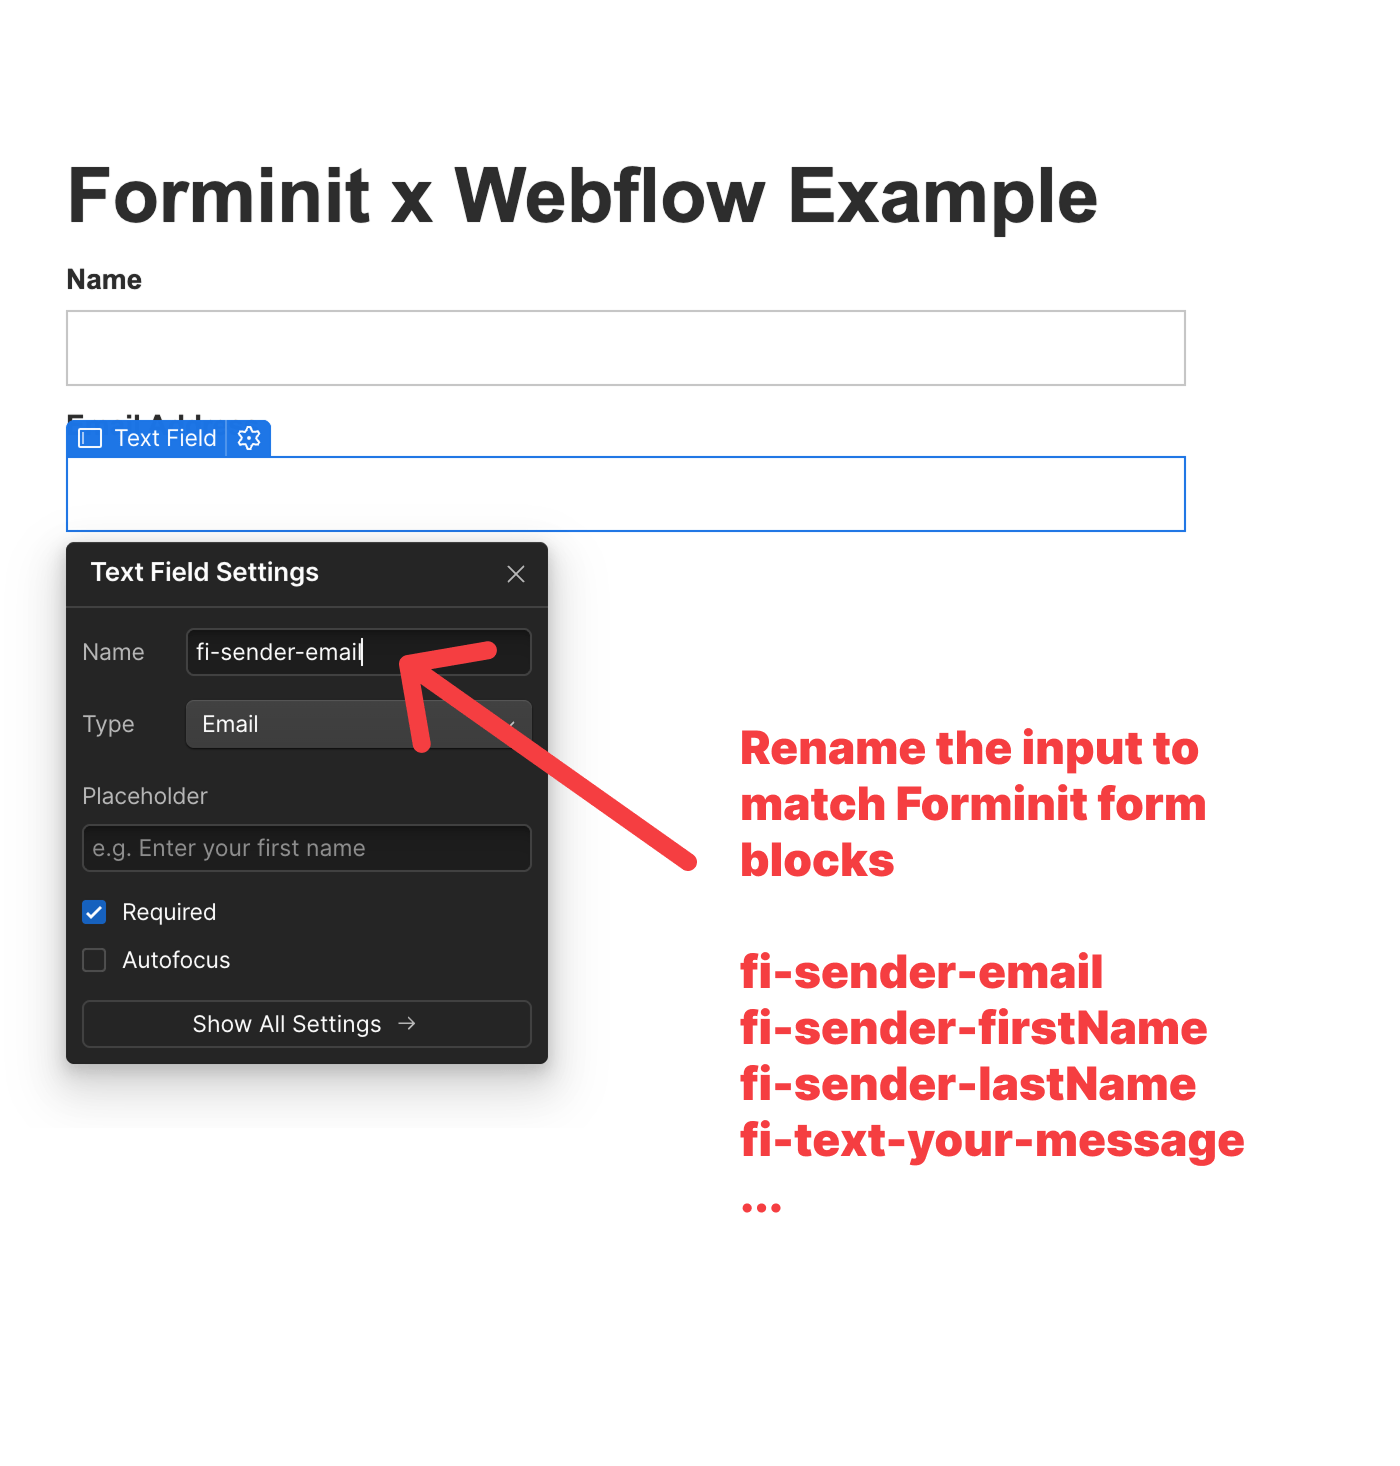
Step 6: Rename Input Fields
Select each input field and update the Name attribute to match Forminit’s field naming convention.
For submitter information: Sender Block
FieldName AttributeEmailfi-sender-emailFirst Namefi-sender-firstNameLast Namefi-sender-lastNamePhonefi-sender-phone
For other fields: Single Blocks
See all available form blocks: /docs/form-blocks/
Step 7: Test Your Form
- Publish your Webflow site.
- Submit a test entry.
- View the submission in your Forminit dashboard: https://app.forminit.com
For select fields, you’ll see analytics showing how often each option was chosen across all submissions.

Adding File Uploads
Webflow’s native file upload requires a Business plan. With Forminit, file uploads work on any plan.
Add a File Input
- Open the Add Elements panel.
- Drag a Code Embed element into your form block.
- Add one of the following code snippets.
Single file upload:
<input type="file" name="fi-file-resume" />
Multiple file upload:
<input type="file" name="fi-file-documents[]" multiple />
- Save and publish your site.

Redirecting After Submission
By default, the form displays a success message after submission. If you’d prefer to redirect users to a thank-you page or another URL:
- In your Forminit dashboard, open your form settings and set your Redirect URL.
- In your Webflow page script, find the commented redirect code and uncomment it:
if (redirectUrl) {
  window.location.href = redirectUrl;
}
The redirectUrl value comes from your Forminit form settings, so you can change the destination anytime without updating your Webflow code.
Troubleshooting
Form not submitting?
- Verify the form ID matches in both Webflow and your script.
- Check that authentication mode is set to Public in Forminit.
- Open browser developer tools to check for JavaScript errors.
Success or error messages not showing?
- Ensure your form block has the default
.w-form-doneand.w-form-failelements.
File uploads not working?
- File inputs must use the
fi-file-{name}naming pattern. - For multiple files, add
[]to the name and include themultipleattribute.
Next Steps
- Add spam protection with reCAPTCHA:
/docs/recaptcha/ - Set up email notifications:
/docs/email-notifications/ - Connect to Zapier or Make:
/docs/zapier/
Frequently asked questions
Yes. Webflow's built-in submission storage and email notifications cannot run at the same time as a custom action URL. When you add a custom action pointing to Forminit, you must first delete the existing Webflow and Email notification destinations in the form's Send To section. Getform then handles submission storage, email notifications, and spam filtering. The Webflow form documentation confirms this constraint.
The no-code form action URL method works on all Webflow plans, including the free Starter tier. The JavaScript SDK method requires a paid Webflow site plan because it uses custom code injection. File upload fields added via Code Embed elements also require a paid plan. For full details on plan-level feature access, see the Webflow pricing page.
Yes. Create a separate form endpoint in the Getform dashboard for each form on your site — for example, one for contact inquiries and another for newsletter signups. Each Webflow Form Block gets its own custom action URL and its own Element ID if you are using the JavaScript SDK. This allows different notification rules, spam settings, and webhook destinations per form. The Getform Webflow guide covers multi-form configuration.
Several verified causes exist. If site-level reCAPTCHA is enabled in Webflow's site settings, every form on the page must include a reCAPTCHA element — even forms using a custom action — or submissions will fail. CORS errors appear when your Webflow domain is not listed in Forminit's authorized domains setting. Also, custom code does not execute in Webflow's preview mode, so always test on the published site. Check the Getform troubleshooting guide for a complete list of common issues and fixes.
Yes. Getform.io rebranded to Forminit in January 2026. All features, accounts, endpoints, and data carried over with no migration required. The
getform.iodomain redirects to forminit.com, and the Zapier connector is accessible under both names. If your existing Webflow forms point togetform.ioendpoints, they should continue to resolve, but review them to confirm. The official rebrand announcement has full details.
Description
Routes Webflow form submissions to Forminit for server-side validation, file uploads, spam protection, and email notifications via custom form actions or the JavaScript SDK.
This integration page is provided for informational and convenience purposes only.

Jinglebell
Jinglebell brings you an intuitive module to fully integrate your Webflow-designed forms.
Form Sparrow
Point a Webflow form's action URL at Form Sparrow to process submissions and deliver them by email, exported sites included.
FormToEmail
Connect FormToEmail, a hosted form-to-email backend, with Webflow to route form submissions to specific inboxes, send autoresponder emails, and filter spam with reCAPTCHA and IP blocking.

FormBucket
Route Webflow form submissions through FormBucket to get spam filtering, email notifications, webhooks, and API access without server infrastructure.

Formstack
Connect Formstack, a data capture and workflow automation platform, with Webflow to embed advanced forms and sync submissions using Code Embed, Zapier, or APIs.

Formcarry
Connect Formcarry, a form endpoint service, with Webflow to collect submissions with file uploads, send auto-reply emails, filter spam, and restore form processing on exported sites.

Formspree
Connect Formspree with Webflow to handle form submissions, file uploads, and spam filtering without a backend.

Form Data
Connect Form Data, a form backend service, with Webflow to add spam filtering, auto-response emails, file uploads, and webhook-driven workflows to any form.

Enrollsy
Connect your enrollment management system with your Webflow site to streamline class registrations, manage programs, and process payments seamlessly.
Related integrations
Get started for free
Try Webflow for as long as you like with our free Starter plan. Purchase a paid Site plan to publish, host, and unlock additional features.
