

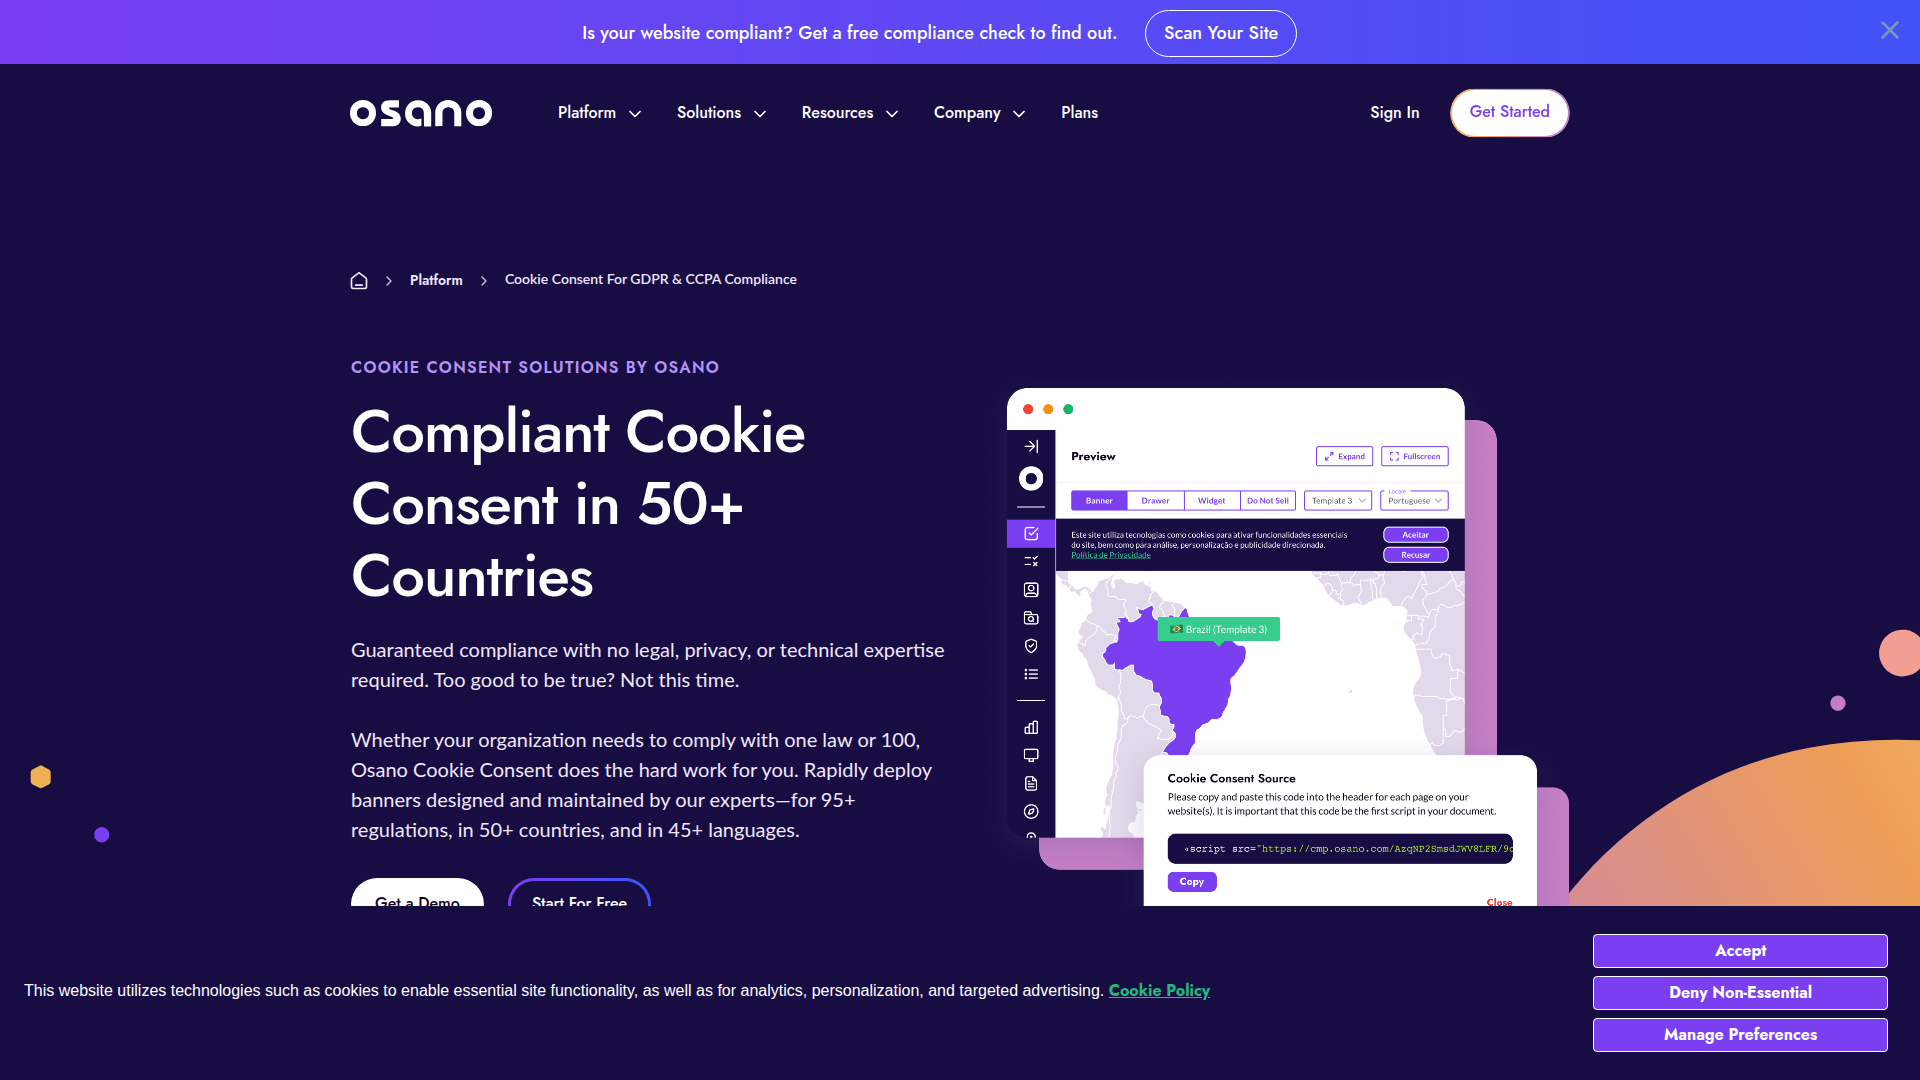
Osano Cookie Consent
Connect Osano Cookie Consent, a consent management platform, with Webflow to enforce cookie compliance, block non-essential scripts before consent, and display geo-targeted banners across 50+ countries.
Webflow doesn't ship with a GDPR-compliant cookie consent tool, so any site with visitors in the EU, California, or the 50+ other countries with cookie laws is at risk. Osano closes that gap with a managed consent banner you drop in via a single script tag in Webflow's custom code in head and body tags.
It handles cookie discovery, script-blocking, geo-targeted banners in 45+ languages, and consent records — all from the Osano dashboard, no republishing needed. Great fit for site owners, agencies, and compliance teams who want marketing and legal to manage consent without pulling in a developer.
How to integrate Osano Cookie Consent with Webflow
What is Osano Cookie Consent? Osano Cookie Consent is a consent management platform that deploys cookie banners, blocks non-essential scripts, and stores consent records for regulatory compliance. It supports GDPR, CCPA/CPRA, LGPD, and 95+ privacy laws across 50+ countries with automatic geo-targeting. For the Webflow setup in this guide, the practical implementation path is Osano's hosted CMP added through a script tag in site-wide custom code. Osano also offers a free open-source JavaScript library with different capabilities, but the implementation steps below focus on the hosted product.
Teams running Webflow sites with visitors from regulated regions need consent enforcement before any tracking scripts load. Because Osano manages all banner styling, cookie classification, and compliance mode settings from its own dashboard, the Webflow-side setup stays minimal — one script tag and a publish.
The Osano Cookie Consent-Webflow integration supports 3 approaches:
- Code Embed and custom code embed adds the Osano hosted CMP script to your site's head code for site-wide consent management without writing application logic.
- The Osano JavaScript API lets you build consent-driven behaviors like conditional script loading, footer preference links, and CCPA opt-out controls.
- The Webflow and Osano REST APIs give you full control over programmatic script deployment across multiple sites, but require server-side development.
Most implementations start with the custom code embed and add JavaScript API methods as compliance requirements grow.
Add Osano Cookie Consent with custom code
The hosted Osano CMP deploys through a single <script> tag placed in Webflow's site-wide head code. This is the standard approach for any Webflow site that needs cookie consent, and it requires no coding beyond pasting the script. Osano generates the tag in its admin portal after you configure your domain, privacy policy, consent approach, and banner styling. A paid Webflow site plan (Basic or higher) is required because the free Starter plan does not allow custom code on published sites.
To set up the integration:
- Sign up at osano.com and create a new configuration in the Osano Admin Portal. Enter your domain name, link your privacy policy URL, choose your consent approach (GDPR, CCPA, or both), and style your consent banner.
- Copy the generated script tag from the Osano dashboard. It will look like
<script src="https://cmp.osano.com/YOUR-UNIQUE-ID/osano.js"></script>with your actual account and configuration ID. - In Webflow, open your site and go to Site settings > Custom code.
- Paste the Osano script tag into the Head code field as the first script — before any analytics, marketing pixels, or other third-party code.
- Do not add
asyncordeferattributes to the script tag. Per Osano's installation guide, these attributes break Osano's ability to block cookies before they fire. - Click Save changes and publish your site.
- In the Osano Admin Portal, classify all discovered cookies and switch from Listener mode to Permissive or Strict mode.
Once installed, the Osano banner handles several compliance functions automatically:
- Displays a geo-targeted consent banner in the visitor's language (45+ languages supported)
- Blocks non-essential scripts until the visitor grants consent (requires Permissive or Strict mode on a paid Osano plan)
- Records consent choices for regulatory audits
- Supports Google Consent Mode v2, IAB TCF/GPP, and Global Privacy Control signals
Listener mode is the default when you first install Osano, but it does not display a banner or block any scripts. According to Osano's Webflow installation article, you must classify all cookies and switch to a live mode before the site is compliant. The free Osano tier also does not include automated script-blocking or consent storage — production sites with actual cookie blocking requirements need a paid Osano plan.
Customize consent behavior with the Osano JavaScript API
The hosted CMP script exposes a client-side JavaScript API at window.Osano.cm that you can use to build consent-driven behaviors directly in Webflow. This is useful when you need to conditionally load analytics scripts, add a "Cookie Preferences" link to your footer, or implement a CCPA "Do Not Sell" link. All of these patterns work by adding JavaScript to Webflow's head or body custom code sections alongside the main Osano script.
Load scripts based on consent state
Some teams prefer to control exactly which third-party scripts load based on each visitor's consent choices rather than relying entirely on Osano's automatic blocking. The JavaScript API provides getConsent() and event listeners for this purpose.
To conditionally load scripts after consent:
- Add the following code to your site's Custom code > Footer code section (or in a separate
<script>block in the head code, after the Osano script):
window.Osano.cm.ready(function() {
  var consent = window.Osano.cm.getConsent();

  if (consent.ANALYTICS === 'ACCEPT') {
    // Initialize your analytics script here
  }

  if (consent.MARKETING === 'ACCEPT') {
    // Initialize your marketing pixel here
  }
});

window.Osano.cm.addEventListener('osano-cm-consent-saved', function(consent) {
  if (consent.ANALYTICS === 'ACCEPT') {
    // Load analytics if consent was just granted
  }
  if (consent.MARKETING === 'ACCEPT') {
    // Load marketing pixel if consent was just granted
  }
});
- Replace the placeholder comments with your actual script initialization logic (e.g., GA4, Meta Pixel).
The Osano.cm.ready() wrapper is critical — it prevents your code from calling getConsent() before Osano has finished loading. The osano-cm-consent-saved event fires whenever a visitor saves their preferences, so scripts can load in real time after consent is granted. Full event documentation is available in the Osano CMP JavaScript API reference.
Add a cookie preferences link
Many privacy regulations require a way for visitors to revisit their consent choices after the initial banner dismissal. You can wire any Webflow element to reopen the Osano consent drawer.
To add a preferences link:
- In Webflow, add a text link or button element to your footer (or anywhere on the page). Set its element ID to
cookie-prefs-linkusing the element settings panel. - Add this JavaScript to your site's custom code:
document.getElementById('cookie-prefs-link').addEventListener('click', function(e) {
  e.preventDefault();
  window.Osano.cm.showDrawer();
});
This calls showDrawer(), which opens the detailed consent preferences panel where visitors can toggle individual cookie categories.
Add a CCPA "Do not sell" link
California's CCPA requires a "Do Not Sell My Personal Information" link on sites that sell personal data. Osano provides a dedicated UI for this.
To add the link:
- Add a text link to your Webflow footer with the ID
do-not-sell-link. - Add this JavaScript to your site's custom code:
document.getElementById('do-not-sell-link').addEventListener('click', function(e) {
  e.preventDefault();
  window.Osano.cm.showDoNotSell();
});
The showDoNotSell() method opens Osano's built-in CCPA opt-out interface. No additional configuration is needed in Webflow — the opt-out behavior is managed entirely through Osano's admin portal.
Build with the Webflow and Osano APIs
For teams managing multiple Webflow sites or automating compliance deployment, the Osano Customer REST API and Webflow Data API provide programmatic control over the entire setup. This approach requires server-side development and is intended for developers building internal tools or agency platforms that deploy Osano across many client sites at once.
The relevant APIs for this integration are:
- The Osano Customer REST API handles configuration management, cookie discovery retrieval, rule creation, and publishing. Authentication uses an
x-osano-api-keyheader with keys generated at my.osano.com/api-keys. - Webflow's Data API handles custom code registration and deployment to sites and pages. Authentication uses Bearer tokens with
custom_code:readandcustom_code:writescopes. - Webflow webhooks can trigger events when site content changes, though the primary value for this integration is on the Osano side — Osano's publish endpoint accepts a
webhookUrlparameter that sends a callback when a new CMP configuration goes live.
For server-side automation across multiple sites, use the Osano Customer REST API with the Webflow Data API; for in-browser consent-driven behavior on a Webflow site, use the Osano JavaScript API.
Deploy Osano across Webflow sites programmatically
This pattern is useful for agencies or internal platform teams that need to install and configure Osano on multiple Webflow sites without logging into each site's dashboard manually.
To implement programmatic deployment:
- Retrieve your Osano configuration ID by calling
GET https://api.osano.com/v1/cookie-consent/configswith your API key. - Register the Osano hosted script in Webflow by calling
POST https://api.webflow.com/v2/sites/{siteId}/registered_scripts/hostedwith your Osano CDN URL. - Retrieve existing custom code from the Webflow site with
GET https://api.webflow.com/v2/sites/{siteId}/custom_code— this is critical because the update endpoint replaces all existing code blocks. - Apply the Osano script alongside any existing code blocks with
PUT https://api.webflow.com/v2/sites/{siteId}/custom_code. - Publish the Osano configuration by calling
POST https://api.osano.com/v1/cookie-consent/configs/{configId}/publish. Include awebhookUrlin the request body to receive a callback when the publish completes.
This workflow lets teams deploy Osano across many Webflow sites while preserving existing custom code.
The Webflow custom code PUT endpoint replaces all existing custom code blocks on the site. Always GET the current blocks first and include them in your update payload to avoid overwriting other scripts.
What you can build with the Osano Cookie Consent Webflow integration
Integrating Osano Cookie Consent with Webflow lets you add regulatory cookie compliance to any Webflow site without building consent infrastructure from scratch.
- Geo-targeted consent banners: Deploy a cookie banner that automatically displays in the correct language and follows the correct legal framework based on each visitor's location. A Webflow site serving visitors in both Germany and California shows GDPR-style opt-in consent to German visitors and CCPA opt-out notices to California visitors, all from one script tag.
- Consent-aware analytics loading: Gate Google Analytics 4, Meta Pixel, or any marketing script behind visitor consent so tracking cookies only fire after explicit permission. A SaaS marketing site can use the
osano-cm-consent-savedevent listener to load GA4 only after a visitor accepts the Analytics category, avoiding compliance violations from premature cookie setting. - Self-service compliance for non-technical teams: Give legal and marketing teams direct control over cookie classifications, banner text, and compliance modes through the Osano dashboard with no Webflow publishing or developer involvement required. An agency can hand off the Osano login to a client's legal team for ongoing consent management after the initial site build.
- CCPA "Do not sell" implementation: Add a compliant "Do Not Sell My Personal Information" link to any Webflow page by wiring a footer element to Osano's
showDoNotSell()method. An ecommerce store built on Webflow can meet California's CCPA requirements with a single JavaScript call attached to a footer link.
If you need more control over deploying consent configurations across multiple sites or automating cookie rule management, the API integration path covers those cases with full flexibility.
Frequently asked questions
Yes. Osano requires a script tag in your site's head code, and Webflow's free Starter plan does not allow custom code on published sites. The Basic site plan is the minimum required tier. See Webflow's custom code documentation for details on plan requirements and custom code capabilities.
Paste it in Site settings > Custom code > Head code as the first script before any other third-party code. Do not add
asyncordeferattributes. These attributes prevent Osano from blocking non-essential cookies before they load. Do not use Google Tag Manager to load the script either, as Osano cannot confirm compliance when loaded through GTM.The most common cause is that Osano is still in Listener mode, which is the default. Listener mode does not display a banner, block scripts, or delete cookies. You need to classify all discovered cookies in the Osano Admin Portal and switch to Permissive or Strict mode. Also, verify you are testing on your published domain, not in the Webflow canvas, which does not render custom code.
No. All banner customization — colors, text, button styles, and positioning — is managed through the Osano Admin Portal, not in Webflow. The banner renders as an overlay controlled entirely by the Osano script.
There are three common causes. First, the Osano script tag is not the first entry in your Head code section, so other scripts may execute before it. Second, analytics were added through Webflow's built-in integrations panel rather than through custom code, which loads through a separate mechanism. Third, the Osano script tag has
asyncordeferattributes. To fix this, add all third-party scripts through custom code (not the integrations panel), place the Osano tag first, and remove anyasync/deferattributes.
Description
Osano Cookie Consent adds GDPR, CCPA, and 95+ privacy law compliance to Webflow through a single script tag. Handles cookie discovery, script-blocking, geo-targeted banners in 45+ languages, and consent record storage — all managed from the Osano dashboard.
This integration page is provided for informational and convenience purposes only.
Consent Pro by Finsweet
Connect Consent Pro with Webflow to manage cookie consent and privacy compliance directly inside your Webflow project.
Axeptio
Connect Axeptio, a consent management platform, with Webflow to add customizable cookie consent banners and block tracking scripts until visitors opt in.

DataGrail Consent
Connect DataGrail Consent with Webflow to manage cookie consent and stay compliant with GDPR, CCPA, and other privacy regulations.
Clawdia AI
Generate legal documents like privacy policies, terms of service, and client contracts without hiring a lawyer for every template. Clawdia AI provides contract drafting, document generation, and legal guidance specifically for US-based small and medium-sized businesses. Set up your Clawdia AI and Webflow integration by installing the Clawdia AI app from the Webflow Marketplace. This link-based integration opens Clawdia's external dashboard where you generate documents, export them as PDFs, and upload them to Webflow CMS Collections or static pages.
Flowstar Age Verification
Connect Flowstar Age Verification with Webflow to add age verification gates to sites for alcohol, cannabis, tobacco, or adult content.
DocuSign
Integrate DocuSign's e-signature platform with Webflow to send signature requests and track document status from your website. Send signature requests, track document status, and collect legally binding agreements through automated API-triggered workflows.
Osano Cookie Consent
Implement GDPR and CCPA-compliant cookie consent on your Webflow site with Osano's powerful consent management platform, enabling automatic cookie blocking, customizable consent banners, and comprehensive compliance reporting without coding.
Iubenda Privacy & Cookie Policy
Automate privacy compliance for your Webflow site with Iubenda's comprehensive privacy and cookie policy solutions. Generate GDPR, CCPA, and LGPD-compliant policies, display customizable cookie banners, and manage user consent — all without complex coding.
Openli (formerly Legal Monster)
Connect Openli’s automated compliance platform with Webflow to add GDPR-compliant cookie consent banners and privacy management while maintaining complete design control over consent experiences.
Related integrations
Get started for free
Try Webflow for as long as you like with our free Starter plan. Purchase a paid Site plan to publish, host, and unlock additional features.
