

Chatwoot
Connect Chatwoot, an open-source customer support platform, with Webflow to add live chat, AI-assisted replies, and a shared multi-channel inbox covering email, WhatsApp, Instagram, and more.
Chatwoot drops a live chat widget onto any page of your site and routes conversations into a shared inbox alongside email, WhatsApp, Instagram, and other channels—so a visitor with a question on your pricing page gets an answer before they bounce. Setup is a short JavaScript snippet pasted into the custom code Footer Code field under Site Settings. No plugins, no marketplace apps.
It's a fit for founders running their own support, marketing teams capturing leads from landing pages, agencies deploying chat across client sites, and SaaS or e-commerce operators who need multilingual support and AI-assisted replies.
How to integrate Chatwoot with Webflow
What is Chatwoot? Chatwoot is an open-source customer support platform available as a cloud service or a self-hosted deployment. It unifies website live chat, email, WhatsApp, Instagram, Facebook Messenger, Telegram, and other channels into a single agent dashboard. Chatwoot also includes AI features such as Captain that can draft responses, summarize conversations, and handle common questions from your knowledge base.
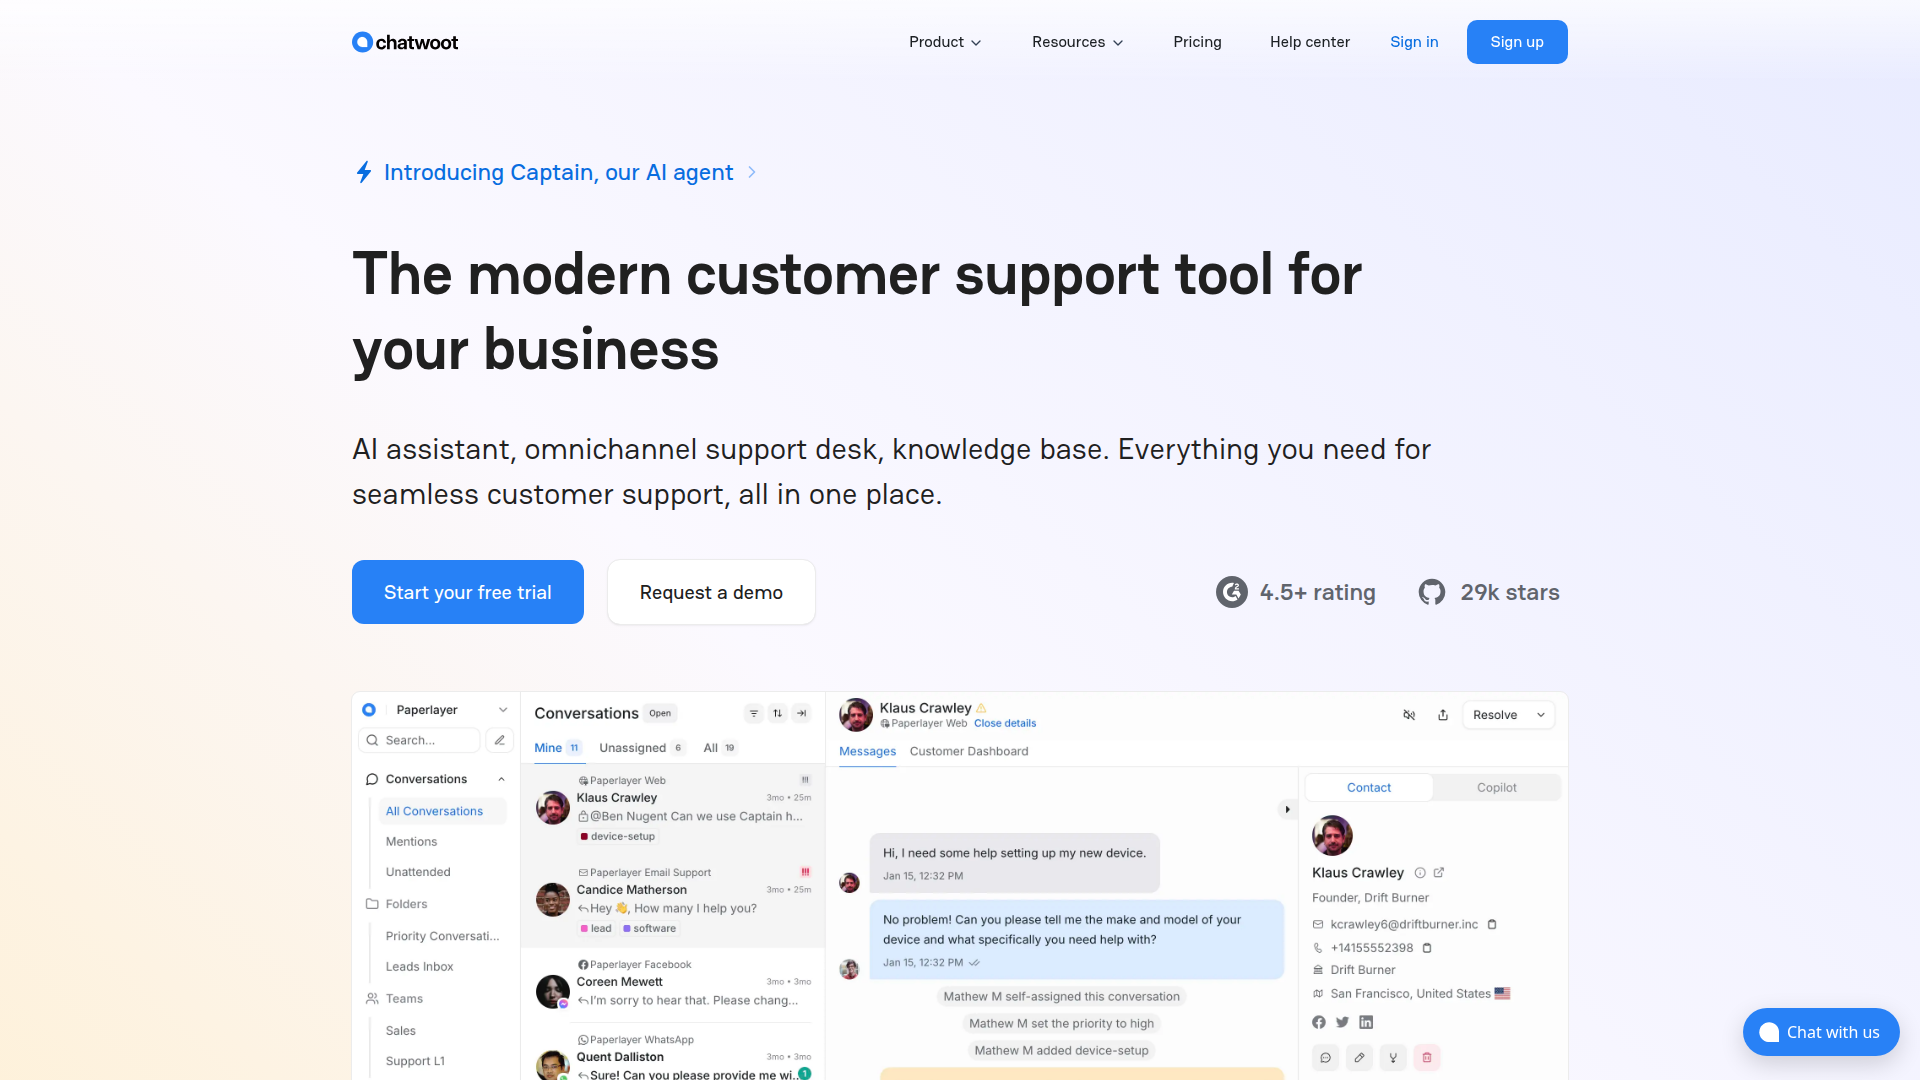
Teams use Chatwoot on Webflow sites to talk with visitors while they browse, collect contact information through pre-chat forms, and route conversations to the right agent or team. The combination turns a static marketing site into an active support and lead-qualification point.
You can connect Chatwoot to your site in 3 ways:
- The Chatwoot widget script adds live chat by pasting code into your site settings or individual pages.
- Automation workflows can route form submissions and CMS events to Chatwoot's API for contact creation and conversation routing.
- The Webflow Data API and Chatwoot API let you sync data between systems—including form-to-contact pipelines, CMS-based ticket tracking, and visitor identification—but require server-side development.
Most implementations start with the widget script and add automation or API integrations as needs grow.
Add the Chatwoot widget with custom code
Paste the widget loader script into Site Settings > Custom Code to add Chatwoot to your site. The options available depend on your current plan, and the whole process takes about five minutes. Chatwoot's official Webflow installation guide walks through it step by step. You can deploy the widget site-wide through Site Settings, target specific pages using Code Embed elements, or manage it through Google Tag Manager for more flexibility.
[image placeholder]
Site-wide deployment via site settings
Placing the Chatwoot widget in Site Settings puts it on every page of your site. This is the standard site-wide method documented by Chatwoot.
To generate and install the widget script:
- Log in to your Chatwoot account and go to Settings > Inboxes > New Inbox.
- Select Website as the channel type, enter your website name, and click Create Inbox.
- Open the Configuration tab of the new inbox and copy the generated script.
- Open your site and click Site Settings (the gear icon).
- Go to the Custom Code tab and scroll to Footer Code.
- Paste the Chatwoot script into the Footer Code field and click Save Changes.
- Click Publish and select your domain to push the changes live.
- Visit your published site to confirm the chat widget appears.
When you put the script in Footer Code rather than Head Code, your page content loads before the chat JavaScript executes. The widget still works the same way, but it doesn't block page rendering. Custom code only runs on the published site, not in the Designer canvas or preview mode.
Page-specific deployment with Code Embed
When you only need chat on certain pages (pricing, contact, or checkout), a Code Embed element keeps the widget off the rest of your site.
To add the widget to a specific page:
- Open the target page in the Designer.
- From the Add panel, drag a Code Embed element onto the page.
- Double-click the element to open the code editor.
- Paste the Chatwoot script (including
<script>tags) and click Save & Close. - Publish the page.
This avoids loading the widget JavaScript on pages where chat isn't needed. Code Embed elements support up to 50,000 characters, well beyond what the Chatwoot snippet requires.
Google Tag Manager deployment
Google Tag Manager lets you manage the Chatwoot widget without touching your site after the initial GTM setup. You can update, pause, or remove the chat widget entirely from the GTM interface. Once GTM is in place, you can manage the widget from there without republishing your site.
To install via GTM:
- Log in to Google Tag Manager and open your container.
- Click Add a new tag and rename it (for example, "Chatwoot").
- Click Tag Configuration, select Custom HTML, and paste your Chatwoot script.
- Click Triggering, select All Pages (or create a custom trigger for specific pages).
- Click Save, then Submit, enter a version name, and click Publish.
- Refresh your live site to confirm the widget appears.
GTM also supports trigger conditions that fire the widget only on specific URLs. This gives you page-level control similar to Code Embed, managed entirely outside the Designer.
Customize the widget from the Chatwoot dashboard
Once the script is installed, all visual customization happens in the Chatwoot dashboard at Settings > Inboxes > your inbox > Widget Builder tab. You don't need to touch code or republish your site. You can configure widget color, screen position (left or right), bubble type (standard circle or expanded pill with custom text), dark mode (auto-adapts to the visitor's OS preference), and display language (50+ languages supported).
For more detailed control, add a window.chatwootSettings block before the loader script in your Footer Code field:
<script>
  window.chatwootSettings = {
    position: "right",
    locale: "en",
    type: "standard",
    darkMode: "auto"
  };
</script>
The SDK also supports options like hideMessageBubble, showUnreadMessagesDialog, welcomeTitle, welcomeDescription, and message strings for online and offline states. The complete configuration reference is in Chatwoot's SDK settings documentation.
Build with the Webflow and Chatwoot APIs
If you need direct control over data flow between your site and Chatwoot, both platforms expose REST APIs that cover form capture, contact creation, conversation management, and CMS synchronization. This path needs server-side development and works best when you have developer resources or custom requirements that automation tools can't handle.
The relevant APIs:
- The Chatwoot Application API handles contacts, conversations, messages, labels, custom attributes, and webhook subscriptions
- The Webflow Data API handles CMS collections, form submissions, and site publishing
- Webhooks trigger real-time events for form submissions, CMS item changes, and e-commerce orders
Together, these interfaces cover the main data paths involved in a custom Webflow–Chatwoot integration.
Both APIs use token-based authentication. Chatwoot uses api_access_token headers; the Data API uses Authorization: Bearer headers. All Data API calls must use the /v2/ prefix, since the v1 API was deprecated in March 2025.
Sync Webflow form submissions to Chatwoot contacts
Sending form data to Chatwoot as new contacts with auto-created conversations is the most common API integration pattern. This gives agents immediate context about where the lead came from and what they submitted.
To implement this with webhooks:
- Register a
form_submissionwebhook viaPOST /v2/sites/{site_id}/webhookswith your server URL as the target. You'll need thesites:writescope. - When a form payload reaches your server, verify the
x-webflow-signatureHMAC header and reject any request whosex-webflow-timestampis more than five minutes older than your server's current time. - Search for the contact in Chatwoot using
GET /api/v1/accounts/{id}/contacts/search?q={email}to avoid duplicates. - If the contact is new, create it with
POST /api/v1/accounts/{id}/contacts, mapping form fields toname,email, andphone_number. - Create a Contact Inbox record with
POST /api/v1/accounts/{id}/contacts/{id}/contact_inboxesto get thesource_idrequired for conversations. This step is a prerequisite that the Chatwoot conversation docs call out. - Create a conversation using the
source_idfrom the previous step, and attach form metadata as custom attributes.
If you don't have a webhook server, polling works too. Call GET /v2/sites/{site_id}/forms/{form_id}/submissions on a schedule to check for new entries, then follow the same contact and conversation creation sequence.
Sync Chatwoot conversation data back to Webflow CMS
When a conversation resolves in Chatwoot, you can update a "Support Tickets" or "Leads" collection in the CMS to keep a public or internal record.
To implement bidirectional syncing:
- Register a Chatwoot webhook at
POST /api/v1/accounts/{id}/webhooks, subscribing toconversation_createdandconversation_status_changedevents. - When your server receives a
conversation_status_changedpayload withstatus: "resolved", usePATCH /v2/collections/{id}/items/{item_id}to update the corresponding CMS item's status field. - Publish the updated item with
POST /v2/collections/{id}/items/publish.
Verify Chatwoot webhook signatures using the X-Chatwoot-Signature HMAC header and the X-Chatwoot-Timestamp to block spoofed requests. Chatwoot's webhook documentation covers the full event list and payload structure.
Identify known visitors in the chat widget
For sites with authenticated users, you can pass visitor identity data to Chatwoot so chat history persists across sessions. You'll need to generate an HMAC hash on your server using Chatwoot's identity validation secret.
To set up visitor identification:
- Find your HMAC secret in the Chatwoot dashboard at Inboxes > Settings > Configuration > Identity Validation.
- Generate the hash server-side using the visitor's unique identifier. In Node.js:
crypto.createHmac('sha256', 'YOUR_HMAC_SECRET').update('USER_IDENTIFIER').digest('hex'). - In your page's custom code (before
</body>), callwindow.$chatwoot.setUser()after thechatwoot:readyevent, passing the visitor's unique identifier, name, email, and the generatedidentifier_hash.
This prevents impersonation and links all conversations to a verified identity. Full setup details are in Chatwoot's identity validation documentation.
Use cases for the Chatwoot Webflow integration
Connecting Chatwoot to your site turns static pages into active support and lead-capture points without a separate backend.
- Real-time lead capture on landing pages: Add a pre-chat form to your pricing or demo pages that collects visitor name and email before a conversation begins. Agents see the lead in Chatwoot's inbox with full context about which page triggered the chat.
- Proactive visitor engagement with campaigns: Configure Chatwoot's Campaigns feature to send an automated message when a visitor spends a set amount of time on a specific page. A pricing page campaign might ask "Have questions about plans?" and connect the visitor to a sales agent directly.
- CMS-backed support ticket tracking: Create a "Support Tickets" collection in the CMS and sync conversation status from Chatwoot via API. Resolved tickets update automatically, and you can display ticket status on a client-facing portal page using a Collection List.
- Multi-channel inbox for agency client sites: Deploy one self-hosted Chatwoot instance with separate inboxes for each client site. Each client gets its own agents, branding, and routing rules, managed from a single Chatwoot dashboard.
If you need more direct control over data mapping between your forms and Chatwoot conversations, the API integration path handles those cases.
Frequently asked questions
The three most common causes are: the site has not been published after adding the script, the script is in the wrong location, or no agents are assigned to the inbox. Custom code only executes on the published live site, not in the Webflow canvas or preview mode. Confirm your script is in Site Settings > Custom Code > Footer Code, then publish. In Chatwoot, go to Settings > Inboxes > your inbox > Collaborators and verify you are added as an agent. Even administrators must be assigned to an inbox to see its conversations. Chatwoot's live chat settings guide covers the full troubleshooting steps.
For standard custom code injection, you need a Webflow plan that supports custom code. Webflow's free Starter plan does not run custom scripts, and there is no error message when it fails. If you install Chatwoot through Google Tag Manager, GTM is an alternative installation path and can handle later widget changes outside Webflow after the initial setup.
Yes. Use page-level custom code or a Code Embed element instead of the site-wide Footer Code field. Place the Chatwoot script only on the pages where you want chat to appear. If you use Google Tag Manager, you can create trigger conditions that fire the widget on specific URLs. You can also run multiple Chatwoot inboxes on the same site (for example, Sales on the pricing page and Support on the help page) by using different widget scripts per page. Chatwoot's adding inboxes documentation explains how to configure separate inboxes.
No. Chatwoot does not have a one-click installable app on the Webflow Apps Marketplace. It is listed in Webflow's integration directory under the "Customer engagement" category, but this is an informational listing only. The integration method is the manual JavaScript snippet described in Chatwoot's Webflow installation guide.
The widget bundle is a notable file size. A GitHub issue (#4828) reports it exceeding 600KB. Placing the script in Footer Code (before
</body>) rather than Head Code is the standard mitigation, since it loads the widget after page content renders. For sites where chat is only relevant on a few pages, use page-level Code Embed elements instead of site-wide deployment to avoid loading the bundle on every page. That keeps the script limited to the pages where it is most useful.
Description
Chatwoot adds a live chat widget and multi-channel inbox to Webflow through a JavaScript snippet in site settings. Conversations from chat, email, WhatsApp, and social channels route to a single agent dashboard with AI-assisted replies and pre-chat lead capture.
This integration page is provided for informational and convenience purposes only.
Connect WhatsApp, Meta's business messaging platform, with Webflow to add chat buttons, trigger automated messages from form submissions and orders, and build real-time customer communication into any page.
FullContext
FullContext provides an embeddable JavaScript solution that handles conversational interfaces through a single code snippet, eliminating the need to build chat infrastructure or maintain form validation logic.
ManyChat
Connect ManyChat, a chat marketing and messenger automation platform, with Webflow to route form submissions into messaging flows and trigger conversations across Instagram, Messenger, and WhatsApp.
Zendesk Chat (Zopim)
Connect Zendesk Messaging, a live chat and AI-powered support platform, with Webflow to add a chat widget, bot responses, help center search, and persistent conversations to any page.
Zendesk
Connect Zendesk, a cloud-based customer service platform, with Webflow to add live chat, AI-assisted messaging, and ticket creation to any page on your site.
Website Toolbox Forum
Connect Website Toolbox Forum, a hosted community discussion platform, with Webflow to embed threaded forums, user management, and moderation tools on any page without backend code.
UserVoice
Connect UserVoice's powerful feedback management platform with Webflow to collect user insights, prioritize feature requests, and build customer-driven websites. Transform visitor feedback into actionable improvements with voting systems, roadmap transparency, and seamless design integration.
Trustpilot
Build trust and credibility by showcasing authentic customer reviews on your Webflow site. Connect Trustpilot's review platform to display ratings, collect feedback automatically, and boost conversions with social proof that updates in real-time.
Storylane
Connect Storylane, a demo automation platform, with Webflow to embed interactive product tours as inline demos, click-to-launch overlays, or popup modals on landing pages and CMS-driven galleries.
Related integrations
Get started for free
Try Webflow for as long as you like with our free Starter plan. Purchase a paid Site plan to publish, host, and unlock additional features.
