Chat Everywhere

Connect Chat Everywhere with Webflow to add a floating chat button that routes visitors to WhatsApp, Messenger, SMS, and other messaging platforms.

Install app
View website
View lesson
A record settings
CNAME record settings
Chat Everywhere

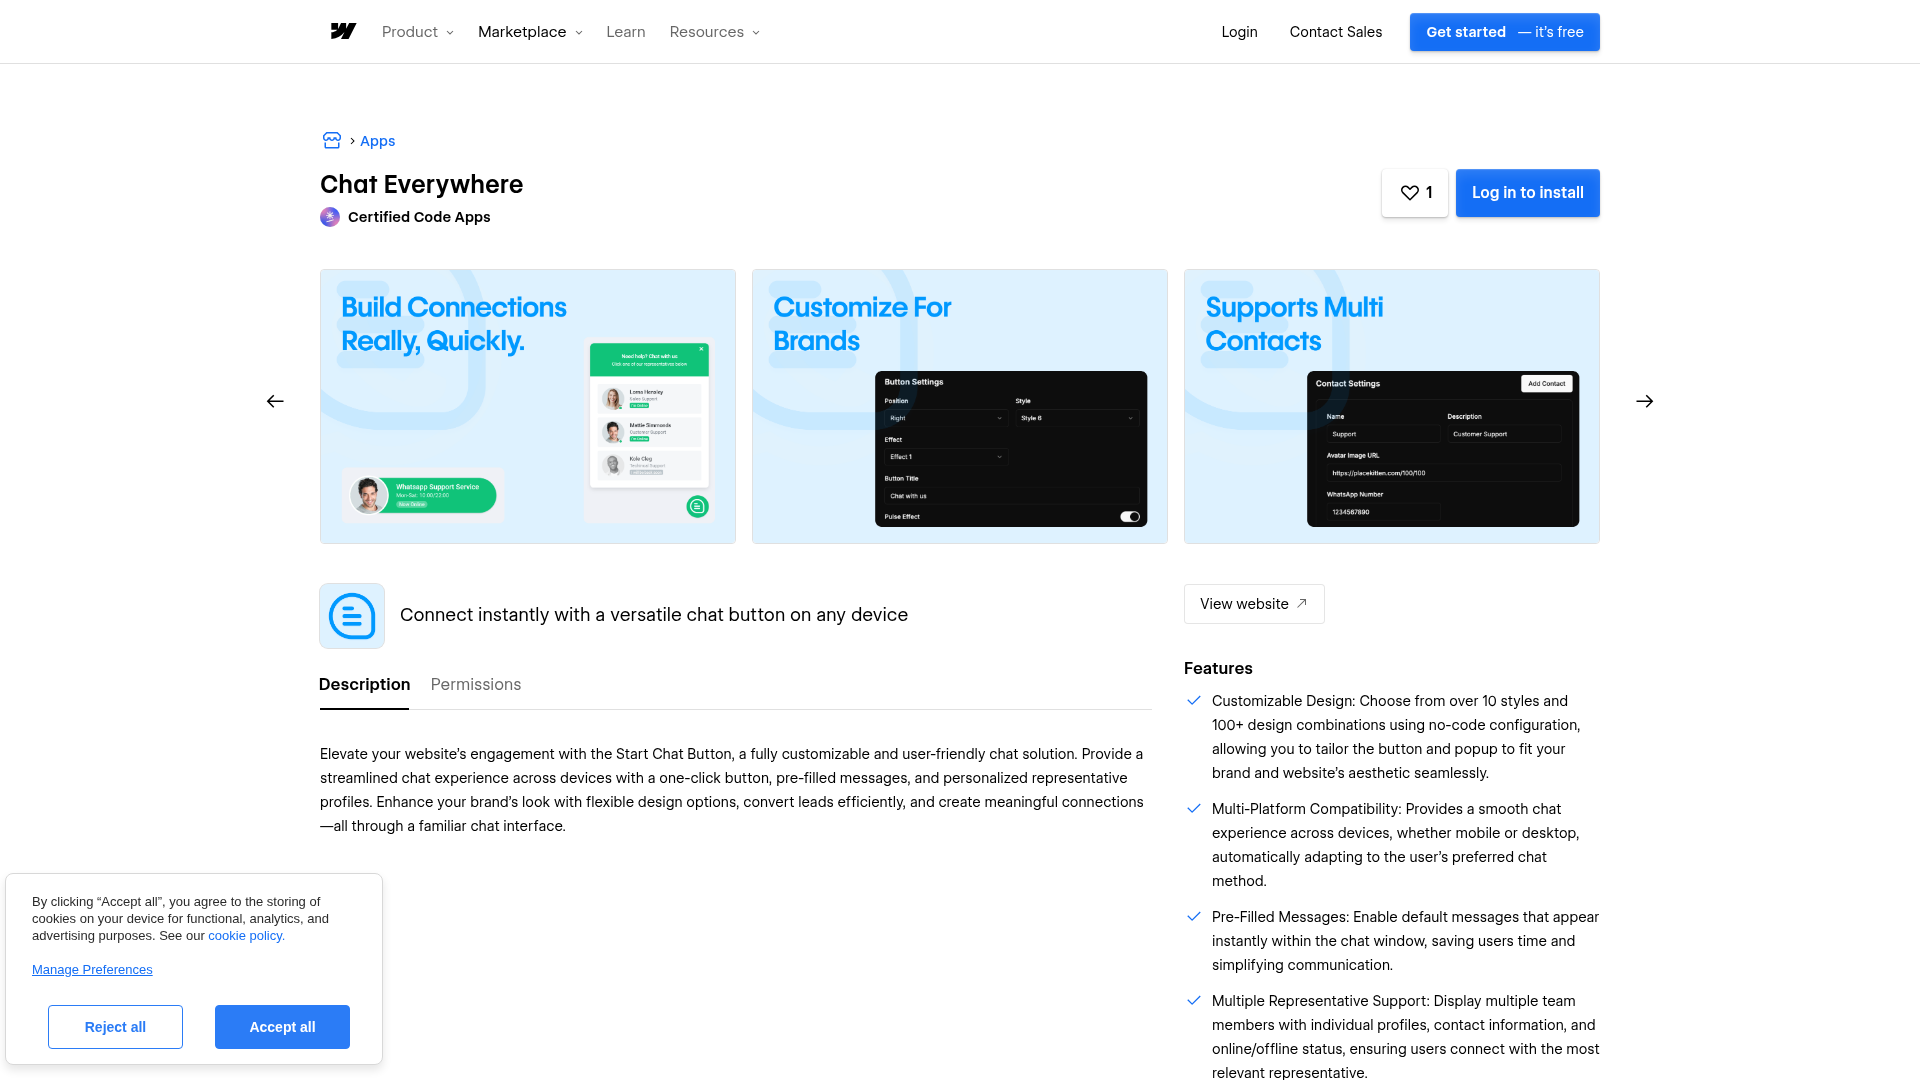
Chat Everywhere by Certified Code drops a floating chat button onto your Webflow site that routes visitors straight into WhatsApp, Facebook Messenger, SMS, or another preferred app with the message pre-filled and the right team member's contact info already loaded. Install it from the Webflow App Marketplace, no code required.

It's a fit for freelancers, agencies, and small business owners who want direct messaging without building a custom chat system. Service businesses with multiple staff, e-commerce operators handling pre-sales questions, and teams in WhatsApp-heavy markets get the most out of multi-platform routing and per-representative scheduling.

How to integrate Chat Everywhere with Webflow

What is Chat Everywhere? Chat Everywhere is a multi-platform messaging button widget built by Certified Code Apps. It displays a floating chat button that connects visitors to WhatsApp, Facebook Messenger, SMS, and other messaging platforms. The widget supports multiple team representative profiles, pre-filled messages, online/offline scheduling, and over 100 design combinations you can set up without code.

Add Chat Everywhere to your site when you want visitors to reach a real person through familiar messaging apps rather than filling out a static form. The widget routes visitors to WhatsApp, Messenger, or another configured platform. Visitors click the button on your published site and land in a conversation on the platform you've configured. Your team member's contact info and a contextual opening message are pre-loaded.

You have 2 primary ways to add Chat Everywhere to your site:

  • The Chat Everywhere app deploys the widget and lets you set it up without writing code.
  • Custom code embedding lets you place the widget site-wide, on a single page, or at a specific position within a page layout.

You can also use the Data API v2 to build server-side workflows around chat-related data. For example, you can log form submissions or write conversation records to CMS collections. This path requires server-side development and doesn't integrate with the widget itself.

Most implementations use the marketplace app. Custom code methods give you more control over widget placement. Reach for the API path when you need to connect external data sources to your site programmatically.

Install the Chat Everywhere app

Install the Chat Everywhere app from the App Marketplace to add the widget without any embed code or manual script setup. The app injects its own script automatically after you authorize it, and you handle all setup through the app's visual interface. For the widget to appear on a live published site, your site plan needs to support live custom code.

To set up the integration:

  1. Go to the Chat Everywhere marketplace listing and click Log in to install.
  2. Select the site you want to add the widget to.
  3. Review and authorize the app's three permissions: read and write custom code, read authorized user information, and read site data and publishing status.
  4. Set up your chat button appearance, messaging platforms, and representative profiles through the app's interface.
  5. Publish your site. The chat button shows only a placeholder in the canvas, so use Preview mode to verify rendering before you publish.

The app gives you access to all Chat Everywhere features through a no-code interface:

  • Over 10 button styles and 100+ design combinations
  • Pre-filled message templates for contextual conversation starters
  • Multiple team representative profiles with names, avatars, and contact info
  • Per-representative online/offline status with day-of-week scheduling
  • Automatic mobile and desktop adaptation

All of these settings take effect once you publish your site.

The app deploys the widget to every page on your site automatically. If you need the widget on specific pages only, or at a fixed position within a page layout, use the custom code methods below.

Add Chat Everywhere with custom code

Use custom code embedding when you need control over where the Chat Everywhere widget loads. You can deploy it across every page from site settings or restrict it to a single page. A Code Embed element lets you place it at a specific spot in your layout. For all three paths, you need a paid site plan and your Chat Everywhere embed script, which you grab from your Chat Everywhere account dashboard.

Add the widget site-wide

Use site-level custom code injection to display the chat button on every page. Choose this when you want visitors to reach your team from anywhere on the site.

To add the widget site-wide:

  1. Open your site's dashboard and go to Site Settings.
  2. Click the Custom Code tab.
  3. Scroll to the Footer Code section and paste your Chat Everywhere embed script.
  4. Click Save Changes.
  5. Publish your site.

Place the script in Footer Code rather than Head Code. Scripts in the footer load after page content renders, which avoids blocking the initial page display. The Chat Everywhere integration guide recommends footer placement.

Add the widget to a single page

Use page-level custom code to restrict the widget to one specific page. This works well when you only want the chat button on a contact page, pricing page, or landing page.

To add the widget to a single page:

  1. Open your site in the Designer and go to the Pages panel.
  2. Click the gear icon next to the target page to open Page Settings.
  3. Scroll to the Custom Code section.
  4. Paste your Chat Everywhere embed script in the Before tag field.
  5. Save changes and publish your site.

Page-level code loads after any site-wide custom code in the HTML output.

Place the widget at a specific position with a Code Embed element

Use a Code Embed element when you want the widget at an exact location within your page layout. Reach for this when you want the chat entry point inside a specific section rather than as a floating overlay.

To place the widget with a Code Embed element:

  1. Open the target page in the Designer.
  2. Click the Add Elements panel (the + icon).
  3. Drag a Code Embed element (</>) onto the canvas at your desired position.
  4. Double-click the element to open the code editor.
  5. Paste your Chat Everywhere embed script.
  6. Click Save & Close.
  7. Publish your site.

JavaScript inside Code Embed elements shows only a placeholder on the canvas. The widget renders fully on the published site. Don't include <html>, <body>, or <head> tags inside a Code Embed element — they break the page's HTML structure. You can only use HTML, CSS inside <style> tags, and JavaScript inside <script> tags.

Build with the Data API

Use the Data API v2 for custom data workflows alongside Chat Everywhere. Chat Everywhere has no public API, so you can't run server-to-server integration with the widget itself through documented means. You can still log inquiries or update CMS records based on external events. This path requires server-side development.

Available API resources for building alongside Chat Everywhere:

  • The Data API v2 reads and writes to CMS collections
  • Webhooks trigger real-time notifications for events like form submissions and CMS item changes

These two surfaces support custom data workflows built around the widget.

Authenticate all API requests with Bearer tokens generated in Site Settings > Apps & Integrations > API Access. The current Data API version is v2.

Log form submissions alongside chat interactions

If your site uses both a native form and the Chat Everywhere widget, you can capture form submission data through webhooks. Route it to your CRM or database in parallel with messaging conversations.

To register a form submission webhook:

  1. Generate a site API token with sites:write scope in Site Settings > Apps & Integrations > API Access > Generate API Token.
  2. Send a POST request to /v2/sites/:site_id/webhooks with the following body:
{
  "triggerType": "form_submission",
  "url": "https://your-endpoint.example.com"
}
  1. Validate incoming payloads by checking the x-webflow-signature header against your signing key.

Each webhook delivery includes the form name, submitted field data, and a timestamp. Failed deliveries retry automatically.

Write chat context to the CMS

If you build middleware that captures conversation data from external messaging platforms like the WhatsApp Business API, you can write records to a CMS collection and display them with a Collection List. This gives you a browsable log of inquiries on your site.

To create a CMS item:

  1. Send a POST request to /v2/collections/:collection_id/items with your fieldData payload (name, slug, and any custom fields).
  2. Items are staged as drafts by default. To create an item published directly to the live site, use POST /v2/collections/:collection_id/items/live instead. To publish existing staged items, use POST /v2/collections/:collection_id/items/publish.
  3. Bulk operations support multiple items per request.

This gives you a browsable log of inquiries on your site.

This approach requires custom server-side code because Chat Everywhere doesn't emit API calls or webhook events. Conversation data originates in the messaging platform's own API (WhatsApp Business API, Messenger Platform, etc.).

What can you build with the Chat Everywhere Webflow integration?

When you integrate Chat Everywhere with your site, you give visitors a one-click path to a live conversation on their preferred messaging app — no custom chat infrastructure needed.

  • Multi-channel contact hub: Replace a static "Contact Us" page with a floating button that routes visitors to WhatsApp, Messenger, or SMS based on their preference. Pre-filled messages can reference the page the visitor is on, giving your team immediate context.
  • Team directory with live availability: Set up multiple representative profiles with names, photos, and individual schedules. Visitors see who is available and can message the right person directly. A consulting firm could list partners by specialty with separate WhatsApp numbers and office-hours schedules.
  • Multi-site client deployment: Deploy branded chat buttons across multiple client sites at no per-site cost. The 100+ design combinations and no-code setup let you match each client's visual identity without building custom widgets.
  • Product-specific pre-sales routing: On e-commerce or service pages, set up pre-filled messages that reference specific products or services. A visitor on a pricing page sends "I have a question about the Pro plan" rather than a generic "hello," so your sales team can respond with context already established.

If you need more control over logging conversations to CMS collections or triggering workflows from form submissions, the API integration path covers those cases.

Frequently asked questions

  • For the widget to run on a live published site, your Webflow setup needs support for live custom code. The free Starter plan blocks custom code on live domains. You can test the widget in preview mode without a paid plan, but it will not appear on your published site until you upgrade.

  • Chat Everywhere on the Webflow App Marketplace is a messaging routing widget that sends visitors to external messaging platforms like WhatsApp, Messenger, and SMS. Certified Code does publish AI-powered chat products (GPT-based and Gemini-powered). Those are available only on Wix and are not installable on Webflow.

  • The widget usually does not appear because the site was not published after the embed code was added. Custom code only executes on published pages, not in the Webflow canvas. If you have published and the widget still does not appear, check four things. Confirm you have a paid Webflow plan. Open your browser console and look for JavaScript errors. Verify the embed code is in the Footer Code section (not Head Code). Confirm your Chat Everywhere account is active. The integration troubleshooting checklist covers each of these steps.

  • Place it in the footer. The Chat Everywhere integration guide instructs you to paste the script in the Footer Code section under Site Settings > Custom Code. Scripts in the footer load after page content renders. This prevents the chat widget from blocking the initial page display. Scripts placed in Head Code can delay visible content from appearing.

Chat Everywhere
Chat Everywhere
Joined in

Description

Add a floating chat button to your Webflow site that connects visitors to WhatsApp, Facebook Messenger, SMS, and other messaging apps through one-click routing.

Install app

This integration page is provided for informational and convenience purposes only.


Other Customer engagement integrations

Other Customer engagement integrations

Flowstar Click to Call

Flowstar Click to Call

Connect Flowstar Click to Call with Webflow to add mobile-optimized phone buttons that convert visitors into callers with a single tap.

Customer engagement
Learn more
Social Intents

Social Intents

Connect Social Intents with Webflow to chat with website visitors directly from Microsoft Teams, Slack, or Google Chat without separate agent software.

Customer engagement
Learn more
Poper

Poper

Connect Poper with Webflow to deploy AI-powered popups that capture leads, reduce cart abandonment, and increase conversions through behavioral targeting.

Customer engagement
Learn more
ChatSale

ChatSale

Connect ChatSale with Webflow to add ChatGPT-driven chatbots to a site for automated lead capture and qualification.

Customer engagement
Learn more
Salespeak

Salespeak

Connect Salespeak with Webflow to deploy chat widgets with AI-powered lead qualification that engage visitors and sync conversation data to CRM systems.

Customer engagement
Learn more
Smartarget Countdown Popup

Smartarget Countdown Popup

Connect Smartarget Countdown Popup with Webflow to display time-limited offers and event deadlines through JavaScript embed codes.

Customer engagement
Learn more
Announcement Bar

Announcement Bar

Connect Announcement Bar by Smartarget with Webflow to display promotional notifications, shipping thresholds, and time-sensitive offers across your site through JavaScript embedding.

Customer engagement
Learn more
Massively AI

Massively AI

Connect Massively AI, an AI-powered chatbot platform, with Webflow to automate customer support and qualify leads through conversational marketing on your site.

Customer engagement
Learn more
Flowstar Spin Wheel Gamification

Flowstar Spin Wheel Gamification

Connect Flowstar Spin Wheel’s gamification widget platform with Webflow to add interactive pop-ups that capture leads in exchange for discount codes and rewards.

Customer engagement
Learn more

Related integrations

No items found.

Get started for free

Try Webflow for as long as you like with our free Starter plan. Purchase a paid Site plan to publish, host, and unlock additional features.

Get started — it’s free