

Attio
Connect Attio, a CRM for go-to-market teams, with Webflow to turn form submissions into CRM records with enriched contact data, pipeline stage assignments, and automated follow-up tasks.
Webflow sites collect form submissions, but the data stays trapped inside Webflow with no built-in way to push contacts, companies, or deals to a CRM. Connecting Attio with Webflow turns those submissions into CRM records automatically, landing new contacts in your pipeline with enriched company data, submission notes, and stage assignments based on your workflow rules.
The connection works through automation platforms like Zapier, embeddable form tools with native Attio sync, or direct API calls for custom implementations. It fits B2B SaaS teams capturing demo requests, agencies running client intake forms, and founders building their first go-to-market pipeline without manual data entry.
How to integrate Attio with Webflow
What is Attio? Attio is a CRM for go-to-market teams that syncs with email and calendar on setup and adapts its data model through custom objects and attributes. It includes a canvas-based workflow builder, AI-powered enrichment for company and contact records, and a REST API. API access is available on all plans, and Attio also supports webhook-based integrations through its developer platform.
Teams use Attio and Webflow together when their website is the primary source of inbound leads. The most common pattern sends Webflow form data to Attio, where records are created or updated, enriched with firmographic data, and placed into a pipeline stage. Some teams also sync Attio records back to Webflow CMS collections to display client logos, team directories, or case study content.
The Attio-Webflow integration supports 3 approaches:
- Attio-connected form embeds handle direct CRM writes from forms built in Fillout, Typeform, or Attio's own Forms app, embedded in your Webflow pages.
- Automation platforms like Zapier and viaSocket let you route Webflow form submissions to Attio records without writing code.
- The Webflow and Attio APIs give you full control over record creation, webhook-driven workflows, and bidirectional CMS sync, but require server-side development.
Most implementations combine two of these methods depending on form complexity and how much control you need over the data flow.
Embed Attio-connected forms in Webflow
Several form builders connect directly to Attio without middleware. You build the form in the external tool, connect it to your Attio workspace, then embed or link the form on your Webflow site. Submissions create or update CRM records instantly. This approach works well for teams that want native Attio sync without managing a Zapier account or writing API code.
Each tool handles the Attio connection differently. Pick the one that matches your existing stack or the level of customization you need.
Attio Forms app
The Attio Fors app generates forms directly from your Attio workspace schema. Field types, select options, and related objects match your CRM structure automatically. Every submission creates or updates a record in Attio with zero middleware.

To set up Attio Forms:
- Sign up at attioforms.com and connect your Attio workspace via OAuth.
- Select the object you want to collect data for (People, Companies, or a custom object).
- Drag and drop the fields you need, then add your logo and any custom CSS.
- Click Publish and copy the public URL.
You have two options for adding the form to your Webflow site:
- Link a button or CTA to the form's public URL. This works on any Webflow plan and requires zero code.
- Embed the form directly on a page using a Code Embed element (requires a paid Webflow plan). In Webflow, open the Add panel, drag a Code Embed element onto the canvas, paste the iframe snippet, click Save & Close, and publish.
The link-out option is the fastest path from zero to a working Attio integration with no plan requirements on either side.
Fillout
Fillout is a form builder with a native Attio connector. It syncs responses to Attio records through a drag-and-drop field mapping interface. You can create new records, update existing ones based on a matching attribute like email, and set conditional rules for which fields map where.
To connect Fillout and embed in Webflow:
- In Fillout, open the Integrate menu, select Attio, and connect your workspace.
- Choose an object (People, Companies, or custom), then map each form field to an Attio attribute.
- Toggle Update if record already exists and select your matching attribute.
- Click Publish and copy the embed code.
- In Webflow, add a Code Embed element to your page, paste the Fillout embed snippet, click Save & Close, and publish.
Fillout is a good fit when you need conditional logic or multi-step forms that still write directly to Attio.
Typeform
Typeform connects directly to Attio's workflow engine as a native automation app. Submissions trigger Attio workflows that create records, assign pipeline stages, or send Slack notifications. The setup lives entirely inside Attio's automation settings.
To connect Typeform to Attio:
- In Attio, go to Settings > Apps > Automations Apps and install the Typeform app.
- Create a workflow with a Typeform trigger and configure the downstream actions (record creation, list entry, task assignment).
To embed the Typeform in Webflow, copy the embed code from Typeform's share settings, add a Code Embed element in Webflow, paste the snippet, and publish. Embedding requires a paid Webflow plan.
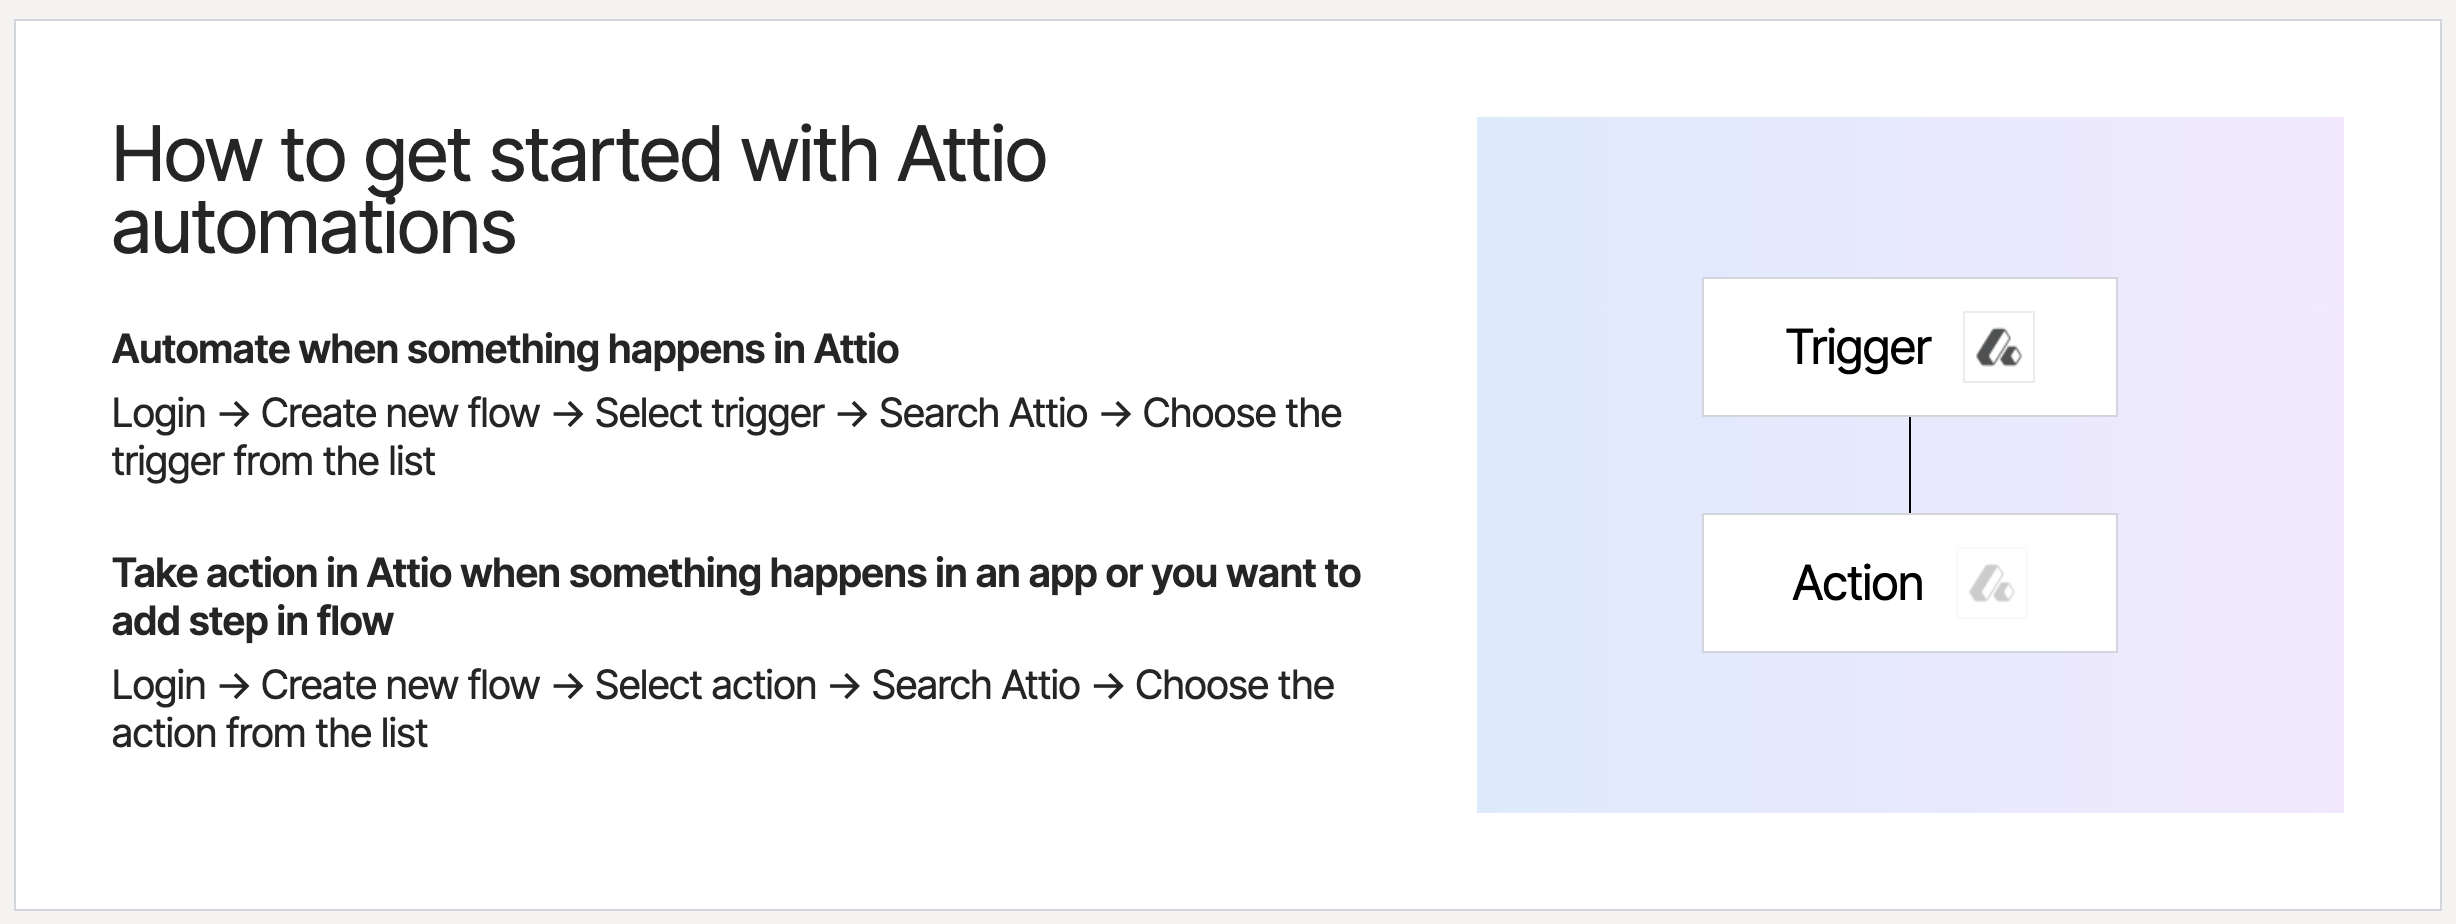
Connect Attio and Webflow through automation platforms
Automation platforms sit between Webflow and Attio, catching form submissions from one side and creating CRM records on the other. This path requires no custom code. Zapier has the most pre-built templates for this specific pairing. viaSocket is an alternative with its own trigger and action library.
Zapier
Zapier offers six pre-built templates for connecting Webflow forms to Attio. The most popular template creates or updates Attio people records from new Webflow form submissions, using email as the deduplication key.
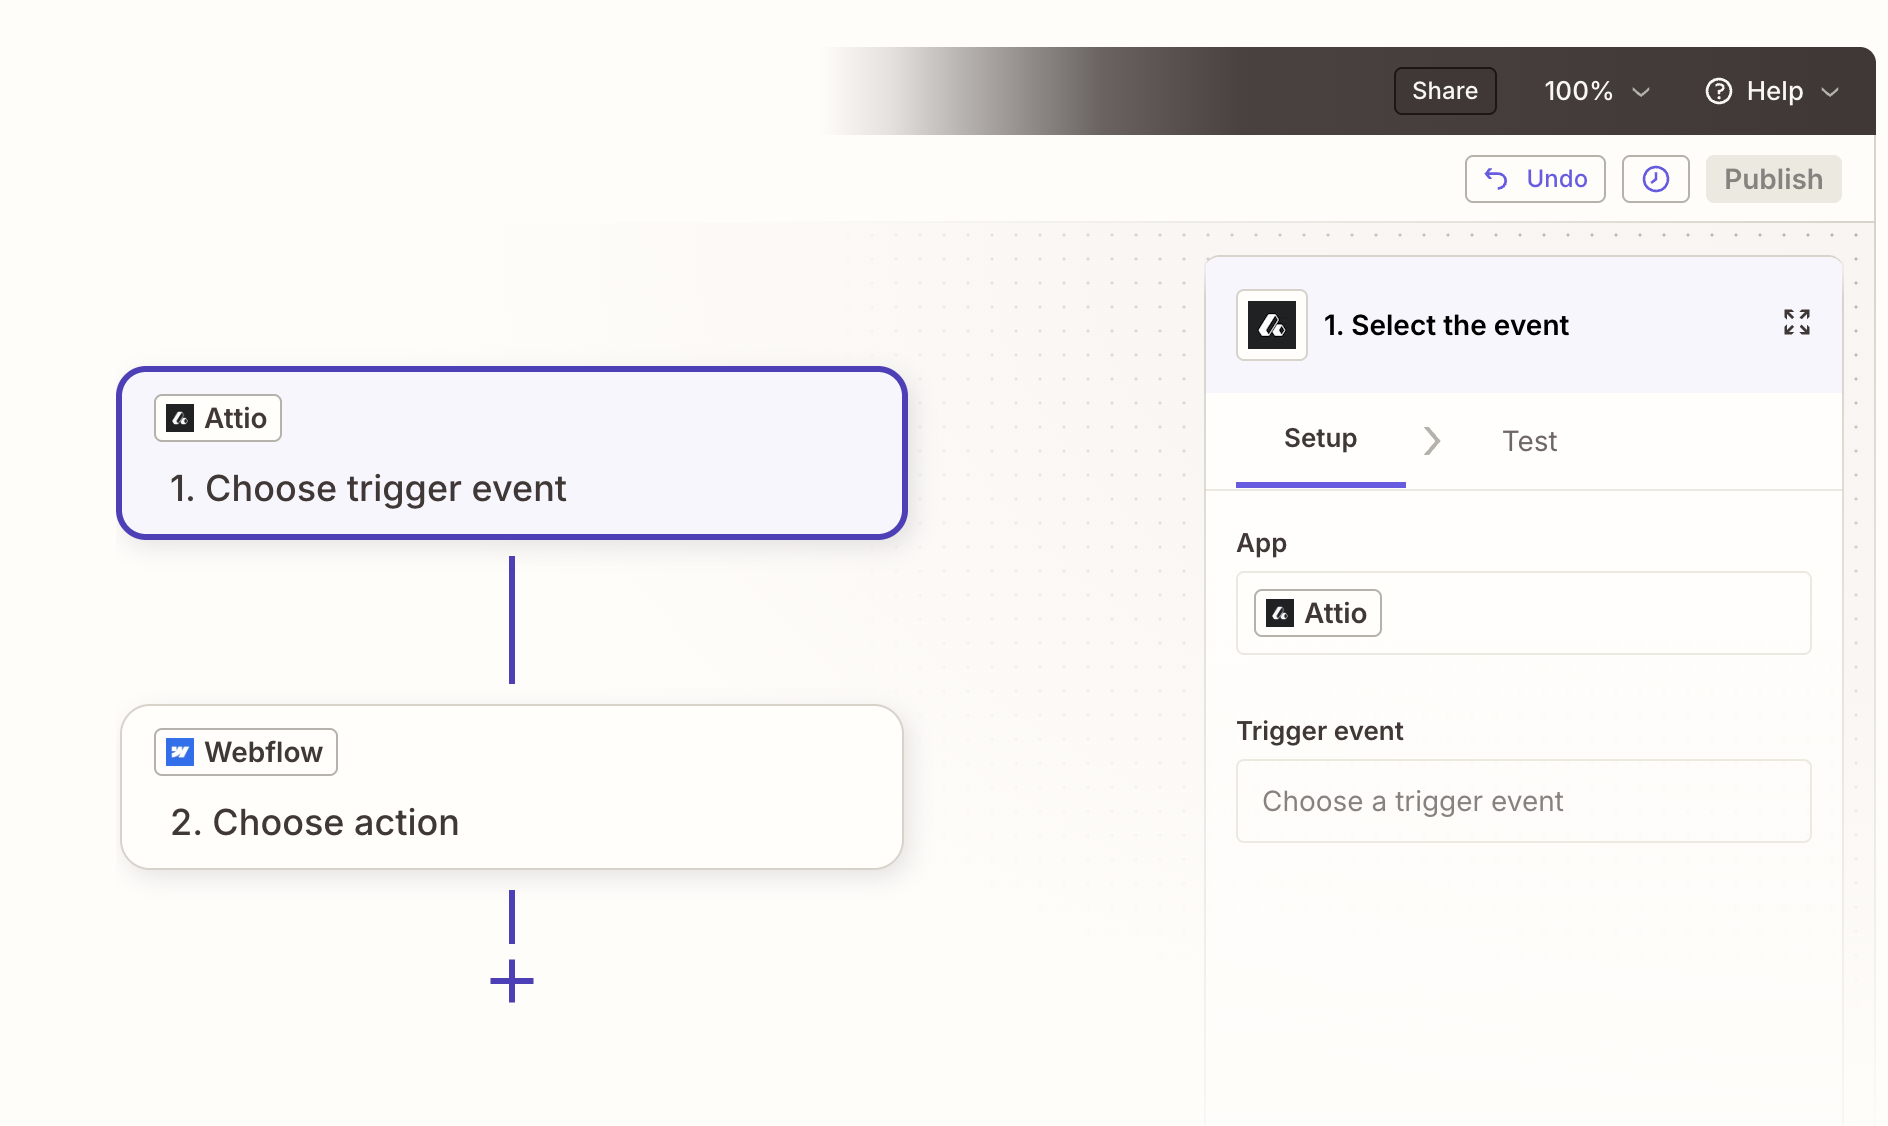
To set up a Webflow-to-Attio Zap:
- In Zapier, create a new Zap. Select Webflow as the trigger app and choose Form Submission as the trigger event.
- Connect your Webflow site and select the form you want to monitor.
- Add Attio as the action app. Choose Create or Update Record as the action event.
- When prompted for an API key, generate one in Attio at Workspace Settings > Developers.
- Map each Webflow form field to the corresponding Attio attribute (for example, the "Email" field maps to
email_addresses). - Test the Zap and turn it on.
Zapier supports these Attio actions relevant to Webflow integrations:
- Create or Update Record (upsert by email, the most useful action for form data)
- Create or Update List Entry by Parent Record (for pipeline management)
- Create Task (generates follow-up items from form submissions)
- Create Note (attaches form context to an existing record)
These actions cover the most common Webflow-to-Attio lead routing workflows.
If "No options are available" appears during setup, the Attio API key lacks the required scopes. Go to the Developers page in Attio settings, select the integration, and grant read-write access for the scopes the Zap needs. Attio's Zapier troubleshooting guide covers this in detail.
viaSocket
viaSocket supports a direct Webflow-to-Attio pairing with confirmed templates. In viaSocket, Webflow includes the trigger New Form Submission, and Attio includes actions such as Update Record, Create Note, Create Task, and Create List Entry.
Common viaSocket workflows for this integration:
- New Webflow form submission creates or updates an Attio contact record
- New Webflow form submission adds the submitter to a specific Attio pipeline list
- Attio record updates sync data back to a Webflow CMS collection
These workflows make viaSocket a workable option for both lead capture and CMS sync.
viaSocket is a viable alternative when you want explicit Webflow form triggers and Attio actions without building the flow from scratch.
Build with the Webflow and Attio APIs
For full control over data flow, field mapping, and error handling, you can connect Webflow and Attio through their REST APIs. This approach requires a server-side environment (Vercel, Netlify Functions, Cloudflare Workers, or similar) because Webflow cannot execute backend code. Never expose API keys in client-side JavaScript on your Webflow site.
The relevant APIs for this integration:
- The Attio REST API handles record creation, updates, list management, notes, tasks, and webhook subscriptions
- Webflow Data API handles CMS collections and form submissions
- Webflow webhooks trigger real-time events when forms are submitted or CMS items change
Together, these APIs cover the core pieces needed for custom lead capture and sync flows.
Both APIs use Bearer token authentication. Generate an Attio API key at Workspace Settings > Developers. Generate a Webflow site token at Site Settings > Apps & Integrations > API access.
Route form submissions to Attio records
The most common API integration registers a Webflow webhook for form submissions, then processes each payload on your server to create or update Attio records.
To implement webhook-based lead capture:
- Register a webhook on your Webflow site by sending a
POSTrequest to/v2/sites/{site_id}/webhookswithtriggerTypeset toform_submissionandurlpointing to your server endpoint. - When your server receives a form payload, extract the field values from
payload.dataand map them to Attio attribute slugs. - Send a
PUTrequest tohttps://api.attio.com/v2/objects/people/recordsto upsert the person record, usingemail_addressesas the matching attribute. - Optionally, send a
POSTto/v2/notesto attach the full form submission as a note on the new record.
The PUT endpoint is the standard choice for form integrations. It creates a new record when no match exists and updates the existing record when the email already appears in Attio. The POST endpoint will return an error if the email already exists.
A sample upsert request body:
PUT https://api.attio.com/v2/objects/people/records
{
  "data": {
    "values": {
      "email_addresses": [{"email_address": "user@example.com"}],
      "name": [{"first_name": "Jane", "last_name": "Smith"}]
    }
  }
}
Store failed submissions in a retry queue and log errors with the original form payload for manual resolution.
Sync Attio records to Webflow CMS
You can push Attio data into Webflow CMS collections to display client logos, team members, or partner directories on your site. This requires subscribing to Attio webhooks and writing to the Webflow CMS API.
To implement Attio-to-Webflow CMS sync:
- Register an Attio webhook by sending a
POSTtohttps://api.attio.com/v2/webhookswithevent_typeset torecord.updatedandtarget_urlpointing to your server. - When your server receives a record update, extract the relevant fields and send a
POSTto Webflow's/v2/collections/{collection_id}/itemsendpoint to create a new CMS item, or aPATCHto/v2/collections/{collection_id}/items/{item_id}to update an existing one. - If the item needs to go live immediately, send an additional
POSTto/collections/{collection_id}/items/liveto publish.
CMS item limits apply at the workspace level across all collections. The CMS plan supports 2,000 items and the Business plan supports up to 20,000. Automated creation workflows may stop creating items once the limit is reached, so build in limit checks and error handling before writing new items.
For bidirectional sync, implement change-origin tracking so updates made by one direction do not trigger the opposite direction in an infinite loop.
What can you build with the Attio Webflow integration?
Integrating Attio with Webflow lets you turn your website into an active lead generation system without manually transferring contact data between tools.
- Inbound lead pipeline: A Webflow demo request form submits data through Zapier or a webhook to Attio, where a Person and Company record are created, auto-enriched with firmographic data, and placed into a sales pipeline stage. The sales team sees the lead in their pipeline within seconds of submission.
- Agency client intake system: A Webflow inquiry form captures project type, budget range, and timeline. The automation creates Company, Person, and Deal records in Attio with custom attributes, assigns the deal to an account manager, and creates a follow-up task.
- Product-led growth qualification: A Webflow signup form triggers an Attio workflow that evaluates the new contact's company size and funding stage using AI attributes. A Switch block routes the record to different pipeline lists based on qualification thresholds, separating enterprise prospects from self-serve signups.
- Dynamic client directory: Attio record updates trigger a webhook that pushes approved client data to a Webflow CMS collection. A Collection List on your site displays client logos and descriptions, updating automatically when records change in the CRM.
If you need more control over field mapping, conditional routing, or multi-object record creation, the API integration path covers those cases with full flexibility.
Frequently asked questions
No. Webflow does not execute server-side code, so there is no way to call the Attio API from a Webflow form submission alone. You need either an automation platform such as Zapier, an embeddable form tool with native Attio sync (Fillout, Attio Forms app), or a server-side webhook handler. This connection requires webhooks, an automation platform, or a custom API workflow.
It depends on the method. Linking a button to an Attio Forms app URL works on any Webflow plan. Embedding forms with a Code Embed element, using webhooks for automation platforms, and injecting custom code in head and body tags all require a paid Webflow site plan.
No. API access is available on all Attio plans, including the free tier. Attio's plans documentation confirms that apps and API access are not gated behind any paid tier. The free plan supports up to 50,000 records and 3 custom objects.
At minimum, you need
record_permission:read-writeandobject_configuration:readfor creating and updating records. Addwebhook:read-writeif you are managing Attio webhooks programmatically. Generate an API key with these scopes at Workspace Settings > Developers in your Attio workspace. The authentication guide covers scope configuration in detail.Webflow retries failed webhook deliveries 3 times at 10-minute intervals. After all retries fail, the webhook is deactivated and Webflow sends a notification email. Submissions during the downtime are not recoverable through the webhook system. As a fallback, use the Webflow Forms API to periodically poll for submissions that may have been missed. The form data is still stored in Webflow's built-in form submission storage.
Description
Route Webflow form submissions to Attio CRM records through automation platforms like Zapier, embeddable form tools, or direct API and webhook connections.
This integration page is provided for informational and convenience purposes only.

Jobber
Connect Jobber with Webflow to capture service leads through forms and sync customer data between platforms.
Odoo
Connecting Odoo with Webflow lets you automate lead capture, sync product catalogs, and manage customer data without manual entry.
Recruit CRM
Connect RecruitCRM's applicant tracking system with Webflow through automation platforms like Zapier or Make.
Pardot
Connect Pardot to Webflow and capture leads through custom forms without rebuilding your site in Pardot templates.
HighLevel
Connect HighLevel, an all-in-one CRM and marketing automation platform, with Webflow to embed forms, chat widgets, and booking calendars while routing leads into pipelines and follow-up sequences.
LeadConnector
Connect LeadConnector with Webflow to capture form submissions, trigger workflow automation, and sync contact data in real time.
Microsoft Dynamics CRM
Connect Microsoft Dynamics CRM with Webflow to sync form submissions to CRM records. Use integration platforms like Zapier, Make.com, or n8n for visual workflow automation, embed Dynamics forms directly in Webflow pages, or build custom API integrations for bidirectional synchronization.
HoneyBook
Connect HoneyBook forms in Webflow or use Zapier to auto-create clients and projects from site inquiries.
Bitrix24
Connect Bitrix24, a unified business workspace with CRM and project management, with Webflow to capture leads from forms, embed live chat widgets, and sync CRM data through automation platforms.
Related integrations
Get started for free
Try Webflow for as long as you like with our free Starter plan. Purchase a paid Site plan to publish, host, and unlock additional features.
