

123FormBuilder
Connect 123FormBuilder, a drag-and-drop form builder, with Webflow to embed payment forms, multi-step workflows, conditional logic, and HIPAA-compliant intake on any page.
123FormBuilder brings payment processing, conditional logic, multi-step workflows, and HIPAA-compliant intake to your site through embeddable forms, capabilities native forms don't cover.
Drop them in as inline elements, lightbox popups, or floating buttons, with all submission handling, storage, and compliance staying on 123FormBuilder's servers.
From there, route data to CRMs, payment processors, or Webflow CMS collections through automation platforms. The integration fits lead capture with CRM routing, donation forms, regulated intake, and client sites that need payments or branching logic without a full ecommerce setup.
How to integrate 123FormBuilder with Webflow
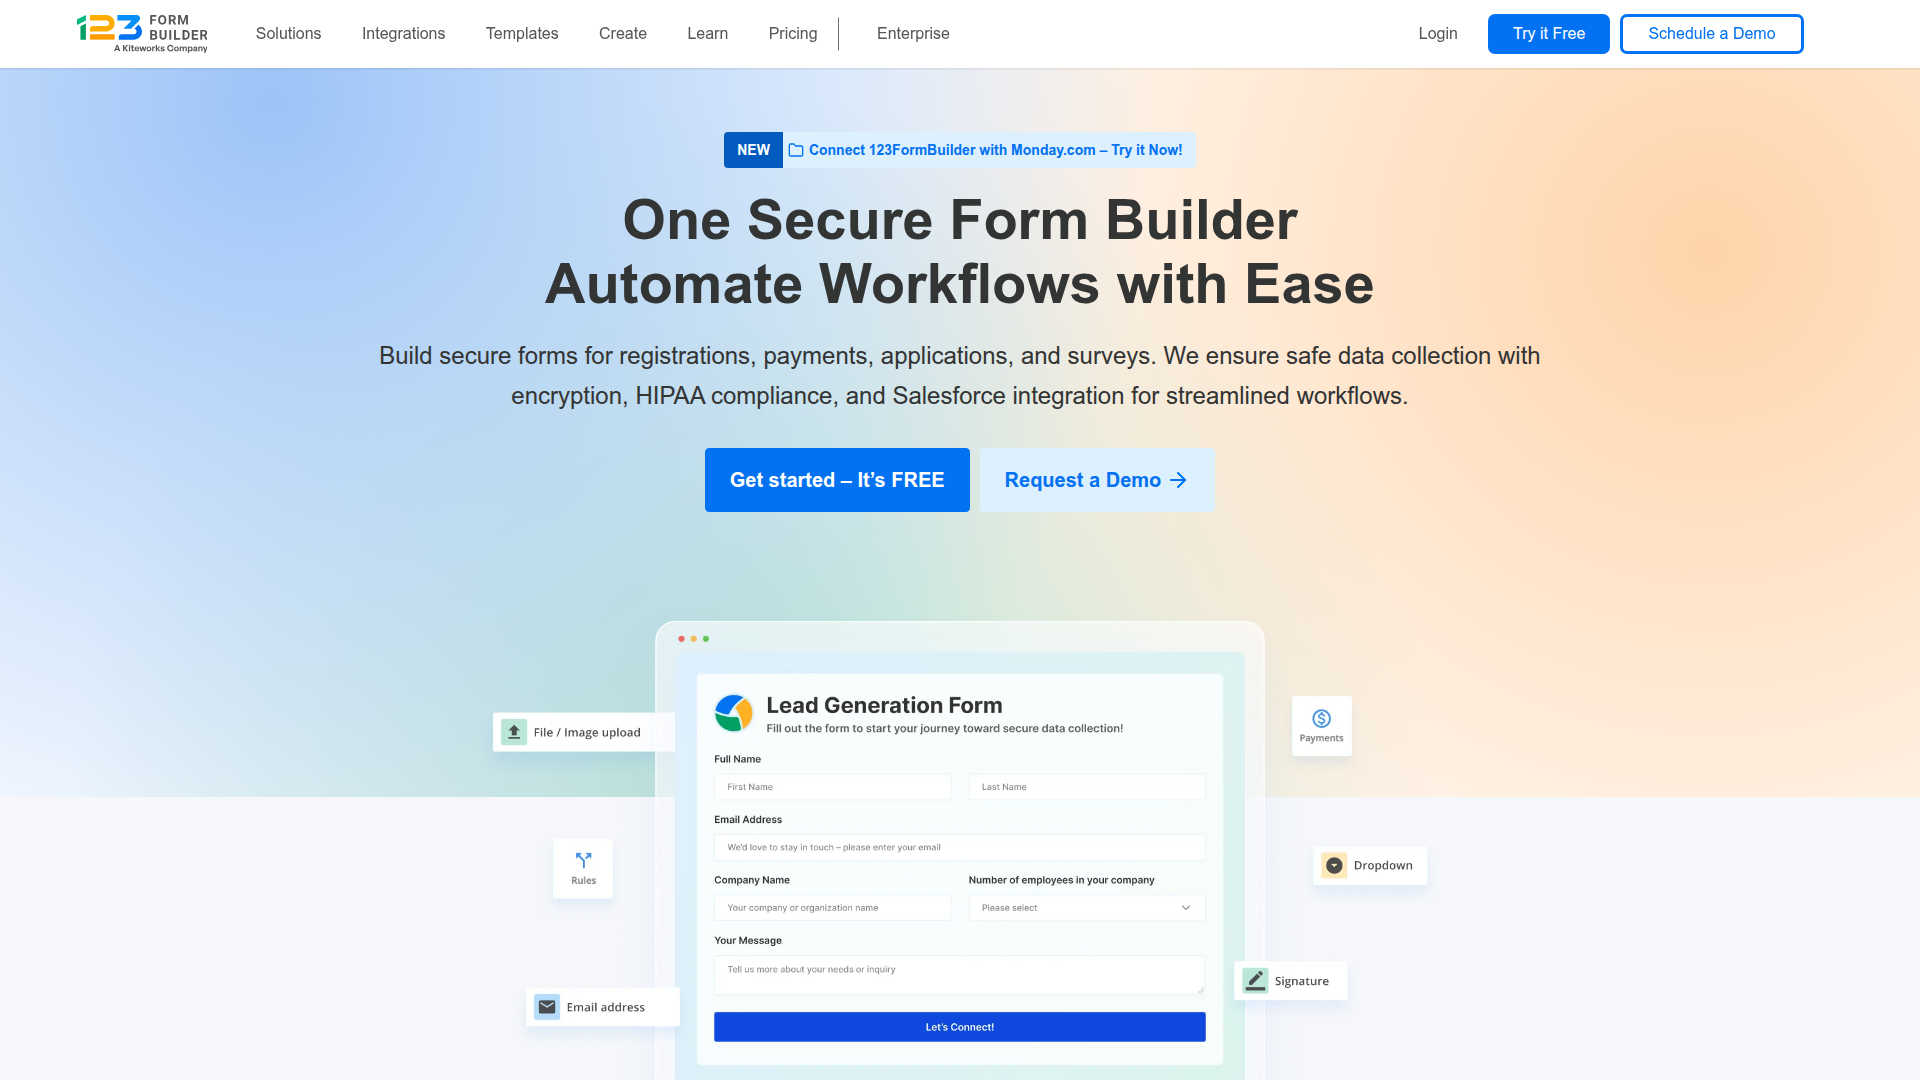
What is 123FormBuilder? 123FormBuilder is a drag-and-drop online form builder with 25+ field types, conditional branching logic, and built-in payment processing through Stripe, PayPal, Square, and other gateways. It has multi-page forms, digital signatures, file uploads, and document generation. The platform holds ISO 27001 and SOC 2 Type II certifications, with HIPAA compliance available on its Enterprise plan.
Reach for 123FormBuilder alongside your site when you need form capabilities that go beyond basic contact collection. Common triggers include accepting payments without a full ecommerce plan, routing leads directly to Salesforce or HubSpot, collecting sensitive data with regulatory compliance, or building multi-step registration workflows with conditional pricing.
You can integrate 123FormBuilder in three ways:
- 123FormBuilder embed codes place forms on your pages through Code Embed elements or custom code in head and body tags, with five display options including inline, popup, and floating button.
- Zapier and viaSocket connect 123FormBuilder submissions to your CMS collections, creating or updating items automatically without code.
- The Webflow Data API and 123FormBuilder API give you full control over submission data routing and CMS item creation, though you'll need server-side development.
Most implementations combine embed codes for display with an automation platform for data routing.
Add 123FormBuilder forms with Code Embed elements
123FormBuilder has five embed methods. Each generates a code snippet you paste into your page. For most use cases, go with the recommended JavaScript embed because it auto-adjusts form height and reflects changes made in 123FormBuilder without re-embedding. You can also choose iFrame for content isolation, auto pop-up for timed modals, floating button for persistent site-wide access, or text/image lightbox for click-triggered overlays. You'll find all five methods through the same path in 123FormBuilder: Publish > Embed form.
For inline embed methods (JavaScript and iFrame), you need a paid site plan to use the Code Embed element. Pop-up and floating button codes can alternatively go into site-wide custom code fields, which sidesteps the Code Embed element requirement.
Embed a form inline with JavaScript
Use this method for contact forms, registration forms, order forms, and other forms that should appear directly on a page. The JavaScript embed auto-adjusts height as users interact with conditional fields or navigate multi-step forms.
To embed a form inline:
- Open your form in 123FormBuilder. Click Publish > Embed form > JavaScript > Copy code.
- Back in the Designer, open the target page. Click the Add (+) panel, go to Widgets, and drag an Embed element to the location where the form should appear.
- Paste the JavaScript code into the HTML Embed Code Editor. Click Save & Close.
- Click Publish and visit the published URL to verify.
The form appears only on the published site. The editor canvas shows a placeholder because JavaScript executes on the published URL, so verify on the live URL after publishing. To control the form's width and positioning, wrap the Code Embed element in a Div Block and use the style panel to set width, padding, and alignment.
Embed a form inline with iFrame
An iFrame isolates form content from the rest of the page. It uses a fixed height (default 300px) that does not auto-resize, so you may need to adjust the height value in the code before pasting.
To embed with iFrame:
- In 123FormBuilder, click Publish > Embed form > iFrame > Copy code.
- Edit the
min-heightvalue in the copied code to match your form's actual pixel height. - Back in the Designer, drag a Code Embed element to the target location. Paste the iFrame code and click Save & Close.
- Publish and test on both desktop and mobile. If a scrollbar appears, bump up the
min-heightvalue.
The JavaScript embed is the better default choice for most forms. Reach for iFrame only when you specifically need content isolation between the form and the host page.
Add a timed pop-up form
Auto pop-up forms appear in a lightbox overlay after a configurable delay. They work well for newsletter signups, exit-intent alternatives, and promotional offers.
To add a pop-up form:
- In 123FormBuilder, click Publish > Embed form > Auto pop-up.
- Click Customize and set the delay in seconds (default is 3 seconds).
- Click Copy code.
- For a single page, paste the code into a Code Embed element. For site-wide display, go to Site Settings > Custom Code and paste into the Footer Code field.
- Save and publish.
The site-wide method takes only one paste to cover every page. Tune the delay so you don't interrupt visitors who have just landed.
Add a floating contact button
The floating button stays visible as users scroll and opens the form in a lightbox on click. This works well for support forms or feedback collection that should be accessible from any page.
To add a floating button:
- In 123FormBuilder, click Publish > Embed form > Floating button.
- Click Customize to set button text, color, font, and screen placement.
- Click Copy code.
- Go to Site Settings > Custom Code and paste into the Footer Code field. Save and publish.
You can also paste the code into a Code Embed element on a single page if you only want the button on specific pages. Test placement on mobile to confirm the button doesn't overlap important content.
Add a click-triggered lightbox form
The text/image lightbox opens the form when a visitor clicks a text link or image. This keeps the page clean while giving visitors a clear call to action.
To add a lightbox form:
- In 123FormBuilder, click Publish > Embed form > Text/Image lightbox.
- Choose Text link or Image link as the trigger. Click Customize to set the trigger text or image URL.
- Click Copy code.
- Back in the Designer, drag an Embed element to where the trigger should appear. Paste the code and click Save & Close.
- Publish and test.
Configure all form styling — fonts, colors, button appearance — inside 123FormBuilder before generating the embed code. CSS applied through the style panel won't reach form internals because the form loads in its own rendering context.
Connect 123FormBuilder and Webflow with Zapier or viaSocket
Embed codes handle form display. To create or update items in your CMS from submission data, you need an automation platform as middleware. Zapier and viaSocket both have direct 123FormBuilder-to-Webflow connections.
Job application portals often use this pattern so each submission becomes a browsable candidate listing. Event registration pages can auto-populate attendee directories. Testimonial collection forms can publish approved responses to a Collection List.
Zapier has these triggers and actions for the 123FormBuilder-Webflow combination:
- New Submission in 123FormBuilder triggers Create Item in Webflow (adds a CMS collection item per submission)
- New Submission in 123FormBuilder triggers Update Item in Webflow (modifies an existing CMS item)
- New Form in 123FormBuilder triggers Create Item in Webflow (creates a CMS item when a new form is added to the account)
Zapier also has pre-built templates, including "Create new Webflow items from new 123FormBuilder submissions," which gives you a starting point with the trigger and action pre-configured.
To set up a Zapier automation:
- In Zapier, create a new Zap. Select 123FormBuilder as the trigger app and choose New Submission as the trigger event.
- Connect your 123FormBuilder account and select the specific form.
- Select Webflow as the action app. Choose Create Item as the action event.
- Connect your Webflow account. Select the target site and CMS collection.
- Map 123FormBuilder form fields to your CMS fields using Zapier's visual field mapper.
- Turn the Zap on and submit a test form entry to verify.
viaSocket has a similar workflow with additional Webflow-side triggers, including Site Published, Page Created, and Updated Order events. Keep an eye on CMS item limits when you route submissions into collections: the CMS plan supports 2,000 items and the Business plan supports 10,000 items. Factor these caps into your expected submission volume. Zapier and viaSocket each need their own subscription, separate from your Webflow and 123FormBuilder plans.
Build with the Webflow Data API and 123FormBuilder API
For full control over how submission data flows between 123FormBuilder and your site, both platforms expose REST APIs. This approach suits you if you're building custom dashboards, processing submissions through validation middleware, or syncing data with systems that automation platforms don't cover. You'll need server-side development.
Relevant APIs include:
- The 123FormBuilder API v2 handles form management, submission retrieval, and webhook configuration (via
PUT /groups/{group_id}). Authenticate with tokens obtained viaPOST /token. - The Data API v2 handles CMS collections and item creation. Authenticate with Bearer tokens that carry
cms:readandcms:writescopes. - Webhooks trigger real-time events, including
form_submission, which can kick off downstream processing.
123FormBuilder also has its own webhooks, which you configure through Form Settings > 3rd Party Apps > Webhooks in the form editor, or programmatically via PUT /groups/{group_id} with a webhook_url field. The webhook fires a POST request containing all submitted form data whenever someone submits the form.
Sync submissions to Webflow CMS via API
This pattern reads submissions from 123FormBuilder and creates corresponding CMS items in your site. A typical implementation runs on a serverless function — Vercel, AWS Lambda, or similar — triggered by a 123FormBuilder webhook.
To implement submission-to-CMS sync:
- Configure a webhook in 123FormBuilder pointing to your serverless endpoint. Go to Form Settings > 3rd Party Apps > Webhooks and paste your endpoint URL in the Script URL field.
- In your server-side code, parse the incoming POST payload to extract submission field values.
- Call
GET /v2/collections/{collection_id}on the Data API to retrieve the field schema for your target collection. Map submission fields to CMS field slugs. - Call
POST /v2/collections/{collection_id}/itemswith the mappedfieldDataobject. Includenameandslugas required fields:
curl -X POST "https://api.webflow.com/v2/collections/{collection_id}/items" \
  -H "Authorization: Bearer <token>" \
  -H "Content-Type: application/json" \
  -d '{
    "fieldData": {
      "name": "Form Submission #123",
      "slug": "form-submission-123"
    },
    "isDraft": false,
    "isArchived": false
  }'
- After creating items, call
POST /v2/collections/{collection_id}/items/publishwith the returned item IDs to make them live.
123FormBuilder webhooks don't include HMAC signature verification. For workflows handling healthcare or financial data, add validation logic in your middleware to sanitize and verify payloads before you write to the CMS. The 123FormBuilder webhook documentation covers payload structure and configuration options.
What can you build with the 123FormBuilder Webflow integration?
Pairing 123FormBuilder with your site lets you collect payments, route data to CRMs, and run forms built for compliance requirements without custom backend infrastructure.
- Payment-enabled order pages: Accept payments through Stripe, PayPal, or Square directly within an embedded form, without setting up a full ecommerce store. A bakery site, for example, can list custom cake options with conditional pricing that adjusts based on size and add-on selections.
- HIPAA-compliant patient intake portals: Collect appointment requests, insurance information, and consent signatures through Enterprise-plan forms embedded on a healthcare practice site. Submission data stays on 123FormBuilder's HIPAA-certified infrastructure, separate from your hosting layer.
- Self-updating job boards: Pair a job application form with a Zapier automation that creates a CMS item for each submission. Candidates appear in a browsable directory on the site without manual data entry, and hiring managers review applications directly from the collection.
- Event registration with attendee directories: Build multi-step registration forms with conditional pricing — early-bird vs. standard, member vs. non-member — and route registrant data into a CMS collection that powers a live attendee list on the event page.
If you need more control over submission processing, data transformation, or integration with systems Zapier doesn't cover, take the API integration path.
Frequently asked questions
Forms embedded via JavaScript render only on the published site. The canvas does not execute JavaScript, so it displays a placeholder instead. Click Publish and check the live URL to see the form.
For inline forms using the Code Embed element, yes. The Code Embed element requires a paid site plan or workspace. Two display methods offer an alternative: the auto pop-up and floating button codes can be pasted into Site Settings > Custom Code > Footer Code, which does not require the Code Embed element. The Code Embed documentation details plan requirements.
Yes. Do the styling inside 123FormBuilder's editor rather than through Webflow's style panel. CSS applied in Webflow will not reach the form's internal elements. 123FormBuilder has CSS styling and advanced theme editing on all plans, including free. Adjust fonts, colors, button styles, and layout within the form builder before generating your embed code.
Yes. Use Zapier to map form fields to CMS collection fields and automatically create items from each submission. For custom workflows, the Webflow Data API accepts POST requests to create collection items programmatically. Keep CMS item limits in mind: the CMS plan supports 2,000 items and the Business plan supports 10,000 items.
Yes. Conditional logic, including field rules, form rules, and branching, operates entirely within 123FormBuilder. The embed method does not restrict this functionality. The logic operates the same way on a Webflow-hosted page as it does on any other site.
Description
123FormBuilder adds payment processing, conditional logic, and compliance-ready forms to Webflow through five embed formats, including inline, popup, and floating button.
This integration page is provided for informational and convenience purposes only.
Arengu
Visually build user flows with custom actions with your API or favourite apps.

Airtable forms
Connect Airtable's powerful database capabilities with Webflow to create dynamic, data-driven websites. Sync content in real-time, automate workflows, and scale beyond traditional CMS limitations while maintaining complete design control.
Related integrations
Get started for free
Try Webflow for as long as you like with our free Starter plan. Purchase a paid Site plan to publish, host, and unlock additional features.
