










Neon Postgres connects to Webflow Cloud with no proxies, no Hyperdrive config, and no connection lifecycle to manage. If you're building a Next.js app on Webflow Cloud that needs a real database backend, this setup works.
How to add a serverless Postgres database (Neon) to your Webflow Cloud project
Webflow CMS handles content well. However, the moment you need relational data (user-specific records, searchable directories, cross-table joins, pgvector similarity search), you need additions.
Webflow Cloud runs Next.js on Cloudflare Workers. Each Worker invocation runs in a fresh, stateless execution context; standard Postgres clients that hold persistent connections across queries don't fit this model.
Neon solves this: its @neondatabase/serverless driver sends each query as an independent HTTP request, with no connection object to open, manage, or close between invocations.
On Webflow Cloud, a Neon query runs natively from a route handler with no proxies, no Hyperdrive configuration, and no connection lifecycle to manage.
This guide covers the full setup: creating a Neon project, configuring the pooled connection string, querying from Next.js server components and API route handlers, and deploying to Webflow Cloud.
What are the connection options for Neon on Webflow Cloud?
There are three practical ways to connect Neon Postgres to a Cloudflare Workers environment. I use the neon() HTTP function for almost every Webflow Cloud project. It requires the least setup and runs natively in the Workers runtime with no additional configuration.
The table below maps each method to its transport layer, primary use case, and compatibility with Webflow Cloud's Workers runtime:
| Method | Package | Transport | Best for | Webflow Cloud |
|---|---|---|---|---|
neon() function |
@neondatabase/serverless |
HTTP | Single queries, serverless, edge | Recommended |
Pool / Client |
@neondatabase/serverless |
WebSocket | Sessions, transactions | Works, more setup |
Hyperdrive + pg |
pg + Cloudflare Hyperdrive |
TCP (proxied) | High-volume apps, connection pooling | Works, requires Hyperdrive |
Standard pg |
pg |
TCP | Traditional servers | Persistent TCP connections; incompatible with the Workers stateless execution model |
| Method → Package → Transport → Best for → Webflow Cloud |
|---|
neon() function |
@neondatabase/serverless |
| HTTP |
| Single queries, serverless, edge |
| Recommended |
Pool / Client |
@neondatabase/serverless |
| WebSocket |
| Sessions, transactions |
| Works, more setup |
Hyperdrive + pg |
pg + Cloudflare Hyperdrive |
| TCP (proxied) |
| High-volume apps, connection pooling |
| Works, requires Hyperdrive |
Standard pg |
pg |
| TCP |
| Traditional servers |
| Persistent TCP connections; incompatible with the Workers stateless execution model |
Standard pg opens persistent TCP connections that expect to survive across multiple queries. In the Workers runtime, each request runs in a fresh execution context. No connection pool exists between invocations, so those connections terminate at the end of each handler, leaving dangling state.
The @neondatabase/serverless driver was built to address this exact constraint: it reimplements the Postgres protocol over HTTP and WebSockets, both of which Workers natively support.
The neon() function is the HTTP option: fastest to set up, no connection object to manage, no open/close lifecycle, and each query is an independent HTTP request. For most CRUD operations in a Webflow Cloud app, this is the right choice.
What do you need to connect Neon Postgres to Webflow Cloud?
You need a Webflow workspace with Cloud access, a Neon account, Node.js 22.0.0 or higher, and the Webflow CLI. Neon's free tier is genuinely useful for development. It provides 100 projects (each with 10 branches, 0.5 GB storage, and 100 CU-hours of compute per month) and auto-suspends after 5 minutes of inactivity.
A Webflow workspace with Cloud access
Confirm you have access to the Cloud section in your Webflow dashboard. Webflow Cloud is available on paid site plans.
Your Cloud project will be mounted as a subpath of your Webflow site, for example, yoursite.webflow.io/app or on a custom domain. You'll set this mount path when creating the environment in a later step, so decide on it before you initialize the project.
If your workspace is on a free plan, upgrade to a paid site plan before continuing. Webflow Cloud isn't available in the free tier, and the CLI will prompt for a site with Cloud access during webflow cloud init.
Node.js 22.0.0 or higher and npm
Webflow Cloud's build environment and local preview both require Node.js 22. If you're on an older version, use a version manager like nvm or fnm to switch: nvm install 22 && nvm use 22.
Webflow Cloud supports only npm. If your existing project uses pnpm or yarn, convert the lockfile to package-lock.json and remove the other lockfiles before initializing. A project with a yarn.lock or pnpm-lock.yaml will fail during the Webflow Cloud build step.
The Webflow CLI
The Webflow CLI handles project scaffolding, local preview, and deployment to Webflow Cloud. It's published on npm and requires a Webflow account to authenticate.
The CLI uses your Webflow account credentials to link the local project after you create a site. Authentication is handled inline during webflow cloud init. You don't need to authenticate separately before running the init command.
Install globally and authenticate before project initialization:
npm install -g @webflow/webflow-cliConfirm with webflow --version.
A Neon account and project
Create an account at neon.com.
Neon's free tier is sufficient for development and light production traffic. Once signed in, create a project. Neon provisions a Postgres database and automatically creates a default branch, database, and role.
After you create your Neon project, implementation takes about 30 minutes. Here's how.
5 steps to connect Neon Postgres as a database backend for Webflow Cloud
These five steps cover Webflow Cloud project initialization, Neon connection string configuration, driver setup, querying from server components and route handlers, and production deployment.
If you've followed any of our previous Webflow Cloud guides, the scaffolding in Step 1 is identical. Webflow Cloud's config is consistent across all integrations.
1. Initialize the Webflow Cloud project
Install the Webflow CLI and run webflow cloud init to scaffold the project.
Authentication is prompted inline during init:
npm install -g @webflow/webflow-cli
webflow cloud init
The init wizard prompts you to select a framework (choose Next.js), set a mount path, and authenticate. Webflow Cloud reads your package.json, detects the framework and generates the deployment configuration at build time, so most of what you may have seen described as required scaffolding is not.
You do not commit an adapter, a base path or an output mode. A wrangler.json is only needed to declare storage bindings, and a Neon app has none, so this stack needs no wrangler config at all.
This is what makes @neondatabase/serverless work, as the driver uses Node.js buffer and crypto APIs internally:
{
  "$schema": "node_modules/wrangler/config-schema.json",
  "name": "nextjs",
  "main": ".open-next/worker.js",
  "compatibility_date": "2025-03-01",
  "compatibility_flags": ["nodejs_compat"],
  "assets": {
    "binding": "ASSETS",
    "directory": ".open-next/assets"
  },
  "observability": { "enabled": true }
}
The optional webflow.json file pins the framework. Detection is automatic, so you only add this if you want the choice explicit:
{
  "cloud": {
    "framework": "nextjs"
  }
}
Then install the OpenNext adapter and add the preview script:
npm install @opennextjs/cloudflare

{
  "scripts": {
    "preview": "opennextjs-cloudflare build && opennextjs-cloudflare preview"
  }
}
Run npm run preview before every deploy to catch runtime issues locally before they hit production. The Wrangler simulation is close enough to the production Workers runtime to catch most Neon connection failures before deployment.
Expected outcome: The project scaffolds successfully. npm run preview starts a local Wrangler simulation without errors. You now have a working Next.js project ready to connect to Neon.
2. Get the Neon pooled connection string
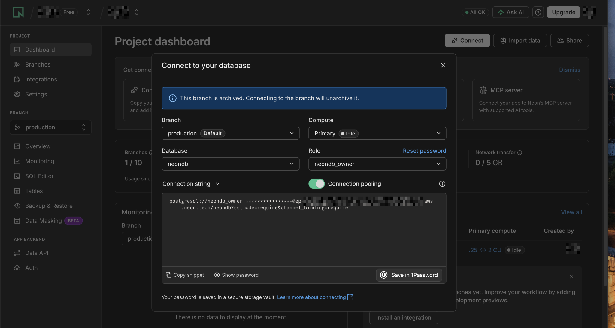
Click Connect on your Neon Project Dashboard to open the Connect to your database modal. Select your branch, database, and role.
Enable the Connection pooling toggle if it isn't already on.
This produces a connection string with -pooler in the hostname:
postgresql://username:password@ep-xxx-pooler.us-east-1.aws.neon.tech/dbname?sslmode=require&channel_binding=requireThe pooled connection string routes through PgBouncer, which maintains persistent connections to your underlying Postgres compute.
Be careful about what pooling does and does not buy you here, because this is widely misreported. The pooler prevents connection-slot exhaustion when many short-lived invocations each want a connection, which is exactly the serverless pattern.
It does not mask a scale-to-zero cold start: the pooler sits at the compute, so when the compute is suspended, there is no warm backend connection to hand out. Neon's own list of cold-start mitigations covers scale-to-zero settings, region co-location, client timeouts, retries, and caching, and pooling isn't on it.
I always use the pooled string for serverless deployments. Use the non-pooled direct connection string only for schema migrations and pg_dump.
Copy the full connection string. In the next step, add it to Webflow Cloud's Settings → Variables and your local .env.local.
Direct vs. pooled connection string
The direct connection string (without -pooler) connects straight to the Postgres compute over WebSockets. Use this string for schema migrations (e.g., drizzle-kit push or pg_dump) that require a session-based connection.
Never use the direct string for serverless application queries. Each Worker invocation creates a new connection, and direct connections consume Postgres connection slots.
Expected outcome: You have the pooled connection string copied to your clipboard. The hostname contains -pooler, and the string includes sslmode=require.
3. Install the driver and create the database client factory
The @neondatabase/serverless package is the driver that works on the Workers runtime without a proxy layer in front of it, which is why this guide uses it. Install it as a production dependency; it replaces pg in this stack.
It is not the only option, and the reason matters. pg fails here because the Workers runtime gives it no Node TCP socket to open, not because of connection lifecycle problems. Put a proxy in the path that terminates TCP for you, and pg works fine: Neon's own Cloudflare Workers guide recommends Cloudflare Hyperdrive with a native driver like pg as its first option, and specifically says to use a native driver rather than the serverless driver when Hyperdrive is in play.
Choose the serverless driver when you want no extra infrastructure; choose Hyperdrive plus pg when you want to keep a standard Postgres driver.
Install @neondatabase/serverless:
npm install @neondatabase/serverlessCreate lib/db.ts with a factory function that returns a neon() query function:
// lib/db.ts
import { neon } from "@neondatabase/serverless";

export function getDb() {
  const databaseUrl = process.env.DATABASE_URL;
  if (!databaseUrl) {
    throw new Error("Missing DATABASE_URL environment variable");
  }
  return neon(databaseUrl);
}
The neon() function returns a tagged template literal query function (sql) that sends queries over HTTP. Each call to getDb() creates a new sql function bound to the connection string.
Because Webflow Cloud injects environment variables per-request in the Workers runtime, reading process.env.DATABASE_URL inside the function (rather than at module initialization) ensures the value is available when the function runs, not when the module first loads.
Add the DATABASE_URL to your local .env.local:
DATABASE_URL=postgresql://username:password@ep-xxx-pooler.us-east-1.aws.neon.tech/dbname?sslmode=require&channel_binding=requireIn Step 5, you'll add the same string to Webflow Cloud's environment variables for the production deployment.
Expected outcome: lib/db.ts exists and exports getDb(). DATABASE_URL is set in .env.local. Running npm run preview with a valid connection string queries Neon without errors.
Optional: Add Drizzle ORM for type-safe queries
If you prefer type-safe queries and schema management over raw SQL, Drizzle ORM integrates directly with @neondatabase/serverless via the neon-http adapter:
npm install drizzle-orm drizzle-kitUpdate lib/db.ts to return a Drizzle instance:
// lib/db.ts
import { neon } from "@neondatabase/serverless";
import { drizzle } from "drizzle-orm/neon-http";

export function getDb() {
  const databaseUrl = process.env.DATABASE_URL;
  if (!databaseUrl) {
    throw new Error("Missing DATABASE_URL environment variable");
  }
  const sql = neon(databaseUrl);
  return drizzle({ client: sql });
}
The drizzle-orm/neon-http adapter wraps the neon() function, giving you Drizzle's query builder and schema management on top of the HTTP transport. Everything else in the article works the same way: the factory pattern, the environment variable, the deployment steps.
4. Create a table and run queries from server components and route handlers
Create your first table in Neon's SQL Editor, then add server component and route handler queries to your Next.js app. The driver works identically across all three server-side Next.js contexts: server components, route handlers, and Server Actions.
Creating a table in Neon
In the Neon Console, open the SQL Editor for your project and create a table to work with:
CREATE TABLE posts (
  id SERIAL PRIMARY KEY,
  title TEXT NOT NULL,
  content TEXT,
  published BOOLEAN DEFAULT false,
  created_at TIMESTAMPTZ DEFAULT NOW()
);

INSERT INTO posts (title, content, published)
VALUES
  ('First post', 'Hello from Neon and Webflow Cloud', true),
  ('Draft post', 'Not published yet', false);
After running this, you'll have two rows in the posts table to query in the next steps.
Querying from a server component
In a Next.js server component, call getDb() and use the tagged template syntax to run a parameterized query:
// app/posts/page.tsx
import { getDb } from "@/lib/db";

type Post = {
  id: number;
  title: string;
  content: string | null;
  published: boolean;
  created_at: string;
};

export default async function PostsPage() {
  const sql = getDb();
  // Note: the tagged template takes no type argument. `sql<Post[]>`
  // is a TypeScript error, so assert on the result instead.
  const posts = (await sql`
    SELECT id, title, content, published, created_at
    FROM posts
    WHERE published = true
    ORDER BY created_at DESC
  `) as Post[];

  return (
    <main>
      <h1>Posts</h1>
      {posts.map((post) => (
        <article key={post.id}>
          <h2>{post.title}</h2>
          <p>{post.content}</p>
        </article>
      ))}
    </main>
  );
}
The tagged template syntax automatically parameterizes values.
The ${value} interpolations become $1, $2, etc. in the prepared statement. This prevents SQL injection without a separate escaping step. I use this pattern as the default for all read queries in server components: no ORM overhead, clear SQL and full type safety with the generic type parameter.
The server component renders at request time on Webflow Cloud's Workers runtime. The Neon query goes out as an HTTP request from Cloudflare's infrastructure to Neon's HTTP endpoint.
Neon computes live in specific cloud regions rather than alongside the Workers network, which is exactly why Neon's own latency guidance is to put your app and your database in the same region. Publish-time round-trip numbers age badly, so measure yours rather than trusting a figure from an article.
Running mutations from a route handler
For write operations (inserts, updates, deletes), use route handlers so mutations go through your API rather than being embedded in server components:
// app/api/posts/route.ts
import { getDb } from "@/lib/db";
import { NextRequest, NextResponse } from "next/server";

export async function POST(request: NextRequest) {
  const { title, content } = await request.json();

  if (!title) {
    return NextResponse.json({ error: "Title is required" }, { status: 400 });
  }

  const sql = getDb();

  const [post] = await sql`
    INSERT INTO posts (title, content, published)
    VALUES (${title}, ${content ?? null}, false)
    RETURNING id, title, created_at
  `;

  return NextResponse.json(post, { status: 201 });
}

export async function GET() {
  const sql = getDb();

  const posts = await sql`
    SELECT id, title, content, published, created_at
    FROM posts
    ORDER BY created_at DESC
  `;

  return NextResponse.json(posts);
}
The RETURNING clause returns the newly created row in the same query, avoiding a second round trip to fetch the ID. The [post] destructuring on the result takes the first (and only) row returned, the standard pattern for single-row inserts.
Running transactions over HTTP
For multi-query transactions (insert + update in one atomic operation), the neon() function supports HTTP-based transactions via the transaction() method:
const sql = getDb();

const [[newPost]] = await sql.transaction([
  sql`INSERT INTO posts (title, content) VALUES (${"New post"}, ${"Content"}) RETURNING id`,
  sql`UPDATE posts SET published = true WHERE id = (SELECT MAX(id) FROM posts)`,
]);
HTTP transactions in Neon are non-interactive. All queries in the batch run in a single round-trip. They support isolation levels and read-only mode as options on the second argument. For interactive transactions (where one query's result determines the next), use Pool/Client with WebSockets instead.
Expected outcome: Server component queries return Neon data at /posts. POST requests to /api/posts insert rows and return 201. The preview simulation confirms the driver works in the Workers runtime before deployment.
5. Deploy to Webflow Cloud and configure the production DATABASE_URL
Before deploying, set the DATABASE_URL in your Webflow Cloud project's Settings → Variables:
DATABASE_URL=postgresql://username:password@ep-xxx-pooler.us-east-1.aws.neon.tech/dbname?sslmode=require&channel_binding=requireUse the pooled connection string (with -pooler in the hostname) for production, not the direct connection string. The .env.local value is never deployed to Webflow Cloud; the Settings → Variables panel is the only place production variables are read.
Then deploy:
webflow auth login
webflow cloud deploy
After deployment, test a database query from the live URL and check the Webflow Cloud deployment logs for any Missing DATABASE_URL or connection errors.
Expected outcome: The live URL returns Neon data. No connection errors appear in the deployment logs. The full stack is confirmed end-to-end.
What causes Neon Postgres connections to fail on Webflow Cloud?
Most Neon failures on Webflow Cloud stem from four sources: an incorrect or missing DATABASE_URL, using a direct connection string instead of a pooled one, cold-start timeouts on inactive Neon instances, and accidentally using the standard <a href="https://www.npmjs.com/package/pg" target="_blank" rel="noopener noreferrer">pg</a>package instead of @neondatabase/serverless.
Here's the diagnostic for each.
Queries fail with "Missing DATABASE_URL" or return undefined data
Cause: The DATABASE_URL environment variable exists in .env.local, but wasn't added to Webflow Cloud's Settings → Variables. On Webflow Cloud, variables in .env.local are read-only when running npm run dev or npm run preview locally. They are never deployed to the production worker.
Fix: In your Webflow Cloud project, open Settings → Variables and add DATABASE_URL with the full pooled connection string, including sslmode=require. Redeploy after saving. The guard clause in getDb() (the if (!databaseUrl) throw new Error(...) check) surfaces this as a clear error in the deployment logs rather than a silent null reference downstream.
The first request after inactivity is noticeably slow
Cause: Neon's compute scales to zero; auto-suspend triggers after 5 minutes of inactivity by default on Free and Launch plans (Scale plans allow this to be configured or disabled entirely). The first query must wait for the compute to wake before executing. This is a Neon compute cold start, not a Webflow Cloud issue.
Fix: This is scale-to-zero, and Neon documents reactivation as taking "a few hundred milliseconds," not seconds. Pooling will not help, for the reason given in step 2. What does help is one of Neon's documented approaches: adjust or turn off the scale-to-zero setting on a paid plan, put the app and the database in the same region, build retry handling into the client, or cache at the application level.
Note that connect_timeout is a libpq parameter and does nothing for the HTTP driver, which issues fetch calls with no libpq connection phase. If you want to bound an HTTP query, pass an AbortController signal through fetchOptions instead:
const controller = new AbortController()
setTimeout(() => controller.abort(), 10_000)

const sql = neon(process.env.DATABASE_URL!, {
  fetchOptions: { signal: controller.signal },
})
This prevents premature timeout errors during the compute wake cycle. If your use case demands consistent sub-100ms first-query latency, upgrade to a Neon plan with a higher compute size or turn off auto-suspend.
Queries fail with "connection refused" or SSL error
Cause: One of three things: the connection string is malformed (missing sslmode=require), you're using the direct connection string where the pooled string should be used, or the channel_binding=require parameter is causing a conflict with an older driver version.
Fix: Confirm that the DATABASE_URL in Settings → Variables is the pooled connection string (the hostname contains -pooler). Confirm it includes sslmode=require.
If you're still getting SSL errors, remove channel_binding=require and test with sslmode=require alone. Some combinations of environment and driver versions handle binding negotiation differently.
Application works locally but fails after deployment with a driver error
Cause: The standard pg package was installed instead of @neondatabase/serverless, or the application has a fallback import path that reaches pg. Standard pg opens persistent TCP connections that expect to survive across multiple queries.
In the Cloudflare Workers runtime, each request runs in a fresh execution context. No persistent connection pool exists between invocations. The `pg` connection opened at the start of a handler is terminated when the handler completes, leaving dangling transaction state and causing errors on subsequent requests.
Fix: Confirm @neondatabase/serverless is the only Postgres client in package.json. Search for any require('pg') or import { Pool } from 'pg' in your codebase and replace with imports from @neondatabase/serverless.
If using an ORM, confirm it's configured with the neon-http or neon-serverless adapter, not the generic pg adapter.
Transactions silently fail or return incorrect results
Cause: Using the HTTP neon() function for interactive transactions, where the result of one query determines the parameters of the next. HTTP transactions via sql.transaction([]) are non-interactive: all queries are sent in a single round-trip.
If your transaction logic requires reading from one query before writing with another, the HTTP transaction model can't express it correctly.
Fix: For interactive transactions, use Pool or Client from @neondatabase/serverless with WebSocket transport.
Create and close the connection within the same request handler:
import { Pool } from "@neondatabase/serverless";

export async function POST(request: NextRequest) {
  const pool = new Pool({ connectionString: process.env.DATABASE_URL });

  try {
    const client = await pool.connect();
    await client.query("BEGIN");
    const { rows } = await client.query("SELECT balance FROM accounts WHERE id = $1 FOR UPDATE", [userId]);
    await client.query("UPDATE accounts SET balance = $1 WHERE id = $2", [rows[0].balance - amount, userId]);
    await client.query("COMMIT");
    await client.query('COMMIT');
    return NextResponse.json({ success: true });
  } catch (err) {
    await client.query('ROLLBACK');
    return NextResponse.json({ error: 'Transaction failed' }, { status: 500 });
  } finally {
    // release() returns the client to the pool; it does NOT close the
    // pool. On Workers the WebSocket cannot outlive the request, so
    // the pool itself has to be closed too, on every path.
    client.release();
    await pool.end();
  }
}
Be precise about these two calls, because treating them as interchangeable is what leaks connections. client.release() hands the client back to the pool. pool.end() closes the pool and its WebSocket.
On the Workers runtime, you must create, use and close a Pool or Client inside a single request handler, so you need both in a finally block to ensure they run on the error path as well. Rolling back before releasing matters too: returning a client to the pool mid-transaction is how you get state bleeding into the next request.
Build more on your Neon + Webflow Cloud foundation
This guide covered the full database connection: @neondatabase/serverless with HTTP transport, the pooled connection string, factory function pattern for Webflow Cloud's runtime variable injection, and querying from both server components and route handlers.
To combine Neon with AI features, the pgvector extension enables native similarity search in your Neon database. Store embeddings as vectors and run semantic search queries alongside your regular Postgres queries.
Explore Webflow + Neon for additional use cases, including pgvector for AI search, programmatic SEO pipelines, and financial data filtering.
Frequently asked questions
How do I handle database schema migrations with Neon on Webflow Cloud?
Run migrations from your local machine using the direct connection string, not from within Webflow Cloud. Set a separate DATABASE_MIGRATION_URL in .env.local pointing to the direct string. Run drizzle-kit push or your preferred migration command locally before deploying. Schema changes take effect immediately in Neon, and deployed workers see the updated schema on their next request.
Can I use Drizzle ORM or Prisma instead of raw SQL?
Drizzle ORM works directly with @neondatabase/serverless via drizzle-orm/neon-http. Configure lib/db.ts to use drizzle({ client: sql }) as shown in Step 3. Both work. Prisma's current documented setup for Neon is the @prisma/adapter-neon driver adapter, which runs Prisma on top of @neondatabase/serverless with no Data Proxy and no Accelerate. The Data Proxy is retired, so the old "Prisma needs a proxy" reasoning no longer distinguishes the two. Pick on ergonomics: Drizzle is lighter and closer to SQL; Prisma brings its schema and migration tooling.
What's the performance impact of Neon's auto-suspend on Webflow Cloud?
Scale to zero triggers after 5 minutes of inactivity on the Free and Launch plans, and Neon documents reactivation as taking a few hundred milliseconds rather than seconds. Paid plans can turn off scale to zero entirely, including Launch; configuring the threshold itself is a Scale-plan feature. The effective mitigations are region co-location, retry handling and application caching, not connection pooling.
Can I use Neon's branching feature with Webflow Cloud deployments?
Yes. Neon branches provide isolated database copies sharing parent storage. Point each Webflow Cloud environment's DATABASE_URL to its branch connection string. Because Neon lacks a merge-to-parent operation, rely on Reset from parent, instant restore, or Time Travel queries instead of merging. Typically, you run migrations per branch and reset from the parent to start fresh, achieving full isolation per deployment without data duplication. Copy each connection string from the Neon Console's Connect modal.



















