










Learn how to integrate external APIs with Webflow securely. We compare three methods: Webflow Cloud proxy, client-side fetch, and no-code automation.
Pulling external data into a Webflow site is the easy part. Keeping your API credentials out of the browser is where most implementations go wrong.
The problem is calling APIs without exposing credentials in the browser. I've seen this mistake more times than I'd like: an API key sitting inside a client-side fetch() call, visible to anyone who opens browser devtools.
It's a security hole that's trivially exploitable and just as trivially avoidable once you understand Webflow's three integration patterns.
This guide covers all three patterns with working code for each and goes into the most depth on the Webflow Cloud proxy, the only approach that keeps credentials entirely off the browser.
3 ways to integrate external APIs with Webflow
The right integration method depends on two questions: does your API require authentication, and do you need real-time data displayed in the browser?
Each approach handles these differently:
| Method | API key security | Real-time data | Setup time | Best for |
|---|---|---|---|---|
| Webflow Cloud proxy | Keys hidden server-side | Yes | ~30 min | Any authenticated API, production sites |
| Code Embed + client-side fetch | Keys visible in browser | Yes | ~5 min | Public APIs only; no credentials |
| Zapier / native integrations | Keys managed by Zapier | No; event-driven only | ~15 min | Form submissions, CRM sync, webhooks |
| Method → API key security → Real-time data → Setup time → Best for |
|---|
| Webflow Cloud proxy |
| Keys hidden server-side |
| Yes |
| ~30 min |
| Any authenticated API, production sites |
| Code Embed + client-side fetch |
| Keys visible in browser |
| Yes |
| ~5 min |
| Public APIs only; no credentials |
| Zapier / native integrations |
| Keys managed by Zapier |
| No; event-driven only |
| ~15 min |
| Form submissions, CRM sync, webhooks |
Here’s how to choose.
Method #1: Webflow Cloud API proxy (recommended for authenticated APIs)
Webflow Cloud lets you deploy a Next.js, Astro or Vite app alongside your Webflow site on the same domain. An API route in that app acts as a proxy: your Webflow page calls the proxy, the proxy calls the external API server-side, and only the cleaned response reaches the browser. The API key never leaves the server.
This is the only approach I use for production sites with authenticated APIs. The security benefit is obvious, but the proxy pattern goes further. You can shape the response (strip fields you don't need before they travel over the wire), implement a cache so you're not hammering the external API on every page load, and swap API providers later without touching your frontend code.
The tradeoff: Webflow Cloud requires Node.js 22 or later, a GitHub account, and a repository to deploy from. The initial setup takes about 30 minutes.
Method #2: Code Embed + client-side fetch (public APIs only)
If the API you're calling is genuinely public (no authentication required, or authentication explicitly designed to be visible), you can call it directly from a Code Embed element using fetch(). No Webflow Cloud or backend is needed, though the Code Embed element itself requires a Core, Growth, Agency, or Freelancer Workspace, or an active Site plan on the site.
The caveat is absolute: if the API requires a key, do not use this approach. Every URL and header your page sends is visible in browser devtools, including credentials embedded in client-side JavaScript.
I've had clients come to me after being billed thousands of dollars in API overages because a competitor found and used their exposed key. It takes about 30 seconds with DevTools open.
Good use cases for client-side fetch: public government datasets, open weather APIs without auth, and endpoints you've purposely designed to be publicly accessible. If there's a key involved, move to Method 1.
Method #3: No-code automation with Zapier and native integrations (event-driven only)
Zapier and Webflow's native integration library connect Webflow to external services without custom code. A Webflow form submission triggers a Zap that sends data to Salesforce, Airtable, HubSpot, or hundreds of other tools; all configured through a dashboard, not a code editor.
This approach works for event-driven workflows: something happens (e.g., a form is submitted or a CMS item is published), and data flows to an external system. It does not work for displaying live external data on your Webflow pages
If you need a price feed, inventory count, or user-specific data to appear in the browser, you need Method 1 or Method 2. Method 3 is unidirectional and asynchronous by design. It's a data pipe, not a data source for your frontend.
What do you need to integrate an external API with Webflow?
The prerequisites depend on the method you use. For the Webflow Cloud proxy approach (which handles the widest range of cases, including APIs that require authentication), you need four things in place before you start.
Verify all of these before running the CLI.
External API credentials and endpoint documentation
Before writing a single line of proxy code, get your API key and read the authentication docs for your specific API. Every API handles credentials differently: some want an Authorization: Bearer <key> header, some use x-api-key, some embed the key in the URL path.
The proxy code you write depends entirely on what the API expects, so this step isn't optional
Check rate limits and pricing before you build a caching strategy. If the API allows 1,000 calls per day for free and your site gets 5,000 visitors, a ten-minute cache keeps you well inside the limit
If it's billed per call with no free tier, caching is critical; every uncached request is billable. I've seen a staging environment with aggressive load testing and no cache generate a $400 API bill in two hours. Read the pricing page before you deploy anything.
A Webflow account, and a decision about where the app lives
You do not necessarily need an existing site. Webflow Cloud apps deploy either attached to a site, where the app mounts at a path on that site's domain, or standalone on their own domain, with no site involved. Both are supported, and app hosting is included on every tier, including the free Starter plan, so a paid site plan is not the gate people assume it is.
This guide takes the site-attached route, because a proxy is usually most useful on the same domain as the pages calling it. Setting /app as the mount path means your API routes live at mysite.webflow.io/app/api/your-route, same-origin with your pages, which is what removes the CORS problem entirely.
The site needs to be published at least once before your Webflow Cloud environment goes live. If you see a 404 at your mount path after a successful deployment, publishing your Webflow site activates the route in Webflow's routing layer, particularly on first-time setup.
The environment is configured, but the mount path isn't active until Webflow publishes it.
GitHub account and repository
Webflow Cloud deploys from a GitHub repository. Every push to your configured branch automatically triggers a new build and deployment. You need a GitHub account and a repository for your app before you can create a Webflow Cloud project.
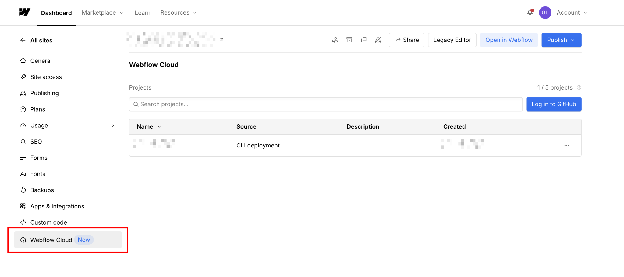
The GitHub App installation step in Webflow Cloud's settings is mandatory. Webflow needs read access to the repository to pull and build your code. If deployments stop triggering after you change GitHub settings or move a repository, check this first.
Navigate to Site Settings, open the Webflow Cloud sidebar, and click "Install GitHub" to verify Webflow Cloud still has access to your repository.
Node.js 22 or later and npm
Webflow Cloud requires Node.js 22 or later, and the Webflow CLI raises the effective floor to 22.13.0, so match that rather than the platform minimum. Check your version with node --version before initializing a project, and update via nodejs.org or a version manager like nvm if needed.
Note also that npm is currently the only package manager Webflow Cloud supports for the build
The Webflow CLI uses npm as the package manager. Yarn and pnpm are not supported at this time.
Install the CLI globally once you've confirmed your Node version:
npm install -g @webflow/webflow-cliRun webflow --version to confirm the installation succeeded. If the command isn't found, the global install path may not be in your PATH; a common issue on macOS with certain Node version managers.
5 steps to build an API proxy with Webflow Cloud
The Webflow Cloud proxy is a Next.js or Astro API route that calls your external API server-side, optionally shapes and caches the response, and returns only what your frontend needs. The approach hides credentials, reduces unnecessary API calls, and decouples your frontend entirely from the external API provider.
Here's the full setup.
1. Initialize your Webflow Cloud project
Run webflow cloud init in your terminal. The prompt that matters most is the first one, and it is the one most walkthroughs skip: "Where do you want to deploy this app?" Its default is New domain, which creates a standalone app on its own domain, mounted at /.
Choose Existing site instead. Everything later in this guide assumes a site-attached app: the Webflow Cloud panel inside that site's settings, URLs like mysite.webflow.io/app/api/data, and the Publish step in the Designer. Accept the default, and none of that applies, which is a confusing place to end up ten minutes in.
The remaining prompts cover the framework (Next.js, Astro or Vite), an app name, the mount path (for example,/app), authenticating with your Webflow account and searching for the site to attach to.
One naming note: cloud init and cloud deploy still work, but Webflow now treats the apps namespace as canonical and documents these as deprecated aliases that emit warnings. At the time of writing apps ships only on the CLI's pre-release channel, so cloud remains the working choice on a default install.
webflow cloud initAfter initialization, the CLI creates a scaffolded project directory and imports your Webflow design system via DevLink.
Navigate into it and initialize a git repository:
cd your-project-name
git init
Push the repository to GitHub. Once it's there, navigate to your Webflow site's Settings and select "Webflow Cloud" from the sidebar. Click "Login to GitHub," then "Install GitHub" to grant Webflow Cloud access to your repositories.
With GitHub connected, click "Create New Project," enter your project name and the GitHub repository URL, then click "Create project." Next, click "Create environment" and configure the branch to deploy from and the mount path. Finally, click "Publish" in your Webflow Designer or Dashboard.
Most people miss that publish step. The mount path only becomes active after publishing. Without it, you'll get a 404 at your proxy URL.
2. Create the API route
In your scaffolded project, create the API route file. The location depends on your framework.
For Astro, create src/pages/api/data.ts. For Next.js, create app/api/data/route.ts.
Neither framework needs a runtime declaration here, and adding one is the most common way these routes get broken.
For Next.js, do not add export const runtime = "edge". Webflow Cloud builds Next.js apps with the OpenNext Cloudflare adapter, and its setup guide says to remove that line from every source file because it doesn't support the Next.js Edge runtime. Route Handlers should stay on the Node.js runtime, which is the default and which exposes the Node APIs the Workers runtime provides.
For Astro, do not add export const config = { runtime: "edge" } either. Astro has no such route export: its documented route-level export is export const prerender, and Webflow's own Astro examples for storage bindings include no runtime declaration.
Webflow Cloud installs and wires the adapter for you, and its configuration guide says plainly that "you don't need to add an adapter, a base path, or an output mode."
Be aware that Webflow's bring-your-own-app page still suggests adding an edge directive to API routes for both frameworks. That advice predates the current build pipeline; follow the adapter that actually compiles your app.
For Astro:
// src/pages/api/data.ts
export async function GET({ locals }: any) {
    const env = locals.runtime.env;
    const API_KEY = env.MY_API_KEY || process.env.MY_API_KEY;

    if (!API_KEY) {
        return new Response(
            JSON.stringify({ error: 'Server configuration error' }),
            { status: 500, headers: { 'Content-Type': 'application/json' } }
        );
    }

    const response = await fetch(`https://api.example.com/endpoint?key=${API_KEY}`);

    if (!response.ok) {
        return new Response(
            JSON.stringify({ error: 'External API request failed' }),
            { status: response.status, headers: { 'Content-Type': 'application/json' } }
        );
    }

    const data = await response.json();
    return new Response(JSON.stringify(data), {
        headers: { 'Content-Type': 'application/json' }
    });
}
For Next.js:
// app/api/data/route.ts
export async function GET(request: Request) {
    const apiKey = process.env.MY_API_KEY;

    if (!apiKey) {
        return Response.json({ error: 'Server configuration error' }, { status: 500 });
    }

    const response = await fetch(`https://api.example.com/endpoint?key=${apiKey}`);

    if (!response.ok) {
        return Response.json({ error: 'External API request failed' }, { status: response.status });
    }

    const data = await response.json();
    return Response.json(data);
}
Both patterns do the same thing: retrieve the API key from server-side environment variables, call the external API and return the response. The MY_API_KEY value is never sent to the browser. Replace the fetch URL and any headers with what your specific API requires.
Neither snippet declares a runtime, which is deliberate. If you have seen a version of this pattern that does, it was written against an earlier build pipeline.
3. Add your API key as an environment variable
In Webflow, navigate to Site Settings and open the Webflow Cloud sidebar. Select your project and open the environment you just created.
Find the environment variables section and add a new variable:
- Name:
MY_API_KEY - Value: your actual API key
Variable names are case-sensitive. MY_API_KEY and my_api_key are different variables, and the mismatch does not produce an error. Your code just reads undefined, and the API call fails silently. After adding any variable, redeploy the app. Variables added after the last deployment are not available until the next build runs.
For local development, create a .env file at the project root and add the key there. The CLI populates a .env file during Webflow auth login, so you may already have it. Never commit .env to GitHub.
4. Call the proxy from your Webflow page
With the API route deployed, call it from your Webflow page using a Code Embed element. The path must include your mount prefix: /app/api/data rather than /api/data. That is still a root-relative path, so this is about the prefix rather than about relative versus absolute URLs.
Inside a Next.js app, read the prefix at runtime rather than hard-coding it, since Webflow Cloud sets it from your environment's mount path:
const baseUrl = process.env.NEXT_PUBLIC_BASE_PATH ?? '';
const response = await fetch(`${baseUrl}/api/data`);
In a Code Embed on a Webflow page, you have no access to that variable, so the literal prefix is fine there. Just remember to update it if you ever remount the environment.
Add a Code Embed element to your Webflow page:
<div id="api-output">Loading...</div>

<script>
  async function loadData() {
    try {
      const response = await fetch('/app/api/data');
      if (!response.ok) throw new Error('Request failed');
      const data = await response.json();
      document.getElementById('api-output').textContent = JSON.stringify(data, null, 2);
    } catch (error) {
      document.getElementById('api-output').textContent = 'Error loading data.';
    }
  }

  loadData();
</script>
Replace /app/api/data with your mount path and route name. If your mount path is /feeds and your route file is api/prices.ts, the fetch URL is /feeds/api/prices. Getting this path wrong is one of the most common reasons the call returns 404 in production while working fine in local dev.
Publish your Webflow site after adding the Code Embed. Scripts inside a Code Embed render in preview and comment modes so that you can check the call there; publishing only changes whether the behavior is live for visitors.
If you specifically want code excluded from preview, Webflow supports wrapping it in an EXCLUDE FROM PREVIEW comment, which only exists because running in preview is the default.
5. Add response caching with KV Store
Without caching, every page load that calls your proxy triggers a fresh request to the external API. For a read-heavy page, this adds up fast. If you're displaying the same data to everyone and it changes only once an hour, there's no reason to make one external API call per visitor.
First, declare a KV Store binding in your wrangler.json file at the project root:
{
  "$schema": "node_modules/wrangler/config-schema.json",
  "name": "my-app",
  "compatibility_date": "2025-04-15",
  "kv_namespaces": [
    {
      "binding": "CACHE_KV",
      "id": "placeholder"
    }
  ]
}
The name and compatibility_date fields are not decoration. Webflow Cloud validates this file before it reads your bindings, and a validation failure doesn't fail the build; it logs the error and deploys your app without any bindings at all.
You get a green deploy and an undefined binding at runtime, which surfaces as a cache-lookup crash rather than a config error. If bindings ever appear missing in a deployed environment, read the build log before touching anything else.
The id can stay a placeholder. Webflow Cloud provisions the namespace per environment and substitutes the real ID at deploy time; the binding name must match what your code reads. After deployment, the Storage tab in your environment dashboard shows the binding and its status.
Then update your API route to check the cache before calling the external API:
// Astro — src/pages/api/data.ts with caching
export async function GET({ locals }: any) {
    const env = locals.runtime.env;
    const API_KEY = env.MY_API_KEY;
    const kv = env.CACHE_KV;

    if (!API_KEY) {
        return Response.json({ error: 'Server configuration error' }, { status: 500 });
    }

    // Check cache first
    const cached = await kv.get('api_response');
    if (cached) {
        return new Response(cached, {
            headers: { 'Content-Type': 'application/json', 'X-Cache': 'HIT' }
        });
    }

    try {
        const response = await fetch(`https://api.example.com/endpoint?key=${API_KEY}`);

        // Check before caching. Without this, one upstream 429 or 500
        // gets JSON-parsed and written to KV, and you serve that error
        // to every visitor for the full TTL.
        if (!response.ok) {
            return Response.json(
                { error: 'External API request failed' },
                { status: response.status }
            );
        }

        const data = await response.json();

        await kv.put('api_response', JSON.stringify(data), { expirationTtl: 600 });

        return new Response(JSON.stringify(data), {
            headers: { 'Content-Type': 'application/json', 'X-Cache': 'MISS' }
        });
    } catch (error) {
        // A non-JSON error body makes response.json() throw. Without
        // the catch that surfaces as an unhandled 500 with no shape.
        console.error('Proxy error:', error);
        return Response.json({ error: 'Upstream request failed' }, { status: 502 });
    }
}
Note that the guards from step 2 are still here. Caching is where they matter most: an unchecked error response does not just fail one request; it gets written to KV and served to everyone for the next ten minutes.
For Next.js, the shape is the same, but you reach the binding differently. There is no locals.runtime.env; you pull the Cloudflare context from the adapter:
// app/api/data/route.ts with caching
import { getCloudflareContext } from '@opennextjs/cloudflare';

export async function GET() {
    // Read bindings inside the handler, not at module scope.
    const { env } = getCloudflareContext();
    const kv = env.CACHE_KV;
    const apiKey = process.env.MY_API_KEY;

    if (!apiKey) {
        return Response.json({ error: 'Server configuration error' }, { status: 500 });
    }

    const cached = await kv.get('api_response');
    if (cached) {
        return new Response(cached, {
            headers: { 'Content-Type': 'application/json', 'X-Cache': 'HIT' },
        });
    }

    try {
        const response = await fetch(`https://api.example.com/endpoint?key=${apiKey}`);

        if (!response.ok) {
            return Response.json(
                { error: 'External API request failed' },
                { status: response.status }
            );
        }

        const data = await response.json();
        await kv.put('api_response', JSON.stringify(data), { expirationTtl: 600 });

        return Response.json(data, { headers: { 'X-Cache': 'MISS' } });
    } catch (error) {
        console.error('Proxy error:', error);
        return Response.json({ error: 'Upstream request failed' }, { status: 502 });
    }
}
The expirationTtl: 600 sets a 10-minute TTL. After 600 seconds, the cached entry expires, and the next request fetches fresh data from the external API. Tune this value based on how frequently your data changes.
Mind the floor when you tune it: Webflow Cloud documents a minimum cache TTL of 60 seconds, so it rejects values below that rather than honoring them. That rules out the sub-minute caching people reach for first, such as a 30-second TTL on a live sports score.
KV Store is also eventually consistent, with writes propagating globally in roughly 60 seconds, so the effective freshness floor is about a minute either way. For anything that must be identical across all regions the instant it changes, KV is the wrong tool, and you want the call to go through uncached.
What causes external API integrations to fail in Webflow?
Most Webflow Cloud API integration failures come down to four issues: a 404 at the proxy endpoint, a missing API key in production, a CORS error from a misplaced client-side call, or stale data that doesn't reflect recent changes.
Each has a distinct symptom. Here's how to identify and fix them.
404 on the proxy endpoint after deployment
Symptom: Your API route works in local development (npm run dev), but returns 404 at mysite.webflow.io/app/api/data after deployment.
Cause 1: You didn't publish the Webflow site after creating the environment. Creating a Webflow Cloud environment doesn't automatically make the mount path live. The 404 error appears because the Webflow routing layer doesn't yet know about the new environment.
Fix: If you haven't published the Webflow site yet, do so now. Click 'Publish' in the top right corner of the Designer or Dashboard and wait 10–30 seconds. For subsequent deployments, you no longer need to republish the site.
Cause 2: GitHub App doesn't have repository access. Deployments fail silently when Webflow Cloud can't read the repository.
Fix: Navigate to Site Settings, open the Webflow Cloud sidebar, and click "Install GitHub." Follow the GitHub prompts to confirm Webflow Cloud has read access to your specific repository. After confirming access, push a commit to trigger a new build.
Cause 3: Wrong mount path in the fetch URL. Your environment is configured with the mount path /app, but your Code Embed fetches from /api/data, which doesn't exist in the Webflow routing layer.
Fix: Always prefix the fetch path with the full mount path. Check your environment configuration in the Webflow Cloud sidebar to confirm the exact mount path, then update the fetch() call in your Code Embed to match.
API key not found in production
Symptom: The proxy returns a 500 Server configuration error in production, but works in local dev where .env is present.
Cause: Environment variables added in Webflow Cloud are only available after the next deployment. If you set the variable after the last build, the currently running app still doesn't see it.
Fix: After adding any environment variable in Webflow Cloud, trigger a redeploy by either pushing a commit to GitHub or running webflow cloud deploy from your terminal. Check the build logs in the Deployments section to confirm the deploy completed.
Also, double-check the variable name for case sensitivity. MY_API_KEY and my_api_key are different variables, and the mismatch shows no error, just undefined at runtime.
CORS errors on client-side fetches
Symptom: Browser console shows Access-Control-Allow-Origin errors when calling an external API from a Code Embed.
Cause: A browser is making a cross-origin request to an API that does not return an Access-Control-Allow-Origin header permitting your domain, and the browser refuses to hand the response to your JavaScript.
Note that this has nothing to do with credentials: a completely public, keyless API triggers the identical error if it omits those headers, which is why this bites Method 2 as often as anything else. It affects only browser-initiated requests; server-to-server calls aren't subject to CORS at all.
Fix: Move the API call to a Webflow Cloud proxy route. Your Code Embed fetches from /app/api/data (same domain, no CORS check), and the proxy fetches from the external API server-side. The CORS error disappears because the second request is server-to-server. This also solves the key exposure problem.
What to build next with your Webflow API integration
Once a proxy works, the same pattern covers most third-party work on Webflow Cloud. For a working example that adds a database behind the proxy, see our Neon Postgres guide; for one that writes back into the CMS, see the CMS API guide.
A working server-side proxy turns Webflow Cloud into a full-stack backend layer. Once the pattern is solid, most teams extend it in two directions: exposing Webflow's CMS as a queryable API and building more complex data pipelines.
Explore Webflow's developer documentation for the complete extensibility surface: Data API for content management, Designer API for programmatic design changes, Code Components for reusable React components in the visual canvas, and Webflow Cloud's three storage options (KV Store, SQLite, and Object Storage) for persistent backend state.
Frequently asked questions
Can I call external APIs from Webflow without Webflow Cloud?
Yes, but only for public APIs with no credentials. A Code Embed lets you call fetch() client-side, as long as your Workspace or Site plan includes custom code. If the API requires a key, you need Webflow Cloud. You can't hide credentials in a client-side script.
Does Webflow Cloud work with any external API?
Any API accessible over HTTPS from a server. Webflow Cloud runs on Cloudflare's edge network, so APIs with IP allowlists may not work without additional configuration. Most REST APIs have no IP restrictions and work without changes.
What's the difference between Webflow Cloud and Webflow's native integrations?
Native integrations connect Webflow to external tools without code, typically for form submissions, CRM sync, and publishing automation. Webflow Cloud is for custom server-side logic: API proxies, caching layers, and full-stack apps. They solve different problems and are not interchangeable.
How much does Webflow Cloud cost?
Webflow Cloud is available on paid Webflow site plans. Check webflow.com/pricing for current plan details. KV Storage, SQLite, and Object Storage each have usage quotas that vary by plan.
Can I proxy multiple external APIs from a single Webflow Cloud project?
Yes. Create a separate API route file for each external API (api/weather.ts, api/pricing.ts, api/inventory.ts ), and add each service's credentials as separate environment variables. All routes deploy under the same project's mount path. There's no limit on the number of routes per project, though very high request volumes will count toward your plan's usage quotas.



















