


Connect Webflow frontends to Shopify Plus B2B commerce APIs through serverless middleware for customer-specific pricing, catalogs, and draft orders.
Building B2B wholesale portals that combine Webflow's frontend flexibility with Shopify's commerce infrastructure requires a three-tier architecture with serverless middleware. This guide explains the system relationships, authentication patterns, and API boundaries you need to understand before implementation.
Integration architecture overview
The Shopify-Webflow integration connects Webflow's visual development and CMS capabilities to Shopify's B2B features, including company accounts, customer-specific pricing, volume discounts, and payment terms. Shopify Plus is required for B2B functionality.
The integration requires mandatory server-side middleware because Shopify enforces strict CORS policies that block direct browser-to-API requests. Your Webflow frontend communicates with a serverless proxy layer, which handles authentication and forwards requests to Shopify's APIs.
The integration architecture follows this flow:
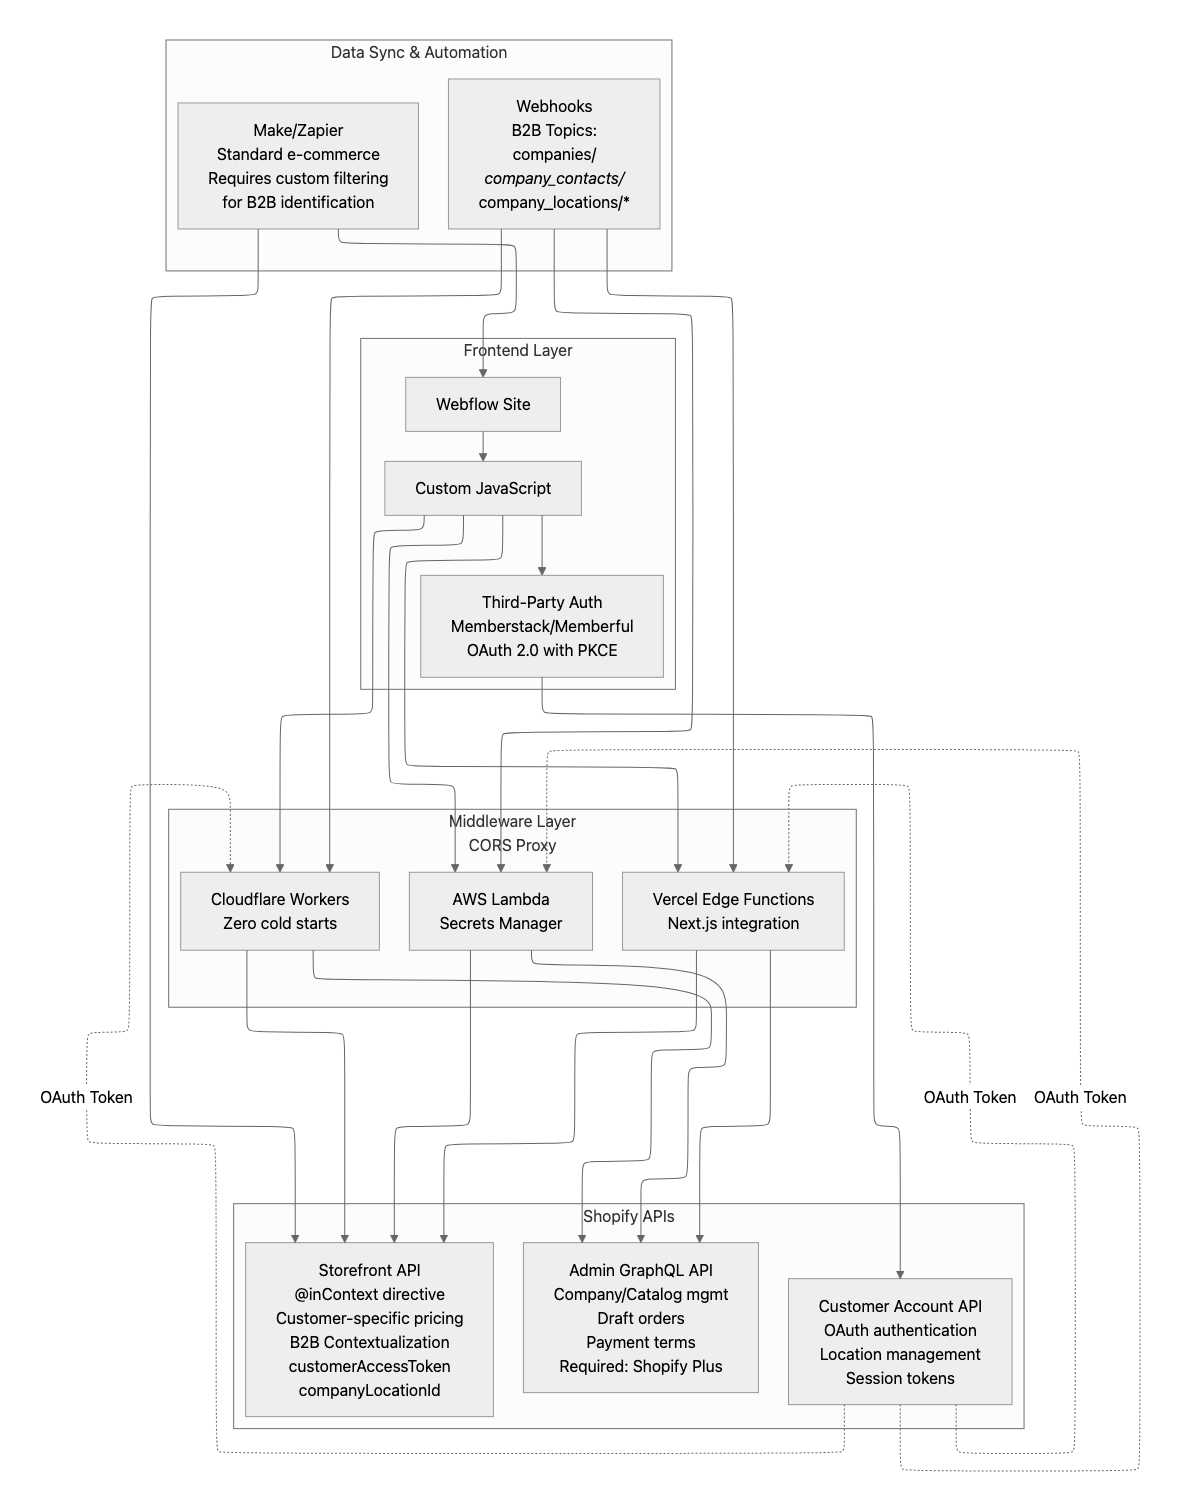
Two Shopify APIs serve distinct purposes in B2B implementations:
- Storefront API: Returns customer-specific pricing from assigned price lists when queries include customerAccessToken and companyLocationId via the @inContext directive, and filters products based on company-specific catalog assignments
- Admin GraphQL API: Manages Company, CompanyLocation, and CompanyContact objects, creates and assigns Catalogs and PriceLists, configures payment terms per location, and handles draft order creation with purchasingEntity parameter
The Storefront API cannot create draft orders, manage catalogs, or access payment terms. These operations require Admin API access with appropriate OAuth scopes.
Prerequisites and platform requirements
Before starting implementation, you need accounts and access configured on both platforms, plus a middleware service.
At a high level, you'll need:
- Shopify Plus subscription (required for B2B API access)
- Webflow site with CMS and custom code access
- Third-party membership platform (Memberstack, Memberful, or similar) for B2B customer portal authentication
- Serverless platform account (Cloudflare Workers, Vercel Edge Functions, or AWS Lambda)
Shopify configuration requirements
You'll configure B2B features in your Shopify Plus admin, create a custom app with Admin API access, add required OAuth scopes for B2B operations, and generate Storefront and Admin API access tokens.
Required OAuth scopes for B2B operations:
Configure your Shopify custom app with the required B2B scopes and generate both Storefront API (for customer-facing pricing queries) and Admin API access tokens via the OAuth client credentials grant flow.
Webflow configuration requirements
Webflow requires API tokens for CMS operations.
Configure the following:
- Site API token with CMS read/write permissions
- Custom code in head and body tags for JavaScript injection via Project Settings
- CMS collections for product data synchronization (if caching Shopify data)
Step 1: Implement authentication for B2B customers
B2B customer authentication uses OAuth 2.0 with PKCE via Shopify's Customer Account API, enabling passwordless, email-based login and validating company associations.
At a high level, you'll:
- Generate PKCE code verifier and challenge client-side
- Redirect customers to Shopify's authorization endpoint
- Exchange authorization codes for tokens server-side
- Store tokens securely and retrieve company context
The authentication flow works as follows:
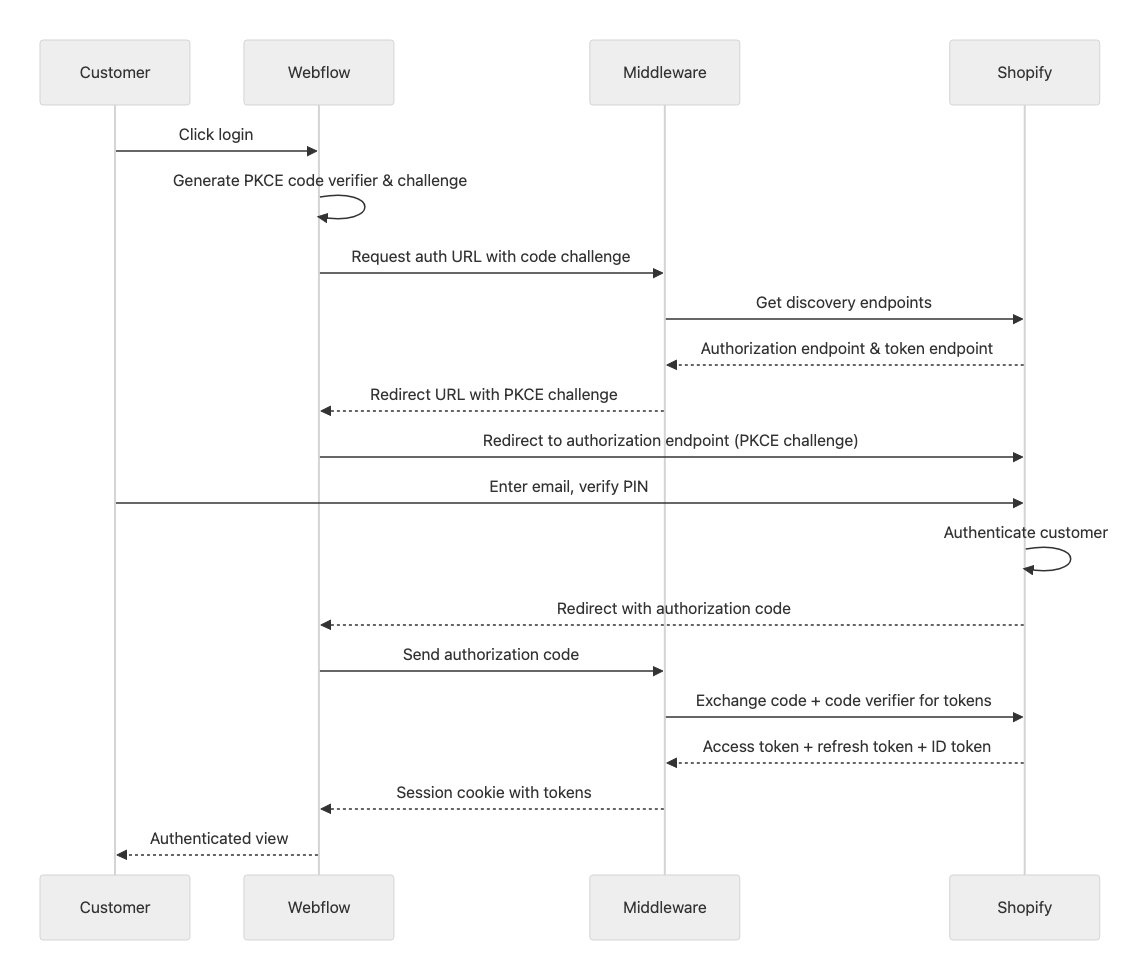
Generate PKCE parameters
PKCE authentication requires generating a cryptographically random code verifier on the client and computing its SHA-256 hash as the code challenge. The verifier must be stored securely on the server during the OAuth token exchange step — never expose access tokens, refresh tokens, or private API credentials to the client.
Generate PKCE parameters with this code:
// Generate cryptographically random code verifier (43-128 characters)
function generateCodeVerifier() {
  const array = new Uint8Array(32);
  crypto.getRandomValues(array);
  return base64URLEncode(array);
}

// Compute SHA-256 hash as code challenge
async function generateCodeChallenge(verifier) {
  const encoder = new TextEncoder();
  const data = encoder.encode(verifier);
  const hash = await crypto.subtle.digest('SHA-256', data);
  return base64URLEncode(new Uint8Array(hash));
}

// Base64 URL encoding (RFC 4648)
function base64URLEncode(buffer) {
  return btoa(String.fromCharCode(...buffer))
    .replace(/\+/g, '-')
    .replace(/\//g, '_')
    .replace(/=+$/, '');
}

// Usage: Generate parameters before OAuth redirect
const codeVerifier = generateCodeVerifier();
const codeChallenge = await generateCodeChallenge(codeVerifier);

// Store verifier server-side for token exchange
// Send codeChallenge with authorization request
For complete OAuth 2.0 with PKCE implementation details and B2B authentication flows, see Shopify's Customer Account API authentication guide.
Retrieve company context after authentication
Once authenticated with proper company context (customerAccessToken and companyLocationId), query the customer's company location associations via the Admin API to retrieve assigned catalogs and corresponding price lists that determine product visibility and pricing for that customer.
Query company associations with this GraphQL query:
query GetCustomerCompanyContext {
  customer {
    id
    companyContacts(first: 5) {
      edges {
        node {
          company { id name }
          location {
            id
            catalogs(first: 5) { ... }
            paymentTerms { ... }
          }
        }
      }
    }
  }
}
This query returns the companyLocationId needed for contextualized product queries. Refer to the Customer Account API for available location-related fields and mutations for location management.
Step 2: Set up serverless middleware
The middleware layer proxies requests between Webflow and Shopify's dual APIs, handling CORS headers, maintaining strict API boundaries (Storefront API for customer-facing B2B pricing and catalogs; Admin GraphQL API for company management and draft orders), and keeping private access tokens exclusively server-side via environment variables or a secure secrets management system.
Implementation options include:
- Cloudflare Workers for zero cold starts and global edge deployment
- Vercel Edge Functions for Next.js integration
- AWS Lambda for enterprise secrets management with automatic rotation
Configure Cloudflare Workers
Cloudflare Workers provide zero cold starts with V8 isolates, making them ideal for latency-sensitive applications requiring sub-millisecond startup times and global edge deployment across 330+ data centers.
The middleware handles CORS preflight requests, proxies authenticated requests to Shopify, and adds appropriate response headers:
export default {
  async fetch(request, env) {
    const url = new URL(request.url);

    // Validate origin against allowed domains
    const origin = request.headers.get('Origin');
    if (origin !== env.ALLOWED_ORIGINS) {
      return new Response('Forbidden', { status: 403 });
    }

    // Handle CORS preflight requests
    if (request.method === 'OPTIONS') {
      return new Response(null, {
        headers: {
          'Access-Control-Allow-Origin': env.ALLOWED_ORIGINS,
          'Access-Control-Allow-Methods': 'GET, POST, OPTIONS',
          'Access-Control-Allow-Headers': 'Content-Type',
          'Access-Control-Max-Age': '86400'
        }
      });
    }

    // Proxy request to Shopify Storefront API
    const shopifyResponse = await fetch(
      `https://${env.SHOPIFY_STORE_DOMAIN}/api/${env.SHOPIFY_API_VERSION}/graphql.json`,
      {
        method: 'POST',
        headers: {
          'X-Shopify-Storefront-Access-Token': env.SHOPIFY_STOREFRONT_TOKEN,
          'Content-Type': 'application/json'
        },
        body: request.body
      }
    );

    // Add CORS headers to response
    const response = new Response(shopifyResponse.body, shopifyResponse);
    response.headers.set('Access-Control-Allow-Origin', env.ALLOWED_ORIGINS);
    return response;
  }
}
Configure secrets using the Wrangler CLI: wrangler secret put SHOPIFY_STOREFRONT_TOKEN. See Cloudflare Workers secrets documentation for environment setup.
Configure environment variables
Store these values in your serverless platform's secrets management:
SHOPIFY_STORE_DOMAIN=your-store.myshopify.com
SHOPIFY_STOREFRONT_TOKEN=your-private-storefront-access-token
SHOPIFY_ADMIN_TOKEN=your-admin-api-oauth-token
SHOPIFY_API_VERSION=2024-01
ALLOWED_ORIGINS=https://your-site.webflow.io
Never expose Admin API tokens or private Storefront tokens in client-side code. The OWASP Secrets Management Cheat Sheet provides additional security guidelines.
Step 3: Query B2B pricing and catalogs
The Storefront API returns customer-specific pricing when queries include the @inContext directive and both a customerAccessToken and a companyLocationId parameter.
At a high level, you'll:
- Retrieve customer-specific pricing from assigned price lists
- Return volume pricing tiers via quantityPriceBreaks
- Enforce quantity rules (minimum, maximum, increment) per variant
- Filter products based on company-specific catalog assignments
Build contextualized product queries
This contextualized query returns customer-specific pricing from the assigned price list, including volume discounts, quantity rules (minimum, maximum, increment), and quantity price breaks. The query includes products with the @inContext directive and requests variants with the price, quantityRule, and quantityPriceBreaks fields.
Key query fields:
Reference Shopify's B2B headless implementation guide for complete query patterns.
Transform response data structure
The Storefront API returns nested GraphQL edges. Transform in middleware to flatten the structure before sending to Webflow.
Shopify Storefront API response structure:
{
  "data": {
    "products": {
      "edges": [
        {
          "node": {
            "id": "gid://shopify/Product/123456789",
            "title": "Industrial Widget Pro",
            "variants": {
              "edges": [
                {
                  "node": {
                    "id": "gid://shopify/ProductVariant/987654321",
                    "price": { "amount": "24.99", "currencyCode": "USD" },
                    "quantityRule": { "min": 10, "max": 1000, "increment": 5 }
                  }
                }
              ]
            }
          }
        }
      ]
    }
  }
}
Webflow CMS item structure:
{
  "name": "Industrial Widget Pro",
  "slug": "industrial-widget-pro",
  "shopify-product-id": "gid://shopify/Product/123456789",
  "shopify-variant-id": "gid://shopify/ProductVariant/987654321",
  "price": 24.99,
  "min-quantity": 10,
  "max-quantity": 1000,
  "quantity-increment": 5
}
Field mapping between Shopify and Webflow:
- node.title → name (direct copy)
- node.title → slug (lowercase, hyphenate spaces)
- node.id → shopify-product-id (direct copy)
- variants.edges[0].node.id → shopify-variant-id (unwrap edges array)
- variants.edges[0].node.price.amount → price (string to number conversion)
- variants.edges[0].node.quantityRule.* → min-quantity, max-quantity, quantity-increment (flatten nested object)
See the Storefront API reference for complete response schemas.
Step 4: Create draft orders with company context
Draft orders enable quote-to-order workflows for B2B customers through the Admin GraphQL API. This operation requires the Admin GraphQL API with write_draft_orders scope and cannot be performed using the Storefront API.
Create a draft order with this mutation:
mutation CreateB2BDraftOrder($input: DraftOrderInput!) {
  draftOrderCreate(input: $input) {
    draftOrder {
      id
      name
      totalPrice
      purchasingEntity {
        ... on PurchasingCompany {
          company { id name }
          location { id name }
        }
      }
    }
    userErrors { field message }
  }
}
Input variables include the company location association:
{
  "input": {
    "purchasingEntity": {
      "customerId": "gid://shopify/Customer/123456",
      "companyLocationId": "gid://shopify/CompanyLocation/789012"
    },
    "lineItems": [
      {
        "variantId": "gid://shopify/ProductVariant/111222",
        "quantity": 50
      }
    ]
  }
}
The purchasingEntity parameter links the draft order to a specific company location, which determines applicable payment terms and pricing. See the draftOrderCreate mutation reference for all available input fields.
Step 5: Configure webhook synchronization
Shopify webhooks notify your middleware of B2B-related events. B2B-specific webhook topics (companies/create, company_contacts/create, company_locations/create, and related events) became available in the 2023-04 Admin API version.
At a high level, you'll:
- Register webhooks using the Admin GraphQL API
- Configure HTTPS endpoints in your middleware
- Implement HMAC-SHA256 signature verification
- Handle retries and ensure idempotent processing
Register B2B webhook topics
B2B-specific webhook topics notify your system when company-related data changes.
Available webhook topics:
Register webhooks using the Admin GraphQL API:
mutation CreateWebhook {
  webhookSubscriptionCreate(
    topic: COMPANIES_UPDATE
    webhookSubscription: {
      format: JSON
      callbackUrl: "https://your-middleware.com/webhooks/companies"
    }
  ) {
    webhookSubscription { id topic }
    userErrors { field message }
  }
}
Reference the WebhookSubscriptionTopic enum for all available topics.
Handle webhook payloads
When a company is updated, Shopify sends a POST request to your registered endpoint.
HTTP headers structure:
X-Shopify-Topic: companies/update
X-Shopify-Hmac-Sha256: XYZ123abc456defGHI789jklMNO012pqrSTU345vwx==
X-Shopify-Shop-Domain: your-store.myshopify.com
X-Shopify-API-Version: 2024-01
X-Shopify-Webhook-Id: b54557e4-bdd9-4b37-8a5f-bf7d70bcd043
Content-Type: application/json
Request body structure:
{
  "id": 1073339468,
  "name": "Acme Corporation",
  "created_at": "2024-01-15T10:30:00-05:00",
  "updated_at": "2024-02-10T14:22:18-05:00",
  "customer_since": "2023-06-01T00:00:00-05:00",
  "note": "Premium wholesale customer - NET 30 terms",
  "main_contact_admin_graphql_api_id": "gid://shopify/CompanyContact/789012",
  "admin_graphql_api_id": "gid://shopify/Company/1073339468"
}
Process webhook data asynchronously after responding with HTTP 200 OK within 5 seconds to prevent retries.
Verify webhook signatures
Shopify requires HMAC-SHA256 signature verification for all webhook endpoints. Compute the hash on the raw request body before JSON parsing, use timing-safe comparison, and return HTTP 200 OK within 5 seconds.
Implement signature verification with this code:
const crypto = require('crypto');

function verifyShopifyWebhook(rawBody, hmacHeader, apiSecret) {
  // Compute HMAC-SHA256 on raw, unparsed request body
  const computedHmac = crypto
    .createHmac('sha256', apiSecret)
    .update(rawBody, 'utf8')
    .digest('base64');

  // Use timing-safe comparison to prevent timing attacks
  const computedBuffer = Buffer.from(computedHmac, 'base64');
  const headerBuffer = Buffer.from(hmacHeader, 'base64');

  if (computedBuffer.length !== headerBuffer.length) {
    return false;
  }

  return crypto.timingSafeEqual(computedBuffer, headerBuffer);
}

// Express.js middleware example
app.post('/webhooks/companies',
  express.raw({ type: 'application/json' }),
  (req, res) => {
    const hmac = req.get('X-Shopify-Hmac-Sha256');
    const webhookId = req.get('X-Shopify-Webhook-Id');

    // Verify signature before processing
    if (!verifyShopifyWebhook(req.body, hmac, process.env.SHOPIFY_API_SECRET)) {
      return res.status(401).send('HMAC verification failed');
    }

    // Return 200 OK immediately (within 5 seconds)
    res.status(200).send('OK');

    // Store webhookId for idempotency checking
    // Process webhook data asynchronously
    const data = JSON.parse(req.body.toString());
    processWebhookAsync(webhookId, data);
  }
);
See Shopify's HTTPS webhook delivery documentation for complete implementation requirements.
Step 6: Integrate with Webflow frontend
Webflow's custom code capabilities support dynamic functionality through JavaScript injection and CMS integration. For B2B customer portals, third-party platforms such as Memberstack, Memberful, or MemberSpace are required to support enterprise authentication, SSO, and multi-tenancy.
At a high level, you'll:
- Add custom JavaScript via Project Settings code injection
- Use custom attributes for data binding to Shopify product IDs
- Integrate a third-party authentication platform for B2B login
- Call your middleware endpoints instead of Shopify APIs directly
Add custom JavaScript to Webflow
Create a B2B portal object that handles product fetching through your middleware.
Add this code before the </body> tag in Project Settings:
<!-- Before </body> tag in Project Settings -->
<script>
const B2BPortal = {
  middlewareUrl: 'https://your-middleware.workers.dev',

  async fetchProducts(companyLocationId, customerAccessToken) {
    const response = await fetch(`${this.middlewareUrl}/api/products`, {
      method: 'POST',
      headers: { 'Content-Type': 'application/json' },
      credentials: 'include',
      body: JSON.stringify({ variables: { customerAccessToken, companyLocationId } })
    });
    return await response.json();
  }
};
</script>
For complete implementation patterns, see the Shopify B2B headless guide. Custom code does not render in the Webflow Designer. Test functionality on the published site.
Use custom attributes for data binding
Custom attributes link Webflow elements to Shopify data to enable dynamic updates.
Define these attributes on product elements:
Embed CMS collection fields in custom code using Webflow's {{wf.field_name}} template syntax. See using collection fields in custom code for syntax details.
Rate limits and error handling
Shopify and Webflow enforce rate limits that affect integration reliability.
Shopify API rate limits
Shopify applies different rate limits based on API type and plan tier.
Rate limit structure:
Monitor the X-Shopify-Shop-Api-Call-Limit response header (format: current/maximum) and implement proactive throttling when approaching the maximum threshold. See Shopify API usage limits documentation.
Webflow API rate limits
Webflow enforces rate limits based on plan tier.
Rate limit tiers:
Reference Webflow rate limits documentation.
Implement retry logic
Handle 429 responses with exponential backoff: start with a 1-second delay after the first 429 error, double the delay with each subsequent retry, and limit retries to a maximum of 5 attempts. Always respect the Retry-After header when present.
Verification checklist
Confirm integration success by testing these scenarios:
Authentication flow
- Customer completes OAuth 2.0 login with PKCE and receives customerAccessToken
- Company location context (companyLocationId) loads after authentication for B2B pricing and catalog visibility
- Unauthenticated requests return public catalog only; B2B pricing and company-specific products require both customerAccessToken and companyLocationId parameters in Storefront API @inContext directive
B2B pricing display (Shopify Plus Storefront API with @inContext)
- Customer-specific pricing displayed through contextualized queries using customerAccessToken and companyLocationId parameters
- Volume pricing tiers retrieved via quantityPriceBreaks GraphQL field, returning minimum quantities and customer-specific prices
- Quantity rulesare enforced via a quantityRule object specifying minimum, maximum, and increment values per variant
Order operations
- Draft order creation via Admin GraphQL API includes the purchasingEntity parameter for company and location association
- Payment terms configured per company location appear based on the location configuration
- Order webhooks (orders/create, orders/updated) trigger notifications that can be processed via backend handlers or automation platforms (Make, Zapier) to update Webflow CMS
Security verification
- Middleware rejects requests from unauthorized origins using CORS validation
- Webhook signatures are validated using HMAC-SHA256 verification
- API tokens are stored exclusively server-side and never exposed in browser network requests
Troubleshoot common issues
Common integration issues stem from CORS configuration, authentication token handling, and API contextualization requirements.
CORS errors from Webflow to Shopify
Direct browser requests to Shopify APIs fail with CORS errors. Route all API calls through your serverless middleware, configuring proper CORS headers with Access-Control-Allow-Origin matching your Webflow domain exactly.
Authentication token exchange failures
Token exchange must occur server-side. Client-side attempts to call Shopify's token endpoint return CORS errors because Shopify enforces strict CORS policies that block browser requests to prevent credential exposure. Ensure your redirect URI exactly matches the value configured in the Shopify app settings.
Retrieving B2B pricing in contextualized API responses
The Storefront API returns customer-specific B2B pricing when queries are properly contextualized with authentication parameters.
Verify that:
- The @inContext directive includes both customerAccessToken and companyLocationId parameters for B2B query contextualization
- The customer has an active company contact association (prerequisite data state from Admin API)
- The company location has assigned catalogs with active price lists (prerequisite data state from Admin API)
Refer to the Shopify community discussions for additional troubleshooting patterns.
Advanced considerations
Production implementations often require additional patterns for caching, multi-location management, and custom checkout flows.
- Caching strategies: Implement edge caching for B2B pricing data with cache invalidation via webhooks. See Cloudflare Workers KV for edge storage patterns.
- Multi-location company management: Companies with multiple locations require location selection UI and session persistence. See Company Location Management.
- Custom checkout flows: B2B checkout with payment terms requires draft order conversion workflows. See Draft Order API.
Related resources
These official documentation sources provide implementation details for the patterns described in this guide.
Shopify documentation
- B2B headless implementation guide - Complete patterns for Storefront API B2B contextualization
- Customer Account API authentication - OAuth 2.0 with PKCE implementation details
- Admin GraphQL API reference - Company, catalog, and draft order operations
- Webhook best practices - Reliability patterns and signature verification
- B2B App Build documentation - Company and catalog management
- Webhook REST API - Webhook registration and payload formats
Webflow documentation
- CMS API reference - Content management endpoints and rate limits
- Custom code documentation - JavaScript injection patterns
- Membership integrations - Third-party authentication platforms


