


You don’t have to put protected content directly in the HTML and hide it with JavaScript, because anyone with DevTools can read it. Instead, you can move that content behind a Webflow Cloud App that first validates the token on the server side.
Webflow's User Accounts feature sunset on January 29, 2026, and the dedicated User Accounts APIs and webhooks were removed from the Webflow Data API on the same day. Sites built around gated content now need a third-party identity layer.
Auth0 covers identity, but some tutorials wire it up with the SPA SDK and localStorage, then use JavaScript on the Webflow page to show or hide protected content. That pattern doesn't hold up: the content is in the DOM before the script runs, and anyone with DevTools can read it.
In this guide, we move protected content into Webflow Cloud App endpoints and validate the Auth0 token server-side before anything reaches the browser: content retrieves auth info from a logged-in user, passes it to a Webflow Cloud App, and the App verifies it with Auth0.
What do you need to add Auth0 authentication to a Webflow site?
You need an Auth0 account configured as a Regular Web Application, a Webflow Cloud App, and three environment variables before writing any code.
Here are the prerequisites:
- AnAuth0 account: Create it at auth0.com if you don't have one. In the Auth0 dashboard, create a Regular Web Application. Regular Web App issues a client secret that the server uses to exchange the auth code for tokens server-side
- AWebflow Cloud Appalready scaffolded: Using Next.js (this guide uses Next.js App Router, but the same approach works with Astro); run
webflow auth login && webflow cloud initif you haven't yet. - Custom code accesson your Webflow site: For the login/logout button wiring in the last step. Available on any paid Site plan
Once these are in place, feel free to proceed to the setup.
5 steps to add Auth0 authentication to a Webflow site with Webflow Cloud
The setup splits cleanly across three systems:
- Auth0 owns identity: hosted login, session issuance, token signing.
- The Webflow Cloud App owns the OAuth dance and the protected data: it exchanges codes for tokens, validates JWTs on every request, and serves gated content only when validation passes.
- The Webflow site owns the UI shell: login and logout buttons, plus a thin client that calls the Cloud App to read auth state and render accordingly.
Let’s explore the five steps below to those layers in order.
Start with Auth0 so you have the three credentials you'll plug into Webflow Cloud in step 2.
1. Configure the Auth0 Regular Web Application
In the Auth0 dashboard, open your Regular Web Application and navigate to Settings. You need to configure three URL fields and copy three values.
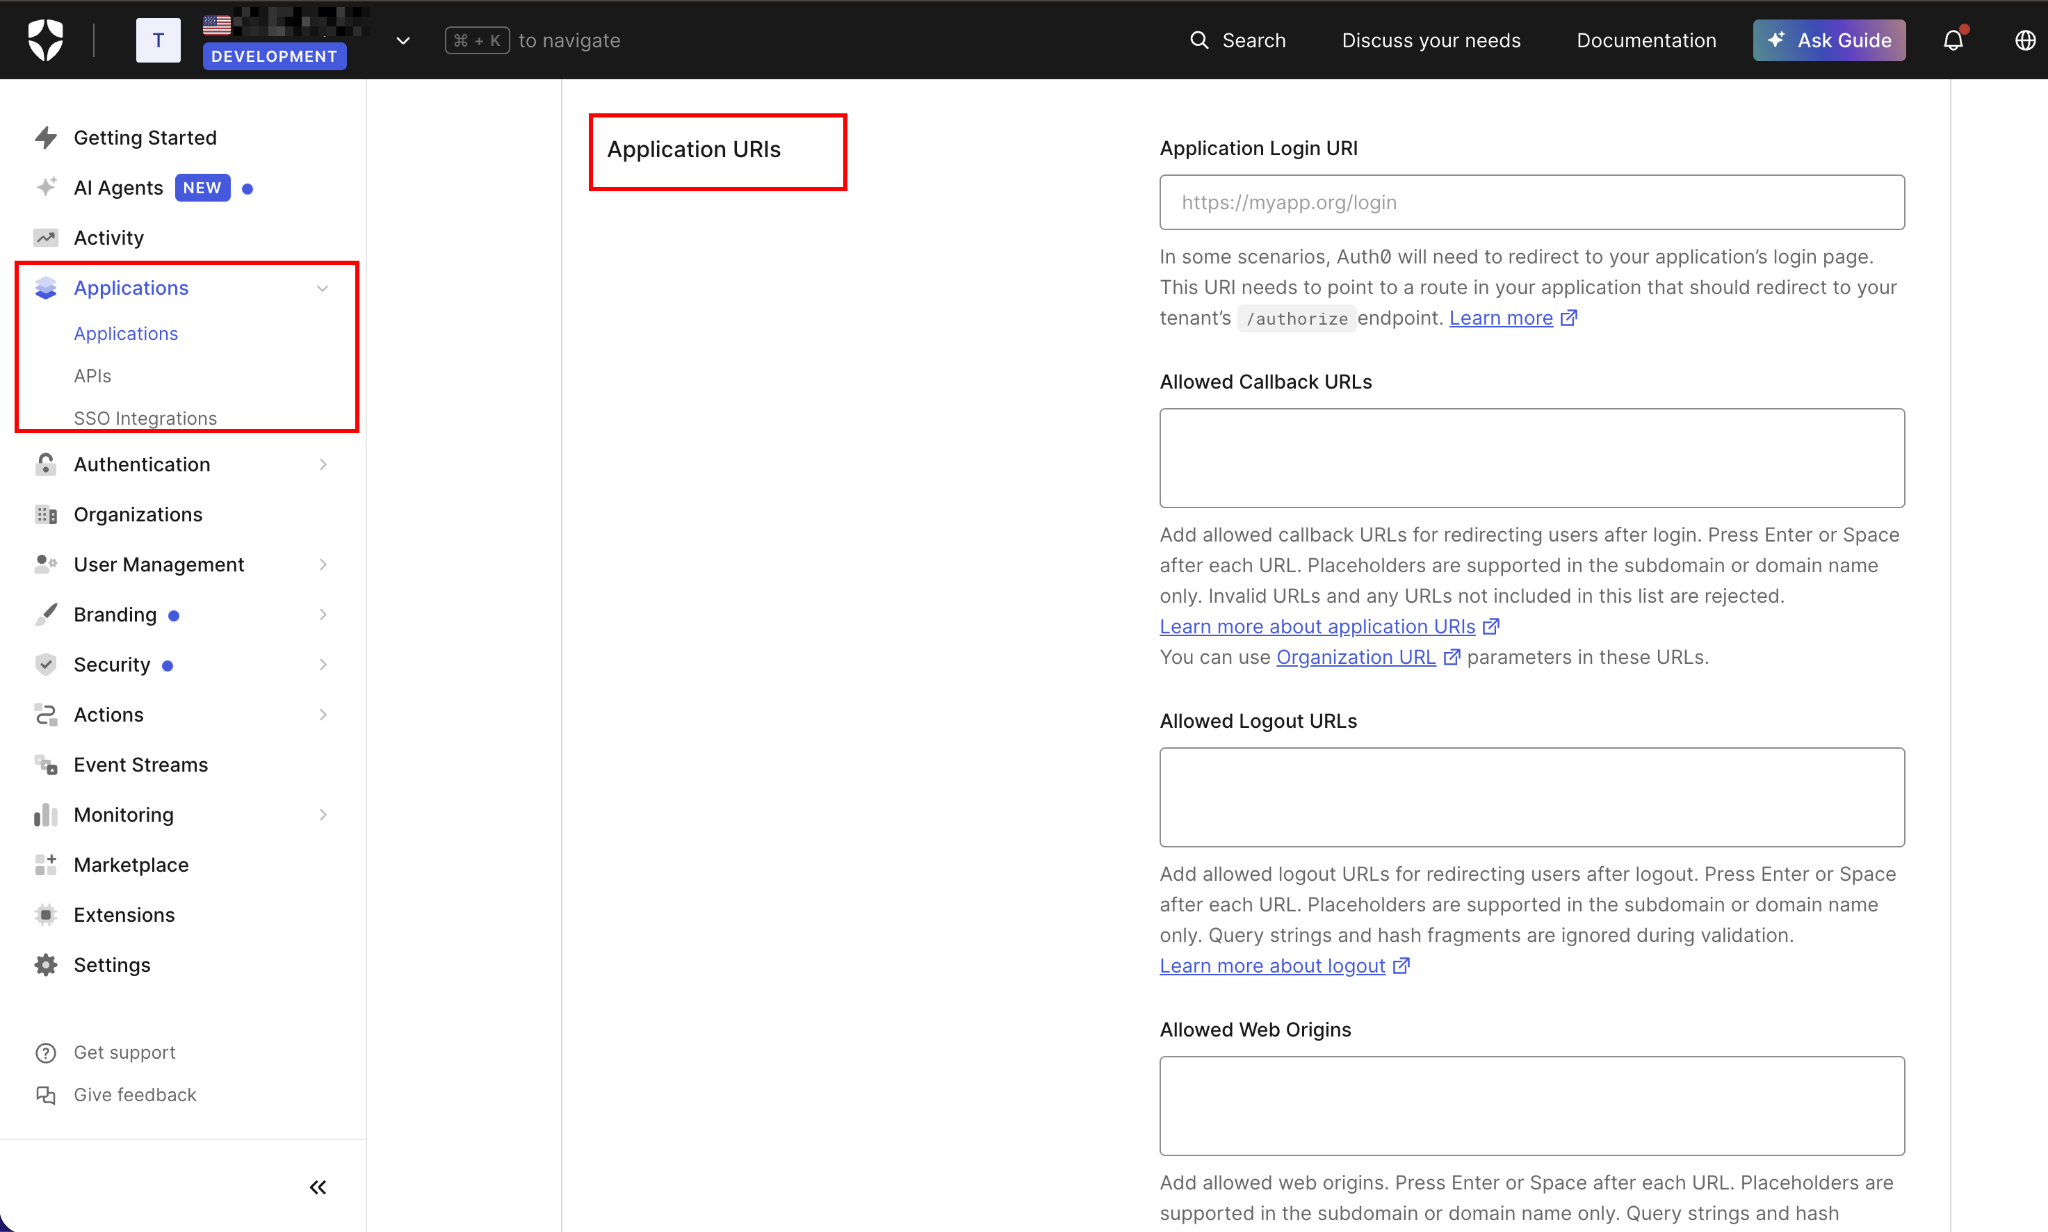
Under Application URIs, fill in:
Allowed Callback URLs:
http://localhost:3000/app/auth/callback, https://yoursite.webflow.io/app/auth/callback, https://yourdomain.com/app/auth/callback

Allowed Logout URLs:
http://localhost:3000, https://yoursite.webflow.io, https://yourdomain.com

Allowed Web Origins:
http://localhost:3000, https://yoursite.webflow.io, https://yourdomain.com
Register both your .webflow.io staging domain and your production custom domain in each field. Every URL must match exactly, including the protocol and path. If Auth0 receives a callback URL that isn't registered here, it rejects the request.
Click Save Changes.
Then, still on the Settings tab, copy the values for Domain, Client ID, and Client Secret. These will be added to your Cloud App environment in the next step.
2. Add Auth0 credentials to your Webflow Cloud environment
Your Cloud App needs four environment variables.
Add them to .env.local for local development:
# .env.local
AUTH0_DOMAIN=your-tenant.auth0.com
AUTH0_CLIENT_ID=your_client_id_here
AUTH0_CLIENT_SECRET=your_client_secret_here
AUTH0_CALLBACK_URL=http://localhost:3000/app/auth/callback
In your Webflow site settings, open Webflow Cloud, select your environment, and add the same four variables under Environment Variables. AUTH0_CLIENT_SECRET gives anyone who holds it the ability to exchange auth codes for tokens on your behalf. Keep it out of client-side code, git history, and any public-facing endpoint.
Checkpoint: Run next dev locally and confirm process.env.AUTH0_DOMAIN resolves.
3. Build the auth Route Handlers
You need to create three Route Handlers:
- One to start the login flow
- One to handle the Auth0 callback
- One to log users out
These are the only three paths that need to communicate directly with Auth0.
Create lib/auth.ts first with the JWT verification helper you'll use in every protected endpoint:
// lib/auth.ts
import { createRemoteJWKSet, jwtVerify, type JWTPayload } from 'jose'

const domain = process.env.AUTH0_DOMAIN!
export const JWKS = createRemoteJWKSet(
  new URL(`https://${domain}/.well-known/jwks.json`)
)

export async function verifyToken(token: string): Promise<JWTPayload> {
  const { payload } = await jwtVerify(token, JWKS, {
    issuer: `https://${domain}/`,
    audience: process.env.AUTH0_CLIENT_ID,
  })
  return payload
}

export function getTokenFromCookie(cookieHeader: string | null): string | null {
  if (!cookieHeader) return null
  const match = cookieHeader.match(/auth_token=([^;]+)/)
  return match ? decodeURIComponent(match[1]) : null
}
createRemoteJWKSet fetches Auth0's public keys once and caches them per isolate. jwtVerify validates the token's signature, issuer, and audience without any outbound network call per request after the initial key fetch.
I use jose here because it's one of the few JWT libraries designed specifically for edge runtimes. Libraries like jsonwebtoken depend on Node.js APIs that are restricted or unavailable in the Edge runtime provided by Cloudflare Workers. jose uses the Web Crypto API natively, so it works without polyfills or compatibility flags.
Now create the three Route Handlers:
// app/auth/login/route.ts
export const runtime = 'edge'

export async function GET() {
  const params = new URLSearchParams({
    response_type: 'code',
    client_id: process.env.AUTH0_CLIENT_ID!,
    redirect_uri: process.env.AUTH0_CALLBACK_URL!,
    scope: 'openid profile email',
  })

  return Response.redirect(
    `https://${process.env.AUTH0_DOMAIN}/authorize?${params}`
  )
}
The login route just constructs Auth0's /authorize URL with the right query parameters and redirects the browser to it. Auth0 takes over the login UI from there. No client secret is exposed because the secret isn't used in this leg of the flow.
Handling the Auth0 callback
When the user finishes logging in at Auth0, the browser is redirected back to your callback URL with an authorization code query parameter. The callback handler exchanges that code for tokens using your client secret, then stores the ID token in an httpOnly cookie.
The code below does that exchange:
// app/auth/callback/route.ts
export const runtime = 'edge'

export async function GET(request: Request) {
  const url = new URL(request.url)
  const code = url.searchParams.get('code')

  if (!code) {
    return Response.redirect(new URL('/auth/login', request.url))
  }

  // Exchange the authorization code for tokens
  const tokenRes = await fetch(
    `https://${process.env.AUTH0_DOMAIN}/oauth/token`,
    {
      method: 'POST',
      headers: { 'Content-Type': 'application/json' },
      body: JSON.stringify({
        grant_type: 'authorization_code',
        client_id: process.env.AUTH0_CLIENT_ID,
        client_secret: process.env.AUTH0_CLIENT_SECRET,
        code,
        redirect_uri: process.env.AUTH0_CALLBACK_URL,
      }),
    }
  )

  if (!tokenRes.ok) {
    console.error('Token exchange failed:', await tokenRes.text())
    return Response.redirect(new URL('/?error=auth_failed', request.url))
  }

  const tokens = (await tokenRes.json()) as { id_token: string }

  // Store the ID token in an httpOnly cookie
  const cookieValue = encodeURIComponent(tokens.id_token)
  return new Response(null, {
    status: 302,
    headers: {
      Location: '/',
      'Set-Cookie': `auth_token=${cookieValue}; Path=/; HttpOnly; Secure; SameSite=Lax; Max-Age=86400`,
    },
  })
}
The token exchange happens server-side, so the client secret never touches the browser. The ID token appears in the JSON response and is set as a cookie with the HttpOnly, Secure, and SameSite=Lax flags. The user returns to the site root with an active session.
Handling logout
Logout needs to do two things: clear the local session cookie and tell Auth0 to end its own session; otherwise the next login click will silently re-authenticate the same user.
This handler does both:
// app/auth/logout/route.ts
export const runtime = 'edge'

export async function GET(request: Request) {
  const returnTo = encodeURIComponent(new URL('/', request.url).toString())
  const logoutUrl = `https://${process.env.AUTH0_DOMAIN}/v2/logout?client_id=${process.env.AUTH0_CLIENT_ID}&returnTo=${returnTo}`

  return new Response(null, {
    status: 302,
    headers: {
      Location: logoutUrl,
      'Set-Cookie': 'auth_token=; Path=/; HttpOnly; Secure; SameSite=Lax; Max-Age=0',
    },
  })
}
I store the ID token in an httpOnly cookie. JavaScript on the Webflow page can't read it. Only the Cloud App's server-side Route Handlers can. This is why this approach is secure where the SPA SDK + localStorage pattern isn't: the token never touches client-side code.
Checkpoint: Start the dev server and navigate to http://localhost:3000/app/auth/login. You should be redirected to Auth0's login page. After authenticating, you should land back at your app with an auth_token cookie set.
4. Protect your Cloud App content endpoints
Any Route Handler that returns content requiring login must verify the token before responding. This is the data-layer check that makes protection real. Middleware alone can be bypassed in certain conditions. CVE-2025-29927, a Next.js authorization bypass disclosed in March 2025, showed exactly this: a crafted x-middleware-subrequest header skipped middleware entirely.
The verification needs to happen at the point where data is accessed.
Here's an example protected endpoint that returns user-specific data:
// app/api/me/route.ts
export const runtime = 'edge'

import { verifyToken, getTokenFromCookie } from '@/lib/auth'

export async function GET(request: Request) {
  const token = getTokenFromCookie(request.headers.get('cookie'))

  if (!token) {
    return Response.json({ error: 'Unauthorized' }, { status: 401 })
  }

  try {
    const payload = await verifyToken(token)

    return Response.json({
      name: payload.name,
      email: payload.email,
      sub: payload.sub,
    })
  } catch {
    return Response.json({ error: 'Invalid session' }, { status: 401 })
  }
}
For any Route Handler that serves gated content, follow the same pattern: call getTokenFromCookie(), call verifyToken(), return 401 if either step fails. Content is sent only if the JWT is valid.
You can also add an edge middleware layer as a secondary check for route-level protection.
Next.js 16 renamed middleware.ts to proxy.ts, but proxy.ts only runs on the Node.js runtime, which Webflow Cloud doesn't support for middleware. Keep using middleware.ts with export const runtime = 'edge' until Webflow Cloud's adapter adds Node.js runtime middleware support:
// middleware.ts
export const runtime = 'edge'
import { NextResponse } from 'next/server'
import type { NextRequest } from 'next/server'
import { getTokenFromCookie, verifyToken } from '@/lib/auth'

export async function middleware(request: NextRequest) {
  // Protect everything under /app/api/protected/*
  if (request.nextUrl.pathname.startsWith('/app/api/protected')) {
    const token = getTokenFromCookie(request.headers.get('cookie'))

    if (!token) {
      return NextResponse.redirect(new URL('/app/auth/login', request.url))
    }

    try {
      await verifyToken(token)
    } catch {
      return NextResponse.redirect(new URL('/app/auth/login', request.url))
    }
  }

  return NextResponse.next()
}

export const config = {
  matcher: ['/app/api/protected/:path*'],
}
Middleware is a useful first filter, but it's not the sole gate. Always re-verify in the Route Handler itself.
Checkpoint: With the server running, call GET /app/api/me without the cookie (curl without cookies). You should get a 401. Then log in via /app/auth/login, copy the auth_token cookie value, and call the endpoint again with the cookie. You should get your Auth0 user profile back.
5. Wire login and logout on the Webflow site
Add this to a Custom Code (Footer code, before </body>) block on any page that has login/logout buttons. The buttons need IDs: login-btn for the login action and logout-btn for the logout action.
For pages where you want to display the authenticated user's name or fetch protected content, the pattern is: call the Cloud App API with the cookie (the browser sends it automatically), render what comes back.
Here's the script. Drop it into the Footer code field in Site settings → Custom Code (or into Page settings for a single-page setup):
(function () {
  const loginBtn = document.getElementById('login-btn')
  const logoutBtn = document.getElementById('logout-btn')
  const userDisplay = document.getElementById('user-display')

  // Wire login and logout buttons
  if (loginBtn) {
    loginBtn.addEventListener('click', function () {
      window.location.href = '/app/auth/login'
    })
  }

  if (logoutBtn) {
    logoutBtn.addEventListener('click', function () {
      window.location.href = '/app/auth/logout'
    })
  }

  // Fetch user info from the authenticated Cloud App endpoint
  // The browser sends the httpOnly auth_token cookie automatically
  async function loadUserInfo() {
    try {
      const res = await fetch('/app/api/me', { credentials: 'include' })

      if (!res.ok) {
        // Not authenticated: show login state
        if (loginBtn) loginBtn.style.display = 'block'
        if (logoutBtn) logoutBtn.style.display = 'none'
        return
      }

      const user = await res.json()

      // Authenticated: update UI
      if (loginBtn) loginBtn.style.display = 'none'
      if (logoutBtn) logoutBtn.style.display = 'block'
      if (userDisplay) userDisplay.textContent = `Hi, ${user.name}`
    } catch {
      // Network error: show login state as fallback
      if (loginBtn) loginBtn.style.display = 'block'
      if (logoutBtn) logoutBtn.style.display = 'none'
    }
  }

  loadUserInfo()
})()
This is different from the JS show/hide pattern. The Webflow page doesn't contain the user's name or any protected data at load time. The JavaScript calls the Cloud App API, the API validates the cookie server-side, and only then does data return to the browser to be rendered.
If the cookie is missing or expired, the API returns a 401 status code, and the page shows an unauthenticated state. No sensitive content was ever in the DOM.
Checkpoint: Publish your Webflow site. Click the login button, authenticate with Auth0, confirm you land back on the site with the logout button visible and your name displayed. Click logout and confirm you return to the login state.
What causes Auth0 authentication to fail on a Webflow Cloud App?
Most failures stem from one of three causes:
- Misconfigured callback URLs on the Auth0 side
- A token audience mismatch in the JWT verification step
- Reading environment variables that weren't actually injected into the Webflow Cloud environment
The first two account for nearly every authentication failure in practice.
Let’s see how to identify and fix each one.
Auth0 rejects the callback with "callback URL mismatch"
This means the URL your app is redirecting to after login isn't registered in the Allowed Callback URLs field.
Check two things:
- The
AUTH0_CALLBACK_URLenv var matches the URL you registered in Auth0 - Both the
.webflow.iostaging domain and your production domain are registered
A common miss is registering one but not the other before testing on the live site.
Token verification throws "jwt audience invalid"
This means the audience parameter in jwtVerify() doesn't match the aud claim in the token. The audience should be your Auth0 Client ID, not your API identifier (if you have one configured).
Verify that AUTH0_CLIENT_ID in your env matches the Client ID field in the Auth0 Dashboard under your Regular Web Application, not any other application in your tenant.
Connect Auth0 to the rest of your Webflow build
Once authentication is wired up, the same Webflow Cloud App can do more than gate content. The validated ID token in each request carries the user's sub claim, which is a stable identifier you can pair with the Webflow CMS API, Stripe customer records, or any third-party API to build a real membership layer on top.
A natural next step is role-based access. Auth0 Actions can inject custom claims into the ID token at login time, and your verifyToken() helper already returns the full payload, so adding a role check is a few lines added to each protected route handler.
Explore Webflow + Auth0 for Webflow-specific integration options beyond this guide, including the Auth0 Lock widget and automation platform options for CMS sync.
Frequently asked questions
Can I use Auth0 with Webflow CMS content?
Webflow CMS pages are static HTML. Anyone with the URL can access them. If you want to gate CMS content, keep it in a separate data store (Airtable, a database, or a headless CMS) and serve it from a protected Cloud App endpoint that validates auth before returning data. The Webflow page is the public shell; the Cloud App endpoint is the gate.
How do I add Google or GitHub social login?
In the Auth0 Dashboard, navigate to Authentication → Social and enable Google OAuth2 or GitHub. Configure your OAuth credentials in each connection's settings. Once enabled, those login options automatically appear on Auth0's Universal Login page. No changes are required in the Cloud App. The login, callback, and logout flow is identical regardless of which provider the user chooses.
How do I show different content to users with different roles?
Auth0 supports roles through its RBAC feature. Assign roles to users in the Auth0 Dashboard, then add an Auth0 Action that injects a custom namespace claim into the ID token. Your Cloud App reads that claim after verifyToken() and returns different content based on the user's roles. This is the same jose-based pattern extended with a claim check.
What happens when the auth_token cookie expires?
The cookie is set with Max-Age=86400 (24 hours). After expiry, the next call to /app/api/me returns 401, and the Webflow page shows the unauthenticated state. The user clicks login again and goes through the full OAuth flow. For long-lived sessions, you can issue a refresh token by adding offline_access to the OAuth scope and storing the refresh token server-side. That requires a server-side session store, which is a separate implementation.


