










Transform your content-heavy Webflow site into an intuitive, high-performance destination that prioritizes discoverability. Integrating Algolia InstantSearch empowers visitors to navigate complex datasets with millisecond-speed results and advanced filtering.
Webflow’s native search is a reliable solution for straightforward content needs. As your site scales to include extensive catalogs, resource directories, or complex datasets, you may want to add more sophisticated discovery features.
You may also want to add more sophisticated discovery features, such as real-time “as-you-type” results, granular faceted filtering, and custom ranking. Hence, visitors find exactly what they need, exactly when they need it.
Algolia's InstantSearch.js library helps through pre-built UI widgets (search box, results list, filters, pagination) that connect to Algolia's hosted search index via a public API key.
You build the layout in Webflow, add widget containers as HTML elements with unique IDs, initialize InstantSearch with a few lines of JavaScript, and Algolia handles the rest, returning results in milliseconds that update on every keystroke, with full filter and pagination support.
In this guide, we explore two approaches: static indexing (upload content once via CSV or JSON) and dynamic sync (automatically keep your Algolia index updated when Webflow CMS items change). Most teams start with static indexing and add sync later.
What do you need to add Algolia Instant Search to Webflow?
You need a paid Webflow plan for custom code access, an Algolia account with a populated index, and your Application ID and Search-Only API key.
Webflow plan with custom code access
The Code Embed element (which you'll use to add InstantSearch's HTML containers and JavaScript initialization) is only available on paid Webflow plans.
There are two routes, and most write-ups mention only one. Webflow's rule is a Core, Growth, Agency or Freelancer Workspace, or an active Site plan on the site itself. So a site still on the free Starter plan can use Code Embed if it sits inside a paid Workspace.
Check both before concluding you need to upgrade the site. Note that Team and Enterprise are Platform plans rather than Site plans, so they sit on a different axis of Webflow's pricing than Basic and Premium.
An Algolia account and index
Sign up at algolia.com. The plan ladder is Free, Grow, Grow Plus and Elevate. The Free plan includes 10,000 search requests a month and 50,000 records, and Algolia positions it for real use rather than evaluation only, including small stores.
Grow is pay-as-you-go with its own included allowance (10,000 requests and 100,000 records) before charges begin, at $0.50 per 1,000 additional search requests and $0.40 per 1,000 additional records. Grow Plus sits above it with the same record pricing but $1.75 per additional 1,000 requests, in exchange for AI ranking and synonyms.
Read the request allowance together with what this guide builds, because the two interact in a way that surprises people. Algolia counts a search request per keystroke in an as-you-type interface, which is exactly what InstantSearch gives you.
A visitor typing an eight-letter query spends eight requests, so 10,000 requests a month is on the order of a few hundred real searches rather than a few thousand.

Your API credentials
Once logged in to the Algolia dashboard, navigate to Settings → API Keys.
You'll need two values:
- Application ID: Identifies your Algolia application
- Search-Only API Key: The public key safe to expose in frontend code
Never use your Admin API Key in frontend code.
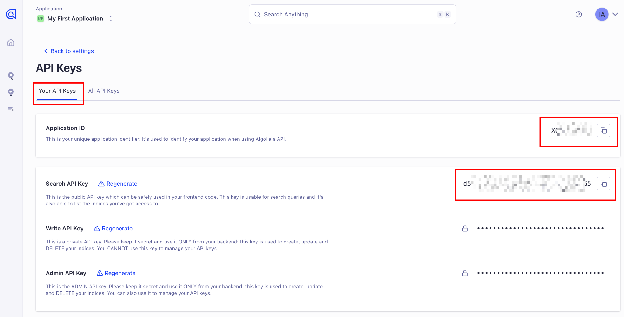
The Admin key has write access to your index and must stay on the server side. The Search-Only key is read-only. It's designed to be embedded in JavaScript.
If you plan to restrict the Search-Only key by domain in Algolia's dashboard (recommended for production), remember to allowlist both your custom domain and your .webflow.io staging subdomain during development.
3 steps to add Algolia InstantSearch to Webflow
Adding Algolia InstantSearch to a Webflow site involves creating an Algolia index for your content, building a search page layout in Webflow using HTML Embed elements as widget containers, and initializing InstantSearch.js with your credentials and widgets in the page's custom code section.
The implementation splits cleanly into three parts: get your content into Algolia, build the container layout in Webflow, and wire up the JavaScript. Steps 1 and 2 are one-time setup. Step 3 brings it to life.
Identify your sync approach before you start (static or dynamic), because it determines whether you stop at Step 3 or continue to Step 4.
Use static indexing (Steps 1-3 with CSV upload) if:
- Your content doesn't change frequently (less than once a day)
- You need to get the search running quickly without the backend infrastructure
- Your dataset is under a few thousand records
Use dynamic sync (add Step 4) if:
- Your Webflow CMS content updates regularly, and search results need to stay current
- You're building a product catalog, job board, or directory where new items are published frequently
If you're not sure which path to take, start with static indexing. You can add webhook sync later without rebuilding the front end. The InstantSearch initialization code is identical either way.
1. Create your Algolia index and upload content
Your Algolia index is the structured dataset that powers search results. Every item you want to appear in search results (blog posts, products, resources) needs to exist as a record in this index.
Creating the index
Log in to the Algolia dashboard and click Search in the left sidebar, then Indices → Create Index. Name the index something descriptive (e.g., webflow_blog_posts, products, resources).
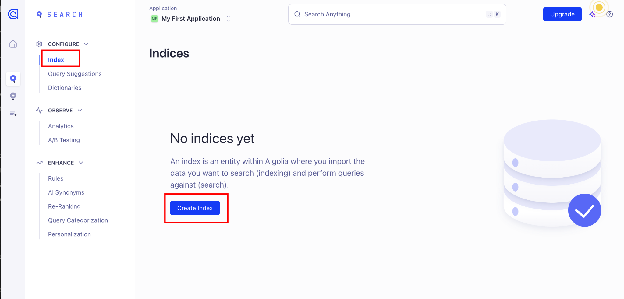
The index name is case-sensitive and referenced in your JavaScript initialization code.
Structuring your records
Each record in Algolia is a JSON object.
For a blog post, a record might look like:
{
  "objectID": "post-slug-here",
  "title": "How to Build a Booking Form in Webflow",
  "description": "A step-by-step guide to adding a booking form using Calendly...",
  "category": "Forms & Automation",
  "url": "/blog/booking-form-webflow",
  "publishedDate": "2025-03-15"
}
objectID is required in every record and must be unique across the index. Use a natural identifier: URL slug, a Webflow CMS item ID, or a combination (e.g., "blog-how-to-build-booking-form"). If objectID is missing, Algolia generates one automatically, but you lose the ability to update or delete specific records later.
What to include: Title, description, URL (so results can link back), and any fields you want to filter by (category, tags, type). Keep records lean. Don't send every field from your CMS; only what the search needs to display and filter.
Uploading via CSV (quick path)
Export your Webflow CMS data as CSV (in the Webflow Designer: CMS → your collection → Export).

Clean the CSV to include only the fields you need. In the Algolia dashboard, select your index → Add records → Upload file.
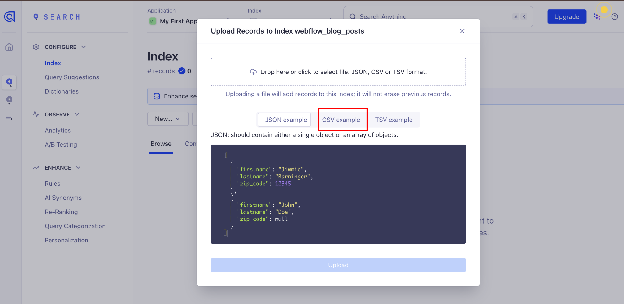
One important limitation: CSV doesn't readily support JavaScript array fields (such as tags or multi-select values). If your content uses arrays for filtering (e.g., ["Design", "Development"]), use JSON or the API instead.
Uploading via JSON (recommended for faceted filtering)
Create a JSON file following this structure:
[
  {
    "objectID": "how-to-build-booking-form",
    "title": "How to Build a Booking Form in Webflow",
    "description": "Step-by-step guide for adding booking functionality...",
    "category": "Forms",
    "tags": ["booking", "calendly", "forms"],
    "url": "/guides/build-booking-form"
  },
  {
    "objectID": "add-algolia-search-webflow",
    "title": "How to Add Algolia Instant Search to a Webflow Site",
    "description": "Add real instant search to Webflow using InstantSearch.js...",
    "category": "Search",
    "tags": ["search", "algolia", "cms"],
    "url": "/guides/algolia-instant-search-webflow"
  }
]
In the Algolia dashboard: Index → Add records → Upload file → select your JSON file. You'll see a confirmation showing how many records were indexed.
Configuring searchable and facetable attributes
After uploading, configure which fields Algolia searches and filters on:
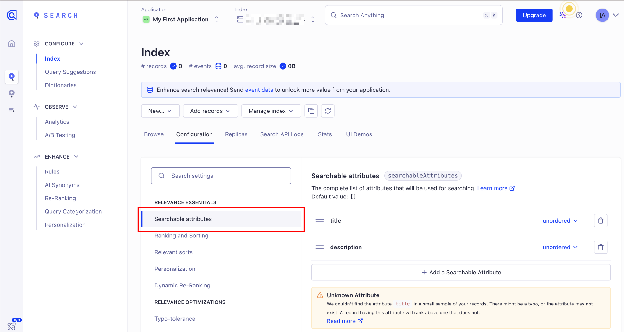
- In your index, click Configuration
- Under Searchable attributes, add:
title,description(in that order: Algolia weighs earlier attributes more heavily) - Under Attributes for faceting, add any fields you plan to filter by:
category,tags
This step is required before refinementList widgets will work. Algolia won't allow filtering on attributes that aren't explicitly enabled for faceting.
2. Build the search page layout in Webflow
The Algolia InstantSearch.js library renders widgets into any HTML element with a matching ID. Your job in Webflow is to create the container elements. Then Algolia fills them.
Creating a dedicated search page
In the Webflow Designer, create a new page (or use an existing page) for search. Add a Section with a container div for your layout.
Structure the page layout before adding widget containers. A typical search layout uses a two-column structure: a narrow sidebar on the left for filter controls and a wider main area on the right for the search box, results, and pagination.
Give each column a class (search-filters and search-results work well). This wrapper structure lets you control spacing and responsive behavior in Webflow's Style panel instead of fighting Algolia's injected widget HTML with custom CSS.
On mobile breakpoints (below 767px), switch the layout to vertical (Flex direction: vertical) so filters stack above results rather than competing for horizontal space.
Adding widget containers via HTML Embed elements
For each InstantSearch widget you want to render, drag in a Code Embed element (older tutorials call it HTML Embed) and add a <div> with a unique ID. The IDs in the Webflow embeds must match the container values you reference in your JavaScript initialization exactly — case-sensitive.
A standard search layout uses these containers:
(1) Search box container: Add an HTML Embed anywhere on the page:
<div id="searchbox"></div>(2) Results container: Add an HTML Embed in your main content area:
<div id="hits"></div>(3) Pagination container: Add below the hits container:
<div id="pagination"></div>(4) Filter container (optional, for faceted filtering): Add in a sidebar or above results:
<div id="category-list"></div>(5) Clear filters button (optional):
<div id="clear-refinements"></div>Give each HTML Embed a class in Webflow for positioning. The divs render inside the embed, so styling the wrapper element controls layout. Example: a two-column layout with filters on the left and results on the right.
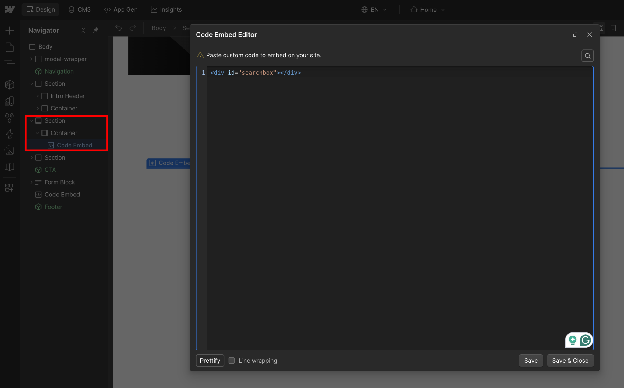
After placing the embeds, publish the page. The containers render as empty divs on the live site, and Algolia's JavaScript populates them.
3. Initialize InstantSearch.js in Webflow's custom code
With containers in place, add the InstantSearch.js library and initialization script to your Webflow page.
Adding CDN scripts to Page Settings
Open Page Settings for your search page (click the gear icon in the Pages panel). Scroll to Custom Code → Footer code (before the </body> tag). Add the Algolia CDN scripts here. This loads them after the page's HTML renders, which InstantSearch needs to find the container elements.
Copy and paste both CDN tags
<script
  src="https://cdn.jsdelivr.net/npm/algoliasearch@5.57.0/dist/lite/builds/browser.umd.js"
  crossorigin="anonymous"
></script>
<script
  src="https://cdn.jsdelivr.net/npm/instantsearch.js@4.115.0/dist/instantsearch.production.min.js"
  crossorigin="anonymous"
></script>
Pin the versions rather than tracking the latest, so a CDN release cannot change your search page without a deploy. Algolia's installation snippets also include an integrity="sha256-…" attribute alongside crossorigin; copy the current pair from their docs if you want subresource integrity, since crossorigin alone doesn't verify the file.
Adding the initialization script
Directly below the CDN script tags (still in the Before </body> section), add your InstantSearch initialization
<script>
window.addEventListener('DOMContentLoaded', function () {
  // Initialize the Algolia client using v5 lite client
  const { liteClient: algoliasearch } = window['algoliasearch/lite'];

  const searchClient = algoliasearch(
    'YOUR_APPLICATION_ID',    // Replace with your Application ID
    'YOUR_SEARCH_ONLY_API_KEY' // Replace with your Search-Only API Key
  );

  // Initialize InstantSearch
  const search = instantsearch({
    indexName: 'YOUR_INDEX_NAME', // Replace with your index name (e.g., 'webflow_blog_posts')
    searchClient,
  });

  // Add widgets
  search.addWidgets([

    // Search input
    instantsearch.widgets.searchBox({
      container: '#searchbox',
      placeholder: 'Search articles...',
      cssClasses: {
        input: 'wf-search-input',
        submit: 'wf-search-submit',
        reset: 'wf-search-reset',
      },
    }),

    // Search results
    instantsearch.widgets.hits({
      container: '#hits',
      templates: {
        item: (hit, { html, components }) => html`
          <div class="wf-hit">
            <a href="${hit.url}" class="wf-hit-link">
              <div class="wf-hit-title">
                ${components.Highlight({ hit, attribute: 'title' })}
              </div>
              <div class="wf-hit-description">
                ${components.Highlight({ hit, attribute: 'description' })}
              </div>
              <span class="wf-hit-category">${hit.category}</span>
            </a>
          </div>
        `,
        empty: () => `<p class="wf-no-results">No results found. Try a different search term.</p>`,
      },
    }),

    // Pagination
    instantsearch.widgets.pagination({
      container: '#pagination',
      cssClasses: {
        list: 'wf-pagination',
        item: 'wf-pagination-item',
        selectedItem: 'wf-pagination-selected',
      },
    }),

    // Results per page configuration
    instantsearch.widgets.configure({
      hitsPerPage: 9,
    }),

  ]);

  // Start InstantSearch
  search.start();
});
</script>
Replace YOUR_APPLICATION_ID, YOUR_SEARCH_ONLY_API_KEY, and YOUR_INDEX_NAME with the values from your Algolia dashboard.
On the wrapper: placing the script in the Before </body> section already guarantees the container divs are parsed by the time it runs, so the DOMContentLoaded listener is belt-and-braces here. Keep it anyway: it costs nothing, and it makes the code safe to move into the <head> or into a shared site-wide block later, which is where the missing-container error actually bites.
Adding optional category filter
If you configured a category as an attribute for faceting in Step 1, add the refinementList widget to your search.addWidgets([...]) array:
// Category filter (requires 'category' in Attributes for Faceting)
instantsearch.widgets.refinementList({
  container: '#category-list',
  attribute: 'category',
  cssClasses: {
    checkbox: 'wf-filter-checkbox',
    count: 'wf-filter-count',
  },
}),

// Clear all active filters button
instantsearch.widgets.clearRefinements({
  container: '#clear-refinements',
  templates: {
    resetLabel: ({ hasRefinements }) => hasRefinements ? 'Clear filters' : 'No active filters',
  },
}),
Adding the Algolia default stylesheet (optional)
InstantSearch injects no styles of its own. Algolia ships two themes, Algolia and Satellite, plus a bare reset. Add one to Site settings → Custom code → inside the <head> tag.
Pick deliberately, because the two do very different things. The reset only nulls browser defaults (box-sizing, list styles, margins) and leaves every widget unstyled, which is what you want if you intend to style everything yourself from Webflow.
Satellite is the themed stylesheet that actually styles pagination buttons and checkbox states, and it already includes the reset:
<!-- Unstyled baseline: reset only -->
<link
  rel="stylesheet"
  href="https://cdn.jsdelivr.net/npm/instantsearch.css@8.21.0/themes/reset-min.css"
/>

<!-- Or the full theme, which bundles the reset -->
<link
  rel="stylesheet"
  href="https://cdn.jsdelivr.net/npm/instantsearch.css@8.21.0/themes/satellite-min.css"
/>
Style widgets to match your Webflow design
InstantSearch renders its own HTML inside your container divs. You can't style it directly from Webflow's Style panel. Every widget in the initialization code above accepts a cssClasses option that lets you attach your own class names to the injected elements.
Target those classes with a global CSS block in Project Settings → Custom Code → <head>:
<style>
  .wf-hit { padding: 16px 0; border-bottom: 1px solid #eee; }
  .wf-hit-title { font-weight: 600; margin-bottom: 4px; }
  .wf-hit-description { color: #666; font-size: 14px; }
  .wf-pagination { display: flex; gap: 8px; justify-content: center; margin-top: 24px; }
  .wf-pagination-selected a { font-weight: bold; text-decoration: underline; }
</style>
See Algolia's widget styling for the full list of injectable class names per widget.
Publishing and testing
Custom code effects appear in the Designer's preview and comment modes so that you can double-check the widgets there. Preview can't tell you whether the code behaves on the live domain, which matters here because a Search-Only key restricted by domain will work in one place and not the other. Publish to your .webflow.io staging subdomain and open the live URL for the real test.
After publishing, open the search page in a browser, type in the search box, and watch results populate from your Algolia index.
You should see:
- The search box renders and accepts input
- Results appear immediately on page load (showing all records by default)
- Results update as you type
- Pagination controls appear when results exceed
hitsPerPage - Category checkboxes appear and filter results if you added the
refinementListwidget
If the search box renders but results don't appear, check the browser console first. "Target container is not a DOM element" means an ID mismatch between your Webflow embeds and the JavaScript; "Invalid Application ID" or "Invalid API Key" means a credentials issue.
4. Keep your Algolia index in sync with Webflow CMS (optional)
Static uploads work, but whenever you publish or update a CMS item in Webflow, your Algolia index becomes stale. For actively maintained content (blog posts, job listings, product pages), set up a Webflow webhook that sends updates to Algolia automatically.
The Webflow Examples repository includes a reference Algolia sync implementation built on Webflow's collection webhooks. Read it for the architecture rather than as copyable code: it was last updated in 2023 and targets the deprecated Webflow API v1 SDK and Algolia client v4, so it will not run against the v2 endpoints and v5 client used above.
If you'd rather run the whole search stack server-side instead of from the Designer, that is a different build with its own trade-offs, and our guide to faceted search walks through it end to end: bulk indexing and webhook sync as Route Handlers, with your Algolia admin key never leaving the server.
The architecture works in two phases.
Phase 1 (Initial bulk sync)
A Node.js script reads all CMS items from Webflow's API, transforms them into Algolia records (mapping collection field names to your index schema), and uploads them using Algolia's saveObjects method.
The script loops through Webflow's paginated CMS API (the Data API returns up to 100 items per request), transforms each item into an Algolia record that matches your index schema, and batches the uploads using Algolia's saveObjects method. The client automatically chunks records into batches of 1,000.
That figure is the client's chunk size, not a hard ceiling: the API limit is 1 GB per batch, and Algolia recommends aiming for roughly 10 MB per batch, which lands somewhere between 1,000 and 10,000 records depending on how big yours are.
A minimal Node.js implementation:
javascript
const { algoliasearch } = require('algoliasearch');
// No fetch import needed: fetch is global on Node 18 and later,
// and node-fetch v3 is ESM-only, so require() of it throws.

const algolia = algoliasearch('YOUR_APP_ID', 'YOUR_ADMIN_API_KEY');

async function syncWebflowToAlgolia(collectionId, indexName) {
  let offset = 0;
  const limit = 100;
  let allItems = [];

  // Paginate through Webflow CMS items
  while (true) {
    const res = await fetch(
      `https://api.webflow.com/v2/collections/${collectionId}/items?limit=${limit}&offset=${offset}`,
      { headers: { Authorization: `Bearer YOUR_WEBFLOW_API_TOKEN` } }
    );
    if (!res.ok) {
      // Without this, a 429 yields no `items`, concat appends
      // undefined, and .length throws on the next line — crashing
      // on exactly the rate limit this script is meant to survive.
      throw new Error(`Webflow API ${res.status}: ${await res.text()}`);
    }

    const data = await res.json();
    allItems = allItems.concat(data.items);
    if (data.items.length < limit) break;
    offset += limit;
  }

  // Transform and upload to Algolia
  const records = allItems.map(item => ({
    objectID: item.id,
    title: item.fieldData.name,
    description: item.fieldData.description,
    category: item.fieldData.category,
    url: `/guides/${item.fieldData.slug}`,
  }));

  await algolia.saveObjects({ indexName, objects: records });
  console.log(`Synced ${records.length} records to Algolia`);
}
Replace collectionId, indexName, and the fieldData property names with your actual Webflow collection and field names. Run this script once to establish the baseline index before setting up real-time sync in Phase 2.
Webflow's Data API rate limit depends on your site plan: 60 requests per minute on Starter and Basic, 120 on the CMS, Ecommerce and Business tiers, and custom limits on Enterprise. (The published table still uses the pre-2026 plan names, so read Premium where it says CMS or Business.)
If your collection has more than a few hundred items, add a delay between pagination requests to avoid 429 Too Many Requests errors.
Phase 2 (real-time sync)
A webhook endpoint in your Node.js application listens for collection_item_created, collection_item_changed, and collection_item_deleted events from Webflow. When an event fires, the handler updates the corresponding Algolia record.
Register the webhook through Webflow's API rather than the dashboard — the Project Settings webhook UI only supports form_submission and site_publish triggers.
Send a POST request to Webflow's Create Webhook endpoint (https://api.webflow.com/v2/sites/:site_id/webhooks) using a site token, with triggerType set to collection_item_created and your endpoint URL as the destination.
For teams without a Node.js backend, no-code tools like Zapier and Make can listen to Webflow CMS events and push updates to Algolia via HTTP API calls, using Algolia's REST API endpoints.
What causes Algolia InstantSearch to fail on Webflow sites?
Most Algolia InstantSearch failures on Webflow trace to one of four things: missing objectID in records, an ID mismatch between Webflow embeds and JavaScript, faceting not enabled on filter attributes, or the initialization script running before the DOM is ready. The symptoms are usually obvious; the causes aren't always.
Here's how to diagnose the most common problems.
Search box renders but shows no results
Symptom: The search box appears and accepts input, but the hits container stays empty regardless of what you type.
Cause 1: the index is empty, or the records are not the ones you think. Note that a missing objectID isn't the cause here: Algolia auto-generates one, and the record still indexes, so records without it are searchable. What you lose is the ability to update or delete a specific record later, which is a maintenance problem rather than a no-results problem. Open your index in the Algolia dashboard and browse records to confirm what actually landed.
Cause 2: Wrong index name in initialization. The indexName in your JavaScript must match the index name in Algolia exactly, including case. webflow_blog_posts and Webflow_Blog_Posts are different indexes. Copy the name directly from your Algolia dashboard.
Cause 3: Search-only API key used on the wrong application. Algolia API keys are scoped to a specific application. If you have multiple Algolia apps, verify that the Application ID and Search-Only API key you're using belong to the same app as your index.
Filters do nothing when checked
Symptom: The refinementList widget renders category checkboxes, but clicking them doesn't filter results.
Cause: Attribute not added to "Attributes for Faceting" in Algolia. The refinementList widget filters only on attributes explicitly enabled for faceting in your index configuration. In your Algolia dashboard: Index → Configuration → Attributes for Faceting — add the attribute name (e.g., category) and re-save.
This is the most common setup mistake. The widget renders without error whether faceting is enabled, which makes the issue hard to spot.
"Target container is not a DOM element" error in console
Symptom: The browser console shows Target container is not a DOM element, and the widgets don't render.
Cause 1: ID mismatch between Webflow embeds and JavaScript. The container value in each widget config (e.g., '#hits') must match the id attribute in your Webflow HTML Embed exactly. This comparison is case-sensitive: id="Hits" doesn't match container: '#hits'.
Cause 2: the script runs before the containers exist. This happens when you move initialization into the <head> or a site-wide custom code block without a window.addEventListener('DOMContentLoaded', ...) wrapper. In the Before </body> position from Step 3, the containers are already parsed, so if you see this error there, chase the ID mismatch in Cause 1 first.
What to build on top of this
The InstantSearch foundation supports several extensions without rebuilding anything:
- Autocomplete suggestions: Algolia's current Autocomplete library,
@algolia/autocomplete-js, adds a dropdown suggestion layer on top of the same index (the olderautocomplete.jsis the retired v0) - URL-based search state: InstantSearch has this built in rather than as a separate package. Set
routing: { router: instantsearch.routers.history() }to serialize the query and active filters into the URL so people can share or bookmark filtered results - Click analytics: Set
insights: truein your InstantSearch config to track which results users click, feeding Algolia's ranking and personalization features - Additional filter types:
numericMenu,rangeSlider, andsortBywidgets extend filtering beyond categories;sortByrequires Algolia replica indexes for each sort option - Media-heavy result sets: pairing the index with a CDN keeps image-rich results fast, which our Algolia and Cloudinary guide covers
Explore Webflow and Algolia connection methods, and see how Algolia fits into Webflow's broader integration ecosystem.
Frequently asked questions
Can I use Algolia InstantSearch with Webflow CMS collection pages?
Yes, but the setup is different from a standalone search page. On CMS collection pages, the most common pattern is a filterable index page rather than a full InstantSearch implementation. You build the index in Algolia, add a search page at a static URL (e.g., /search), and link to it from your collection template.
How do I handle Algolia search on multiple languages or locales in Webflow?
Create a separate Algolia index per language (e.g., blog_en, blog_fr). In your InstantSearch initialization, set indexName to the index matching the current page's locale. If you're using Webflow Localization, pass the current locale to the initialization script via a hidden HTML element or a <meta> tag in your page template, and read it in JavaScript before initializing InstantSearch.
Will Algolia search results include Webflow pages that aren't in my CMS?
Only if you explicitly index them. Algolia indexes the records you upload. It doesn't automatically crawl your Webflow site. Static pages (About, Contact, landing pages) need to be added to your index manually as JSON records, or via Algolia's Crawler product (a separate paid add-on that crawls and indexes your site's published HTML).
Is Algolia the only option?
No. Algolia is the fastest path to as-you-type search from the Designer. Still, if you need to run the search layer yourself or you already have infrastructure, our Elasticsearch autocomplete guide covers that alternative on Webflow Cloud.
Do I need a separate Algolia index for each Webflow site?
Not strictly, but it's the cleanest architecture. Algolia indexes are scoped to an application, and you can create multiple indexes in one application. Typically: one index per site, and one replica index per sort option you want to offer (e.g., a products_price_asc replica for price-sorted results). Replicas count against your total record limit since they duplicate records.



















